Sunrosa NAO1142-3434G
Sunrosa Corner Sliding Shower Enclosure User Manual
Model: NAO1142-3434G
Introduction
This user manual provides comprehensive instructions for the installation, operation, maintenance, and troubleshooting of your Sunrosa Corner Sliding Shower Enclosure. Please read this manual thoroughly before installation and use to ensure safe and proper functioning of the product. Keep this manual for future reference.
Safety Information
Always follow basic safety precautions to reduce the risk of injury or product damage. Professional installation is recommended. Wear appropriate personal protective equipment (PPE) during installation, including safety glasses and gloves.
- Ensure all components are present and undamaged before beginning installation.
- Do not use power tools near water or in wet conditions.
- Handle glass panels with extreme care to prevent breakage and injury. Tempered glass, while strong, can shatter into small pieces if damaged at the edges.
- Verify wall structure can support the weight of the enclosure.
- Allow sealant to cure completely (typically 24 hours) before using the shower.
Product Specifications
| Feature | Detail |
|---|---|
| Brand | Sunrosa |
| Model Number | NAO1142-3434G |
| Dimensions (D x W x H) | 34"D × 34"W × 76"H |
| Glass Thickness | 1/4" (6 mm) ANSI certified clear tempered glass |
| Frame Material | Premium Stainless Steel (Brushed Gold finish) |
| Door Type | Double Sliding Door |
| Walk-in Width | 17 4/8" |
| Item Weight | 120.1 pounds |
| Assembly Required | Yes |
Setup and Installation
Careful measurement and preparation are crucial for a successful installation. Ensure your shower base is level and the walls are plumb.
Pre-Installation Checks
- Measure Wall Spacing: Confirm your wall spacing falls within the adjustable range for the shower enclosure. For 34"x34" doors, the range is 33.2"-34" (844-864mm).
- Check Level and Plumb: Use a level to ensure the shower base is perfectly level and the walls are plumb. This is critical for proper door operation and water sealing.
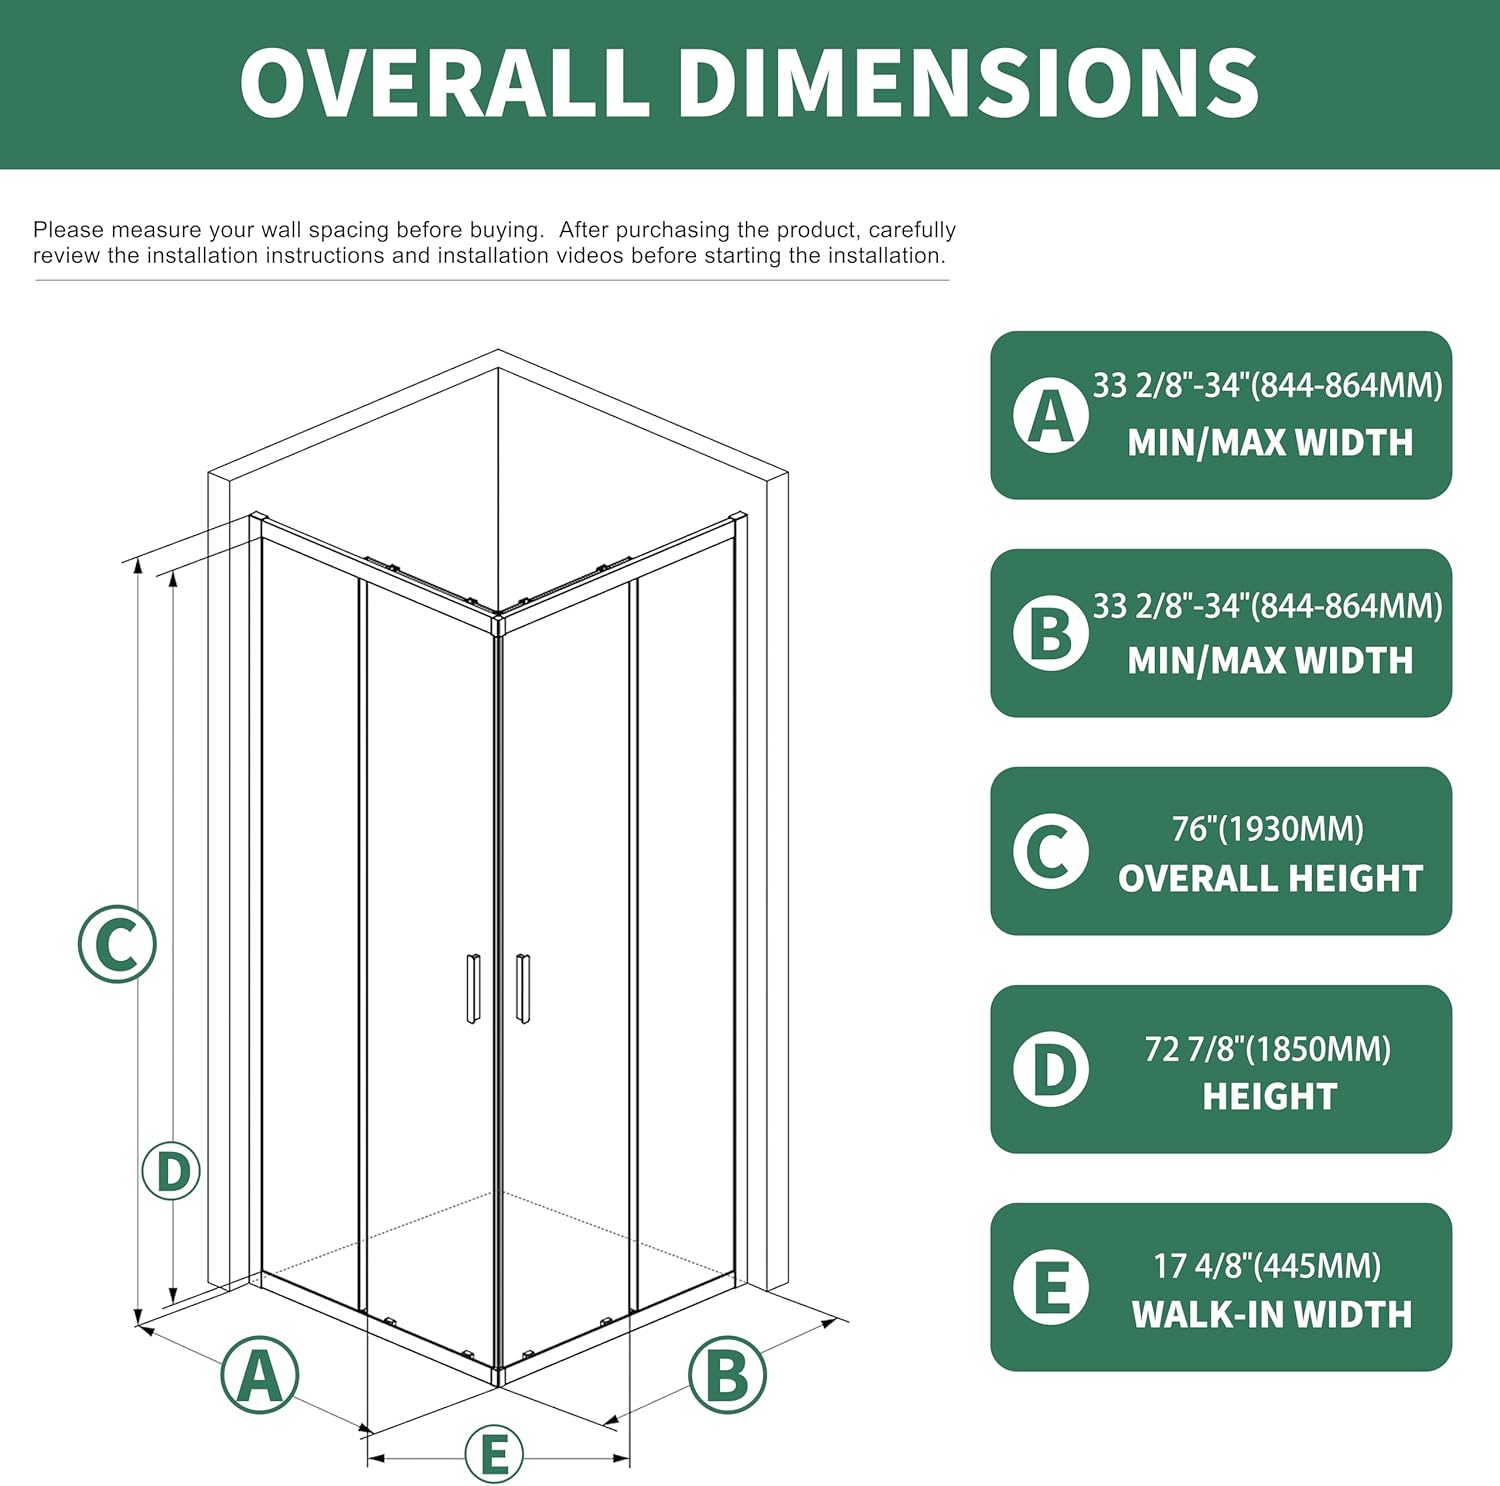
Figure 1: Overall dimensions and measurement points (A, B, C, D, E) for the shower enclosure. Ensure your space matches these specifications for proper fit.

Figure 2: Verifying wall plumb and base level using a spirit level. Accurate measurements are essential for a successful installation.
Installation Steps (Refer to video for detailed visual guide)
For a comprehensive visual guide, please watch the official installation video provided by Sunrosa Store.
Video 1: Official Installation Video for Sunrosa Corner Shower Door. This video provides step-by-step visual instructions for the entire assembly process, from measuring to final sealing.
- Wall Profile Installation: Mark and drill holes for the wall profiles. Secure them using appropriate screws (e.g., ST4x35mm). Ensure they are perfectly plumb.
- Top and Bottom Rail Assembly: Attach the top and bottom rails to the fixed glass panels. Secure with screws (e.g., ST3.5x8mm).
- Glass Panel Placement: Carefully place the fixed glass panels into the wall profiles and rails.
- Roller and Guide Installation: Install the rollers (part 09) and guides (part 10) onto the sliding door panels.
- Corner Connector Assembly: Connect the top and bottom rails at the corner using the corner connector (part 11) and secure with screws (e.g., ST3.5x8mm).
- Sliding Door Installation: Hang the sliding doors onto the top rail rollers and engage the bottom guides.
- Handle Installation: Attach the handles (part 08) to the sliding doors.
- Adjustments: Utilize the adjustable range (0-20mm or 0.79") in the wall profiles to compensate for out-of-plumb walls, ensuring a tight fit.
- Sealing: Apply silicone sealant along the exterior joints of the shower enclosure where it meets the walls and shower base. Allow 24 hours for curing before use.

Figure 3: Magnetic door seal strip ensuring a watertight closure. This feature prevents water leakage from the enclosure.

Figure 4: Easy-to-remove rollers and bottom track for convenient cleaning and maintenance.
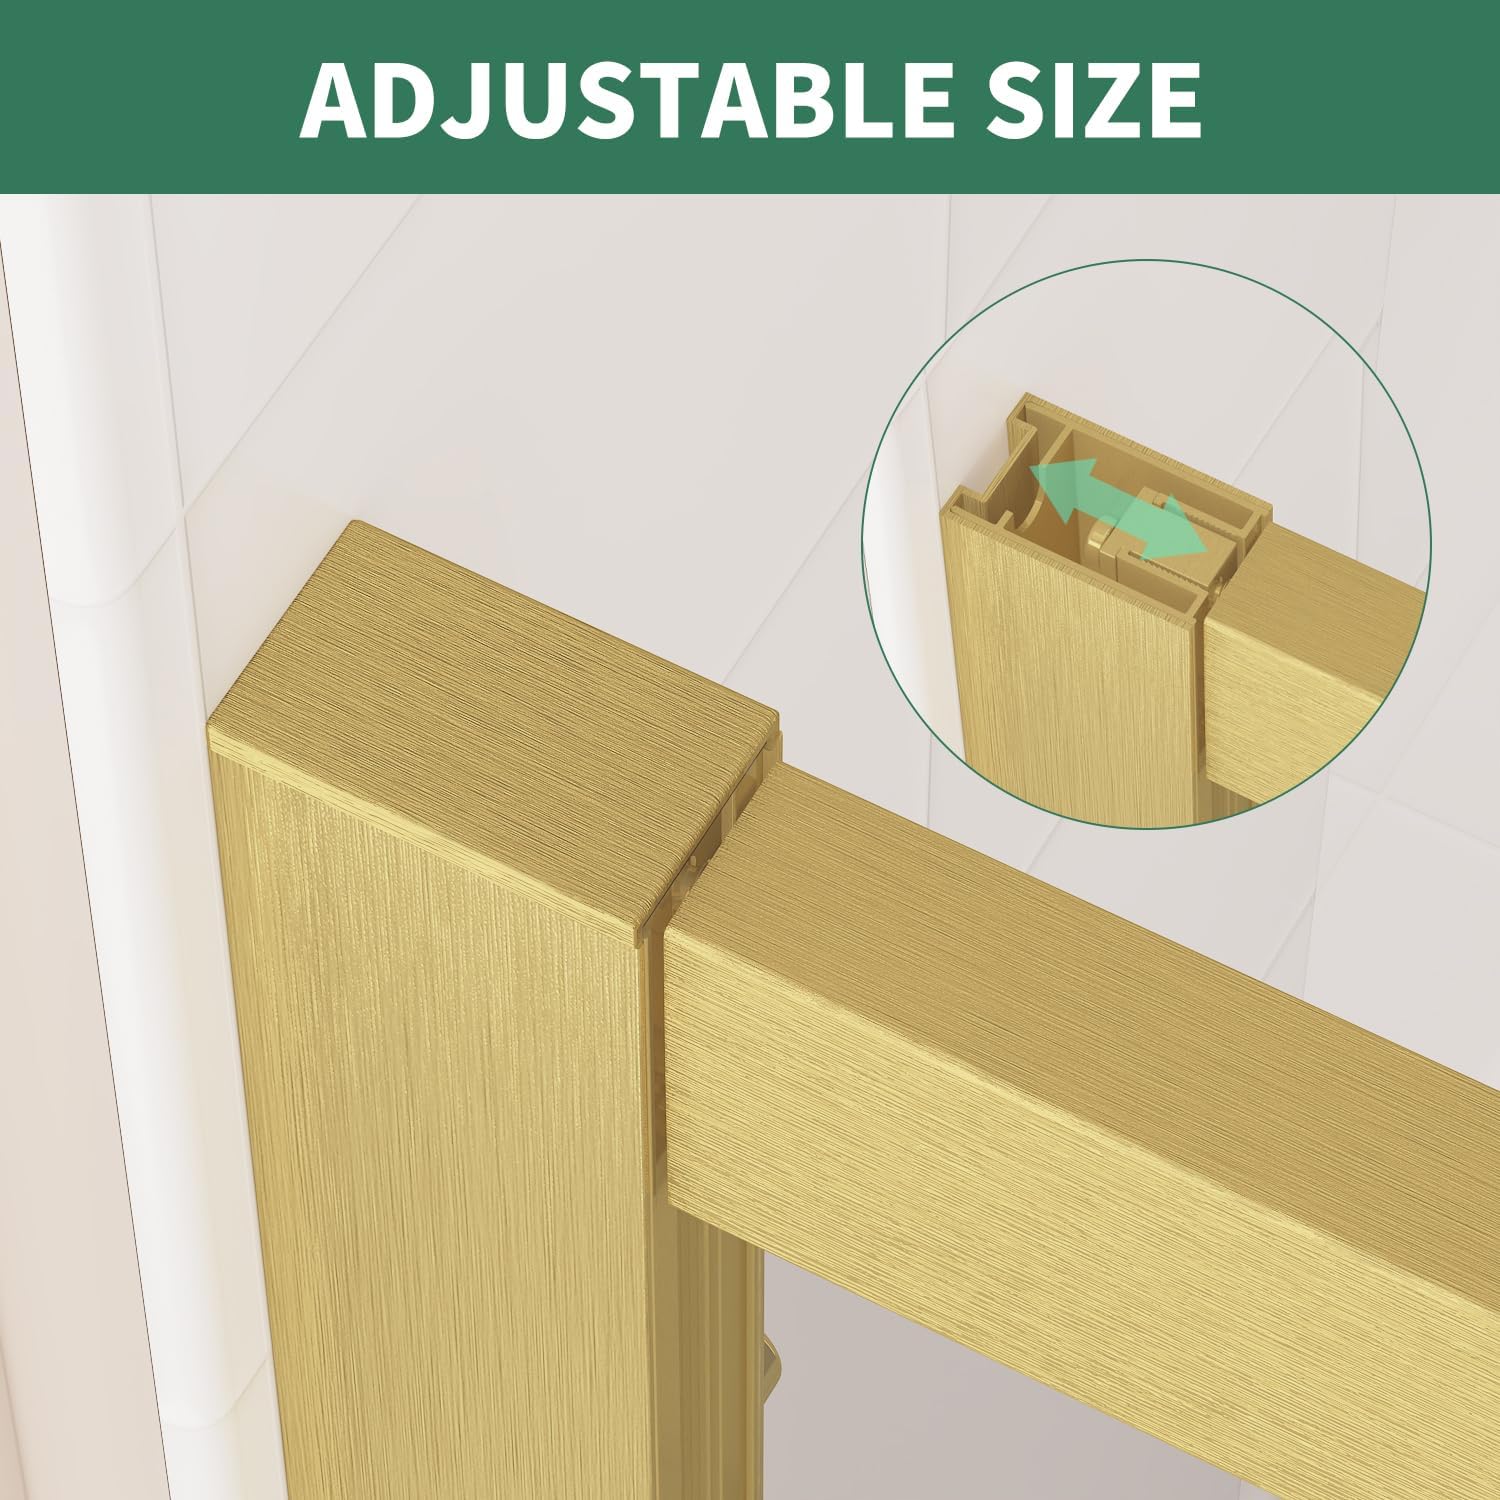
Figure 5: Silent safety pulley design for smooth and quiet operation of the sliding doors, allowing for both left and right opening configurations.
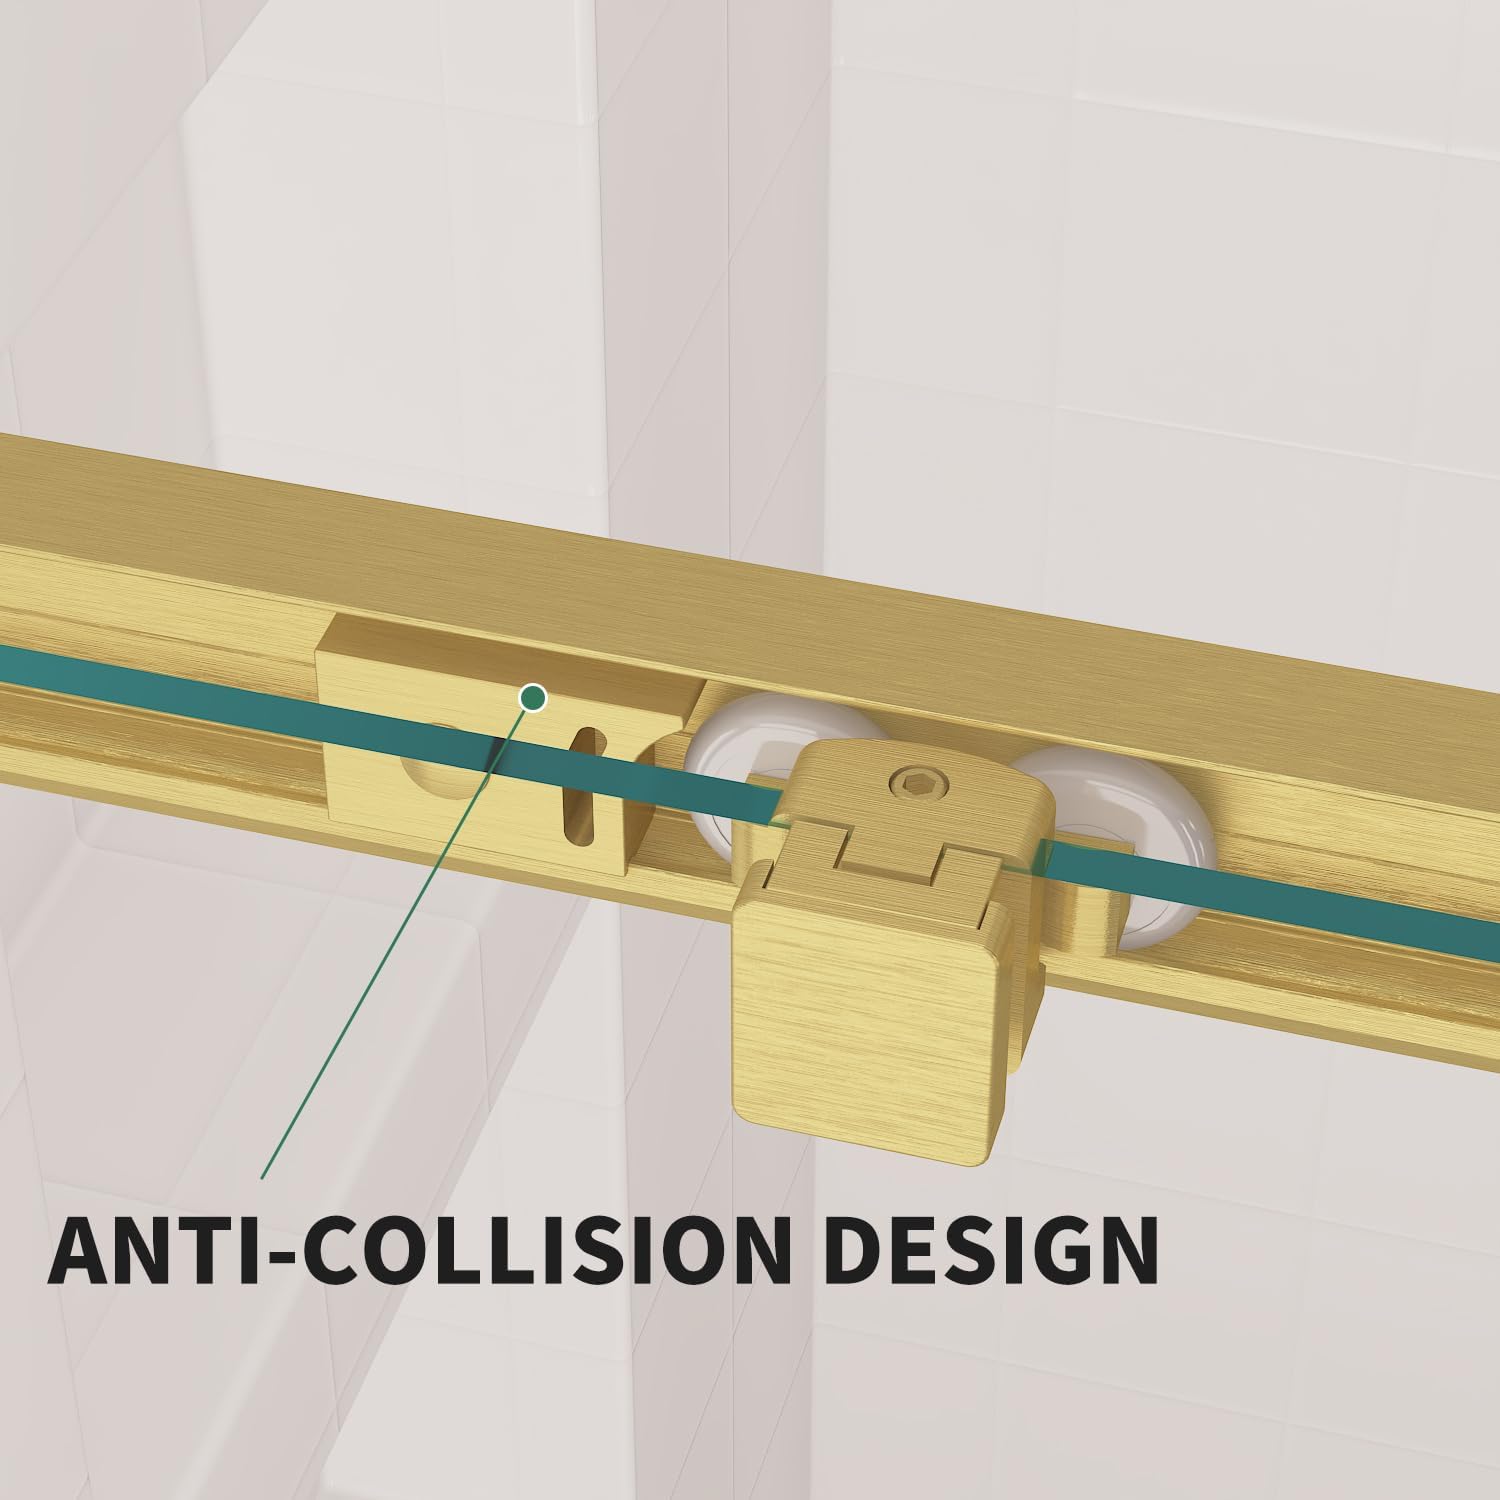
Figure 6: Adjustable size feature allowing for minor adjustments to fit varying wall conditions, and the anti-collision design for enhanced safety.
Operating Instructions
The Sunrosa Corner Sliding Shower Enclosure is designed for ease of use and durability. The double sliding door system allows for flexible entry and exit.
- Opening/Closing: Gently slide the doors along the tracks using the handles. The silent safety pulley design ensures smooth and quiet operation.
- Water Sealing: The magnetic door seal strips ensure a tight closure, preventing water from escaping the enclosure during use.
- Adjustments: If doors do not slide smoothly or close properly, refer to the maintenance section for adjustment procedures.
Maintenance and Care
Regular cleaning and maintenance will prolong the life and appearance of your shower enclosure.
- Glass Cleaning: The 1/4" (6 mm) tempered glass features a nano clean coating for easy cleaning. Use a soft cloth and non-abrasive glass cleaner. Avoid harsh chemicals or abrasive pads that could damage the coating or glass.
- Frame Cleaning: Clean the premium stainless steel frame with a soft, damp cloth and mild soap. Do not use abrasive cleaners or steel wool, as these can scratch the brushed gold finish.
- Track Cleaning: Periodically clean the bottom tracks to prevent buildup of soap scum or debris, which can impede door movement. The easy-to-remove feature allows for thorough cleaning of the tracks and rollers.
- Seal Maintenance: Inspect the magnetic door seal strips regularly for wear or damage. Replace if necessary to maintain water tightness.

Figure 7: The 6mm clear tempered glass with nano clean coating, designed to repel water and simplify cleaning.
Troubleshooting
This section addresses common issues you might encounter with your shower enclosure.
| Problem | Possible Cause | Solution |
|---|---|---|
| Doors do not slide smoothly. | Debris in tracks, worn rollers, or misaligned tracks. | Clean tracks thoroughly. Inspect and replace worn rollers. Check track alignment and adjust if necessary. |
| Water leaks from enclosure. | Damaged or misaligned seal strips, insufficient sealant, or unlevel base/walls. | Inspect and adjust/replace seal strips. Reapply silicone sealant where needed. Verify base and wall levels; professional adjustment may be required for severe issues. |
| Doors do not close completely. | Misaligned magnetic strips, obstruction in track, or out-of-plumb walls. | Check for obstructions in the track. Adjust magnetic strips for proper alignment. Utilize the adjustable wall profiles to correct for out-of-plumb walls. |
Contacting Support for Issues
If you receive a product with an issue or encounter problems not covered here, follow these steps:
- Contact the Seller: Navigate to "Your Orders" on Amazon, click "Problem with order," and select "Contact seller."
- Describe the Issue in Detail: Attach images showing the product issue in the message chat and provide a detailed description of the problem.
- Resolve the Issue: The seller will provide a solution, such as complimentary replacement of damaged or missing parts or other appropriate resolutions.
Warranty and Support
Sunrosa is committed to customer satisfaction. For specific warranty details and support, please refer to the product listing on Amazon or contact the Sunrosa Store directly through the Amazon platform.
The product is eligible for 30-day easy returns as per Amazon's policy. For any assistance, the seller provides customer support.
- Returns: Amazon Return Policy
- Sunrosa Store: Visit the Sunrosa Store on Amazon
Related Documents - NAO1142-3434G
 |
Sunrosa NKI6121-H Frameless Sliding Shower Door Installation Guide Step-by-step installation instructions for the Sunrosa NKI6121-H frameless sliding shower door. Includes parts list, tools required, safety precautions, and detailed assembly steps. |
 |
Sunrosa NKK6122-1 Sliding Shower Door Installation Instructions Detailed installation guide for the Sunrosa NKK6122-1 frameless sliding shower door. Includes parts list, required tools, step-by-step assembly instructions, and aftercare advice. Ensure proper installation for a safe and functional shower enclosure. |
 |
SUNROSA Shower Door Installation Instructions Comprehensive installation guide for SUNROSA shower doors, detailing parts, tools, step-by-step assembly, and important safety and care information. Includes instructions for changing door opening direction. |
 |
NKI6121 Shower Door Installation Instructions | Sunrosa Detailed installation guide for the Sunrosa NKI6121 sliding frameless shower door. Includes parts list, safety warnings, and step-by-step assembly instructions. |
 |
Sunrosa NKK6122 Frameless Shower Door Installation Instructions Detailed installation guide for the Sunrosa NKK6122 frameless shower door. Includes parts list, step-by-step instructions, safety precautions, and aftercare advice. |
 |
NAR6310A Shower Glass Panel Installation Instructions Detailed installation guide for the NAR6310A shower glass panel, including parts list, required tools, and step-by-step assembly instructions. |
Ask a question about this manual
Ask about setup, troubleshooting, compatibility, parts, safety, or missing instructions. Manuals+ will review the question and use this page’s manual context to help answer it.