
1. Introduction
This manual provides essential information for the safe and efficient operation, installation, and maintenance of your new CT Copper Tailor 36-inch Electric Range with Convection Oven. Please read all instructions thoroughly before using the appliance to ensure proper function and to prevent potential hazards. Keep this manual for future reference.
2. Important Safety Information
WARNING: To reduce the risk of fire, electric shock, injury to persons, or damage when using the appliance, follow basic precautions, including the following:
- Read all instructions before using the appliance.
- Ensure proper installation by a qualified technician in accordance with all local codes and ordinances.
- Do not store flammable materials in or near the oven.
- Never use the appliance for warming or heating the room.
- Do not leave children unattended near the appliance.
- Always use dry potholders. Moist or damp potholders on hot surfaces may result in burns from steam.
- Do not touch heating elements or interior surfaces of the oven during or immediately after use.
- Never cover any slots, holes, or passages in the oven bottom or cover an entire rack with materials such as aluminum foil. Doing so blocks airflow and can cause carbon monoxide poisoning.
- Always disconnect power to the appliance before servicing.
3. Unpacking and Included Components
Carefully remove all packaging materials and inspect the range for any damage. Report any damage immediately to your dealer. Ensure all components are present before proceeding with installation.
Included Components:
- CT Copper Tailor 36-Inch Electric Range with Convection Oven
- Instruction Manual (this document)
- 2 Oven Racks
- Broiler Pan & Grill Set

Figure 3.1: Included Oven Accessories (2 Oven Racks, Broiler Pan, Bake Pan Cover)

Figure 3.2: Dishwasher-Safe Oven Accessories
4. Installation and Setup
This CT Copper Tailor electric range is designed as a freestanding unit. Proper installation is crucial for safety and optimal performance. It requires a 240 Volt electrical connection.
Key Installation Considerations:
- Electrical Connection: The appliance requires a dedicated 240V electrical circuit. Consult a qualified electrician for proper wiring and connection. An electrical cord is not included and must be purchased separately.
- Leveling: Ensure the range is level to prevent spills and ensure even cooking. Adjustable leveling legs are provided.
- Anti-Tip Bracket: An anti-tip bracket must be properly installed to prevent the range from tipping over. This is a critical safety feature.
- Clearances: Maintain adequate clearances from adjacent cabinets and combustible materials as specified in local building codes.
It is highly recommended that installation be performed by a licensed professional to ensure compliance with all safety standards and local regulations.

Figure 4.1: Product Dimensions (Oven Size: 36"x35 3/4"x26 1/2", Cutout Size: 36"x36"x24")
5. Product Features
Your CT Copper Tailor Electric Range is equipped with advanced features designed for versatile and efficient cooking.
5.1 Cooktop Features
- 5 Heating Elements: The black polished plate glass ceramic cooktop features five radiant heating elements for diverse cooking needs:
- Right Front: 9"/12" dual element (3000W)
- Left Front: 6"/9" dual element (3000W)
- Two Rear Elements: 6" (1200W each)
- Center: 7" Warming Zone (100W)
- Hot Surface Indicator: Lights illuminate when the surface temperature exceeds 65°C (150°F) for enhanced safety.
- Easy-to-Clean Surface: The smooth glass-ceramic cooktop is designed for easy cleaning.

Figure 5.1: Cooktop with 5 High-Powered Heating Elements

Figure 5.2: Hot Surface Indicator for Safety
5.2 Oven Features
- 6.0 cu. ft. Convection Oven: Large capacity oven suitable for multiple dishes or large items like holiday turkeys.
- True Convection Fan: Ensures faster and more even heat distribution for consistent baking and roasting results.
- 6-Position Adjustable Racks: Provides flexibility for various dish sizes and cooking needs.
- Transparent Oven Window: Allows for effortless monitoring of food without opening the oven door.
- Three-Layer Tempered Glass Door: Enhances safety by keeping the exterior door cooler to the touch.
- Tubular Heating Element: Heats up quickly for faster preheating and efficient cooking.

Figure 5.3: 6.0 cu. ft. Extra-Large Oven Capacity

Figure 5.4: Convection Fan for Even Heat Distribution

Figure 5.5: 6 Rack Positions for Versatile Cooking
5.3 Control Panel
- Heavy-Duty Control Knobs: Durable knobs for precise control of cooktop elements and oven functions.
- Blue LED Indicators: Provide clear visual feedback on the status of each heating element and oven function, even in low light.

Figure 5.6: Front Control Design for Intuitive Operation

Figure 5.7: Blue LED Lights for Easy Visibility
6. Operating Instructions
6.1 Using the Cooktop
The cooktop features five heating elements, each controlled by a dedicated knob on the front panel. Each knob offers 8 precise heat settings.
- Select Element: Identify the knob corresponding to the desired heating element.
- Adjust Heat: Turn the knob clockwise to select a heat setting from 1 (low) to 8 (high). The blue LED light around the knob will illuminate.
- Warming Zone: The center 7" element is a dedicated warming zone (100W) for keeping food warm.
- Hot Surface Indicator: The 'Hot Surface' indicator on the cooktop will light up when an element is hot, even after it has been turned off. It will remain lit until the surface has cooled to a safe temperature.

Figure 6.1: Cooktop Layout with Element Specifications

Figure 6.2: Cooktop Compatibility with Various Cookware
6.2 Using the Oven
The oven offers precise temperature control and a convection fan for even cooking.
- Preheating: Turn the oven control knob to the desired temperature (150°F–500°F). The oven will begin to preheat.
- Convection Baking: The convection fan automatically circulates hot air for more even cooking. This can reduce cooking times and improve browning.
- Broil Function: Use the broil setting for browning and finishing dishes. Position the oven rack appropriately for desired results.
- Oven Light: Press the 'Oven Light' button to illuminate the oven interior for monitoring food through the transparent window.
- Rack Adjustment: Utilize the 6 rack positions to accommodate different dish sizes and optimize heat exposure.

Figure 6.3: Oven Capacity for Multiple Dishes
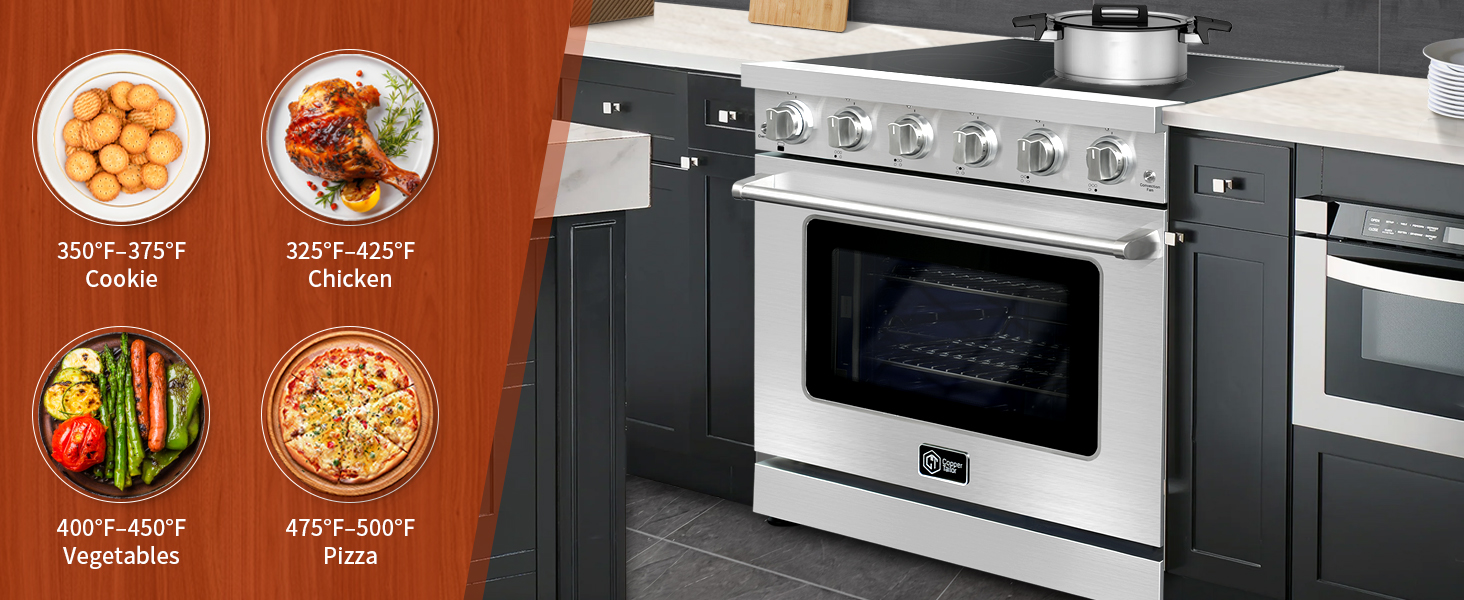
Figure 6.4: Oven Cooking Examples with Temperature Control

Figure 6.5: Viewing Window with Interior Light
7. Cleaning and Maintenance
Regular cleaning and maintenance will help preserve the appearance and performance of your electric range.
7.1 Cooktop Cleaning
- Allow the cooktop to cool completely before cleaning.
- Use a ceramic cooktop cleaner and a non-abrasive pad for daily cleaning.
- For stubborn stains, use a razor scraper designed for glass cooktops.
- Wipe with a clean, damp cloth and dry thoroughly to prevent streaks.

Figure 7.1: Easy-to-Clean Stainless Steel Surfaces
7.2 Oven Cleaning
- Ensure the oven is cool before cleaning.
- Wipe interior surfaces with a damp cloth and mild detergent. Avoid abrasive cleaners.
- Oven racks, broiler pan, and grill set are dishwasher-safe for convenient cleaning.
- For heavy soil, consult the self-cleaning instructions if your model is equipped with this feature (refer to specific model details).
7.3 Exterior Cleaning
- Clean stainless steel surfaces with a stainless steel cleaner and a soft cloth. Wipe in the direction of the grain.
- Clean control knobs with a damp cloth and mild soap. Do not immerse knobs in water.
8. Troubleshooting
Before contacting customer support, review the following common issues and solutions:
| Problem | Possible Cause | Solution |
|---|---|---|
| Range does not operate | No power to the appliance; circuit breaker tripped. | Check the circuit breaker/fuse box. Ensure the range is properly plugged in. |
| Cooktop element not heating | Incorrect heat setting; element failure. | Ensure the knob is turned to a heat setting. If problem persists, contact service. |
| Oven not heating | Incorrect temperature setting; oven element failure. | Verify temperature setting. Allow adequate preheating time. If problem persists, contact service. |
| Uneven baking | Improper rack position; pan size/type; oven not level. | Adjust rack position. Use appropriate bakeware. Ensure the range is level. Utilize convection bake. |
| Hot Surface Indicator remains on | Cooktop surface is still hot. | This is normal. The light will turn off once the surface has cooled. |
If you encounter issues not listed here or if solutions do not resolve the problem, please contact CT Copper Tailor Customer Support.
9. Specifications
Detailed technical specifications for your CT Copper Tailor Electric Range.
| Specification | Value |
|---|---|
| Brand | CT Copper Tailor |
| Model Name | Electric Range with Convection Oven |
| Material | Stainless Steel |
| Finish Type | Polished |
| Form Factor | Freestanding |
| Controls Type | Knob |
| Heating Element Type | Radiant |
| Voltage | 240 Volts |
| Oven Capacity | 6.0 Cubic Feet |
| Number of Heating Elements | 5 |
| Item Dimensions (D x W x H) | 26.5"D x 35.75"W x 36"H |
| Installation Type | Freestanding |
10. Product Overview Video
Watch this official video for a visual overview of the CT Copper Tailor 36-Inch Electric Range with Convection Oven, highlighting its key features and design.
Video 10.1: CT Copper Tailor 36 Inch Electric Range with Convection Oven (Duration: 0:43)
11. Warranty and Support
11.1 Warranty Information
This CT Copper Tailor electric kitchen stove is backed by a 1-year manufacturer's warranty. This warranty covers defects in materials and workmanship under normal use. Please retain your proof of purchase for warranty claims.
11.2 Customer Support
For technical assistance, troubleshooting, or warranty inquiries, please contact CT Copper Tailor Customer Support. Refer to the contact information provided with your purchase documentation or visit the official CT Copper Tailor website.