
1. Safety Information
Please read and understand all safety information before assembling and using this product. Failure to follow these instructions may result in injury or damage.
- Always assemble according to the provided instructions.
- Keep the product away from heat sources.
- Be cautious of sharp edges during assembly and use.
- To prevent tip-over, ensure the product is fully assembled and stable before use.
- Keep children and pets away from the product when it is not in use.
2. Product Overview
The HLR Kitchen Island (Model BM-YJJ240115) is a versatile and functional addition to any kitchen space. It features an extendable dining table, integrated power outlets, and ample storage solutions.
Key Features:
- Extendable Dining Table: A pull-out leaf extension allows for flexible dining or additional prep space, easily retracting when not needed.
- Integrated Charging Station: Equipped with 2 power outlets and 2 USB ports, featuring a 4.9 ft power cord, ideal for small kitchen appliances and charging devices.
- Versatile Functionality: Functions as a kitchen workstation, dining table, coffee bar, working desk, food preparation area, or serving station.
- Ample Storage: Includes open shelves, two drawers, and a storage cabinet with glass doors to organize kitchen essentials.
- Mobility: Designed with rolling wheels for easy repositioning within your kitchen.
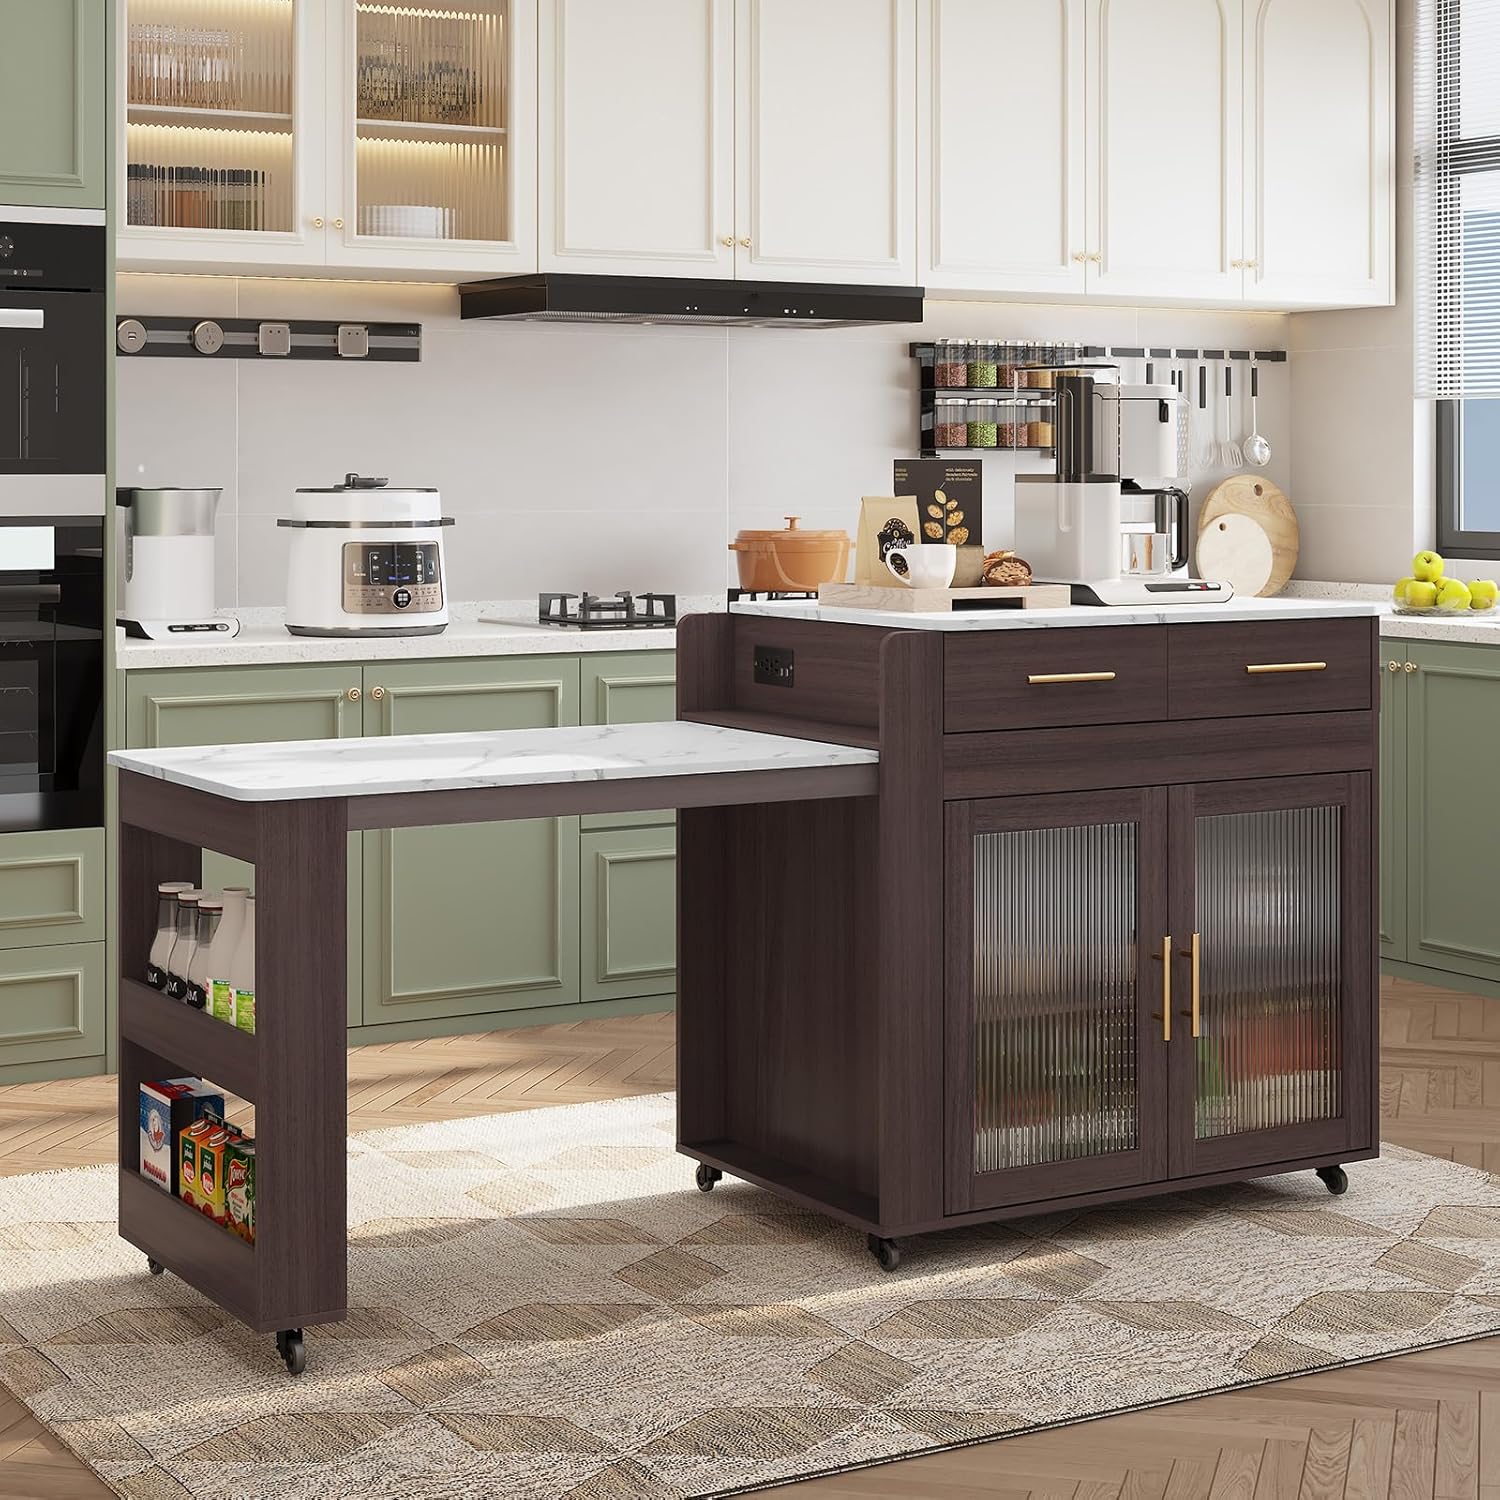
Image 2.1: The HLR Kitchen Island with its extendable dining table in a kitchen environment, showcasing its functional design and storage capabilities.
3. Setup and Assembly
This kitchen island requires assembly. Please follow the step-by-step instructions provided in the separate assembly guide included with your product packaging. Ensure all parts are present before beginning assembly.
- Unpack all components and verify against the parts list in the assembly guide.
- Gather necessary tools as specified in the assembly guide (e.g., screwdriver).
- Follow the numbered steps carefully to assemble the main island structure.
- Attach the extendable table mechanism and ensure smooth operation.
- Install drawers, cabinet doors, and wheels as instructed.
- Once assembled, place the unit in its desired location and lock the wheels for stability.
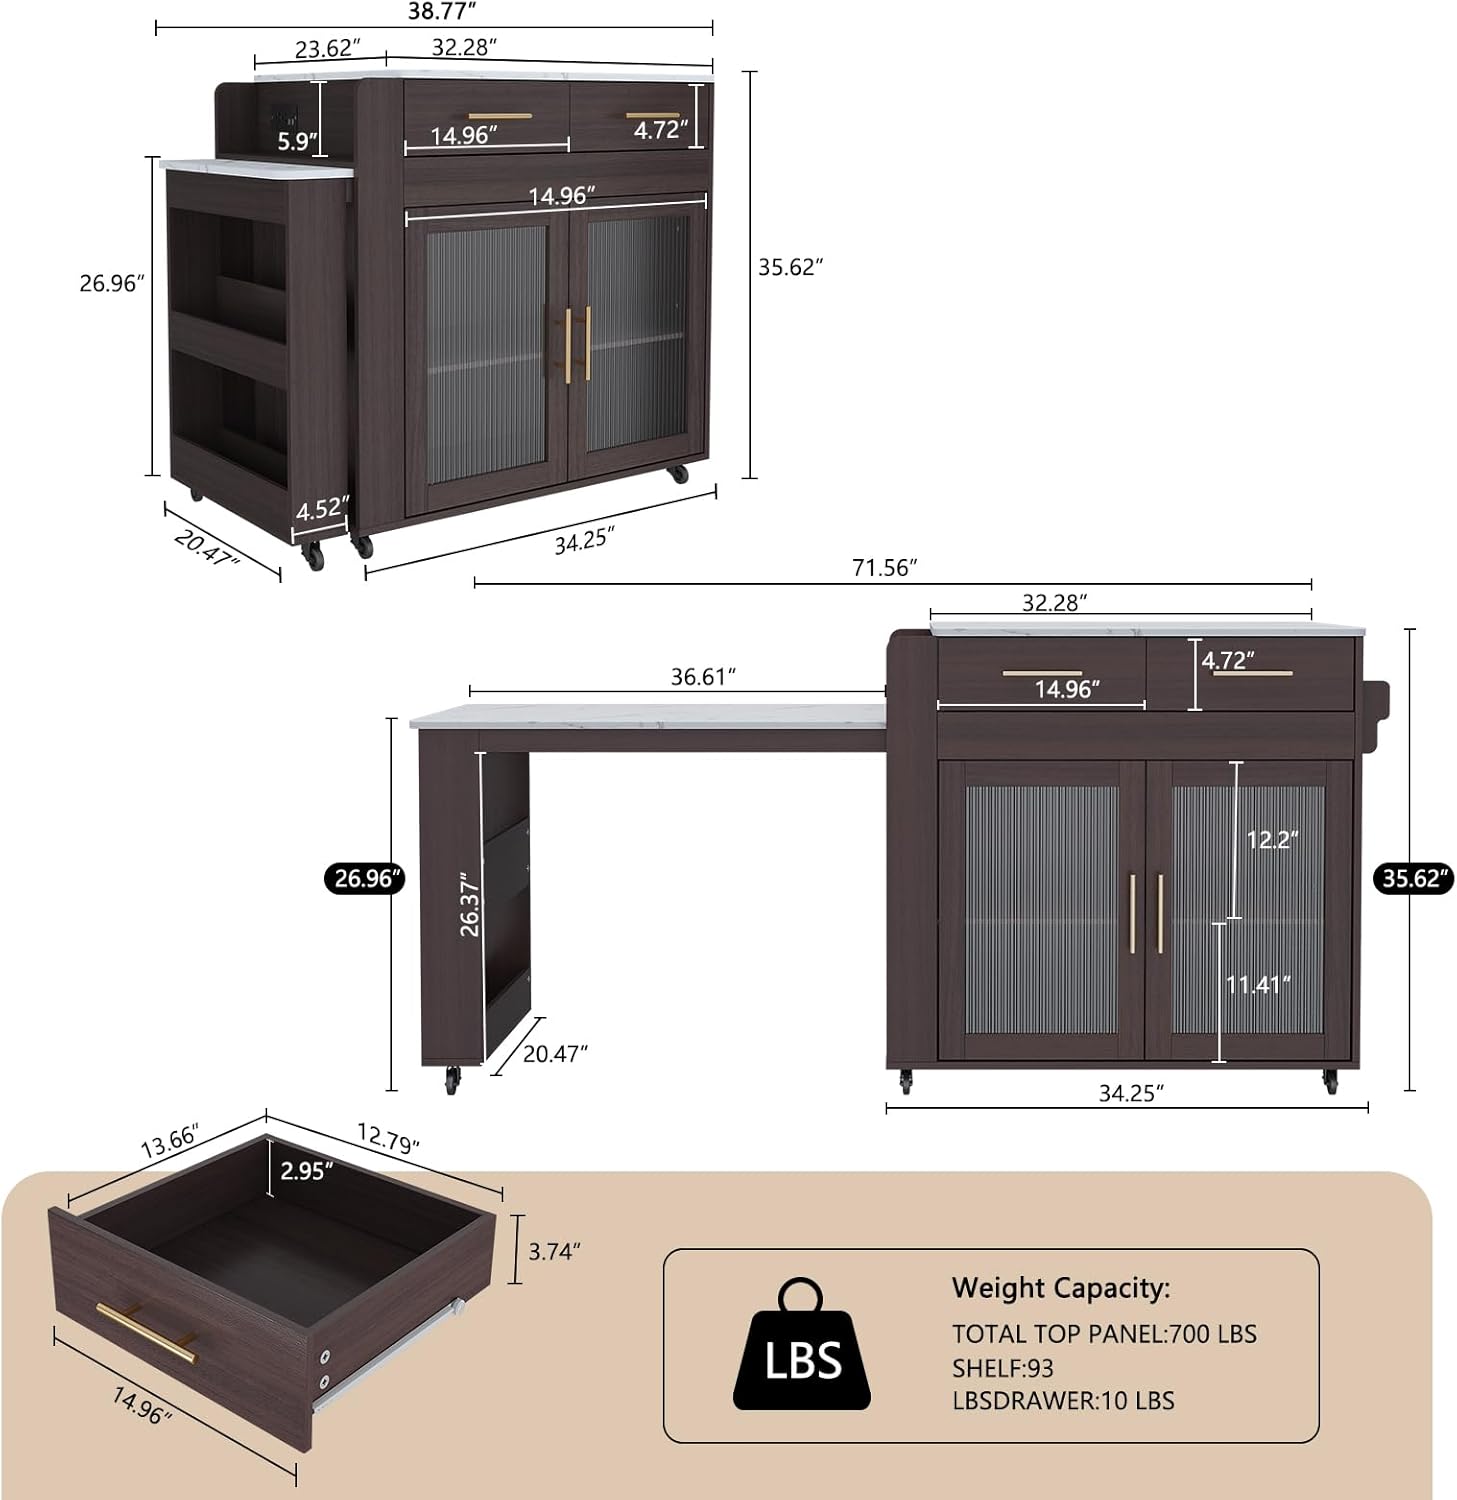
Image 3.1: Detailed dimensions and weight capacity information for the HLR Kitchen Island, assisting with assembly and placement planning.
4. Operating Instructions
4.1 Extending and Retracting the Dining Table
The integrated dining table can be easily extended for use and retracted for space-saving.
- To Extend: Gently pull the extendable table section outwards from the main island body until it locks into place. Ensure the support leg is securely positioned.
- To Retract: Release any locking mechanism (if present) and push the table section back into the main island body until it is fully nested.

Image 4.1: The kitchen island with its extendable table fully deployed and set up for dining, demonstrating its functionality as a meal space.
4.2 Using the Power Outlet and USB Ports
The kitchen island includes a built-in power strip for convenient access to electricity.
- Plug the island's main power cord into a standard wall outlet.
- Connect small kitchen appliances (e.g., microwave, coffee maker, air fryer) to the 2 AC outlets.
- Charge mobile devices using the 2 USB ports.
- Do not overload the power strip. Refer to the maximum wattage rating if available in the assembly guide.

Image 4.2: A close-up view of the integrated power outlet and USB ports, highlighting the convenience for charging devices and powering appliances.
4.3 Utilizing Storage Features
The island offers various storage options to keep your kitchen organized.
- Drawers: Use the two top drawers for cutlery, utensils, or smaller kitchen gadgets.
- Cabinet: The main cabinet with glass doors provides enclosed storage for dishes, pots, or pantry items.
- Open Shelves: The side open shelves are suitable for bottles, cookbooks, or decorative items.

Image 4.3: A detailed view of one of the island's drawers, shown with a cutlery organizer, illustrating its practical storage for kitchen tools.

Image 4.4: The kitchen island with its table retracted, providing a clear view of the cabinet storage and the open shelves on the side, highlighting its compact form and storage capacity.
4.4 Mobility
The island is equipped with wheels for easy movement.
- Unlock the wheel brakes before moving the island.
- Push the island gently to reposition it.
- Once in the desired location, lock the wheel brakes to ensure stability.
5. Maintenance
Proper care will extend the life and appearance of your HLR Kitchen Island.
- Cleaning: Wipe surfaces with a soft, damp cloth. Avoid harsh chemicals or abrasive cleaners that may damage the engineered wood or marble grain countertop.
- Spills: Clean up spills immediately to prevent staining, especially on the countertop.
- Hardware: Periodically check and tighten all screws and fasteners to ensure structural integrity.
- Wheels: Keep wheels free of debris to ensure smooth movement.
- Heat: Always use heat-resistant mats or trivets under hot items to protect the countertop.
6. Troubleshooting
This section addresses common issues you might encounter.
- Assembly Difficulties: If you encounter issues during assembly, double-check the assembly guide for correct part orientation and step sequence. Ensure all hardware is used correctly.
- Extendable Table Not Moving Smoothly: Check for any obstructions in the sliding mechanism. Ensure all fasteners related to the extension are properly tightened but not overtightened.
- Power Outlets Not Working: Verify that the island's main power cord is securely plugged into a functioning wall outlet. Check if the wall outlet itself is receiving power. Do not attempt to repair the electrical components yourself.
- Wobbly Structure: Ensure all screws and bolts are fully tightened. If the issue persists, disassemble and reassemble the affected section, paying close attention to alignment.
For further assistance, please refer to the 'Warranty and Support' section.
7. Specifications
Detailed specifications for the HLR Kitchen Island (Model BM-YJJ240115).
| Feature | Detail |
|---|---|
| Model Number | BM-YJJ240115 |
| Dimensions (L x W x H) | 72 x 24 x 36 inches (Extended) |
| Item Weight | 120.6 pounds |
| Material | Engineered Wood |
| Countertop Material | Marble Grain Finish |
| Number of Drawers | 2 |
| Number of Shelves | 2 (inside cabinet) + side open shelves |
| Power Outlets | 2 AC Outlets |
| USB Ports | 2 USB Ports |
| Power Cord Length | 4.9 ft |
8. Product Demonstration Video
Watch this video for a visual demonstration of the HLR Kitchen Island's features and functionality.
Video 8.1: A demonstration of the HLR Kitchen Island, showcasing its extendable table, storage compartments, and overall design in a kitchen setting.
9. Warranty and Support
HLR is committed to providing quality products and customer satisfaction.
- Warranty Information: Specific warranty details are typically provided with your purchase documentation. Please refer to those documents for terms and conditions.
- Customer Support: If you have any questions regarding assembly, operation, or require assistance with your product, please contact HLR customer support. Contact information can usually be found on the packaging or in your purchase receipt.