
1. Introduction
Thank you for choosing the Barrina TX72 4FT Grow Light. This manual provides essential information for the safe and effective installation, operation, and maintenance of your new grow light. Please read this manual thoroughly before use and retain it for future reference.
2. Product Overview
Key Features:
- 72W High Power & High PPFD: Consumes 72W, providing a PPFD of 525.69 µmol/m²/s at 3.94" distance for maximum photosynthesis.
- Full Spectrum with 660nm Red LEDs: Features 660nm red wavelength chips, 3000K, and 6500K LEDs for all plant growth stages (germination, leafy growth, blooming, fruiting). Offers 8100 lumens and a CRI of 89+.
- Linkable Design & Full Light Coverage: Daisy chain up to 4 lights with 57-inch power cords and individual on/off switches for flexible lighting setups.
- Flexible & Easy Installation Methods: Supports hanging and surface mounting with included chains, hooks, anchors, cable ties, and clips.
- Heat Dissipation & Wide Application: Aluminum housing ensures excellent heat dissipation, extending LED lifespan. Suitable for plant grow tents, shelves, hydroponic rooms, and indoor windowsills.
What's in the Box:
- Barrina TX72 4FT Grow Light (1 Pack)
- Accessories Package (Hooks, Lifting Chains, Cable Ties, Anchors, Screws)
- On/Off Switch Power Cord
- User Manual

Figure 1: Included components in the Barrina TX72 4FT Grow Light package.
3. Safety Information
Please observe the following safety precautions to prevent injury or damage to the product:
- Ensure the power supply voltage matches the product's requirements (120V AC).
- Do not look directly into the LED lights when they are on, as this may cause eye strain.
- Keep the grow light away from water or wet environments. This product is not water-resistant.
- Do not attempt to disassemble or modify the light fixture. Refer all servicing to qualified personnel.
- Ensure proper ventilation around the fixture to maintain optimal operating temperature.
- Unplug the light from the power source before cleaning or performing any maintenance.
4. Setup & Installation
The Barrina TX72 Grow Light offers multiple installation options to suit your needs.
Installation Methods:
The light can be installed using suspended mounting, surface mounting, or cable tie mounting. All necessary hardware is included.

Figure 2: Various installation methods for the Barrina TX72 Grow Light.
Step-by-Step Installation (Suspended Mounting Example):
- Prepare the Mounting Surface: Identify a suitable location for hanging the grow light. Ensure the surface can support the weight of the fixture.
- Install Hooks: Screw the provided hooks into the ceiling or underside of a shelf. Use anchors if installing into drywall.
- Attach Hanging Chains: Connect the lifting chains to the hooks and then to the mounting clips on the grow light fixture.
- Adjust Height: Use the chains to adjust the height of the grow light above your plants. The recommended distance varies by plant stage (refer to Operating Instructions).
- Connect Power: Plug the power cord into the grow light and then into a 120V AC power outlet.
Video 1: This video demonstrates the installation process for the Barrina TX72 Grow Light, showing how to set up the hanging chains and connect the power.
Daisy Chain Connection:
The TX72 grow lights are linkable, allowing you to connect up to 4 fixtures in series from a single power source. Use the provided linking cables to connect the lights end-to-end. Each light has an individual on/off switch for flexible control.
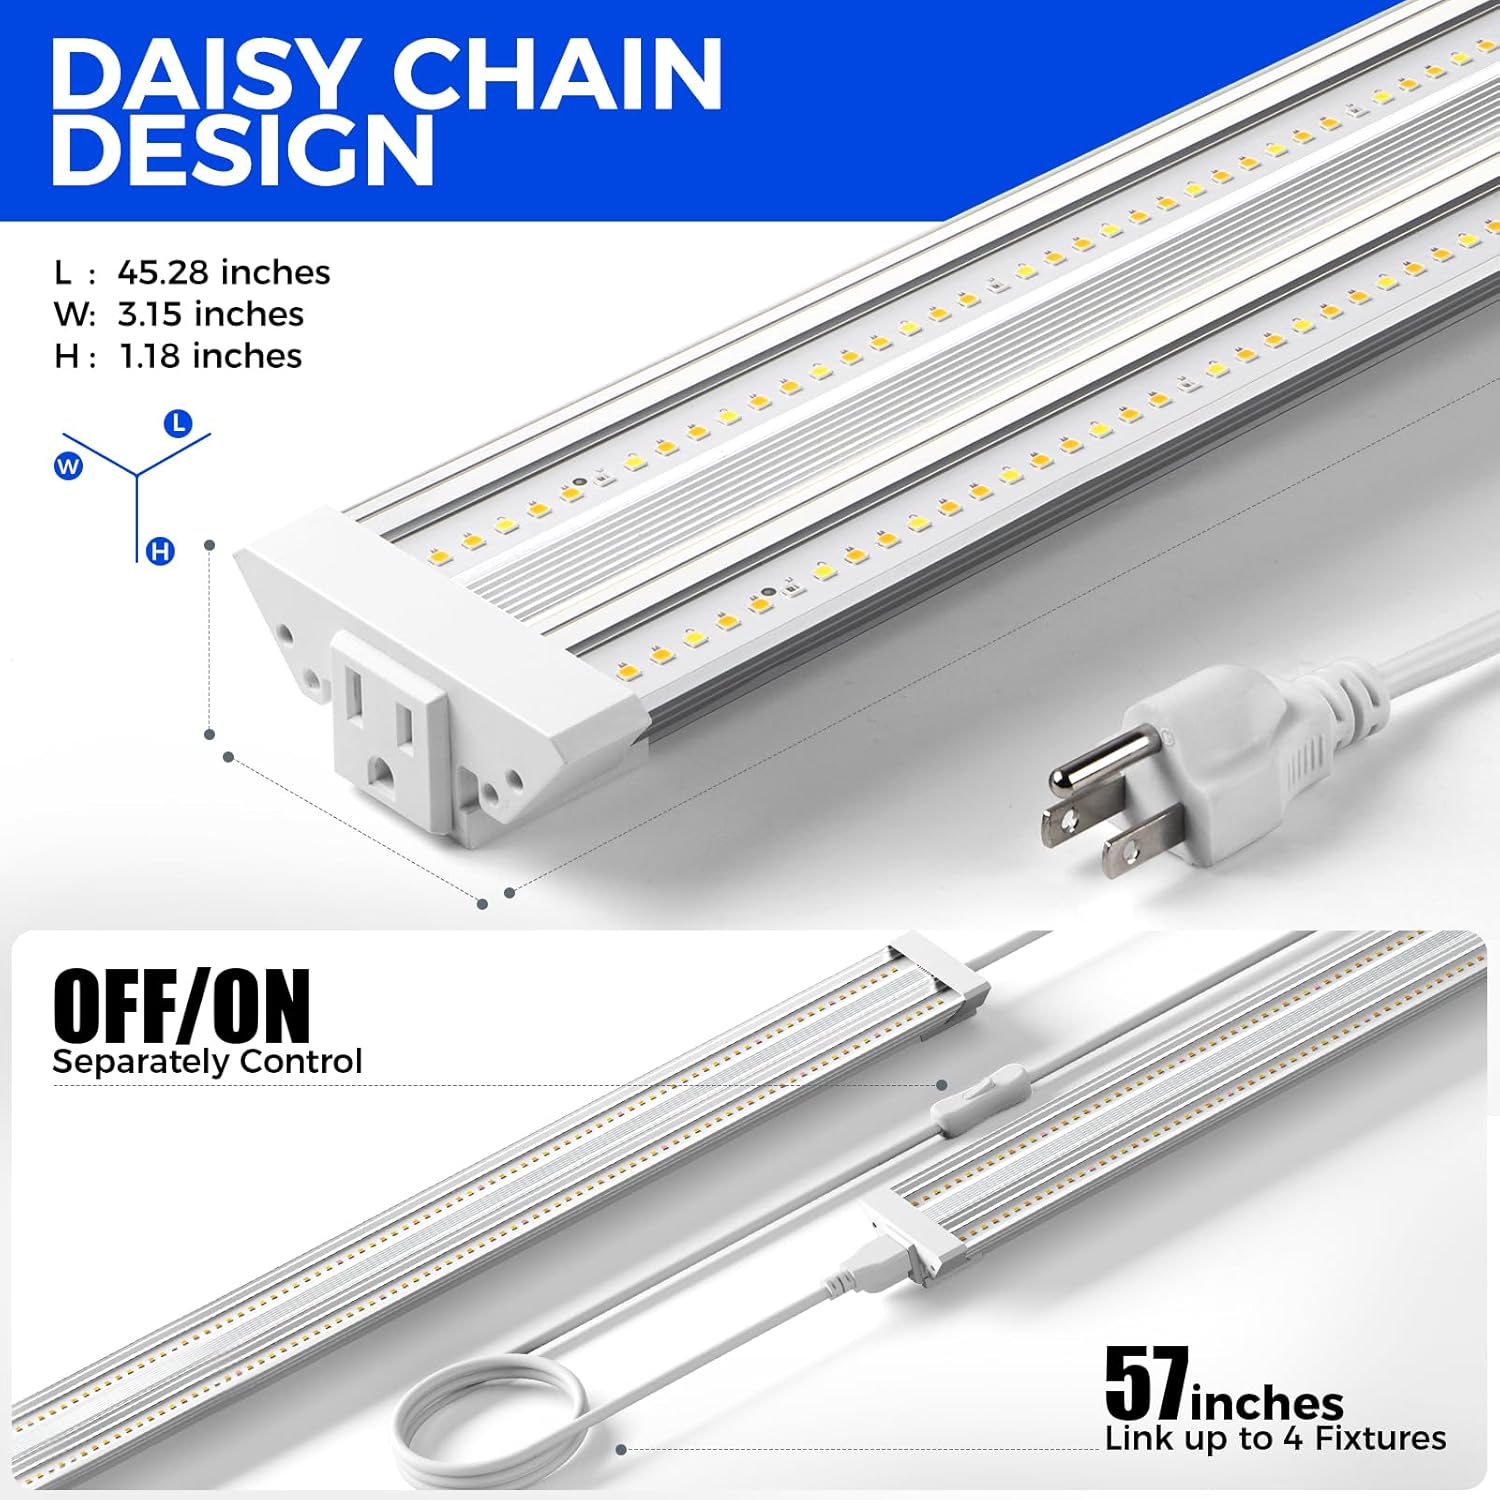
Figure 3: Daisy chain design for connecting multiple Barrina TX72 Grow Lights.
5. Operating Instructions
The Barrina TX72 Grow Light provides a full spectrum light suitable for all stages of plant development.
Powering On/Off:
Use the in-line on/off switch on the power cord to turn the light on or off. If multiple lights are daisy-chained, each light can be controlled individually with its own switch.
Optimal Light Distance and Duration:
The ideal distance and duration of light exposure depend on the plant's growth stage. The TX72's full spectrum, including 660nm red LEDs, supports various stages:

Figure 4: Growth process suggestions for different plant stages.
For maximum photosynthesis, position the lamp at a distance of approximately 3.94 inches from the plant canopy, achieving a PPFD of 525.69 µmol/m²/s.

Figure 5: High PPFD output of a single Barrina TX72 Grow Light.
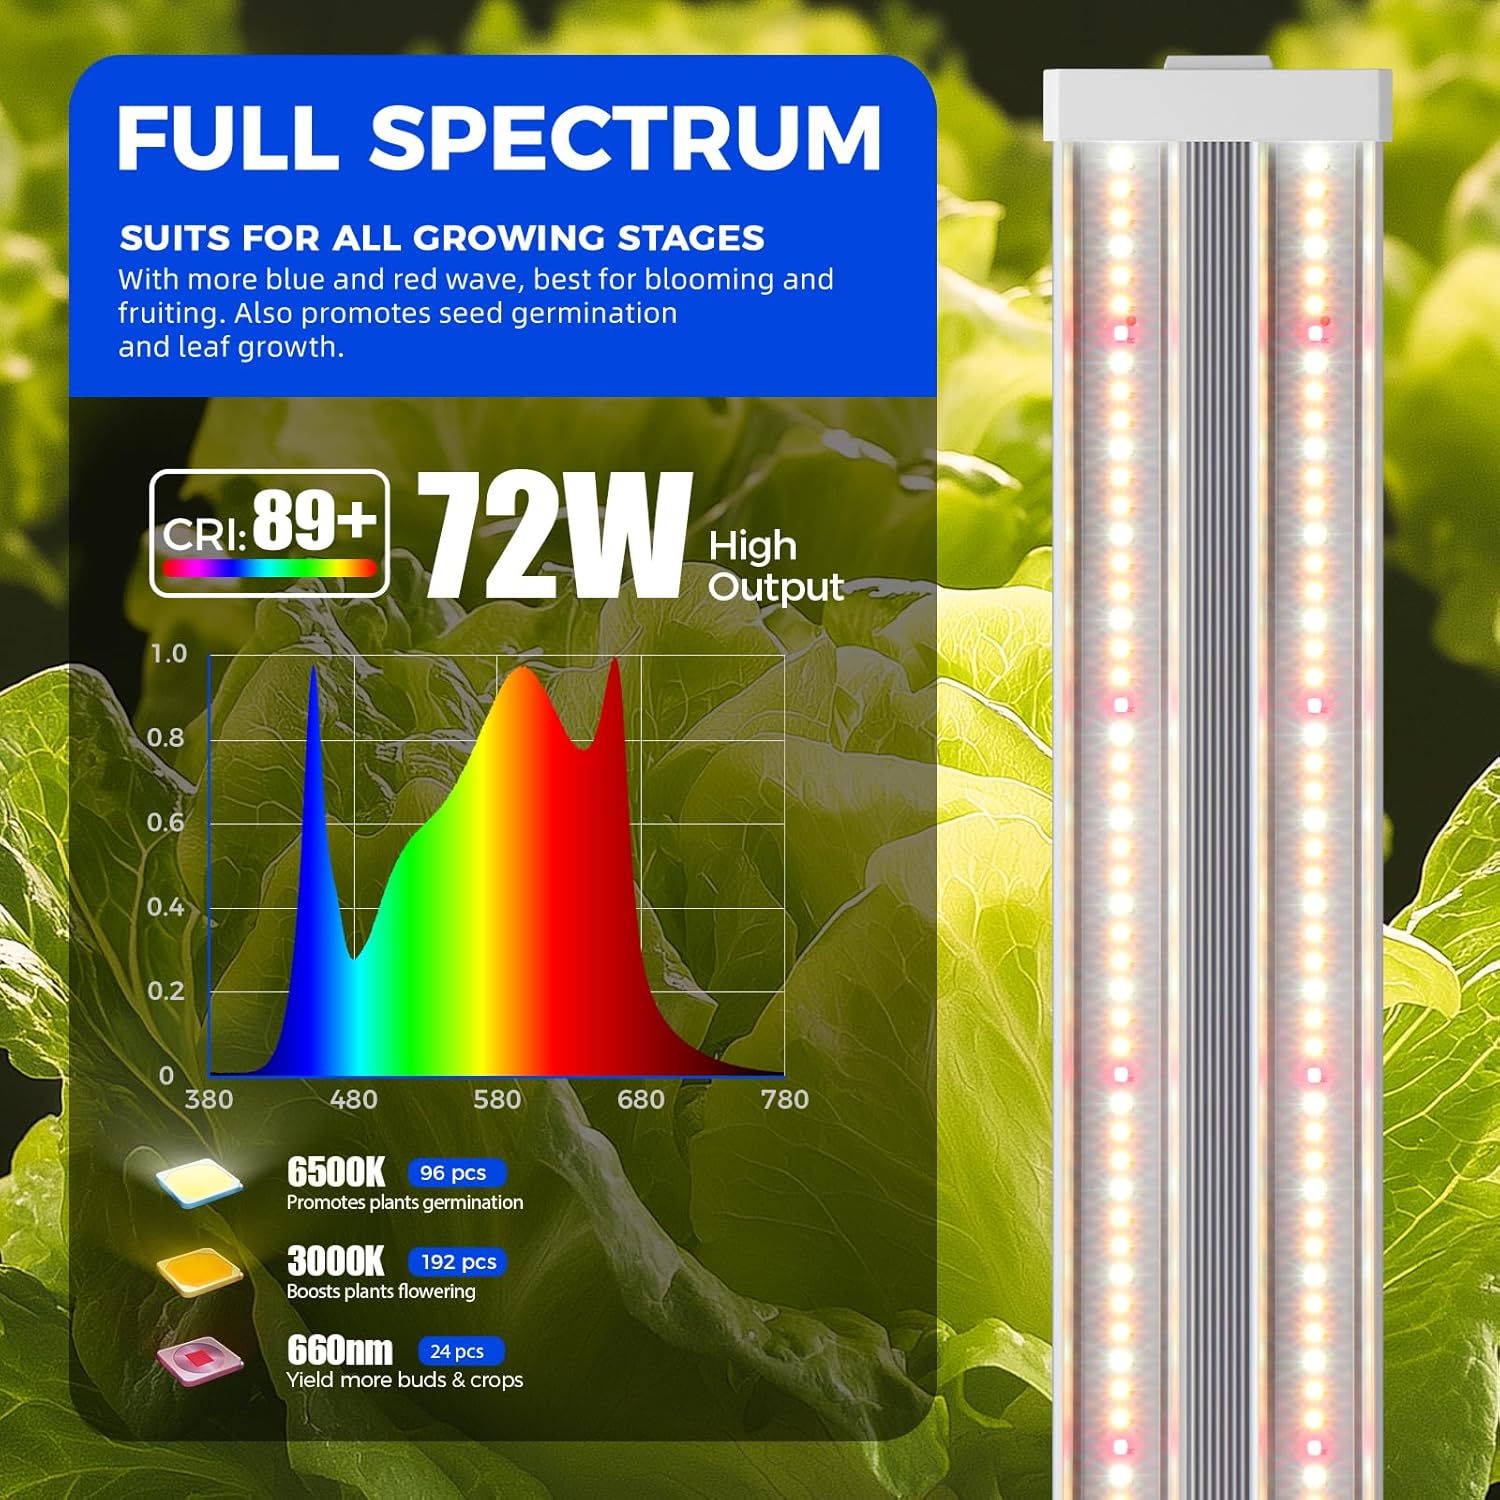
Figure 6: Full spectrum composition of the Barrina TX72 Grow Light.
Video 2: This video highlights the practical hardware and timer features of the Barrina Grow Lights, demonstrating their ease of use for plant cultivation.
Video 3: This video showcases the Barrina TX72 4FT Plant Grow Light, emphasizing its 72W high PPFD and full spectrum capabilities for optimal plant growth.
6. Maintenance
Regular maintenance ensures the longevity and optimal performance of your grow light.
- Cleaning: Ensure the light is unplugged before cleaning. Gently wipe the fixture with a soft, dry cloth to remove dust and debris. Do not use abrasive cleaners or solvents.
- Inspection: Periodically check the power cord and connections for any signs of damage. If any damage is found, discontinue use and contact customer support.
- Ventilation: Ensure the aluminum housing remains clear of obstructions to allow for proper heat dissipation.
7. Troubleshooting
If you encounter issues with your Barrina TX72 Grow Light, refer to the following common troubleshooting steps:
- Light Not Turning On:
- Check if the power cord is securely plugged into both the light fixture and the wall outlet.
- Verify that the wall outlet is functional by plugging in another device.
- Ensure the in-line on/off switch is in the 'On' position.
- Lights Flickering:
- Check all connections, especially in daisy-chained setups, to ensure they are secure.
- Ensure the power supply is stable and not overloaded.
- Reduced Light Output:
- Clean the light fixture to remove any dust or dirt accumulation that might be blocking the LEDs.
- Ensure the light is not operating in excessively hot conditions, which can affect LED performance.
If these steps do not resolve the issue, please contact Barrina customer support for further assistance.
8. Specifications
| Feature | Specification |
|---|---|
| Model Name | TX-72 |
| Brand | Barrina |
| Wattage | 72 Watts |
| Light Source Type | LED |
| Light Color | 3000K+6500K+660nm (Full Spectrum) |
| Brightness | 8100 Lumens |
| Color Rendering Index (CRI) | 89.00 |
| Voltage | 120 Volts (AC) |
| Product Dimensions | 46.46"L x 4.92"W x 2.17"H |
| Material | Aluminium and PC |
| Installation Type | Hanging, Surface Mount |
| Indoor/Outdoor Usage | Indoor use only |
| Water Resistance Level | Not Water Resistant |
9. Warranty and Support
Barrina products are designed for quality and durability. For specific warranty details, please refer to the product packaging or contact Barrina customer support directly. If you have any questions, require technical assistance, or need to report an issue, please reach out to the manufacturer's support channels.