1. Introduction
This manual provides detailed instructions for the installation, operation, and maintenance of your BAFANG 48V500W Front Hub Motor Electric Bike Conversion Kit. Please read this manual thoroughly before installation and use to ensure proper function and safety. This kit is designed to convert a standard bicycle into an electric bicycle, offering enhanced propulsion and riding experience.
2. Product Compatibility
The BAFANG 48V 500W Front Wheel Hub Motor is designed for universal compatibility with various bicycle types. Ensure your bicycle meets the following specifications:
- Front Dropout: 100mm
- Front Fork Aperture: 10mm
- Compatible Brake Types: V Brake and Disc Brake
- Compatible Tire Width: 1.5-2.4 inches
The kit supports multiple wheel sizes:
| Wheel Size | Rim Diameter | Spokes |
|---|---|---|
| 28"/29"/700C | 630mm (24.8") | 12G*36H |
| 26" | 570mm (22.4") | 12G*36H |
| 20" | 425mm (16.7") | 12G*36H |
Refer to the images below for visual guidance on compatibility and installation width.
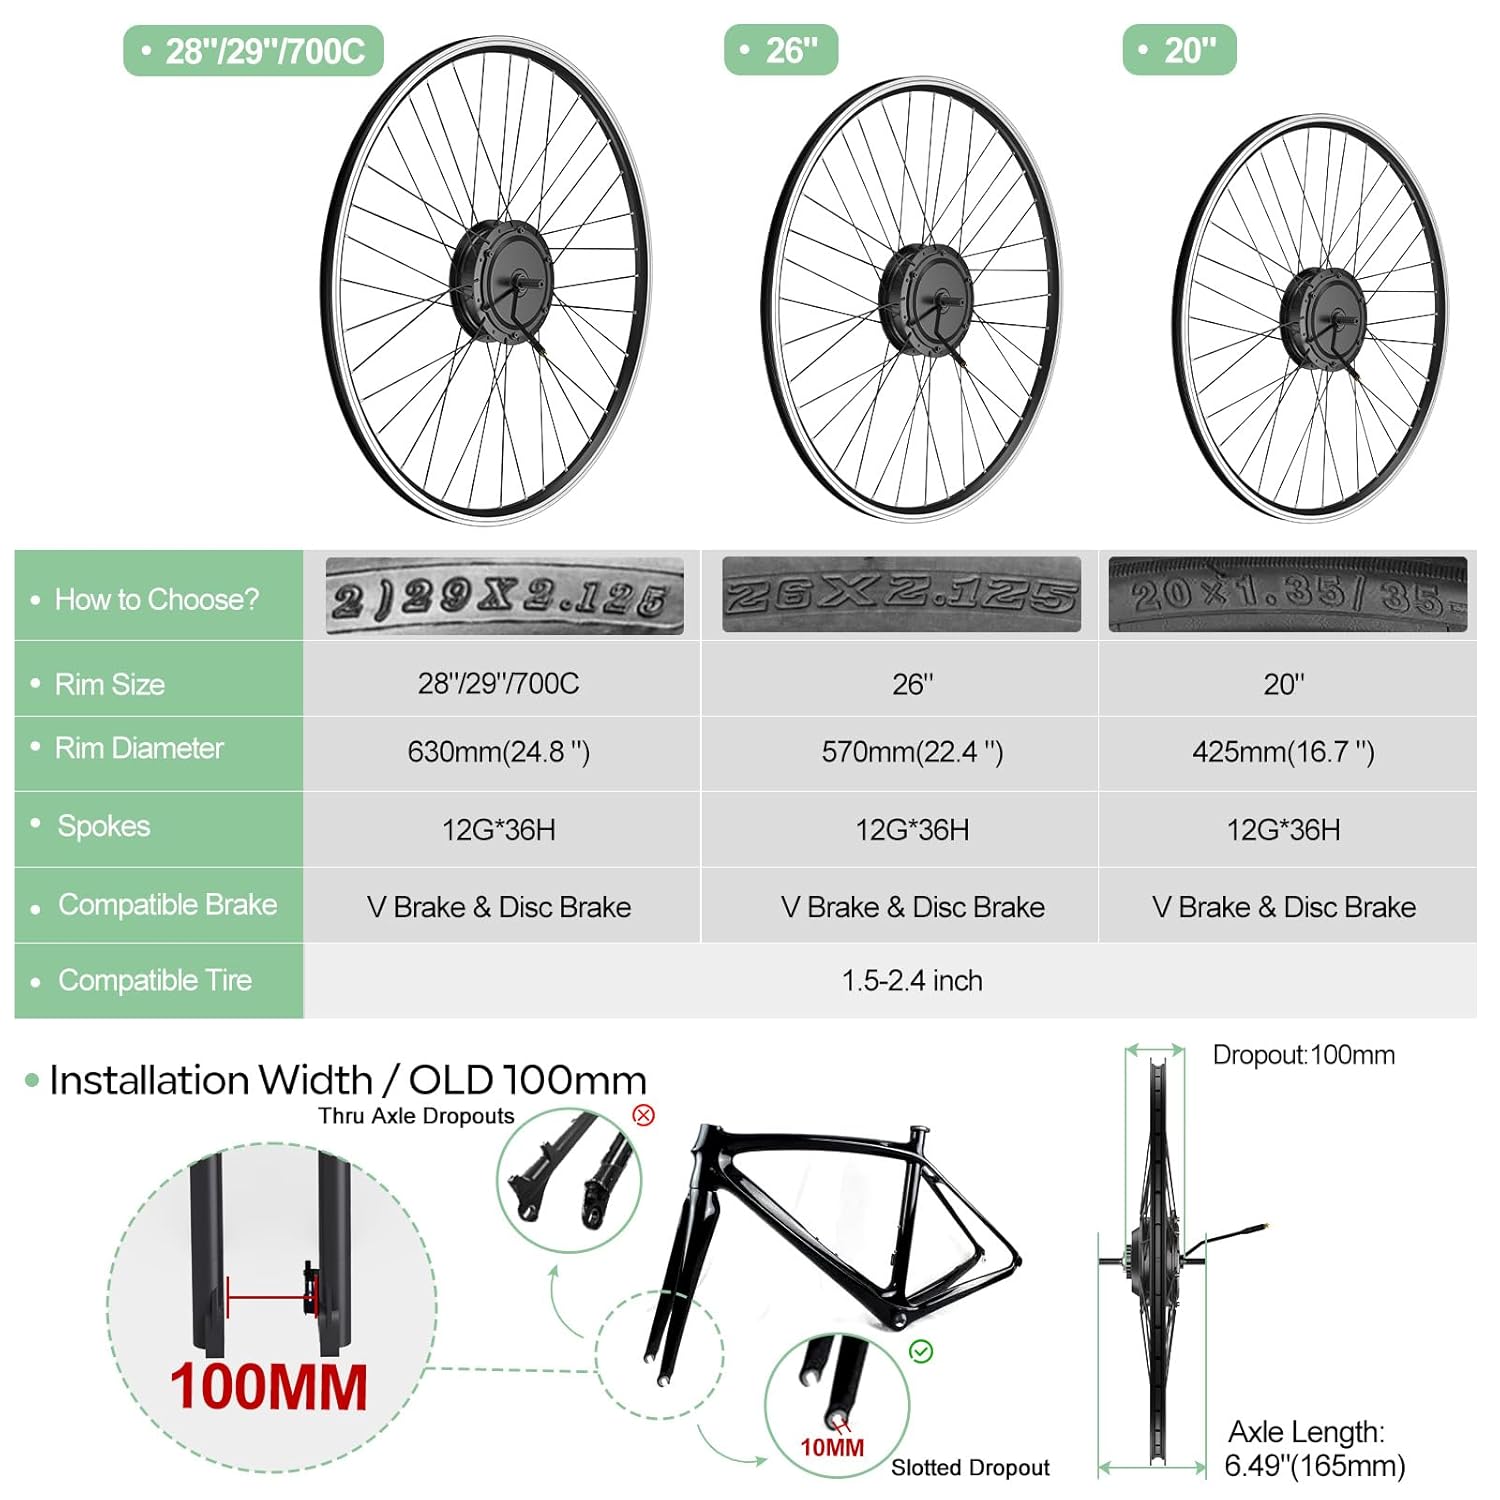
Image: Wheel size compatibility and front fork installation dimensions.

Image: Brake type compatibility and motor installation details.
3. Components Overview (Packing List)
The BAFANG Front Hub Motor Kit includes the following components. Please verify all items are present upon unboxing.
- Front Hub Motor with Wheel (20"/26"/700C, optional)
- Motor Controller
- Thumb Throttle
- 1T4 Cable (main wiring harness)
- Ebike Display (optional, various models available)
- Brake Levers or Brake Sensors
- PAS Sensor (Pedal Assist System)
- Headlight
- Controller Box
- Plastic Straps
- 36V/250W Stickers
- Ebike Battery (optional, needs extra purchase if not included)

Image: Detailed packing list of the conversion kit components.
4. Installation
Follow these steps to install your BAFANG Front Hub Motor Conversion Kit:
- Prepare the Bicycle: Remove the existing front wheel from your bicycle. Ensure the front fork dropouts are clean and free of obstructions.
- Install the Motor Wheel: Carefully insert the BAFANG front hub motor wheel into the front fork dropouts. Ensure the axle is fully seated and secure it with the provided nuts. The motor cable should exit towards the bottom or rear of the fork.
- Mount the Controller: Attach the controller box to a suitable location on your bicycle frame, typically near the battery or motor, using the provided plastic straps or mounting hardware. Ensure it is protected from water and impact.
- Install Display and Throttle: Mount the display and thumb throttle on the handlebars. Position them for comfortable and safe access during riding.
- Install Brake Levers/Sensors: Replace your existing brake levers with the provided e-bike specific brake levers, or install the brake sensors onto your existing brake levers. These are crucial for motor cut-off during braking.
- Install PAS Sensor: Attach the Pedal Assist System (PAS) sensor to the bottom bracket area of your bicycle. Ensure the magnet disc is correctly aligned with the sensor for accurate pedal detection.
- Connect Wiring: Use the 1T4 cable to connect all components to the controller. Refer to the connection diagram below for proper wiring. Each connector is typically color-coded and uniquely shaped to prevent incorrect connections.
- Install Headlight: Mount the headlight to the front of your bicycle and connect it to the designated port on the controller or 1T4 cable.
- Install Battery: Securely mount the battery to your bicycle frame (if purchased separately). Connect the battery to the controller using the appropriate power cable. Ensure the XT60 connector on the motor cable is compatible with your battery connector.
- Cable Management: Neatly route and secure all cables using plastic straps to prevent them from interfering with moving parts or getting damaged.

Image: Kit connection diagram for electrical components.

Image: Brake lever and sensor installation options.
5. Display Options
The kit supports various display models, each offering different features and interfaces. Choose the display that best suits your needs. Common display models include 500C, DPC18, P860ML, DZ40, EKD01, 800S, SW2-M58, and DM03.
| Display Model | Screen Size | Battery Indicator | Handlebar Diameter | USB Port | Speed Limit | Compatible Voltage | PAS Level |
|---|---|---|---|---|---|---|---|
| VD18MT | 1.45 inch | Voltage/Percentage | 22.2mm | No | Yes | 36V/48V/52V | 3-5-9-U |
| DZ40 | 1.6 inch | Percentage | 22.2mm | No | Yes | 24V/36V/48V | 5 |
| EKD01 | 2.4 inch | Voltage/Percentage | 25.4mm/22.2mm | Yes | Yes | 12V/32V/48V/60V | 3, 5, 9 |
| VD04 | 3.5 inch | Voltage/Percentage | 31.8mm/25.4mm/22.2mm | Yes | Yes | 36V/48V/52V | 3, 5, 9 |
| SWM58 | 3.8 inch | Voltage/Percentage | 31.8mm/25.4mm/22.2mm | No | Yes | 24V/36V/48V/52V | 3, 5, 9 |

Image: Detailed comparison of available display options.
6. Battery Compatibility
The BAFANG Front Hub Motor is compatible with 48V and 52V electric bike batteries. If you selected the 'without battery' option, ensure you prepare a compatible battery in advance. The motor is equipped with a male XT60 connector, so your battery connector must be compatible.
Compatible battery capacities include 48V 13Ah, 17.5Ah, 19.2Ah, 20Ah, and 52V 20Ah. Refer to the tables below for detailed battery parameters.
| Battery Type | Watt Hour | Battery Cell | BMS | Battery Charger | Size (L*W*H) | Weight | USB Port |
|---|---|---|---|---|---|---|---|
| HL Downtube 48V 13Ah | 624Wh | DMEGC 18650-26E 2600mAh | 30A | 54.6V 2A | 368*90*111mm | 4.25kg | Yes |
| HL Downtube 48V 16Ah | 768Wh | CMICR 18650 F8M 3200mAh | 30A | 54.6V 3A | 368*90*111mm | 4.23kg | Yes |
| HY Downtube 48V 20Ah | 960Wh | L/G INR21700 M48A 4800mAh | 30A | 54.6V 3A | 365*85*107mm | 5.0kg | No |
| Rear Rack 48V 18.2Ah | 873.6Wh | CMICR 18650 F8M7-2600mAh | 30A | 54.6V 4A | 476*165*89mm | 6.1kg | No |
| G80 Downtube 48V 20Ah | 960Wh | SAM-SUNG INR21700-50E 5000mAh | 30A | 54.6V 3A | 367*90*127mm | 4.7kg | No |

Image: Parameters for various 48V ebike batteries.
| Battery Type | Watt Hour | Battery Cell | BMS | Battery Charger | Size (L*W*H) | Weight | USB Port |
|---|---|---|---|---|---|---|---|
| YW DP-5 52V 20Ah | 1040Wh | SAM-SUNG INR21700-50E 5000mAh | 30A | 58.8V 3A | 368*95*125mm | 5kg | No |
| YW DP-7 48V 25Ah | 1200Wh | EVE INR21700-50E 5000mAh | 40A | 54.6V 3A | 368*95*156mm | 5.9kg | No |
| YW DP-7 52V 25Ah | 1300Wh | L/G INR21700 M50LT 5000mAh | 40A | 58.8V 3A | 368*95*156mm | 5.9kg | No |
| Lithium Ion 48V 10.4Ah | 499.2Wh | FEB 18650 2600mAh | 30A | 54.6V 3A | 274.5*83.5*68.5mm | 2.65kg | No |
| Voltz X 48V 20Ah | 960Wh | SAM-SUNG INR21700-50GB 5000mAh | 30A | 54.6V 3A | 365*109*140mm | 5.2kg | No |

Image: Parameters for various 52V ebike batteries.
7. Operation
Once installed, operate your e-bike as follows:
- Power On: Turn on the battery and then press the power button on your display unit.
- Select Assist Level: Use the buttons on your display to select the desired pedal assist level (PAS). Higher levels provide more motor assistance.
- Pedal Assist: Begin pedaling, and the motor will engage to provide assistance based on your selected PAS level.
- Throttle Use: If equipped, the thumb throttle can be used to provide power without pedaling. Use it cautiously, especially when starting.
- Braking: The brake levers/sensors will cut off motor power when engaged, ensuring safe stopping.
- Power Off: When finished riding, turn off the display and then the battery.
8. Maintenance
Regular maintenance ensures the longevity and optimal performance of your e-bike kit:
- Cleanliness: Keep the motor, controller, and battery clean and free from dirt and debris. Use a damp cloth; avoid high-pressure washing directly on electrical components.
- Connections: Periodically check all electrical connections for tightness and corrosion. Ensure cables are not pinched or damaged.
- Battery Care: Charge the battery regularly, even when not in use, to maintain its health. Store the battery in a cool, dry place. Avoid fully discharging the battery.
- Brakes: Regularly inspect brake pads and cables (or hydraulic fluid) to ensure effective braking. Adjust or replace as needed.
- Tire Pressure: Maintain correct tire pressure for optimal efficiency and safety.
- General Bike Maintenance: Continue with regular bicycle maintenance, including chain lubrication, gear adjustments, and checking for loose bolts.
9. Troubleshooting
If you encounter issues, refer to the following common troubleshooting tips:
- Motor Not Engaging:
- Check if the battery is charged and powered on.
- Ensure all electrical connections are secure.
- Verify the PAS sensor is correctly installed and aligned.
- Check if brake levers are fully released; engaged brake sensors will cut motor power.
- Display Not Turning On:
- Confirm the battery is powered on and connected.
- Check the display cable connection to the 1T4 cable/controller.
- Reduced Power/Range:
- Ensure the battery is fully charged.
- Check tire pressure.
- Verify the selected PAS level is appropriate.
- Environmental factors (temperature, terrain) can affect performance.
- Unusual Noises:
- Inspect the motor for any loose components or obstructions.
- Check spokes for tightness.
If problems persist, contact customer support for further assistance.
10. Specifications
Key technical specifications for the BAFANG 48V500W Front Hub Motor Kit:
- Motor Type: Front Hub Motor
- Rated Voltage: 48V
- Rated Power: 500W
- Maximum Torque: 65N.m
- Max Load Speed (28"): 40KM/H
- No-load Current: <1.8A
- Rated Current: <13.8A
- Wheel Diameter Compatibility: 20"/26"/700C
- Rated Speed: 340±15 RPM
- Noise Level: <55 dB
- Operating Temperature: -20°C ~ 45°C
- Waterproof Rating: IPX5
- Compatible Frame Spacing: 97-103mm
- Controller Max Current: 18A
- Controller Rated Current: 9A
- Controller Rated Voltage: 48V
- Controller Low Voltage Protection: 39 ± 1V
- Controller Dimensions: L 93.8mm x W 49mm x H 29mm

Image: Motor and controller specifications.
11. Warranty and Support
Your BAFANG Front Hub Motor Electric Bike Conversion Kit comes with a warranty:
- Return Policy: 30 days return.
- Repair or Replace: 365 days repair or replace.
For technical support, warranty claims, or any questions regarding your product, please refer to the contact information provided with your purchase or visit the official BAFANG website.