Cartridge Removal Tool User Manual
Model: MKI6AAQEC4FRUCPMFKCN
Product Overview
The Generic Cartridge Removal Tool is a versatile and essential device designed for efficient plumbing repairs. Crafted from robust aluminum and stainless steel, this compact and lightweight tool simplifies the process of removing problematic cartridges from various plumbing fixtures, including faucets, bathtubs, and double-handle tub showers. Its intuitive design and adjustable handle make it ideal for navigating tight spaces and fulfilling diverse usage requirements for both professional plumbers and DIY enthusiasts.

Image: The Cartridge Removal Tool, showcasing its robust metal construction.
Product Specifications
| Specification | Detail |
|---|---|
| Product Name | Cartridge Removal Tool |
| Material | Aluminum, Stainless Steel |
| Product Size (approx.) | 11.7 x 9.7 x 2.2 cm (4.61 x 3.82 x 0.86 inches) |
| Item Weight | 113 g (0.25 lbs) |
| Color | Multicolor (primarily metallic silver) |
| Model Number | MKI6AAQEC4FRUCPMFKCN |
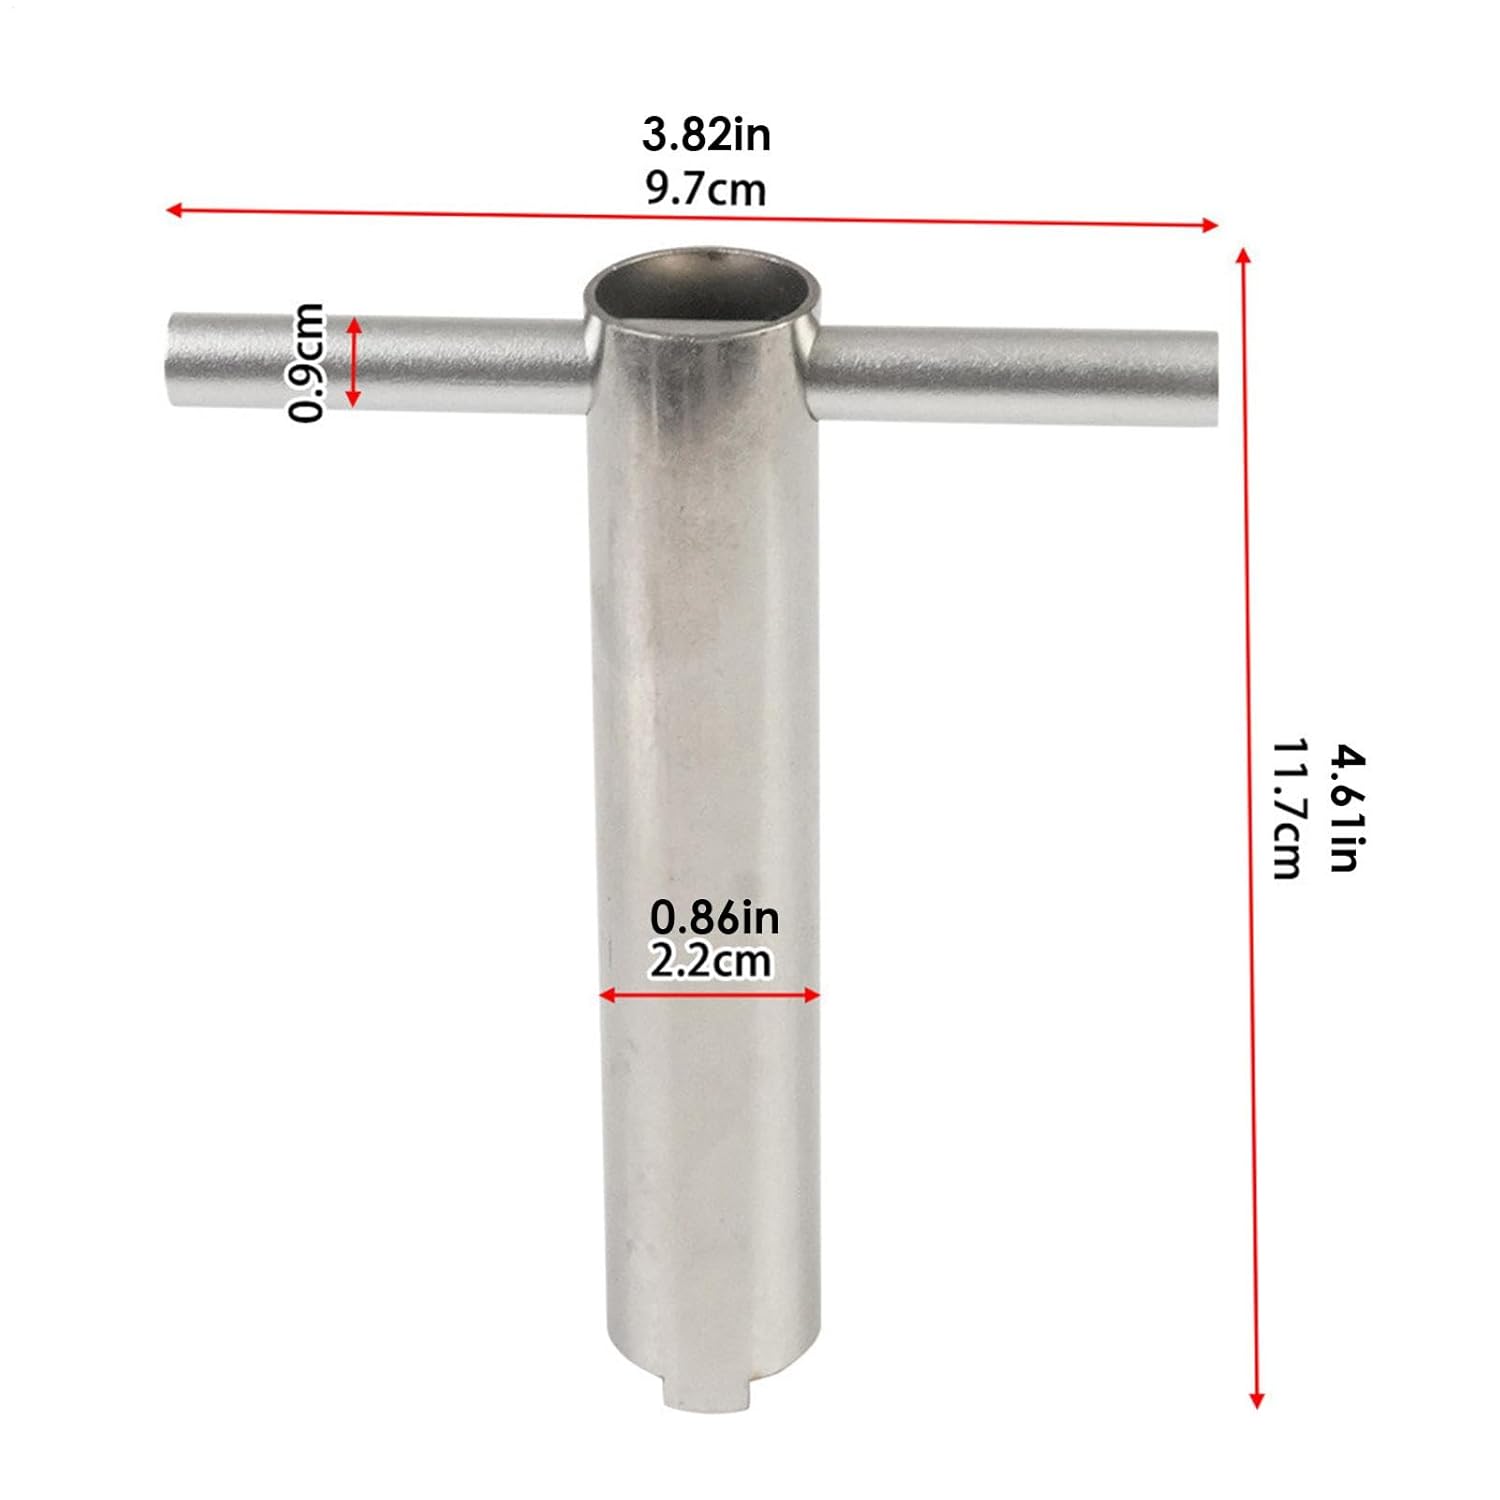
Image: Detailed dimensions of the Cartridge Removal Tool, showing its compact size.
Setup and Assembly
The Cartridge Removal Tool comes with a separate handle for easy adjustment and storage. Assembly is straightforward and quick.
- Identify Components: Unpack the tool. You will find two main parts: the main cylindrical puller body (SUS304 Puller) and a separate aluminum rod (Aluminum Handle).
- Insert Handle: Locate the hole near the top of the cylindrical puller body. Insert the aluminum handle rod through this hole. Ensure it passes completely through to form a 'T' shape.
- Adjust for Grip: The handle can be adjusted by sliding it left or right within the hole to provide the best leverage and grip for your specific task and hand size.

Image: The two main components: the SUS304 Puller and the Aluminum Handle.

Image: Demonstrating the easy assembly of the separate handle into the tool body.
Operating Instructions
This tool is designed to assist in the removal of various plumbing cartridges, particularly those found in faucets and shower fixtures. Always ensure the water supply to the fixture is turned off before beginning any work.
- Prepare the Fixture: Turn off the water supply to the faucet or fixture you are working on. Remove any handles, decorative caps, or retaining nuts that might be covering the cartridge.
- Position the Tool: Carefully place the open end of the cartridge removal tool over the cartridge you intend to remove. The tool is designed to fit snugly around the cartridge, engaging with its specific grooves or tabs.
- Apply Pressure and Twist: Once the tool is securely seated, grasp the handle firmly. Apply steady, even pressure while twisting the tool. The design of the tool provides leverage to help dislodge stubborn cartridges. Twist counter-clockwise to loosen and remove.
- Extract the Cartridge: Continue twisting and pulling gently until the cartridge is free from its housing. Some cartridges may require more force or wiggling to release.
- Inspect and Replace: Once the old cartridge is removed, inspect the housing for any debris or mineral buildup. Clean as necessary before inserting a new cartridge.

Image: The tool being used to remove a cartridge from a faucet, demonstrating its practical application.

Image: Illustrates the wide range of application scenarios for the tool across different faucet designs.
Care and Maintenance
To ensure the longevity and optimal performance of your Cartridge Removal Tool, follow these simple maintenance guidelines:
- Cleaning: After each use, wipe the tool clean with a dry cloth to remove any water, grease, or debris. For stubborn grime, a mild soap solution can be used, followed by thorough drying.
- Drying: Always ensure the tool is completely dry before storing to prevent rust or corrosion, especially since it is made of metal.
- Storage: Store the tool in a dry place, away from excessive moisture or corrosive chemicals. Its compact design allows for easy storage in a toolbox or drawer.
- Inspection: Periodically inspect the tool for any signs of wear, damage, or deformation. While designed to be robust, heavy use can eventually cause wear.
Troubleshooting
While the Cartridge Removal Tool is designed for straightforward operation, you might encounter minor issues. Here are some common scenarios and solutions:
- Tool Does Not Fit Cartridge:
- Ensure you have the correct type of cartridge removal tool for your specific faucet or fixture model. This tool is designed for common plumbing cartridges, but variations exist.
- Check for any obstructions around the cartridge that might prevent the tool from seating properly.
- Cartridge Will Not Budge:
- Ensure the water supply is completely off. Residual pressure can make removal difficult.
- Apply a penetrating lubricant (e.g., WD-40) to the base of the cartridge and let it sit for a few minutes to loosen mineral deposits.
- Apply firm, steady pressure and gentle wiggling motions while twisting. Avoid excessive force that could damage the fixture or tool.
- Handle Feels Loose:
- The handle is designed to be adjustable. Ensure it is centered or positioned to your preference for optimal leverage. It is not meant to be fixed rigidly.
Warranty and Support
Specific warranty information for this Generic product is not provided in the product details. For any issues or inquiries regarding your Cartridge Removal Tool, please refer to the retailer or point of purchase for their return or support policies.
For general plumbing advice or assistance with cartridge identification, consult a qualified plumber or reputable online resources.