Introduction
This manual provides detailed instructions for the setup, operation, and maintenance of your Hama Rhodes LCD Digital Radio-Controlled Alarm Clock. Please read this manual thoroughly before using the device to ensure proper functionality and longevity.
Product Features
- Precise DCF radio alarm clock with digital display of time, alarm time, date, and temperature.
- Automatic time adjustment via DCF radio signal for the most accurate time.
- Automatic brightness sensor that activates in the dark.
- Manual time zone setting capability.
- Digital display for clear readability.
- Adjustable brightness.
- Battery indicator.
Package Contents
- 1 x Hama Rhodes Radio Alarm Clock
- 2 x AA Mignon Batteries
- 1 x Instruction Manual (this document)
Controls and Display
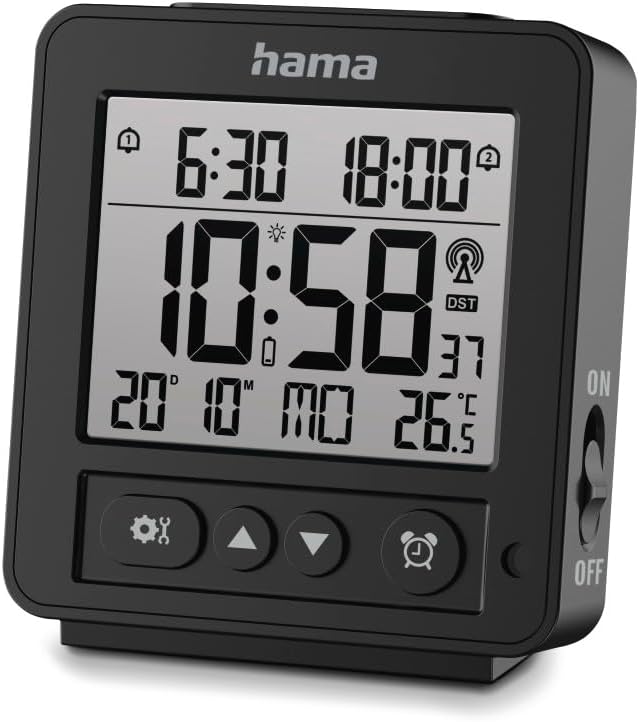
Image: Front view of the Hama Rhodes alarm clock, displaying time, date, temperature, and control buttons.
The alarm clock features a clear LCD display and several control buttons for easy operation:
- Display: Shows current time, alarm times (Alarm 1 and Alarm 2), date, day of the week, indoor temperature, and DCF signal reception status. A battery icon indicates battery level.
- Settings Button (⚙️): Used to enter and navigate through settings menus.
- Up Button (▲): Used to increase values or navigate upwards in menus.
- Down Button (▼): Used to decrease values or navigate downwards in menus.
- Alarm Button (⏰): Used to set and activate/deactivate alarms.
- ON/OFF Switch (Side): Controls the main power of the device.
Setup
1. Battery Installation
- Locate the battery compartment on the back of the alarm clock.
- Open the battery compartment cover.
- Insert the two AA Mignon batteries, ensuring correct polarity (+ and -).
- Close the battery compartment cover securely.
2. Initial Power-On and DCF Signal Reception
- After inserting batteries, switch the ON/OFF switch on the side to "ON".
- The clock will automatically begin searching for the DCF radio signal. This process may take several minutes.
- Place the clock in an area with good signal reception, away from electronic devices that may cause interference.
- Once the signal is received, the time and date will automatically set. A radio tower icon will appear on the display, indicating successful reception.
3. Manual Time Zone Setting (if required)
If the DCF time differs from your local time zone, you can manually adjust it:
- Press and hold the Settings button (⚙️) for a few seconds to enter settings mode.
- Use the Up (▲) or Down (▼) buttons to navigate to the "Time Zone" setting.
- Press the Settings button (⚙️) again to select.
- Use the Up (▲) or Down (▼) buttons to adjust the time zone offset.
- Press the Settings button (⚙️) to confirm and exit.
Operating Instructions
1. Setting the Alarm
The clock supports two independent alarms (Alarm 1 and Alarm 2).
- Press the Alarm button (⏰) once to display Alarm 1 time. Press again for Alarm 2 time.
- While the desired alarm time is displayed, press and hold the Alarm button (⏰) for a few seconds until the alarm time flashes.
- Use the Up (▲) or Down (▼) buttons to adjust the hour. Press the Alarm button (⏰) to confirm the hour and move to minutes.
- Use the Up (▲) or Down (▼) buttons to adjust the minutes. Press the Alarm button (⏰) to confirm and exit.
- To activate an alarm, press the Alarm button (⏰) repeatedly until the alarm icon (bell with '1' or '2') appears next to the alarm time on the display. To deactivate, press until the icon disappears.
2. Snooze Function
When the alarm sounds, press any button (except the ON/OFF switch) to activate the snooze function. The alarm will temporarily stop and sound again after approximately 5 minutes.
3. Brightness Sensor
The alarm clock features an automatic brightness sensor. This sensor detects ambient light levels and adjusts the display brightness accordingly. In dark environments, the display will dim to prevent excessive brightness. This feature is automatically enabled when the ON/OFF switch is in the "ON" position.
Maintenance
1. Cleaning
- Always switch off the device and remove batteries before cleaning.
- Clean the product only with a slightly damp, lint-free cloth.
- Do not use aggressive cleaning agents or abrasive materials.
- Ensure no liquid enters the device.
2. Battery Replacement
When the battery indicator on the display shows low power, replace both AA Mignon batteries following the installation steps in the "Setup" section. Dispose of used batteries according to local regulations.
Troubleshooting
| Problem | Possible Cause | Solution |
|---|---|---|
| No display or dim display | Batteries are low or incorrectly inserted. | Replace batteries or check polarity. Ensure ON/OFF switch is "ON". |
| Clock does not set automatically (no DCF signal) | Poor signal reception due to location or interference. | Move the clock to a different location, away from electronic devices or metal objects. Try placing it near a window. Manual time setting is also an option. |
| Alarm does not sound | Alarm is not activated or set incorrectly. | Ensure the alarm icon is displayed next to the alarm time. Re-check alarm time settings. |
| Incorrect time displayed | Incorrect time zone setting or temporary signal loss. | Check and adjust the time zone setting. The clock should re-synchronize with the DCF signal. |
Specifications
- Brand: Hama
- Model: 00185895
- Color: Black
- Display Type: Digital LCD
- Special Features: Adjustable Brightness, Battery Indicator, Illuminated Display, Temperature Display, DCF Radio Control
- Product Dimensions: 3.54"W x 3.94"H
- Power Source: Battery Powered (2 x AA Mignon batteries)
- Material: Plastic
- Item Weight: 6.4 ounces (182.76 Grams)
- Indoor/Outdoor Usage: Indoor
Warranty and Support
Hama products are designed for reliability and performance. For warranty information or technical support, please refer to the warranty card included with your purchase or visit the official Hama website. Keep your proof of purchase for any warranty claims.
For further assistance, you may contact Hama customer service through their official channels. Details are typically available on the product packaging or their website.