1. Introduction
This manual provides detailed instructions for the installation, operation, and maintenance of your Jingelsye 4 Core 4GB RAM+64GB ROM Car Radio. This unit is specifically designed for Hyundai Elantra models manufactured between 2011 and 2013, offering a 1280x800 IPS touchscreen with advanced features including Wireless CarPlay, Android Auto, 5G WiFi, GPS Navigation, Bluetooth 5.0, and support for a 1080P backup camera. Please read this manual thoroughly before installation and use to ensure proper functionality and safety.
2. Package Contents
Verify that all items listed below are included in your package:
- 1x Car Radio
- 1x Camera Body
- 1x Power Cable
- 1x USB Cable
- 1x Reversing Line
- 1x RCA Cable
- 1x GPS Module
- 1x Crowbar

Figure 2.1: Complete Packing List
This image displays all the components you should find in your product package, including the main car radio unit, various connection cables (power, USB, RCA, reversing line), a camera body, GPS module, and a crowbar tool for installation.
3. Setup and Installation
Professional installation is recommended. Ensure the vehicle's power is disconnected before beginning installation.
3.1 Wiring Connections
Follow these steps to connect the necessary cables to the car radio unit:
- Connect the 4G antenna to its designated port on the back of the car radio.
- Connect the GPS antenna to the GPS port.
- Connect the factory radio antenna to the ANT port.
- Connect the rear camera signal cable to the 10-pin reversing video input port.
- Connect the USB cables (4-pin and 6-pin) to their respective USB ports.
- Connect the 20-pin RCA cable to its port. If your car has a factory amplifier, connect the male AUX cables from the 20-pin RCA to the audio output ports.
- Connect the external microphone to the 3.5mm port on the RCA cables.
- Connect the radio power cable to the 16-pin port.
- Connect the 8-pin CANbus cable to its port.
Video 3.1: Jingelsye Wiring Video
This video demonstrates the step-by-step process of connecting all the necessary wiring harnesses and accessories to the back of the Jingelsye car radio unit, ensuring proper electrical and signal connections before installation into the vehicle dashboard.
3.2 Dashboard Disassembly and Unit Installation
Carefully remove the existing factory radio and dashboard trim. Use the provided crowbar tool to prevent damage to plastic components.
Video 3.2: Hyundai Elantra Headunit Installation
This video provides a visual guide for disassembling the Hyundai Elantra dashboard to remove the original head unit and install the new car radio. It covers the removal of trim pieces, screws, and the old unit, followed by the placement and securing of the new unit.

Figure 3.1: Before and After Installation
This image illustrates the visual transformation of the Hyundai Elantra dashboard, comparing the original factory radio with the newly installed Jingelsye 9-inch touchscreen car radio.
4. Operating Instructions
This section details the primary functions and features of your new car radio.
4.1 Wireless CarPlay & Android Auto
Effortlessly connect your smartphone for seamless access to navigation, music, calls, and messages. The system supports both wireless and wired connections.
- Seamless Integration: Access your favorite apps, contacts, messages, and music directly from the car radio's touchscreen.
- Intelligent Voice Function: Use voice commands to control features, enhancing driving safety.

Figure 4.1: Wireless CarPlay & Android Auto
This image demonstrates the wireless CarPlay and Android Auto functionality, showing how a smartphone connects via Bluetooth or USB to mirror its interface on the car radio screen, providing access to apps like maps, music, and phone calls.
4.2 Bluetooth Handsfree
The car radio supports Bluetooth 5.0 for hands-free calling and music streaming.
- Voice Control: Use commands like "play music," "GPS navigation," or "make a call" to stay focused on the road.
- Safe Driving: Reduces distractions by allowing phone operations without touching your device.

Figure 4.2: Bluetooth 5.0 Handsfree
This image highlights the Bluetooth 5.0 feature, showing a phone call interface on the car radio screen, emphasizing hands-free communication.
4.3 GPS Navigation
Built-in GPS navigation provides precise directions and real-time traffic updates.
- Pre-loaded Maps: Comes with online/offline maps for North America.
- GPS Module Antenna: Equipped with an all-weather GPS module antenna for reliable signal reception.

Figure 4.3: GPS Navigation with 5G WiFi
This image displays the GPS navigation system in action on the car radio, showing a detailed map with route information. It also indicates the support for 5G WiFi, enabling faster map updates and online services.
4.4 FM RDS Audio
Enjoy superior audio quality with the built-in FM RDS radio.
- Digital Signal Processing: Ensures clear and high-fidelity sound.
- 32 EQ Adjustable Function: Customize your audio experience to your preference.
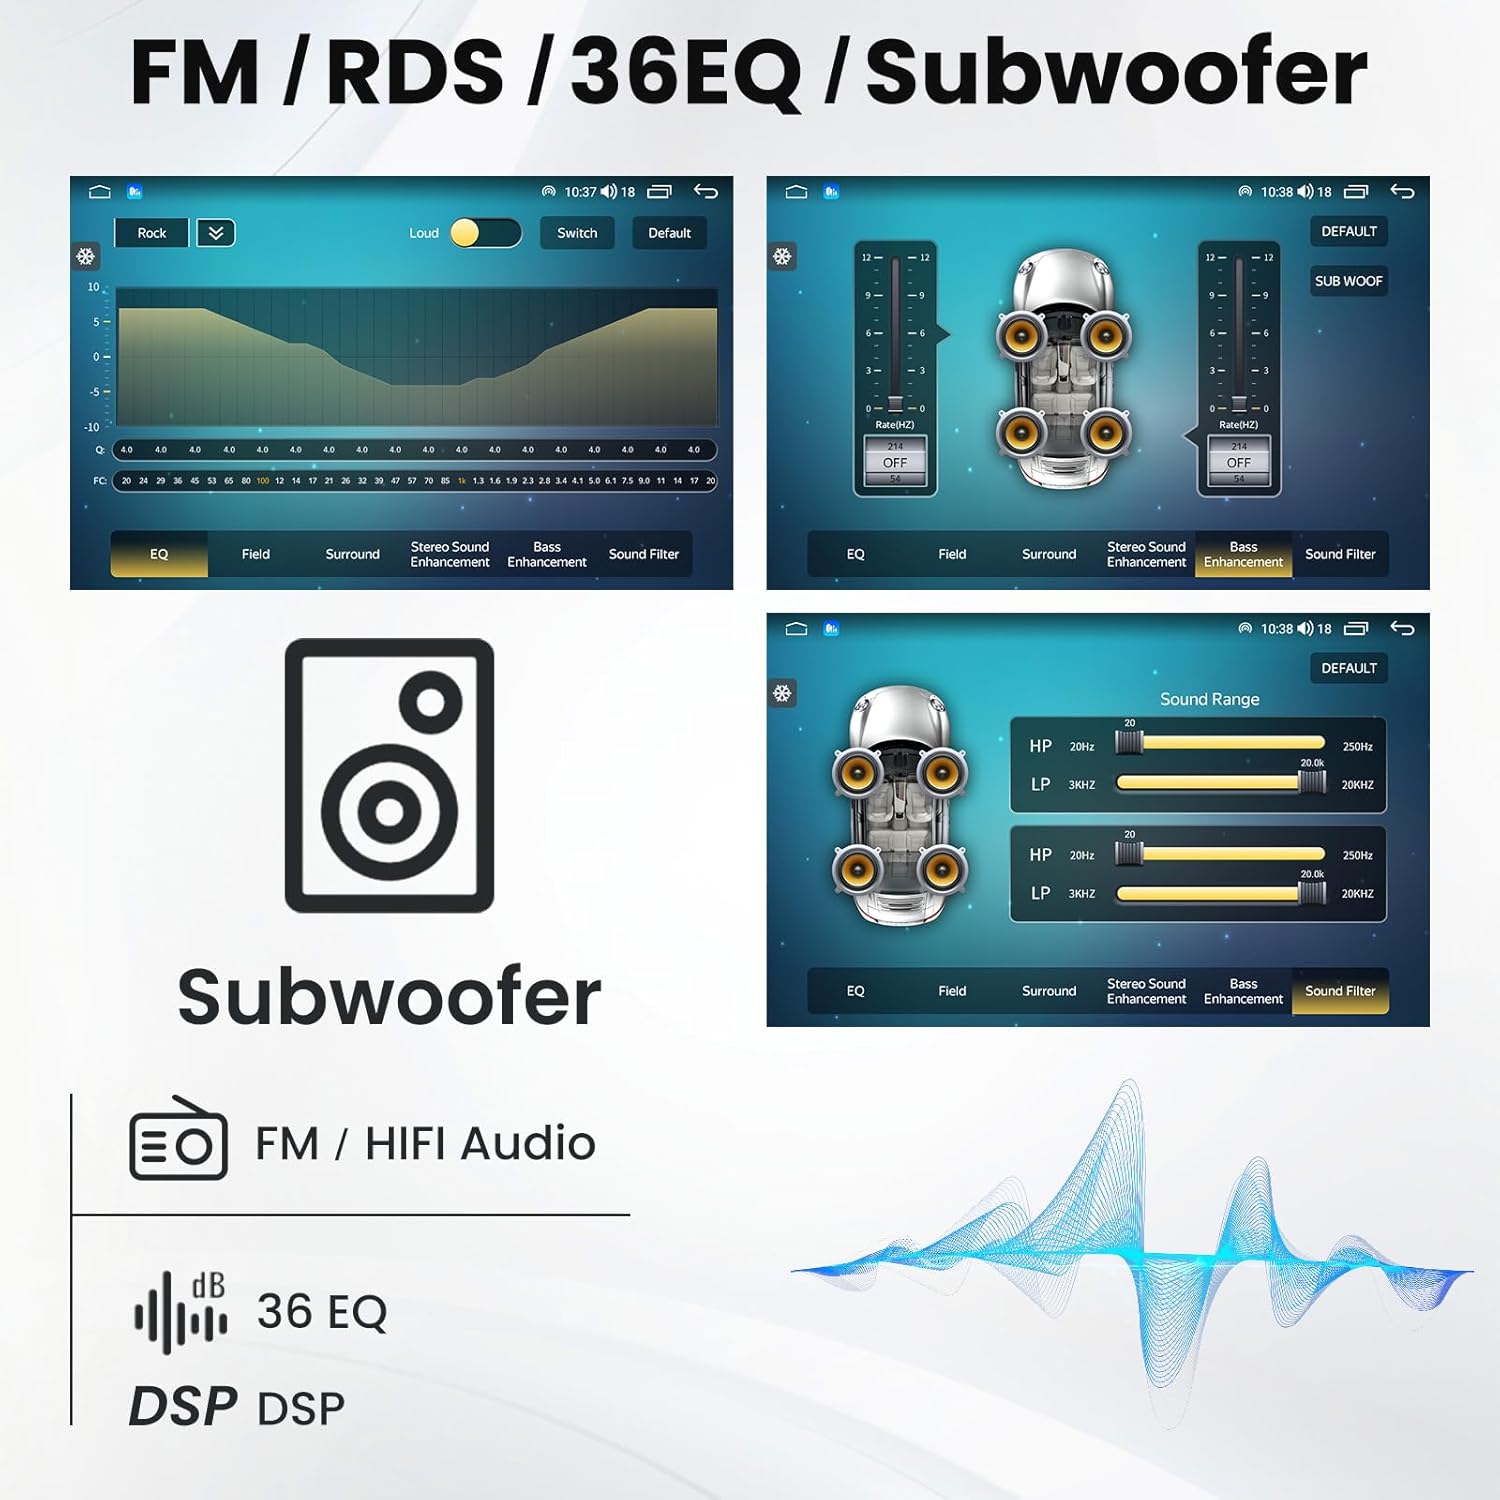
Figure 4.4: FM/RDS Radio and DSP Sound Settings
This image illustrates the FM/RDS radio interface, allowing users to tune into stations and view RDS information. It also showcases the extensive DSP sound settings, including a 36-band equalizer, subwoofer controls, and sound filters for a personalized audio experience.
4.5 1080P Backup Camera
Enhance safety and convenience with the high-definition rearview backup camera.
- 1080P HD Display: Provides a clear view of the area behind your vehicle when reversing.
- Automatic Activation: The camera view automatically appears on the screen when shifting into reverse.

Figure 4.5: 1080P HD Backup Camera
This image displays the view from the 1080P HD backup camera on the car radio screen, complete with parking guidelines. It highlights the camera's wide-angle view, waterproof rating, and night vision capabilities for improved safety during reversing maneuvers.
4.6 Steering Wheel Control (SWC)
Maintain control of essential functions without taking your hands off the steering wheel.
- OEM Functionality: Retains all original equipment manufacturer (OEM) functions.
- Easy Operation: Control volume, tracks, and calls directly from your steering wheel buttons.

Figure 4.6: Steering Wheel Control Interface
This image shows the car radio's interface for configuring steering wheel controls. It visually connects the physical buttons on the steering wheel to their corresponding functions on the touchscreen, allowing users to customize and retain control over media and calls while driving.
4.7 UI Theme Customization
Personalize the look and feel of your car radio's interface.
- Multiple Themes: Choose from various pre-installed UI themes to match your style.
- Easy Switching: Navigate through settings to select and apply new themes.
Video 4.1: Car Radio Features Overview
This video provides a comprehensive overview of the car radio's features, including demonstrations of the DSP sound settings, Bluetooth connectivity, CarPlay/Android Auto, GPS navigation, WiFi connection, FM RDS radio, and various UI themes. It showcases the interactive elements and customization options available on the touchscreen.
5. Maintenance
To ensure the longevity and optimal performance of your car radio, follow these maintenance guidelines:
- Screen Cleaning: Use a soft, lint-free cloth to gently wipe the touchscreen. Avoid abrasive cleaners or solvents that could damage the display.
- Software Updates: Periodically check for and install software updates to ensure the system has the latest features and security patches.
- Environmental Care: Avoid exposing the unit to extreme temperatures, direct sunlight for prolonged periods, or excessive moisture.
- Cable Inspection: Regularly inspect all connected cables for any signs of wear or damage. Ensure connections are secure.
6. Troubleshooting
If you encounter issues with your car radio, refer to the following common problems and solutions:
| Problem | Possible Cause | Solution |
|---|---|---|
| Unit does not power on | Loose power connection, blown fuse, vehicle battery issue. | Check power cable connections. Inspect vehicle fuses. Verify car battery health. |
| No sound output | Incorrect wiring, volume too low, mute activated, amplifier issue. | Verify speaker wiring. Increase volume. Check mute status. Ensure external amplifier (if any) is powered and connected correctly. |
| CarPlay/Android Auto not connecting | Bluetooth/USB connection issue, phone software outdated. | Ensure Bluetooth is enabled on both devices. Try a different USB cable. Update phone's operating system. Restart both phone and car radio. |
| GPS signal lost or inaccurate | GPS antenna improperly installed or obstructed. | Ensure GPS antenna is securely connected and placed in an unobstructed location (e.g., dashboard, under windshield). |
| Backup camera not displaying | Camera wiring issue, incorrect camera settings. | Check the camera's power and signal connections. Verify settings in the car radio's menu for backup camera input. |
7. Specifications
| Feature | Detail |
|---|---|
| Model Name | Jingelsye High-End Car Radio |
| Item Weight | 3.99 pounds |
| Package Dimensions | 15.96 x 13.4 x 4.69 inches |
| Display Size | 9 Inches |
| Screen Resolution | 1280*800 HD Touchscreen |
| Processor | 4 Core |
| RAM | 4GB |
| ROM | 64GB |
| Connectivity Technology | Bluetooth, USB, Wi-Fi (5G) |
| Bluetooth Version | 5.0 |
| Special Features | Wireless Carplay, Android Auto, GPS Navigation, 1080P HD Backup Camera, Steering Wheel Control, FM RDS Audio, Mirror Link |
| Audio Output Mode | Stereo |
| Mounting Type | Dashboard Mount |
8. Warranty and Support
Jingelsye is committed to providing quality products and customer satisfaction. For any questions or assistance with your car radio, please contact our after-sales team.
- Product Fitment: If you are unsure whether this product is suitable for your car, please send a photo of your car's dashboard to our support team for verification.
- Technical Assistance: Our after-sales team is available to help resolve any issues you may encounter with the car radio. Good communication is key to problem resolution.
Additional protection plans are available for purchase:
- 2-Year Protection Plan
- 3-Year Protection Plan
- Complete Protect (monthly plan covering eligible purchases)