1. Introduction
This manual provides detailed instructions for the installation, operation, and maintenance of your Riseem S3001 Non-Programmable Digital Thermostat. This thermostat is designed for conventional single-stage heating and cooling systems (1 Heat/1 Cool) to efficiently control room temperature.
The S3001 features a clear, easy-to-read blue backlight LCD display and user-friendly controls, making it simple to operate. It offers accurate temperature control for consistent comfort and can be powered by either 24VAC or two AA batteries.
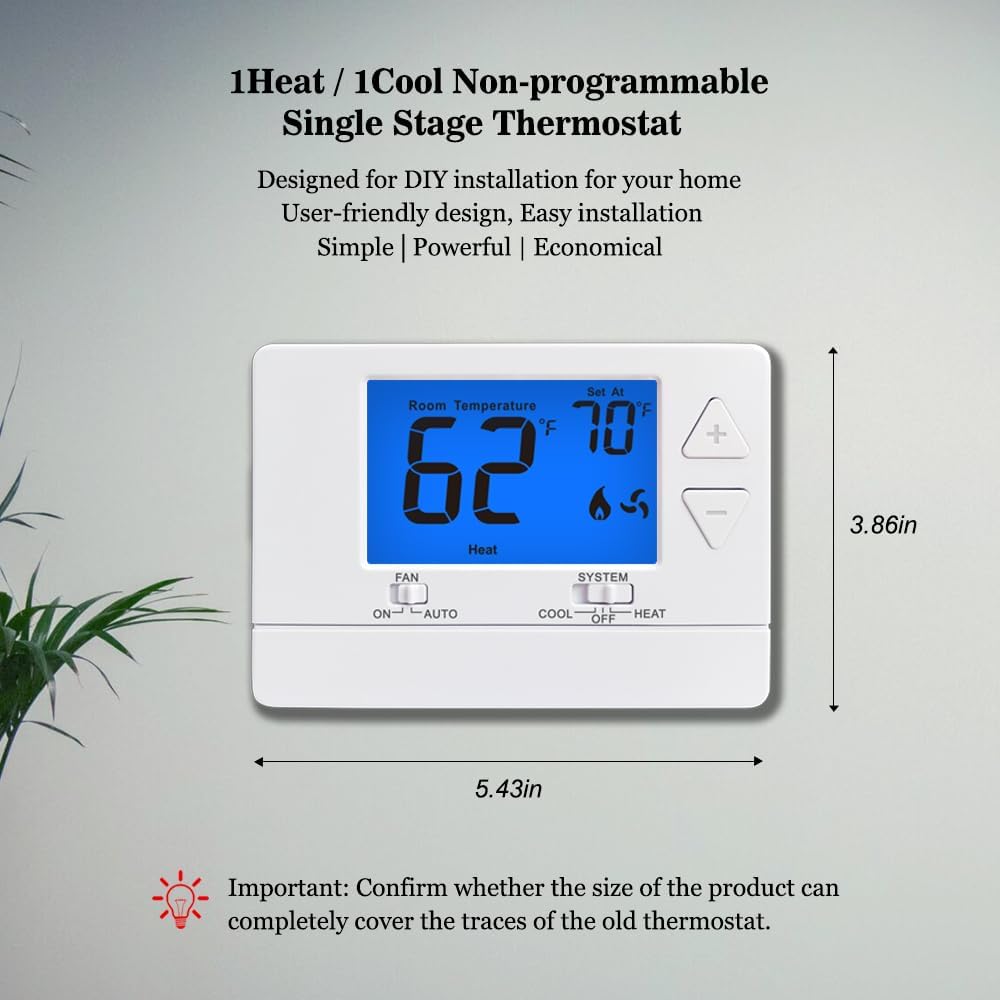
Image 1: Front view of the Riseem S3001 thermostat, showing its display and overall dimensions (5.43 inches width, 3.86 inches height).
2. Important Safety Information
- Always turn off power at the main power source by unscrewing the fuse or switching the circuit breaker to the OFF position before installing, removing, cleaning, or servicing this thermostat. Failure to do so can result in electrical shock or equipment damage.
- Read all information in this manual before installing or operating this thermostat.
- Before removing your old thermostat, label the wires with the supplied wire labels to ensure correct re-connection.
- It is recommended to exercise caution if you lack experience in installation to avoid potential problems like product malfunction or incompatibility due to incorrect purchases.
- The thermostat base can only be attached with a maximum of 2 to 5 wires. Connections with 6 to 8 wires are not suitable for this model.
3. System Compatibility
The Riseem S3001 thermostat is designed for use with conventional single-stage heating and cooling systems. Please verify your system type before installation.
Compatible Systems:
- Single-Stage Heating & Cooling
- Gas/Oil/Electric Furnace (Heat only)
- Boiler Radiant (Heat only)
- Furnace Forced-Air (Heat Only)
- Gas Fireplace (24 Volts)
- Cooling Only systems
Incompatible Systems:
- Multistage Heat & Cooling
- 3-wire Hydronic (Hot Water)
- Heat Pump with Auxiliary Heating
- Heat Pump without Auxiliary Heating
- Dual Fuel/Hybrid Multistage Heating
- Mini Split Systems
- RV Thermostats
- Convectors/Radiant Ceiling Heat
- Electric Baseboard Heat (120-240 Volts)
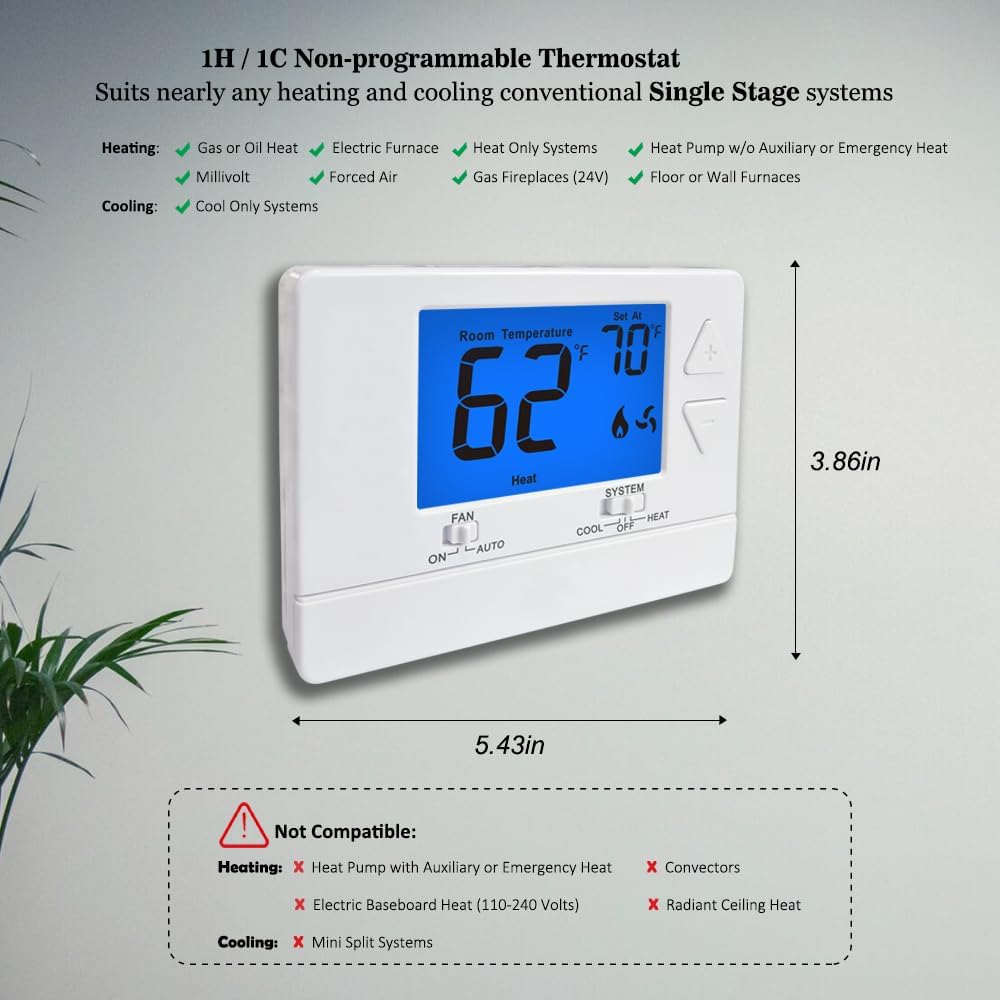
Image 2: Visual guide to compatible and incompatible HVAC systems for the S3001 thermostat.
4. Package Contents
Verify that all items are present in your package:
- 1 x Riseem S3001 Thermostat
- 1 x Operating Manual
- 2 x Screws and Anchors
- 1 x Terminal Wire Tag Sticker

Image 3: Contents of the S3001 thermostat package, including the thermostat unit, manual, screws, anchors, and wire labels.
5. Installation
5.1 Pre-Installation Steps
- Turn off power: Locate your heating/cooling system's circuit breaker or fuse box and turn off the power to the system. This is a critical safety step.
- Remove old thermostat: Carefully remove the cover of your old thermostat. Note how the wires are connected to the terminals.
- Label wires: Use the provided wire tag stickers to label each wire according to its terminal designation (e.g., R, G, Y, W, C). This is crucial for correct re-installation.
- Remove old wallplate: Once wires are labeled and disconnected, remove the old thermostat's wallplate.
5.2 Mounting the New Thermostat
- Mount wallplate: Position the new thermostat's wallplate on the wall. Use the included screws and anchors to secure it. Ensure it is level for aesthetic purposes.
- Connect wires: Match the labeled wires from your system to the corresponding terminals on the new thermostat's wallplate. Insert each wire firmly into its terminal.
- C: Common 24VAC (system power supply)
- O: Reversing Valve Cool
- B: Reversing Valve Heat
- W: Heat
- RH: 24VAC (system power supply) - Heat = RH to W
- RC: Cool = RC to Y, Fan = RC to G
- G: Fan
- Y: Cool
Note: If you have separate RH and RC wires, remove the metal jumper wire between them on the thermostat base. If only 2 wires are used, batteries are required for power.
- Attach thermostat to wallplate: Align the thermostat body with the mounted wallplate and gently push until it clicks into place.
- Restore power: Turn the power back on at your circuit breaker or fuse box.

Image 4: Illustrated steps for replacing an existing thermostat, including power-off, wire labeling, and mounting the new unit.
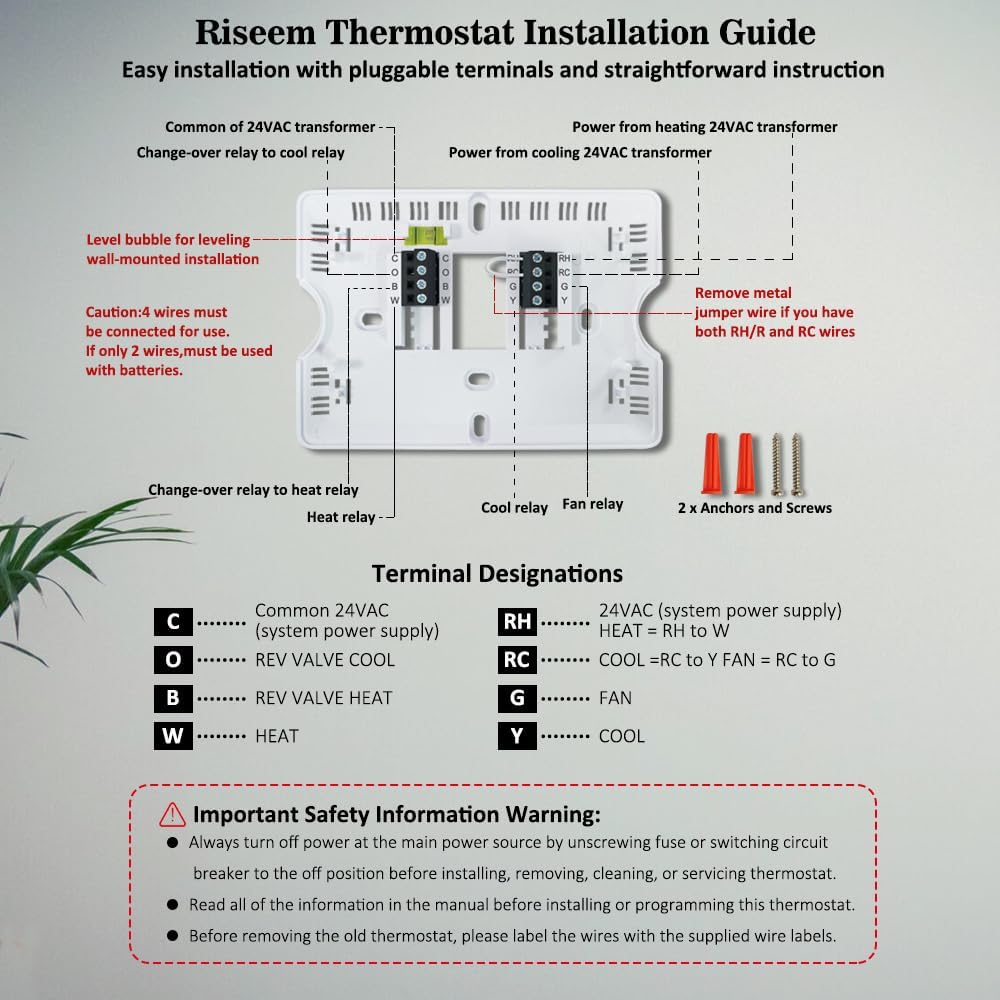
Image 5: Detailed installation guide showing the thermostat's internal components, terminal designations, and important safety warnings.
5.3 Power Supply
The S3001 thermostat can be powered by two methods:
- 24VAC Power: If your system has a common wire (C-wire), the thermostat will draw power from your HVAC system.
- 2 AA Batteries: If a C-wire is not available or not connected, two AA alkaline batteries (not supplied) are required. These batteries also provide backup power in case of a power outage, maintaining your settings.

Image 6: Side and front view of the S3001 thermostat, highlighting its dimensions and the easy-change battery compartment for two AA batteries.
6. Operation
The Riseem S3001 thermostat is designed for straightforward operation. The large LCD display shows the current room temperature and the set temperature.

Image 7: Close-up of the S3001 thermostat display and control buttons, indicating temperature ranges and battery indicator.
6.1 Setting the Temperature
- Use the + (Up) and - (Down) buttons on the right side of the thermostat to adjust your desired temperature. The "Set At" temperature will flash as you adjust it and then stabilize after a few seconds.
- The temperature control range is 44°F to 90°F (7°C to 32°C).
6.2 Fan Switch
The FAN switch is located at the bottom left of the thermostat. It has two settings:
- ON: The fan runs continuously.
- AUTO: The fan runs only when the heating or cooling system is actively operating.
6.3 System Switch
The SYSTEM switch is located at the bottom right of the thermostat. It has three settings:
- COOL: The thermostat will operate your cooling system to maintain the set temperature.
- OFF: The heating and cooling systems are turned off.
- HEAT: The thermostat will operate your heating system to maintain the set temperature.
6.4 Temperature Swing (Cycle Rate)
The thermostat allows for separate adjustment of heating and cooling swing (cycle rate). This feature prolongs or shortens the temperature open time, contributing to energy savings and comfortable temperatures. Refer to the full operating manual for detailed instructions on adjusting this setting.
7. Maintenance
7.1 Battery Replacement
If your thermostat is powered by AA batteries, a low battery indicator will appear on the display when the batteries need to be replaced. To replace the batteries:
- Open the easy-change battery door located at the bottom of the thermostat.
- Remove the old AA batteries.
- Insert two new AA alkaline batteries, ensuring correct polarity.
- Close the battery door.
If your thermostat is C-wire powered, batteries are not strictly required for operation but can provide backup in case of power loss.
8. Troubleshooting
If you encounter issues with your Riseem S3001 thermostat, consider the following:
- No Display/Power: Check if the circuit breaker for your HVAC system is ON. If using batteries, ensure they are fresh and correctly installed. If C-wire powered, verify the C-wire connection.
- System Not Responding: Ensure the SYSTEM switch is set to HEAT or COOL, not OFF. Check wiring connections for looseness or incorrect placement.
- Incorrect Temperature Reading: Allow the thermostat to stabilize for a few minutes after installation. Ensure it is not exposed to direct sunlight, drafts, or heat sources that could affect its sensor.
- Fan Issues: Check the FAN switch setting (ON/AUTO).
For further assistance, please refer to the contact information in the Warranty and Support section.
9. Specifications

Image 8: Overview of the S3001 thermostat's technical specifications, including clock, temperature ranges, and swing settings.
| Feature | Detail |
|---|---|
| Model Name | S3001 |
| Product Dimensions | 1.06"D x 5.43"W x 3.86"H |
| Controller Type | Push Button |
| Special Features | Separate Heating and Cooling Swing (Cycle Rate), Low Battery Indicator |
| Color | Blue |
| Specific Uses | Heating and Cooling Controls |
| Temperature Control Type | Conventional Single Stage Systems |
| Power Source | 24VAC Corded Electric or 2 AA Batteries |
| Item Weight | 0.46 Pounds (7.4 ounces) |
| Voltage | 24 Volts (AC) |
| Material | Plastic |
| Display Type | LCD |
| Mounting Type | Wall Mount |
| Room Temperature Display Range | 41°F to 95°F (5°C to 35°C) |
| Temperature Control Range | 44°F to 90°F (7°C to 32°C) |
| Temperature Accuracy | +/-1°F |
10. Warranty and Support
Riseem products come with a 2-year Worry-Free Warranty and 30 days free return. If you encounter any problems or have questions regarding your S3001 thermostat, please feel free to contact Riseem customer service. We aim to respond within 24 hours.
For support, please refer to the contact information provided with your purchase or visit the official Riseem website.


