1. Introduction
This manual provides comprehensive instructions for the installation, operation, and maintenance of your Riseem S3001 Non-Programmable Wall Thermostat. The S3001 is designed for conventional single-stage heating and cooling systems (1 Heat/1 Cool) to accurately control room temperature. Its user-friendly design includes a clear, easy-to-read backlight LCD display and simple controls for a straightforward user experience.

Image 1: Riseem S3001 Thermostat Overview with Dimensions (approximately 5.43 inches wide by 3.86 inches high).
2. Important Safety Information
Always read and understand all instructions before installing or operating this thermostat. Failure to follow these instructions could result in property damage, personal injury, or death.
- Power Disconnection: Always turn off power to your heating/cooling system at the main power source (e.g., circuit breaker or fuse box) before installing, removing, cleaning, or servicing the thermostat.
- Wiring Caution: Buyers should thoroughly examine the installation and wiring instructions. Exercise caution if you lack experience in electrical installation to avoid potential problems like product malfunction or incompatibility due to incorrect purchases.
- Wire Compatibility: The thermostat base is designed for a maximum of 2 to 5 wires. Connections with 6 to 8 wires are not suitable for this model.
- Wire Labeling: Before removing your old thermostat, label all wires with the supplied wire labels to ensure correct re-connection.
3. Package Contents
Verify that all items are present in your package:
- 1 x Riseem S3001 Thermostat
- 2 x Screws and Anchors for mounting
- 1 x Operating Manual (this document)
- 1 x Cable Label / Terminal Wire Tag Sticker sheet

Image 2: Contents of the Riseem S3001 Thermostat package, including the thermostat, mounting hardware, manual, and wire labels.
4. System Compatibility
The Riseem S3001 thermostat is designed for specific HVAC systems. Please review the compatibility information below before installation.
4.1. Compatible Systems
- Single-Stage Heating & Cooling systems
- Gas/Oil/Electric Furnace (Heat only)
- Boiler Radiant (Heat only)
- Furnace Forced-Air (Heat Only)
- Gas Fireplace (24 Volts)
- Cooling Only systems
4.2. Incompatible Systems
This thermostat is not compatible with the following systems:
- Multistage Heat & Cooling systems
- 3-wire Hydronic (Hot Water) systems
- Heat Pump with Auxiliary Heating
- Heat Pump without Auxiliary Heating
- Dual Fuel/Hybrid Multistage Heating
- Mini Split Systems
- RV Thermostats
- Convectors/Radiant Ceiling Heat
- Electric Baseboard Heat (120-240 Volts)
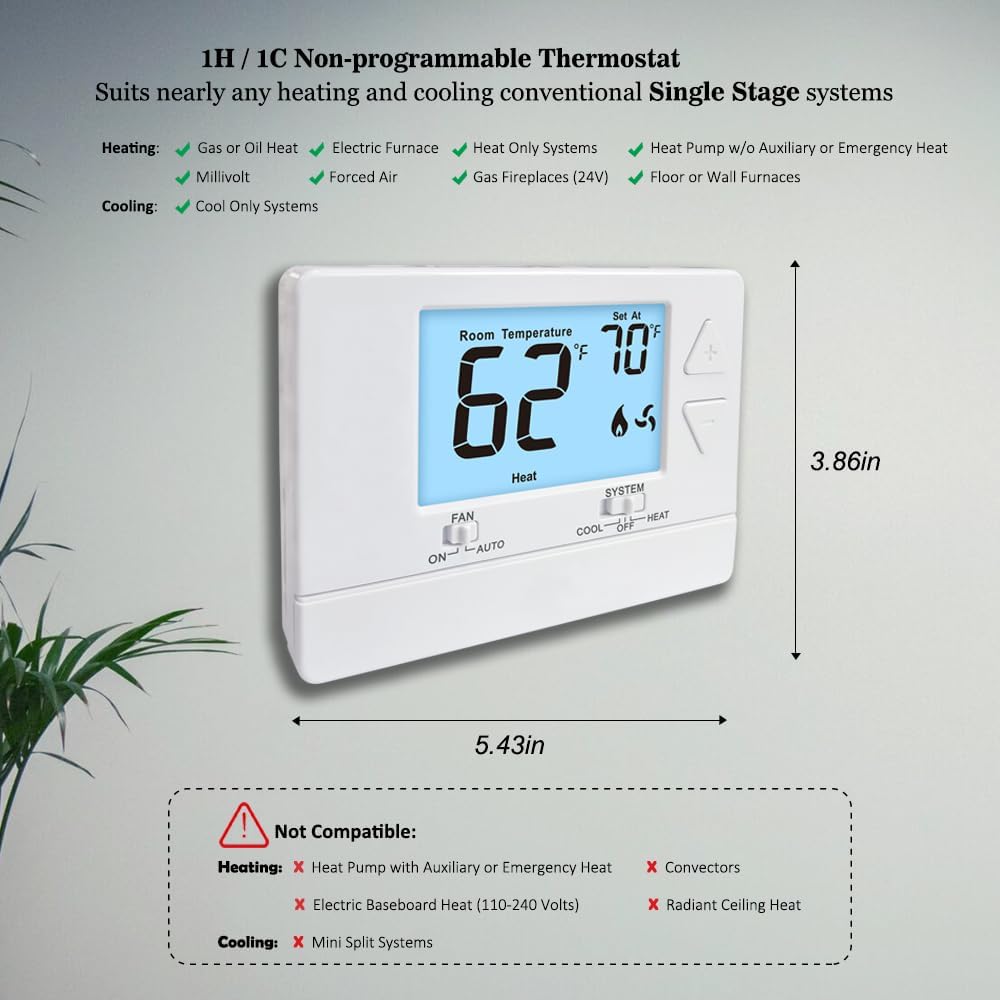
Image 3: Visual guide to compatible and incompatible HVAC systems for the S3001 thermostat.
5. Setup and Installation
Installation can typically be completed within 30 minutes. Follow these steps carefully.
5.1. Replacing Your Old Thermostat
- Turn off Power: Locate your heating/cooling system's circuit breaker or fuse box and turn off the power. Ensure the system is completely off before proceeding.
- Remove Old Thermostat: Carefully remove the cover of your old thermostat. Leave the wall plate with wires attached for now.
- Label Wires: Using the supplied cable labels, tag each wire according to its terminal designation on your old thermostat. This is crucial for correct re-installation.
- Mount New Wall Plate: Remove the old wall plate. Mount the new Riseem S3001 wall plate using the included screws and anchors. Ensure it is level.
- Connect Wires: Match the labeled wires from your system to the corresponding terminals on the new thermostat's wall plate. Refer to the wiring diagram below.

Image 4: Illustrated steps for replacing an existing thermostat with the Riseem S3001.
5.2. Wiring Diagram and Terminal Designations
Refer to the diagram below for proper wire connections. Ensure all connections are secure.
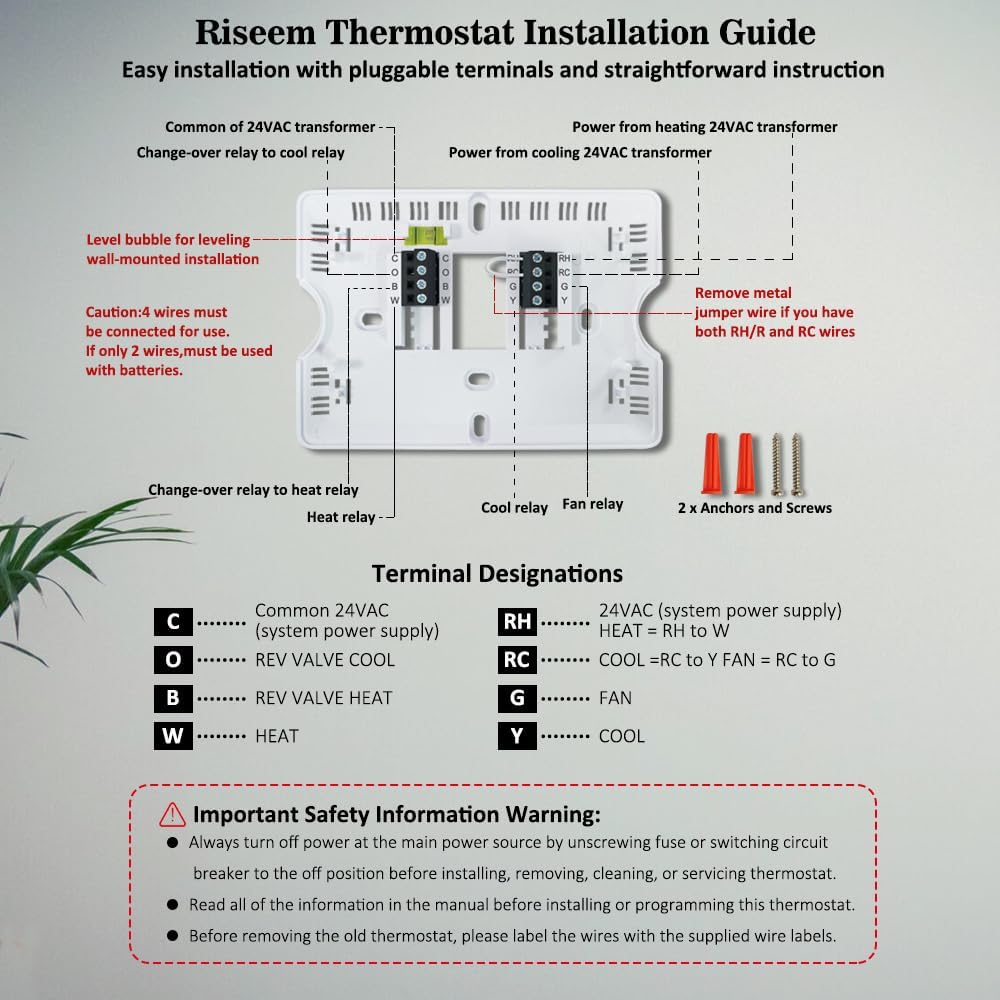
Image 5: Detailed wiring diagram and terminal designations for the Riseem S3001 thermostat. Includes C (Common 24VAC), O (REV VALVE COOL), B (REV VALVE HEAT), W (HEAT), RH (24VAC system power), RC (COOL), G (FAN), Y (COOL).
Terminal Designations:
- C: Common 24VAC (system power supply)
- O: Reversing Valve Cool
- B: Reversing Valve Heat
- W: Heat
- RH: 24VAC (system power supply) - HEAT = RH to W
- RC: COOL = RC to Y FAN = RC to G
- G: Fan
- Y: Cool
Note: If you have both RH and RC wires, remove the metal jumper wire on the thermostat base. If only 2 wires are used, the thermostat must be powered by batteries.
5.3. Powering the Thermostat (Battery Installation)
The S3001 thermostat can be powered by either 24VAC from your system (if a C-wire is connected) or by 2 x AA alkaline batteries (not supplied). If a C-wire is available, batteries provide a backup power source in case of a power outage.
- Open the easy-change battery door located at the bottom front of the thermostat.
- Insert two (2) new AA alkaline batteries, ensuring correct polarity (+/-).
- Close the battery door.

Image 6: The Riseem S3001 thermostat showing the battery compartment for 2x AA batteries.
6. Operating Instructions
The S3001 thermostat features a clear LCD display and simple push-button controls.
6.1. Display Overview
The LCD display shows the current room temperature, the set temperature, and the system mode (Heat/Cool/Off). A low battery indicator will appear when batteries need replacement.
6.2. Controls
- Temperature Adjustment Buttons (Up/Down Arrows): Use these buttons to increase or decrease the desired set temperature. The temperature set range is 44°F to 90°F (7°C to 32°C).
- FAN Switch (ON/AUTO):
- ON: The fan runs continuously.
- AUTO: The fan runs only when the heating or cooling system is actively operating.
- SYSTEM Switch (COOL/OFF/HEAT):
- COOL: The thermostat will activate your cooling system when the room temperature rises above your set temperature.
- OFF: The heating and cooling systems are turned off.
- HEAT: The thermostat will activate your heating system when the room temperature falls below your set temperature.
6.3. Advanced Settings (Cycle Rate / Swing)
The thermostat allows for adjustment of the heating and cooling swing (cycle rate or differential). This setting determines how much the temperature can vary from your set point before the system activates. Both heating and cooling swings are adjustable from 0.2°F to 2.0°F. The factory default setting is 0.5°F for cooling and 0.4°F for heating.
Consult the full operating manual (included in the box) for detailed instructions on adjusting these settings and for room temperature calibration.
7. Maintenance
7.1. Battery Replacement
When the low battery indicator appears on the display, replace the two AA alkaline batteries promptly to ensure continuous operation and prevent loss of settings. Refer to Section 5.3 for battery installation instructions.
7.2. Cleaning
To clean the thermostat, gently wipe the exterior with a soft, damp cloth. Do not use abrasive cleaners, solvents, or spray directly onto the thermostat. Ensure no moisture enters the internal components.
8. Troubleshooting
If you experience issues with your Riseem S3001 thermostat, consider the following common solutions:
- No Display/No Power: Check if the circuit breaker for your HVAC system is on. If using batteries, ensure they are new and correctly installed.
- System Not Responding (Heating/Cooling): Verify that the SYSTEM switch is set to the desired mode (HEAT or COOL) and not OFF. Check all wiring connections for looseness or corrosion. Ensure the set temperature is appropriately above (for cooling) or below (for heating) the current room temperature.
- Fan Not Operating: Check the FAN switch setting. If set to AUTO, the fan will only run when heating or cooling is active. If set to ON, the fan should run continuously.
- Inaccurate Temperature Reading: Ensure the thermostat is not exposed to direct sunlight, drafts, or heat sources that could affect its sensor.
- System Cycles Too Frequently/Infrequently: Adjust the heating and cooling swing (cycle rate) settings as described in Section 6.3.
If problems persist after checking these points, it is recommended to contact a qualified HVAC technician or Riseem customer support.
9. Specifications
| Brand | Riseem |
| Model Name | S3001 |
| Colour | White |
| Product Dimensions | 13.79 x 9.8 x 2.69 cm (5.43 x 3.86 x 1.06 inches) |
| Item Weight | 209 g (7.37 ounces) |
| Voltage | 24 Volts (AC) |
| Material | Plastic |
| Controller Type | Push Button |
| Temperature Control Type | Conventional Single Stage Systems |
| Connectivity Technology | Wired |
| Room Temperature Display Range | 32°F to 99°F (0°C to 40°C) |
| Temperature Set Range | 44°F to 90°F (7°C to 32°C) |
| Temperature Accuracy | +/- 1°F |
| Heating/Cooling Swing (Cycle Rate) | Adjustable 0.2°F to 2.0°F (Factory default: Cooling 0.5°F, Heating 0.4°F) |
| Power Supply | 24VAC or 2 x AA batteries (not included) |
| Special Features | Separate Heating and Cooling Swing (Cycle Rate), Low Battery Indicator |
10. Warranty and Support
Specific warranty information for the Riseem S3001 Non-Programmable Wall Thermostat is not provided within this manual. For details regarding warranty coverage, terms, and conditions, please refer to the documentation included with your purchase or contact Riseem customer support directly.
10.1. Customer Support
For technical assistance, troubleshooting beyond this guide, or inquiries about your product, please contact Riseem customer support through their official website or the contact information provided with your product packaging.