AKLFGN AKL-LDLT-002H-1_2-ZJT1_9
AKLFGN Freestanding Floor Mount Tub Faucet User Manual
Model: AKL-LDLT-002H-1_2-ZJT1_9
Introduction
This manual provides detailed instructions for the installation, operation, and maintenance of your AKLFGN Freestanding Floor Mount Tub Faucet. Please read this manual thoroughly before installation and use to ensure proper function and longevity of the product. Keep this manual for future reference.
The AKLFGN freestanding tub faucet features a 360° swivel spout and a handheld shower head with a 59-inch (150 cm) hose, designed for convenient bathtub filling and cleaning. Its robust construction and thoughtful design aim to provide a reliable and comfortable bathing experience.

Image: Main view of the AKLFGN Freestanding Floor Mount Tub Faucet, showcasing its matte black finish and sleek design.
Safety Information
Please observe the following safety precautions during installation and operation:
- Always turn off the main water supply before beginning any installation or maintenance work.
- Wear appropriate personal protective equipment, such as safety glasses and gloves, during installation.
- Ensure all connections are secure and watertight to prevent leaks.
- If you are unsure about any part of the installation process, consult a qualified plumber.
- Do not use abrasive cleaners or harsh chemicals on the faucet's finish, as this may cause damage.
Package Contents
Verify that all components are present before beginning installation:
- Freestanding tub faucet body
- Brass spout
- Handheld showerhead
- 59-inch (150 cm) shower hose
- Hot and cold water hoses
- Base cover
- Installation hardware (studs, nuts, washers)
- Brass tripod base
- Installation instructions (this manual)
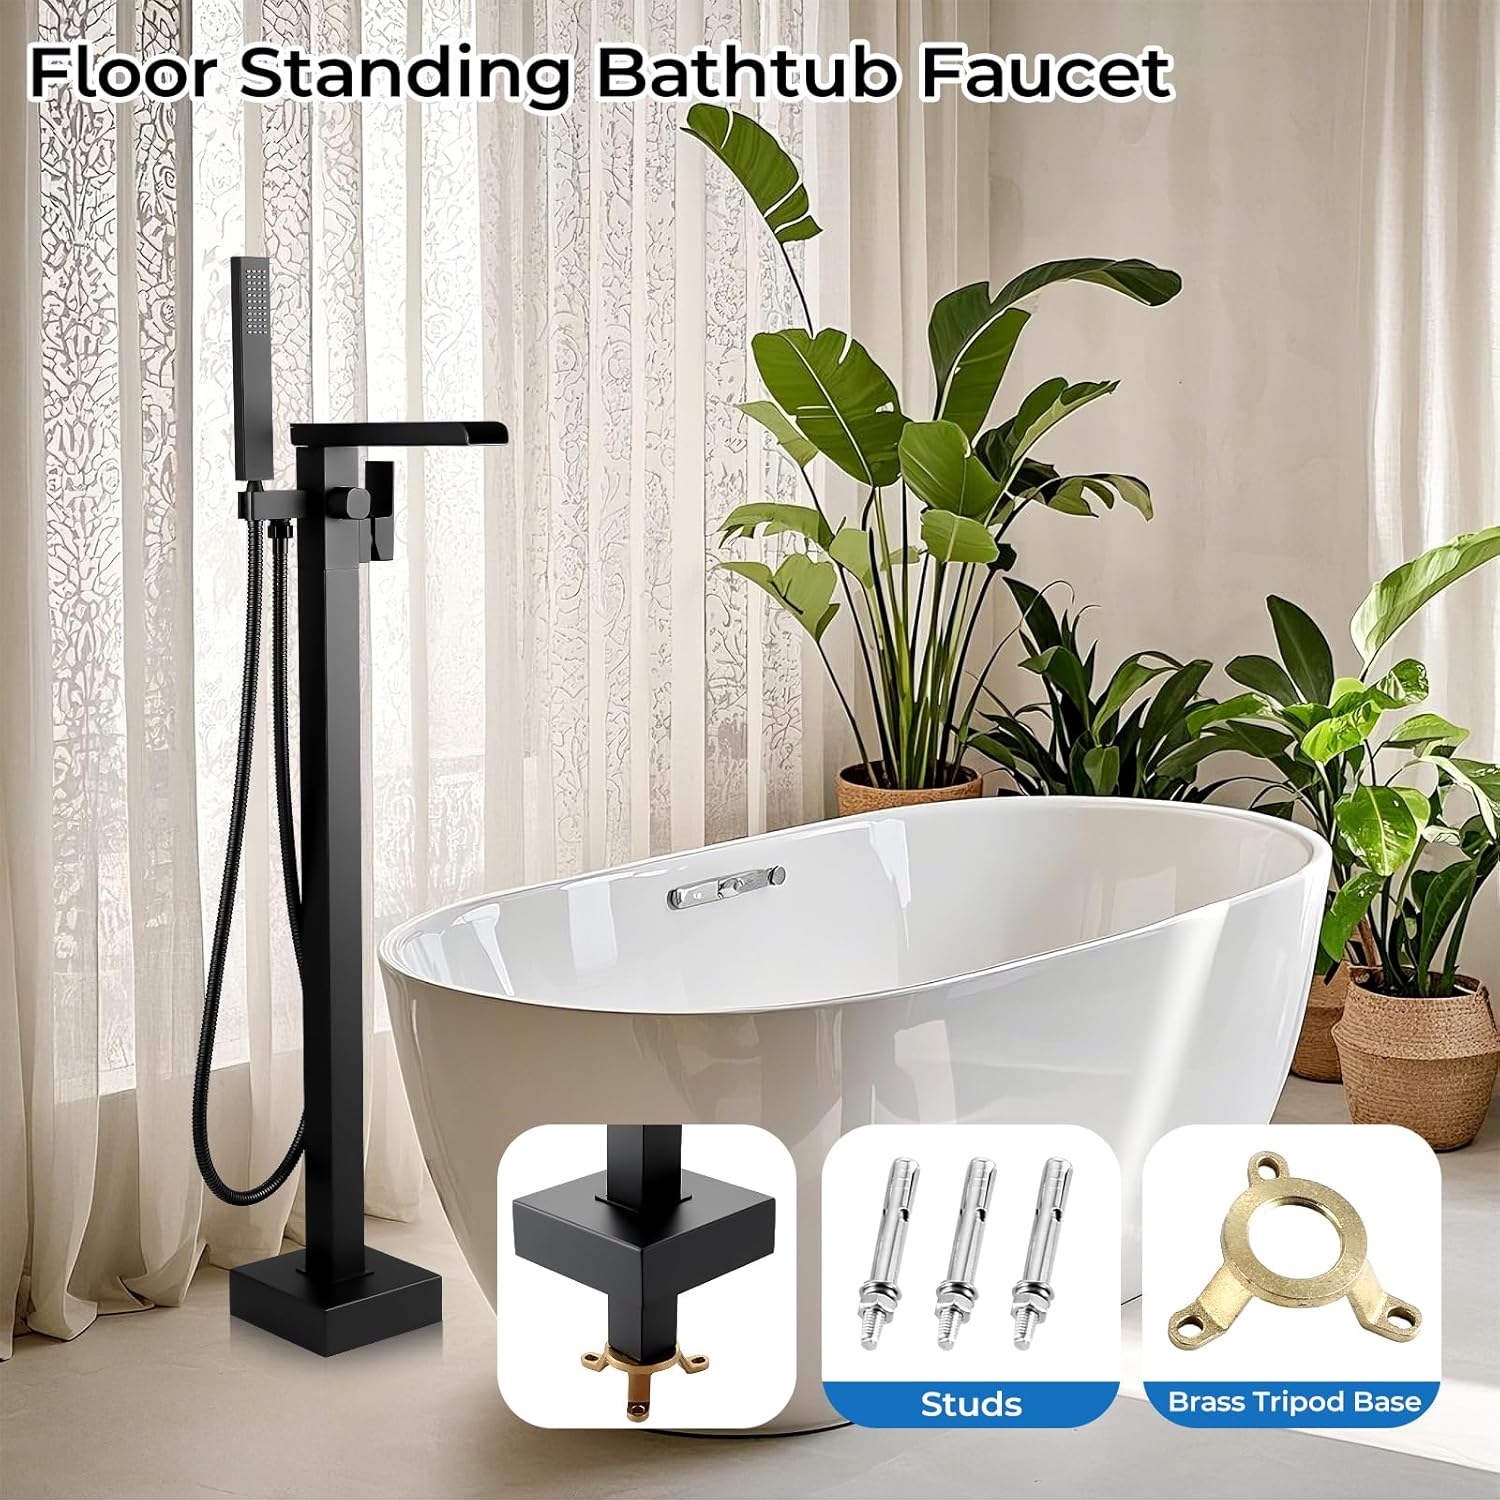
Image: Components included in the package, highlighting the main faucet body, mounting studs, and the brass tripod base for secure installation.
Specifications
| Feature | Detail |
|---|---|
| Brand | AKLFGN |
| Model Number | AKL-LDLT-002H-1_2-ZJT1_9 |
| Material | Brass |
| Finish Type | Brushed |
| Color | Matte Black |
| Number of Handles | 1 |
| Mounting Type | Free Standing |
| Spout Reach | 6.1 inches (approx. 15.5 cm) |
| Overall Height | 44.5 inches (approx. 113 cm) |
| Handheld Shower Hose Length | 59 inches (150 cm) |
| Water Pipe Thread | 1/2 inch (with 3/8 inch adapter included) |
| Item Weight | 11.95 pounds (approx. 5.42 kg) |
| Product Dimensions | 30.3 x 12.4 x 3.29 inches (approx. 77 x 31.5 x 8.4 cm) |

Image: Technical drawing illustrating the faucet's dimensions and the hot and cold water hose connections for installation.
Installation Guide
Professional installation is recommended. Ensure the main water supply is turned off before proceeding.
Tools and Materials (Not Included):
- Adjustable wrench
- Pipe sealant tape (Teflon tape)
- Drill (if required for floor mounting)
- Level
- Measuring tape
Installation Steps:
- Prepare the Installation Area: Ensure the floor where the faucet will be mounted is clean, level, and structurally sound. Identify the hot and cold water supply lines.
- Install the Brass Tripod Base: Position the brass tripod base over the water supply lines. Mark the drilling points on the floor. Drill holes if necessary and secure the tripod base to the floor using the provided studs and nuts. Ensure the base is level and firmly attached.
- Connect Water Hoses to Faucet Body: Attach the hot and cold water hoses to the corresponding inlets on the bottom of the faucet body. Use pipe sealant tape on the threads to ensure a watertight seal.
- Mount the Faucet Body: Carefully place the faucet body onto the secured brass tripod base, aligning the hoses with the openings. Secure the faucet body to the base using the provided hardware.
- Connect Water Supply Lines: Connect the hot and cold water hoses from the faucet to your home's hot and cold water supply lines. Use an adjustable wrench to tighten connections, ensuring not to overtighten. Apply pipe sealant tape as needed.
- Install Handheld Shower Head and Hose: Connect the shower hose to the designated outlet on the faucet body and then attach the handheld shower head to the other end of the hose.
- Test for Leaks: Slowly turn on the main water supply. Check all connections for leaks. If any leaks are detected, turn off the water supply, tighten the connections, and re-test.
- Install Base Cover: Once all connections are secure and leak-free, place the decorative base cover over the mounting hardware at the bottom of the faucet.
Operating Instructions
Your AKLFGN Freestanding Tub Faucet offers versatile functionality for your bathing needs.
Water Flow and Temperature Control:
- The single handle controls both water flow and temperature.
- Lift the handle to increase water flow.
- Move the handle to the left for hot water and to the right for cold water.

Image: Close-up of the single handle, indicating the direction for hot and cold water adjustment.
Diverter Function:
- The diverter knob allows you to switch water flow between the main waterfall spout and the handheld shower head.
- Rotate the knob to select your desired water outlet.
Waterfall Spout:
- The main spout provides a high-flow waterfall effect for rapid tub filling.
- The spout features a 360-degree swivel, allowing you to direct the water flow as needed.
Handheld Shower Head:
- The cylindrical handheld shower head is ideal for rinsing, cleaning the bathtub, or other tasks.
- The 59-inch (150 cm) hose provides ample reach.
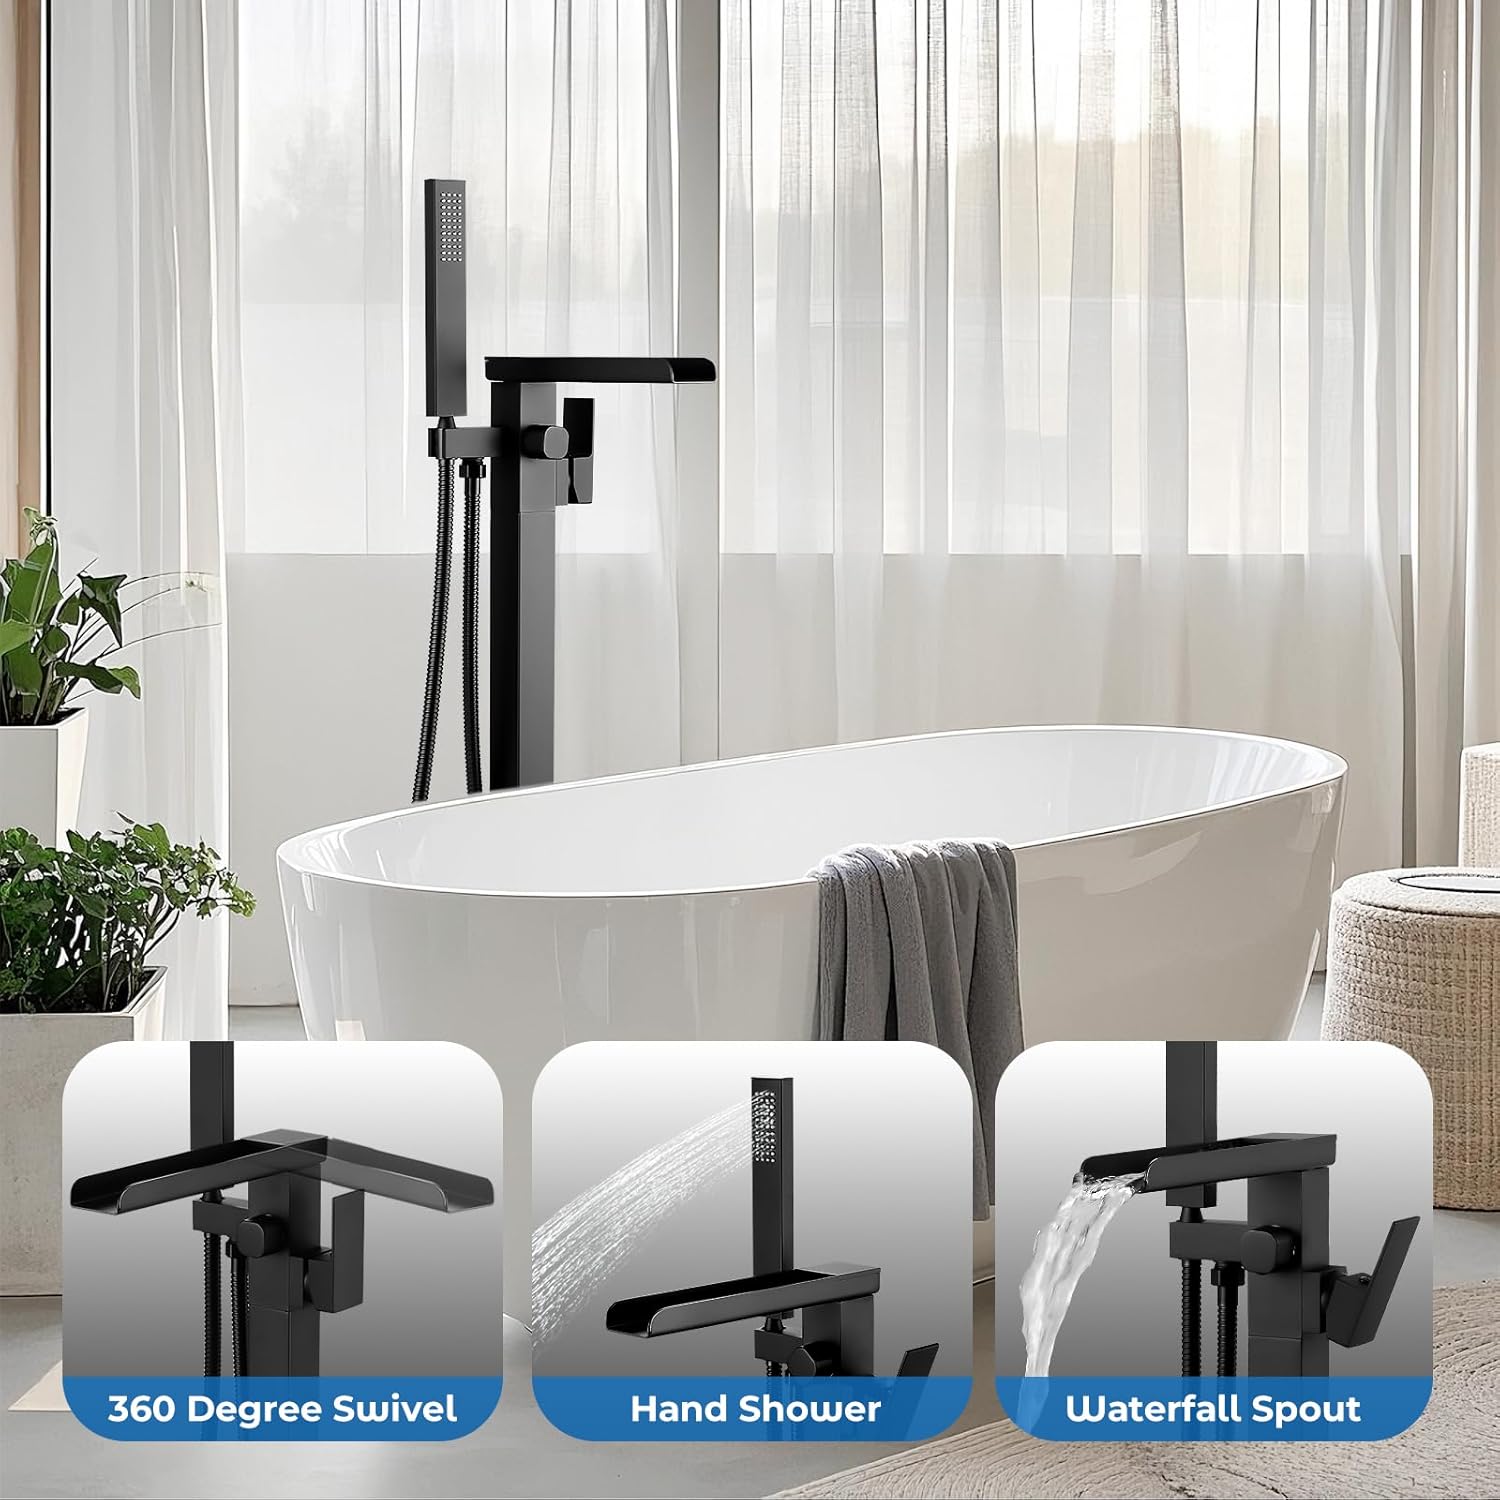
Image: Visual representation of the faucet's multi-functions, including the 360-degree swivel spout, the handheld shower, and the waterfall spout in action.

Image: Examples of practical applications for the handheld shower, such as assisting with bubble baths, pet washing, and general bathroom cleaning tasks.
Care and Maintenance
Proper care and maintenance will ensure the long-lasting durability and appearance of your faucet.
- Cleaning: Clean the faucet regularly with a soft cloth and mild soap or a non-abrasive cleaner specifically designed for bathroom fixtures. Rinse thoroughly with water and dry with a soft cloth to prevent water spots.
- Avoid Harsh Chemicals: Do not use abrasive cleaners, scouring pads, ammonia-based cleaners, or any products containing bleach, acids, or alcohol, as these can damage the finish.
- Finish Durability: The faucet is constructed from high-quality stainless steel with a multi-layer electroplated finish, salt spray tested to withstand humid bathroom environments. Regular gentle cleaning is sufficient to maintain its appearance.
- Aerator Maintenance: Periodically check and clean the aerator (if applicable) to remove any mineral buildup that may affect water flow.
Troubleshooting
If you encounter any issues with your faucet, refer to the following common problems and solutions:
| Problem | Possible Cause | Solution |
|---|---|---|
| Low Water Flow | Clogged aerator; partially closed shut-off valve; kinked hose. | Clean the aerator; ensure shut-off valves are fully open; check and straighten hoses. |
| Leaks at Connections | Loose connections; worn washers/O-rings; insufficient pipe sealant tape. | Tighten connections; replace washers/O-rings; reapply pipe sealant tape. |
| Water Temperature Issues | Incorrect hot/cold supply connections; water heater issues. | Verify hot and cold lines are connected correctly; check water heater settings. |
| Diverter Not Switching | Debris in diverter mechanism; faulty diverter. | Flush the system to clear debris; if issue persists, contact customer support. |
If the problem persists after attempting these solutions, please contact customer support.
Warranty and Customer Support
AKLFGN stands by the quality of its products. If you have any questions, concerns, or require assistance with your freestanding tub faucet, please do not hesitate to reach out to our customer support team. We are committed to providing support and ensuring your satisfaction.
For support, please refer to the contact information provided at the point of purchase or visit the official AKLFGN website.
Related Documents - AKL-LDLT-002H-1_2-ZJT1_9
 |
EndeavorRx Instructions for Use: Digital Therapeutic for Pediatric ADHD Comprehensive instructions for using EndeavorRx, a prescription-only digital therapeutic for pediatric Attention Deficit Hyperactivity Disorder (ADHD). Learn about indications, usage, compatible devices, clinical research, and support. |
 |
EndeavorRx Instructions for Use: Digital Therapeutic for Pediatric ADHD Comprehensive guide to EndeavorRx, a prescription-only digital therapeutic for pediatric ADHD. Learn about its indications, usage, core technologies, clinical research, and safety information. |
 |
Autel MaxiIM Toyota 8A Blade Key All Keys Lost Operation Guide Comprehensive operation guide for using the Autel MaxiIM tool to program a Toyota 8A Blade Key when all keys are lost. Includes steps, tools needed, and diagrams for a 2016 Toyota Camry. |
 |
Audi A3 1997 Workshop Manual: Fuel Supply System (Petrol Engines) Detailed workshop manual for the Audi A3 1997, focusing on the petrol engine's fuel supply system. Covers general repair, fuel tank, delivery unit, and sender maintenance with exploded views and diagnostic procedures. |
 |
XTOOL Ford/Lincoln AKL Alarm Bypass Cable: Grand Updates & Operation Guide Comprehensive guide to the XTOOL Ford/Lincoln AKL Alarm Bypass Cable, covering functions, connection, supported models, compatible devices, and a detailed operation process for key programming on Ford and Lincoln vehicles. |
 |
XTOOL 2015+ Ford Proximity All Key Lost Alarm Bypass Cable This document details the XTOOL 2015+ Ford Proximity All Key Lost Alarm Bypass Cable, designed for performing all key lost procedures on Ford and Lincoln vehicles. It outlines the functions, connection steps, supported models, compatible XTOOL devices, and a detailed operation process for reading EEPROM data. |
Ask a question about this manual
Ask about setup, troubleshooting, compatibility, parts, safety, or missing instructions. Manuals+ will review the question and use this page’s manual context to help answer it.