1. Introduction
Thank you for purchasing the WLIVE PLCT038 Lift Top Coffee Table with Storage. This manual provides detailed instructions for assembly, operation, maintenance, and troubleshooting to ensure safe and efficient use of your new furniture. Please read this manual thoroughly before assembly and retain it for future reference.
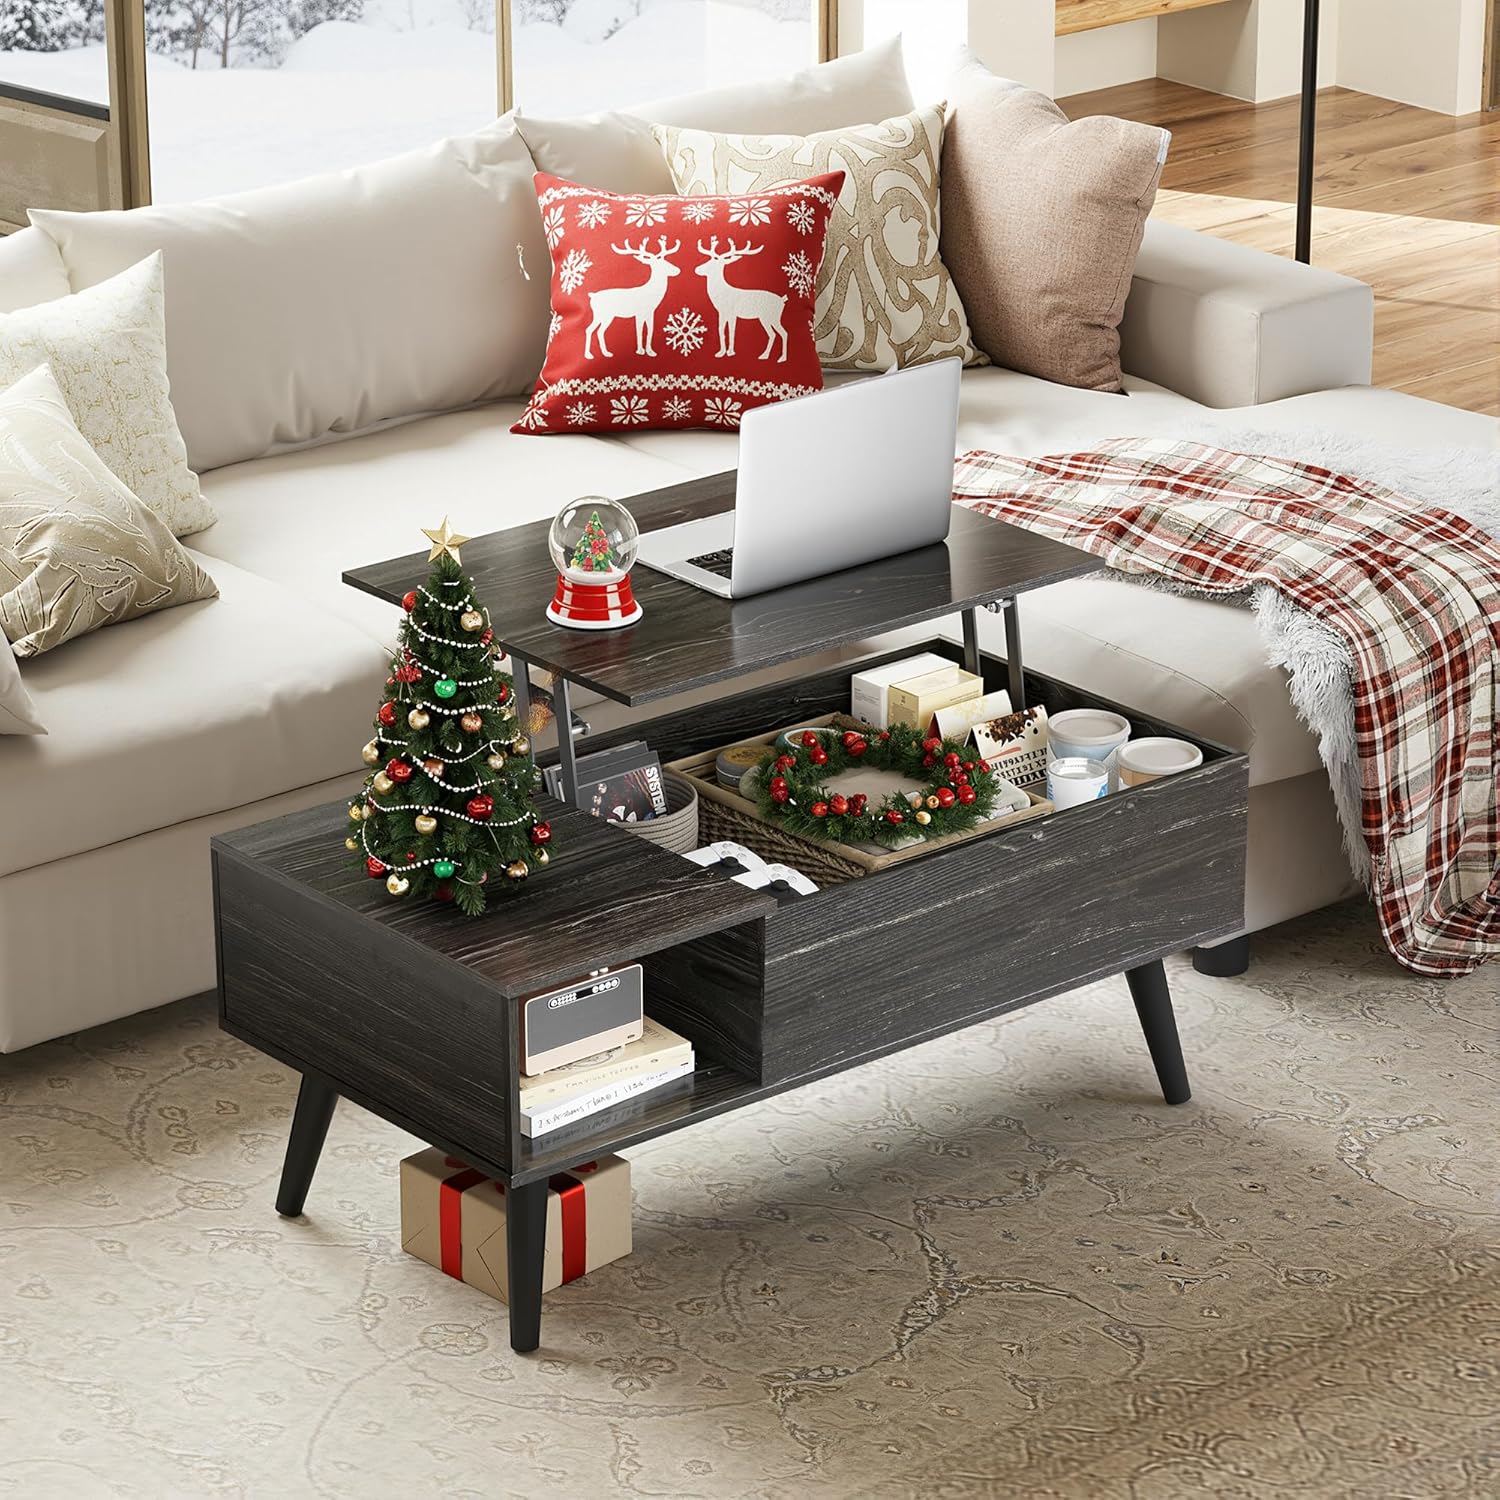
Image 1.1: The WLIVE PLCT038 Lift Top Coffee Table in a living room, showcasing its versatile lift-top feature and hidden storage.
2. Safety Information
- Caution: Keep fingers away from the lift-top mechanism when in use to prevent injury.
- Keep small children and pets away from the assembly area to prevent accidents with small parts.
- Ensure all screws and fasteners are securely tightened before use. Periodically check and re-tighten as necessary.
- Do not overload the table or the storage compartments. Refer to specifications for weight limits.
- Place the table on a flat, stable surface to prevent tipping.
- Avoid standing or sitting on the lift-top section when it is raised.
3. Parts List
Before beginning assembly, please verify that all parts and hardware are present and undamaged. Refer to the assembly video for a visual guide to all components.

Image 3.1: Exploded view of the WLIVE PLCT038 coffee table components and hardware.
Hardware (Refer to Assembly Video for detailed counts):
- Cam Bolts (A)
- Wooden Dowels (B)
- Cam Locks (C)
- Screws (D, E)
- Leg Mounting Plates (F)
- Table Legs (G)
- Left Lift Mechanism (H)
- Right Lift Mechanism (I)
- Floor Protector Pads (J)
- Wrench (K)
- Allen Key (L)
- Wood Plugs (M)
Wooden Panels (Refer to Assembly Video for detailed counts):
- Main Tabletop (1)
- Side Tabletop (2)
- Side Panel (3)
- Front Panel (4)
- Back Panel (5)
- Bottom Panel (6)
- Storage Box Side Panels (7)
4. Assembly Instructions
Assembly typically takes approximately 30 minutes. It is recommended to have a screwdriver (not included) in addition to the provided tools. Follow the steps carefully.
Video 4.1: Official WLIVE Coffee Table Assembly Instruction Video. This video provides a step-by-step visual guide for assembling your coffee table.
Step-by-Step Guide:
- Prepare Panels: Insert Cam Bolts (A) into the designated holes on panels (2, 6).
- Connect Panels: Insert Wooden Dowels (B) into panels (3, 4, 5).
- Attach Lift Mechanisms: Secure the Left Lift Mechanism (H) and Right Lift Mechanism (I) to panels (4 and 5) using Screws (E). Ensure correct orientation.
- Assemble Base: Attach panels (4 and 5) to the bottom panel (1) using Screws (E) and the provided Wrench (K).
- Form Storage Box: Connect the remaining side panels (6) to complete the main storage box structure using Cam Locks (C).
- Attach Top Panel: Secure the main tabletop (7) to the lift mechanisms using Screws (D) and the Allen Key (L).
- Install Side Shelf: Attach the side panel (3) and side tabletop (2) to the main structure using Cam Locks (C) and Wood Plugs (M).
- Attach Legs: Secure the Leg Mounting Plates (F) to the underside of the table using Screws (E). Then, screw in the Table Legs (G) into the mounting plates.
- Apply Floor Protectors: Place Floor Protector Pads (J) on the bottom of each leg.
- Final Check: Ensure all connections are tight and the table is stable.
If you encounter any difficulties during assembly, please refer to the assembly video or contact customer support.
5. Operating Instructions
Lift-Top Mechanism:
- To raise the tabletop: Gently pull the main tabletop upwards and forward. The high-quality steel lift mechanism will smoothly extend, allowing the tabletop to reach a height of 22.7 inches from its original 16.9 inches.
- To lower the tabletop: Gently push the tabletop downwards and backward. Guide it slowly until it rests securely in its closed position.
- The mechanism is designed for smooth and silent operation, preventing sudden drops and ensuring safety.

Image 5.1: Demonstrating the lift-top design, transforming from a standard coffee table to a functional office or dining surface.
Storage Compartments:
- Hidden Compartment: The area beneath the lift-top provides a spacious, hidden storage compartment. Ideal for magazines, laptops, remote controls, and snacks, keeping them dust-free and out of sight.
- Side Shelf: The open side shelf offers additional storage or display space for books, decorative items, or small electronic devices.

Image 5.2: The spacious hidden storage compartment and side shelf, perfect for organizing living room essentials.
6. Maintenance
- Cleaning: Wipe the table surface with a soft, damp cloth. Avoid harsh chemicals or abrasive cleaners, which can damage the engineered wood finish.
- Spills: Promptly clean up any spills to prevent staining or water damage.
- Stability Check: Periodically check all screws and fasteners to ensure they remain tight. Re-tighten if necessary to maintain stability.
- Mechanism Care: The lift mechanism is designed for durability. Avoid forcing it or applying excessive weight. Lubrication is generally not required, but if movement becomes stiff, a silicone-based lubricant can be applied sparingly to moving parts.
- Sunlight Exposure: Avoid prolonged exposure to direct sunlight, which can cause fading or warping of the wood finish.

Image 6.1: The durable wooden textured board is designed for easy cleaning and resistance to wear.
7. Troubleshooting
| Problem | Possible Cause | Solution |
|---|---|---|
| Table is wobbly or unstable. | Loose screws or uneven floor. | Check and tighten all assembly screws. Ensure the table is on a flat surface. Adjust floor protector pads if necessary. |
| Lift-top mechanism is stiff or noisy. | Lack of lubrication or minor misalignment. | Ensure no obstructions. Apply a small amount of silicone-based lubricant to the moving joints of the lift mechanism. |
| Parts do not align during assembly. | Incorrect orientation of parts or manufacturing variance. | Double-check the assembly video and diagrams for correct part orientation. If parts are genuinely misaligned, contact customer support for assistance. |
| Missing hardware or damaged parts. | Packaging error or transit damage. | Review the parts list carefully. Contact WLIVE customer support immediately with details of the missing or damaged items. |
8. Specifications
| Feature | Detail |
|---|---|
| Brand | WLIVE |
| Model Name | PLCT038 |
| Product Dimensions (D x W x H) | 39.37"D x 19.69"W x 16.73"H |
| Frame Material | Engineered Wood |
| Top Material Type | Engineered Wood |
| Color | Black Oak |
| Table Design | Coffee Table (Lift Top) |
| Number of Height Positions | 2 (16.9 inches to 22.7 inches) |
| Number of Shelves | 3 (1 hidden, 2 open) |
| Tools Recommended For Assembly | Screwdriver (not included), Wrench, Allen Key (included) |
| Table Surface Weight Capacity (not lifted) | 200 lbs (approximate, based on image) |
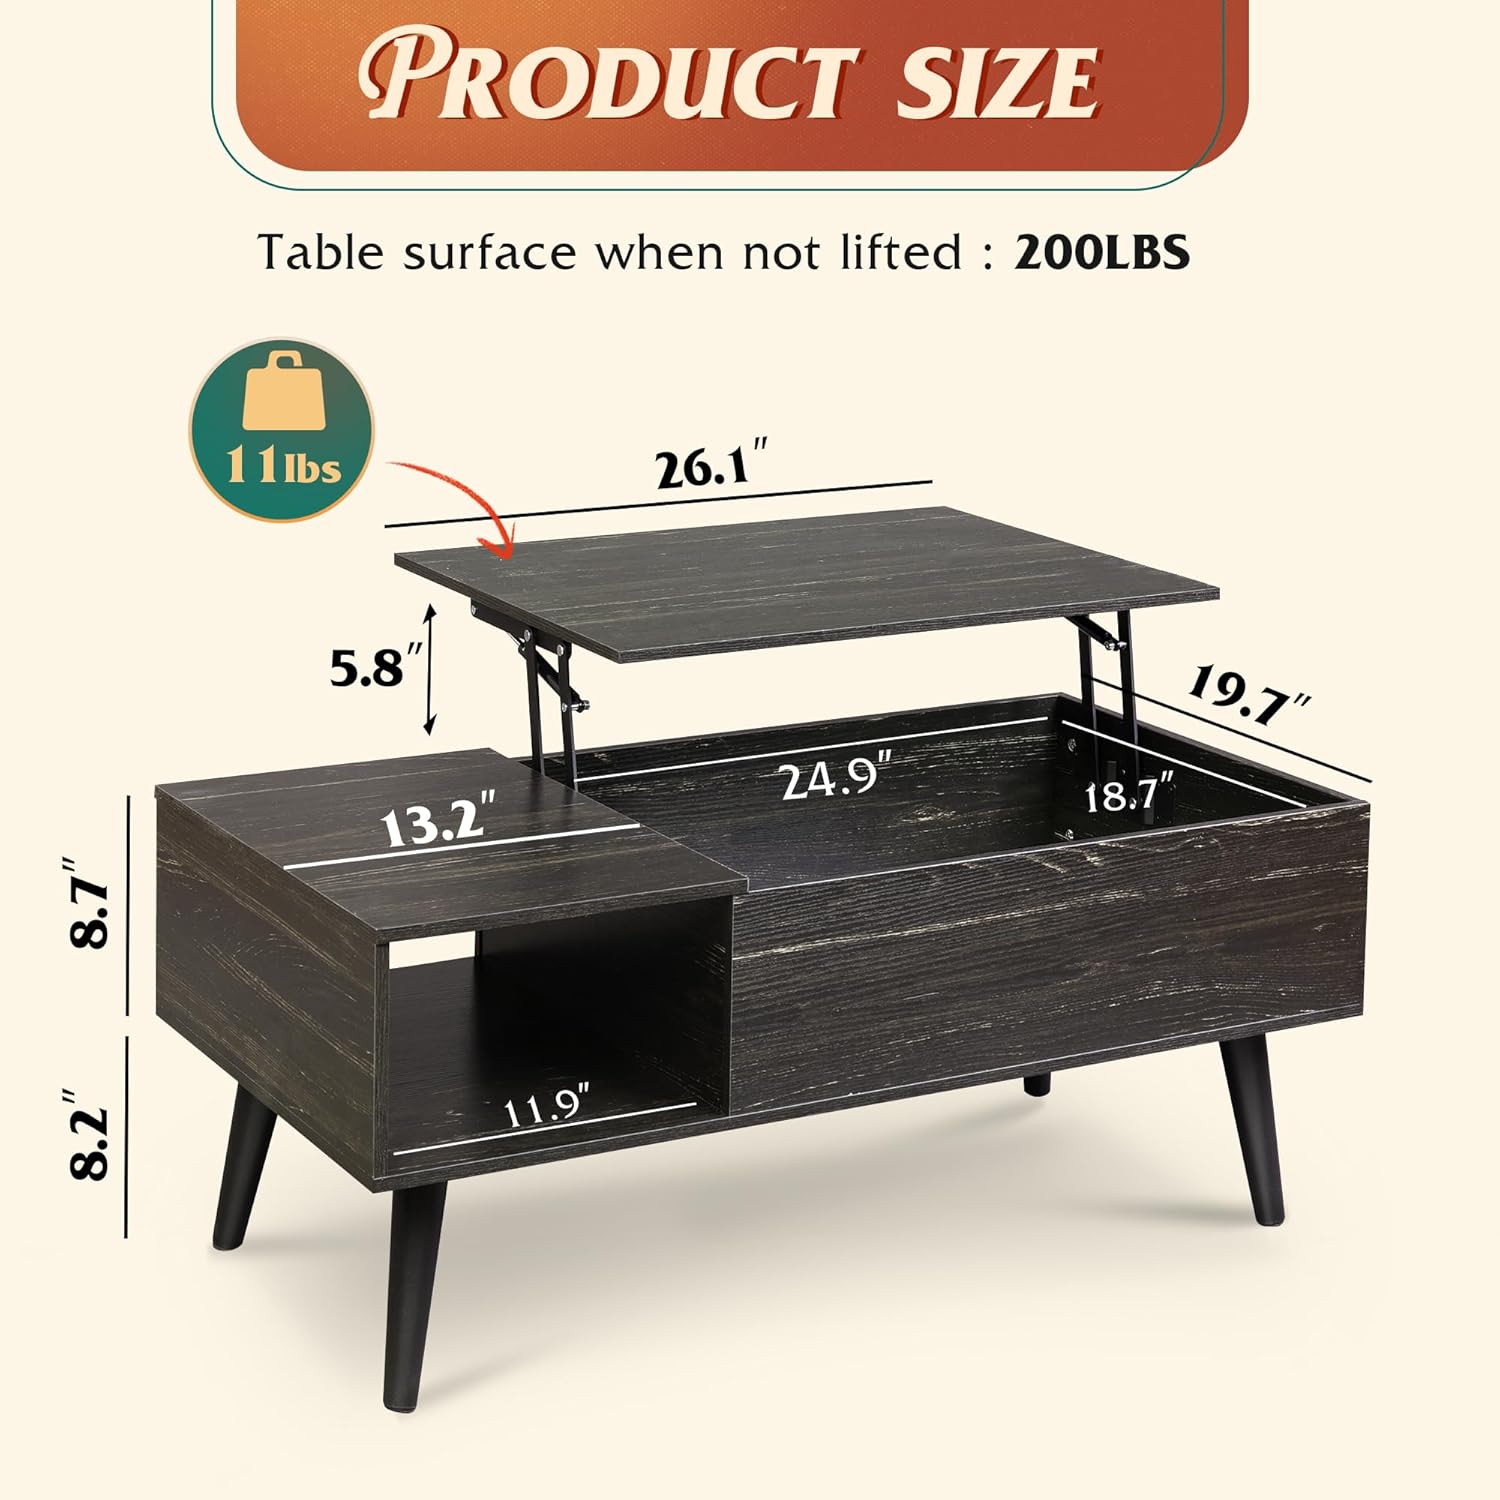
Image 8.1: Detailed product dimensions and weight capacity for the WLIVE PLCT038 coffee table.
9. Warranty & Customer Support
WLIVE is committed to providing high-quality products and excellent customer service. While specific warranty details are not provided in this document, please retain your proof of purchase.
For any questions, concerns, missing parts, or assistance with assembly or operation, please contact WLIVE customer support directly. You can typically find contact information on the product packaging or through the retailer where you purchased the item.
WLIVE Customer Service: Refer to your purchase documentation or the WLIVE official website for the most current contact information.