1. Introduction
The KGKGK VF-6900 is a high-definition digital satellite finder designed for precise installation and alignment of satellite dishes. It supports DVB-S and DVB-S2 standards, including MPEG-2 and MPEG-4 (H.264) decoding. Featuring a 3.5-inch TFT LCD, it provides real-time signal strength, quality, and spectrum analysis. This device also includes capabilities for CCTV camera testing (AHD, TVI, CVI HD) and media playback, making it a versatile tool for satellite and surveillance system technicians.
2. Product Overview
2.1 Key Features
- Supports DVB-S/S2, MPEG-2, MPEG-4, H.264 transmission standards.
- Input Frequency: 950-2150 MHz.
- Signal Input Level: -65dBm to -25dBm.
- LNB Switching Control: 22KHz, DiSEqC 1.0/1.1/1.2/USALS.
- LNB Supply: 13V/18V, IMAX 400mA.
- Demodulation Type: QPSK, 8PSK.
- Symbol Rate: 2 Mbps to 45 Mbps.
- 3.5-inch TFT Transmissive LCD with 320(RGB)*240 resolution.
- AHD input interface (BNC Jack) for AHD, TVI, CVI HD Camera Display.
- AV output/input interface (3.5mm Jack) for CVBS video and stereo audio.
- USB2.0 interface for data management and software upgrades.
- File management system supports NTFS, FAT32, FAT16.
- Media playback for WMA, MP3, MP4, AVI, JPG, JPEG, BMP, IMG files.
- Built-in 7.4V/4000mAH Li-lon Battery.
2.2 Components
The VF-6900 unit includes the main satellite finder device and several accessories to facilitate its use.
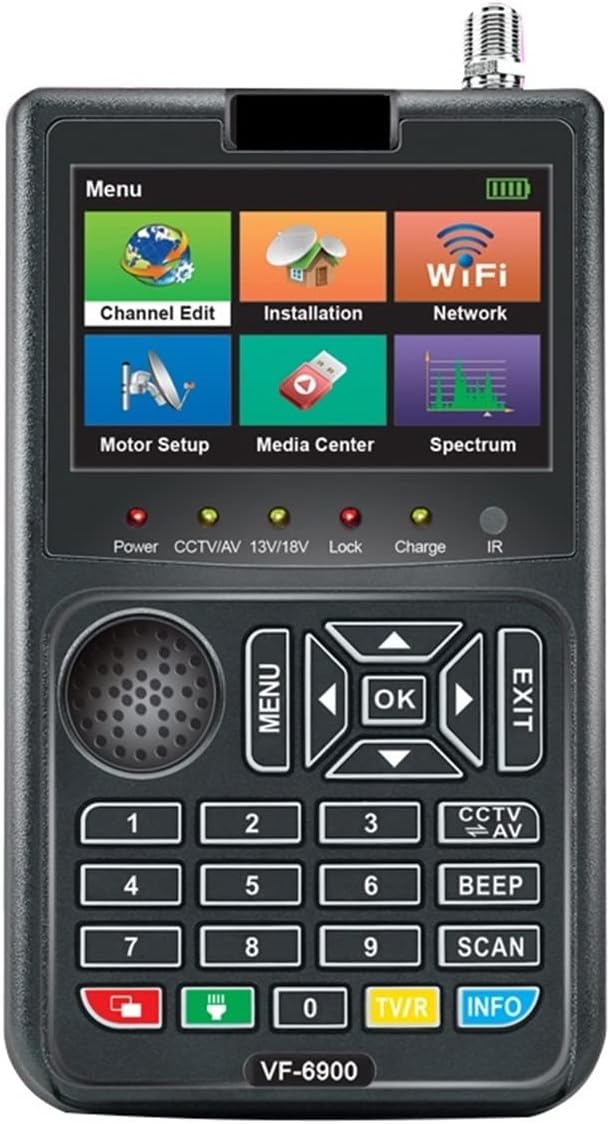
Figure 1: Front View of the VF-6900. This image displays the device's front panel, featuring the 3.5-inch color LCD screen at the top, showing a menu with icons for 'Channel Edit', 'Installation', 'WiFi', 'Motor Setup', 'Media Center', and 'Spectrum'. Below the screen are indicator lights for 'Power', 'CCTV/AV', '13V/18V', 'Lock', 'Charge', and 'IR'. The lower section includes a speaker grille, a 'MENU' button, directional navigation buttons with an 'OK' button in the center, an 'EXIT' button, and a numeric keypad (0-9) along with 'SCAN', 'CCTV/AV', 'BEEP', 'TV/R', and 'INFO' function buttons.

Figure 2: Side View of the VF-6900. This image illustrates the side of the device, revealing various input/output ports. These typically include the LNB input (F-type connector), power input, USB port, and AV input/output jacks.

Figure 3: Back View of the VF-6900. The back panel of the device features a label detailing key specifications such as 'Power Input: DC12V 2A', 'DVB-S Input Frequency: 950-2150MHz', 'Input Impedance: 75Ω', 'Upgrade S/W by USB', and 'Li-Ion Battery (7.4V/2600mAH)'. A speaker grille is also visible.

Figure 4: Included Accessories. This image shows the accessories that come with the VF-6900, which typically include a protective carrying case with a shoulder strap, a car charger, a standard power adapter, and AV cables for connecting to external displays or cameras.
3. Setup
3.1 Charging the Device
- Connect the provided DC12V/1.5A power adapter to the device's DC input port.
- Plug the adapter into a standard AC power outlet (100-240VAC, 50/60Hz).
- The 'Charge' indicator light on the front panel will illuminate, indicating that the internal 7.4V/4000mAH Li-lon battery is charging.
- Allow the device to charge fully before first use for optimal battery life.
3.2 Initial Power On
- Ensure the device is sufficiently charged or connected to the power adapter.
- Press and hold the power button (usually located on the side or top) until the LCD screen illuminates.
- The device will boot up and display the main menu.
4. Operating Instructions
4.1 Satellite Signal Finding
- Connect LNB: Connect the LNB cable from your satellite dish to the F-type input connector on the VF-6900.
- Access Installation Menu: From the main menu, navigate to and select 'Installation'.
- Select Satellite: Choose the desired satellite from the list. If not present, you may need to add or edit satellite parameters.
- Configure LNB Settings: Adjust LNB type, frequency, and DiSEqC settings (1.0/1.1/1.2/USALS) as required for your setup. The device provides 13V/18V LNB supply.
- Adjust Dish: Slowly adjust the azimuth and elevation of your satellite dish while observing the signal strength and quality indicators on the VF-6900's screen. The 'Lock' indicator will illuminate when a signal is acquired.
- Optimize Signal: Fine-tune the dish position to achieve the highest possible signal strength and quality. The device supports QPSK and 8PSK demodulation and displays signal levels from -65dBm to -25dBm.
- Spectrum Analysis: Use the 'Spectrum' function to visualize the signal spectrum and identify potential interference or optimize signal reception.
4.2 CCTV Camera Testing (AHD/TVI/CVI)
- Connect Camera: Connect your AHD, TVI, or CVI HD camera to the BNC Jack AHD input interface on the VF-6900.
- Select CCTV/AV Mode: Press the 'CCTV/AV' button or navigate to the corresponding menu option.
- View Feed: The camera's video feed will be displayed on the 3.5-inch TFT LCD screen.
4.3 AV Output/Input
- AV Output: Connect the 3.5mm Jack AV output to an external display (e.g., TV monitor) to view the satellite signal or camera feed on a larger screen. The output provides CVBS video and stereo voice (L/R).
- AV Input: Connect an external video source to the 3.5mm Jack AV input to display its content on the VF-6900's screen.
4.4 Media Playback
- Connect USB Drive: Insert a USB flash drive containing media files into the USB port.
- Access Media Center: From the main menu, select 'Media Center'.
- Browse Files: Navigate through your files. The device supports WMA, MP3, MP4, AVI, JPG, JPEG, BMP, and IMG formats.
- Play Media: Select a file to play it on the device's screen.
5. Maintenance
- Cleaning: Use a soft, dry cloth to clean the device's exterior. Do not use liquid cleaners or solvents.
- Screen Care: Gently wipe the LCD screen with a microfiber cloth. Avoid pressing hard or using abrasive materials.
- Battery Care: To prolong battery life, avoid fully discharging the battery frequently. Recharge the device regularly, even if not in use for extended periods. Store in a cool, dry place.
- Storage: When not in use, store the device in its protective carrying case to prevent damage from dust and impacts.
- Software Updates: Periodically check the manufacturer's website for software updates. Updates can be performed via the USB port.
6. Troubleshooting
- Device does not power on:
- Ensure the battery is charged. Connect the power adapter and check if the 'Charge' indicator lights up.
- Verify the power adapter is correctly connected to a working power outlet.
- No satellite signal detected:
- Check all cable connections between the LNB, satellite dish, and the VF-6900. Ensure F-type connectors are tight.
- Verify that the correct satellite and LNB settings are selected in the 'Installation' menu.
- Ensure the LNB is receiving power (13V/18V indicator should be on).
- Adjust the satellite dish azimuth and elevation slowly.
- Check for obstructions between the dish and the satellite.
- Poor signal quality:
- Fine-tune the dish alignment. Even small adjustments can significantly improve quality.
- Check the LNB for damage or misalignment.
- Inspect cables for damage or corrosion.
- CCTV camera image not displayed:
- Ensure the camera is properly connected to the BNC AHD input.
- Verify the camera is powered on and functioning correctly.
- Confirm the camera type (AHD, TVI, CVI) is compatible with the VF-6900's input capabilities.
- USB media files not playing:
- Ensure the USB drive is properly inserted.
- Check that the file format is supported (WMA, MP3, MP4, AVI, JPG, JPEG, BMP, IMG).
- Verify the USB drive's file system (NTFS, FAT32, FAT16).
7. Specifications
| Feature | Specification |
|---|---|
| Transmission Standards | DVB S/S2 MPEG-2 MPEG-4, H.264 |
| Input Frequency | 950-2150 MHz |
| Signal Input Level | -65dBm to -25dBm |
| Connector Type | F-TYPE |
| LNB Switching Control | 22KHz DiSEqC 1.0/1.1/1.2/USALS |
| LNB Supply | 13V/18V, IMAX 400mA |
| Demodulation Type | QPSK, 8PSK |
| Symbol Rate | 2 Mbps ~ 45 Mbps |
| LCD Type | TFT Transmissive |
| Number of Dots | 320(RGB)*240 |
| Active Area (W*H) | 70.02*52.58 mm² |
| AHD Input Interface | BNC Jack (AHD&TVI CVI HD Camera Display) |
| AV Output Interface | 3.5mm Jack (CVBS Video, Stereo Voice L/R) |
| AV Input Interface | 3.5mm Jack (CVBS Video, Stereo Voice L/R) |
| Data Service Port | USB2.0 interface |
| File Management System | NTFS, FAT32, FAT16 |
| Supported File Formats | WMA, MP3, MP4, AVI, JPG, JPEG, BMP, IMG |
| Li-lon Battery | 7.4V/4000mAH |
| Power DC OUT | OUTPUT: DC12V/1.5A |
| Adapter Input | 100-240VAC 50/60HZ |
| Power Consumption | Max. 10W |
| Package Dimensions | 1.18 x 0.79 x 0.39 inches |
| Item Weight | 1.76 ounces |
| Item Model Number | 204681705 |
| Manufacturer | KGKGK |
8. Warranty and Support
For warranty information and technical support, please refer to the documentation provided with your purchase or contact KGKGK customer service directly. Specific warranty terms may vary by region and retailer.