
1. Introduction
The mGYDY KT LCD3U LCD Display Instrument is designed for electric bicycles, providing essential riding data and control functions. This manual guides you through its setup, operation, and maintenance to ensure optimal performance and longevity.
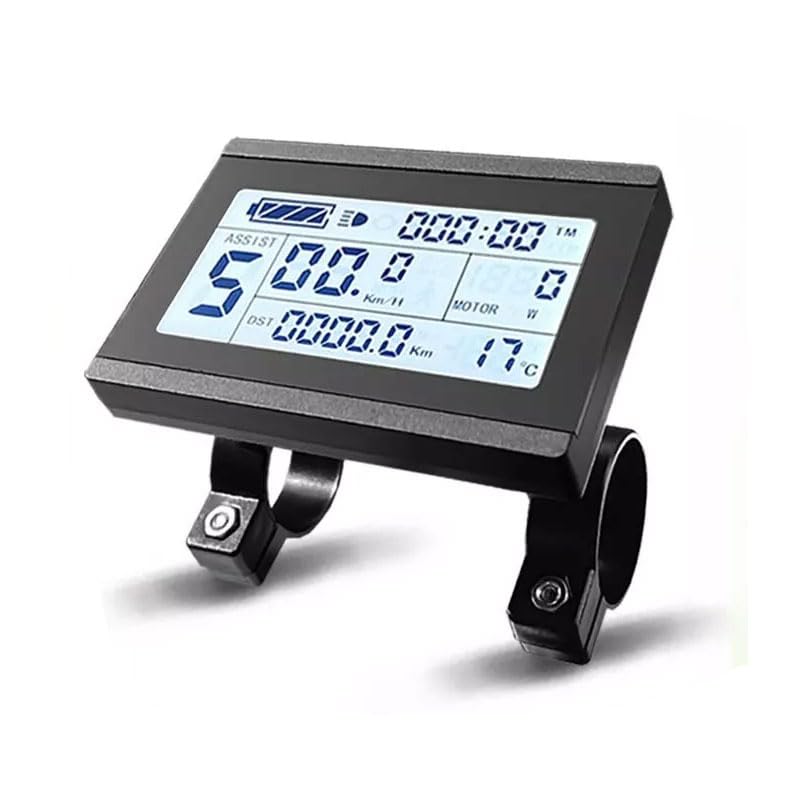
Figure 1: The mGYDY KT LCD3U LCD Display Instrument. This image shows the front view of the display unit, highlighting its screen and control buttons.
2. Product Features
- Data Display: Shows riding speed, unique and accumulated mileage, riding time, power-assist gear, motor power and temperature, battery voltage and charge status, braking status, and ambient temperature.
- Intelligent Power: Provides a true reflection of battery charge and real-time recording of power consumption to ensure accurate riding mileage estimates.
- Gear Configuration: Features multi-gear switching and automatic saving of the power-assist gear. It can restore the power-off gear state when turned on.
- Parameter Setting: Offers various user parameter setting functions for motor, velocity measurement, speed-limit, power, power-assist control, minimum controller voltage, and maximum current.
- Data View: Users can view historical driving data, including single or cumulative riding time, mileage, maximum speed, and average speed. Data can be cleared as needed.
- Vehicle Servo Actuator: Includes a 6KM/h boosting function, indicated by a flashing sign during activation, to assist the rider.
- Cruising and Constant Speed: Through configuration, the vehicle's speed can be automatically maintained for constant speed riding.
- Night Driving: Equipped with a backlight LCD display and a front light switch control function for visibility during night rides.
- Password Setting: Allows for a three-digit power-on password for enhanced security.
- Automatic Warning: Generates different failure warnings for vehicle inspection and maintenance. Includes a temperature display function for motor over-temperature alarm and protection.
- Communication: Utilizes five-line digital communication, ensuring good compatibility and interchangeability with other instruments, allowing direct parameter copying.
- Compatibility: This product is designed to be used exclusively with KT controllers.
3. Package Contents
Verify that all the following items are included in your package:
- 1 x KT LCD3U Instrument
- 1 x Mounting bracket
- 4 x Spacer
- 2 x Screw
- 1 x Instruction Manual
4. Setup
- Unpack Components: Carefully remove all items from the packaging.
- Mount the Display: Attach the LCD instrument to your e-bike's handlebars using the provided mounting bracket, spacers, and screws. Ensure it is securely fastened and positioned for easy viewing.
- Connect to Controller: Connect the instrument's cable to a compatible KT controller. Refer to your e-bike's wiring diagram for correct port identification and connection. The instrument automatically recognizes 24V, 36V, and 48V systems.
- Secure Connections: Double-check all connections to ensure they are firm and properly seated before powering on the system. Loose connections can lead to intermittent operation or damage.
5. Operating Instructions
5.1 Power On/Off
Press and hold the power button (usually located on the display unit) for a few seconds to turn the display on or off.
5.2 Data Display
Upon powering on, the main screen will show real-time riding data. Use the navigation buttons (if available) to cycle through different data views such as speed, mileage, battery level, and assist level.
5.3 Gear Configuration
Use the UP and DOWN buttons to adjust the power-assist gear. The selected gear will be displayed on the screen. The system automatically saves the last used gear and restores it upon the next power-on.
5.4 Parameter Settings
To access the parameter settings menu, typically press and hold a combination of buttons (refer to the specific button layout on your display or the detailed wiring diagram). Within this menu, you can adjust:
- Motor parameters
- Velocity measurement parameters
- Speed-limit parameters
- Power parameters
- Power-assist control parameters
- Minimum controller voltage and maximum current parameters
Always exercise caution when changing parameters, as incorrect settings can affect performance or safety.
5.5 Data View
Navigate to the data view section to review historical riding data. This includes total mileage, maximum speed, average speed, and riding time. Options to clear specific or cumulative data may be available.
5.6 6KM/h Boost Function
Activate the 6KM/h boost function by pressing and holding the designated button. A boost sign will flash on the display, providing temporary assistance for starting or climbing.
5.7 Cruising Function
Enable the cruising function through the settings menu to maintain a constant speed without continuous pedal input. Deactivate by applying brakes or pressing a specific button.
5.8 Night Driving
The LCD display features a backlight for clear visibility in low-light conditions. Use the integrated front light switch control function to turn your e-bike's front light on or off directly from the instrument.
5.9 Password Protection
For added security, you can set a three-digit power-on password in the settings menu. This prevents unauthorized use of your e-bike's display functions.
6. Maintenance
- Cleaning: Keep the display screen clean using a soft, damp cloth. Avoid using abrasive cleaners or solvents that could damage the screen or casing.
- Connection Check: Periodically inspect all cable connections to ensure they are secure and free from corrosion or damage.
- Temperature Monitoring: Pay attention to the motor temperature display. If an over-temperature alarm activates, reduce the load on the motor or stop riding to allow it to cool down, preventing potential damage.
- Protection: Protect the display from direct impact, prolonged exposure to direct sunlight, and extreme weather conditions (heavy rain, snow).
7. Troubleshooting
- No Power: If the display does not power on, check the battery connection and ensure the instrument is securely connected to the e-bike controller. Verify the battery is charged.
- Error Codes: If a vehicle failure occurs, the instrument will display an error code. Note down the specific code and refer to your e-bike controller's manual or contact technical support for diagnosis and resolution.
- Incorrect Readings: If speed or mileage readings appear inaccurate, verify the parameter settings, especially the wheel diameter and speed sensor calibration.
- Over-Temperature Alarm: If the motor temperature alarm activates, immediately reduce power output or stop riding to allow the motor to cool. Continued operation under an over-temperature condition can cause permanent damage.
- Display Malfunction: If the display shows garbled text or is unresponsive, try powering off and restarting the system. If the issue persists, check connections or contact support.
8. Specifications
| Feature | Specification |
|---|---|
| Model Name | KT LCD3U |
| Applicable Voltage | 24V-36V-48V (Automatic Identification) |
| Material | ABS |
| Size (Approx.) | 9.5 x 6.5 x 3 cm (3.7 x 2.6 x 1.2 in) |
| Weight (Approx.) | 209 g |
| Special Features | Digital Display, USB Interface, Portable |
| Compatibility | KT Controllers Only |
| Part Number | 33221144 |
| GTIN/UPC | 744128904658 |
9. Warranty and Support
Warranty: This mGYDY KT LCD3U LCD Display Instrument comes with a 1-Year Manufacturer Warranty from the date of purchase. This warranty covers defects in materials and workmanship under normal use.
Support: For technical assistance, troubleshooting guidance, or to inquire about warranty claims, please contact the manufacturer, mGYDY, or your authorized dealer. Please have your product model number and proof of purchase ready when contacting support.