1. Introduction
Thank you for purchasing the DSP Bread Maker KC3049. This manual provides essential information for the safe and efficient operation of your new appliance. Please read these instructions carefully before first use and keep them for future reference.
2. Important Safety Instructions
When using electrical appliances, basic safety precautions should always be followed, including the following:
- Read all instructions before operating the bread maker.
- Do not touch hot surfaces. Use handles or knobs.
- To protect against electric shock, do not immerse cord, plugs, or the appliance in water or other liquid.
- Close supervision is necessary when any appliance is used by or near children.
- Unplug from outlet when not in use and before cleaning. Allow to cool before putting on or taking off parts.
- Do not operate any appliance with a damaged cord or plug, or after the appliance malfunctions or has been damaged in any manner.
- The use of accessory attachments not recommended by the appliance manufacturer may cause injuries.
- Do not use outdoors.
- Do not let cord hang over edge of table or counter, or touch hot surfaces.
- Do not place on or near a hot gas or electric burner, or in a heated oven.
- Extreme caution must be used when moving an appliance containing hot oil or other hot liquids.
- To disconnect, turn any control to "off", then remove plug from wall outlet.
- Do not use appliance for other than intended use.
3. Product Overview
Components
- Main Unit with Stainless Steel Cover
- Large Glass Viewing Window
- Control Panel with LCD Display
- Non-stick Aluminum Bread Pan
- Cast Aluminum Mixing Blades
- Measuring Cup (240ml)
- Measuring Spoon

Image showing the bread maker with icons indicating features like 60-minute keep warm, 10-15 minute power-off memory, delay timer, and 360-degree rotation (mixing).
4. Setup
- Unpacking: Carefully remove the bread maker and all accessories from the packaging. Retain packaging for future storage or transport.
- Initial Cleaning: Before first use, wash the bread pan and mixing blades with warm, soapy water. Rinse thoroughly and dry. Wipe the exterior of the bread maker with a damp cloth.
- Placement: Place the bread maker on a stable, flat, heat-resistant surface, away from direct sunlight and heat sources. Ensure adequate ventilation around the appliance.
- Insert Bread Pan: Place the bread pan into the baking chamber and turn it clockwise until it locks into place.
- Insert Mixing Blades: Attach the mixing blades onto the shafts inside the bread pan.
- Power Connection: Plug the power cord into a grounded electrical outlet. The bread maker will beep, and the LCD display will light up, indicating it is ready for use.

A general product image of the DSP Bread Maker KC3049 in a kitchen setting, showcasing its design.
5. Operating Instructions
Basic Operation
- Add Ingredients: Add ingredients to the bread pan in the order specified by your recipe (typically liquids first, then dry ingredients, with yeast last).
- Select Program: Use the control panel to select one of the 19 available programs. Refer to the program list for details.
- Select Loaf Size: Choose your desired loaf size (500g, 750g, or 1000g) if applicable for the selected program.
- Select Crust Color: Choose your preferred crust color (Light, Medium, or Dark).
- Start Baking: Press the START/STOP button to begin the baking process. The machine will automatically mix, knead, rise, and bake.
- End of Cycle: Once the program is complete, the bread maker will beep. The keep warm function will activate automatically for 60 minutes.
- Remove Bread: Unplug the appliance. Using oven mitts, carefully remove the bread pan by turning it counter-clockwise and lifting it out. Invert the pan to release the bread. If the mixing blades remain in the bread, remove them carefully with a non-metallic utensil.
19 Automatic Programs
The DSP Bread Maker KC3049 offers 19 electronic programs for various bread types and functions:
- 1. Basic Bread
- 2. Quick Bread
- 3. Sweet Bread
- 4. French Bread
- 5. Whole-wheat Bread
- 6. Rice Bread
- 7. Gluten-free Bread
- 8. Dessert
- 9. Mix
- 10. Dough
- 11. Knead
- 12. Cake
- 13. Jam
- 14. Yogurt
- 15. Bake
- 16. Sticky-rice
- 17. Rice-wine
- 18. Defrost
- 19. Stir-fry

Image displaying the LCD panel and a list of 19 automatic programs.
Loaf Sizes and Crust Colors
The bread maker supports three loaf sizes and three crust color settings:
- Loaf Sizes: 500g, 750g, 1000g
- Crust Colors: Light, Medium, Dark
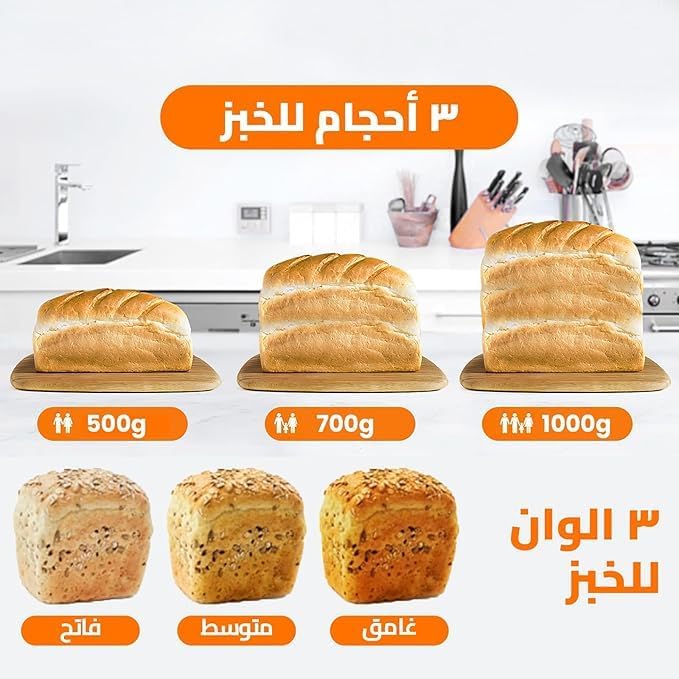
Image illustrating the three available bread sizes (500g, 700g, 1000g) and three crust color options (light, medium, dark).
Delay Timer Function
The 15-hour preset timer allows you to set the bread maker to start baking at a later time. This is ideal for having fresh bread ready in the morning.
- Set the desired delay time using the timer buttons.
- The delay time includes the baking time. For example, if you want bread ready in 8 hours and the program takes 3 hours, set the delay timer for 8 hours.

Image depicting the 15-hour delay timer function, allowing users to set the machine to start baking at a later time.
Keep Warm Function
After the baking cycle is complete, the bread maker will automatically enter a 60-minute keep warm phase to maintain the bread's temperature.
Power-Off Memory
In case of a power interruption, the bread maker has a power-off memory function that will resume operation within 10-15 minutes of power restoration.
6. Maintenance and Cleaning
Proper maintenance ensures the longevity and performance of your bread maker.
- Always unplug the appliance and allow it to cool completely before cleaning.
- Bread Pan and Mixing Blades: Hand wash the non-stick aluminum bread pan and mixing blades with warm, soapy water. Do not use abrasive cleaners or metal scouring pads, as this can damage the non-stick coating. Rinse thoroughly and dry completely.
- Exterior: Wipe the exterior of the bread maker with a soft, damp cloth. Do not immerse the main unit in water or any other liquid.
- Interior: Wipe the inside of the baking chamber with a damp cloth. Remove any crumbs or residue.
- Storage: Store the bread maker in a clean, dry place when not in use.

Image showing the bread maker with its lid open, revealing the non-stick bread pan and the interior.
7. Troubleshooting
If you encounter issues with your bread maker, refer to the following common problems and solutions:
| Problem | Possible Cause | Solution |
|---|---|---|
| Bread does not rise | Expired yeast, incorrect water temperature, too much salt, not enough sugar. | Check yeast expiration date. Use lukewarm water (around 40-45°C). Ensure correct ingredient measurements. |
| Bread is too dense | Too much flour, not enough liquid, incorrect program selected. | Measure ingredients accurately. Ensure the correct program for your recipe is chosen. |
| Bread sticks to pan | Pan not properly greased (if recipe requires), damaged non-stick coating. | Ensure pan is clean and undamaged. Allow bread to cool slightly before removing. |
| Machine beeps, but nothing happens | Power cord not fully plugged in, program not selected. | Check power connection. Ensure a program is selected and START/STOP button is pressed. |
If the problem persists after trying these solutions, please contact customer support.
8. Specifications
| Feature | Detail |
|---|---|
| Model Number | KC3049 |
| Brand | DSP |
| Power | 600 Watts |
| Capacity | 500g / 750g / 1000g |
| Number of Programs | 19 |
| Material | Acrylonitrile Butadiene Styrene (ABS), Stainless Steel (cover), Aluminum (pan) |
| Color | White |
| Dimensions (D x W x H) | 30 cm x 30 cm x 20 cm |
| Item Weight | 1850 grams |
| Care Instructions | Hand wash pan only |
9. Warranty and Support
Warranty information for this product is not available at this time. For technical support or inquiries, please refer to the contact information provided by your retailer or the manufacturer's official website.