Onvian KS-SF34R & WL02C
Onvian Super Bright USB Rechargeable Bike Lights Instruction Manual
Model: KS-SF34R & WL02C
Introduction
Thank you for choosing the Onvian Super Bright USB Rechargeable Bike Lights. This manual provides detailed instructions for the safe and effective use of your new bicycle light set. Please read this manual thoroughly before installation and operation, and retain it for future reference.
Product Overview
Key Features
- High-Performance Headlight: Provides 3 modes (High, Medium, Flashing) for clear visibility.
- Colorful Tail Light: Offers 15 modes and 7 color options for enhanced visibility and signaling.
- Wireless Remote Control: Enables activation of turn signals, brake lights, and emergency flashers without removing hands from handlebars.
- USB Rechargeable Battery: Equipped with a 600mAh battery for long-lasting performance.
- IP66 Waterproof Rating: Designed to withstand various weather conditions including rain, dust, and snow.
- Durable and Lightweight Design: Constructed from premium materials for durability and portability.
Package Contents
The package includes the following items:
- Headlight Unit
- Tail Light Unit
- Wireless Remote Control
- Headlight Mounting Bracket
- Tail Light Mounting Bracket
- USB Charging Cable
- Mounting Hardware (screws, Allen wrench, various shims for different handlebar/seatpost sizes)
- Instruction Manual
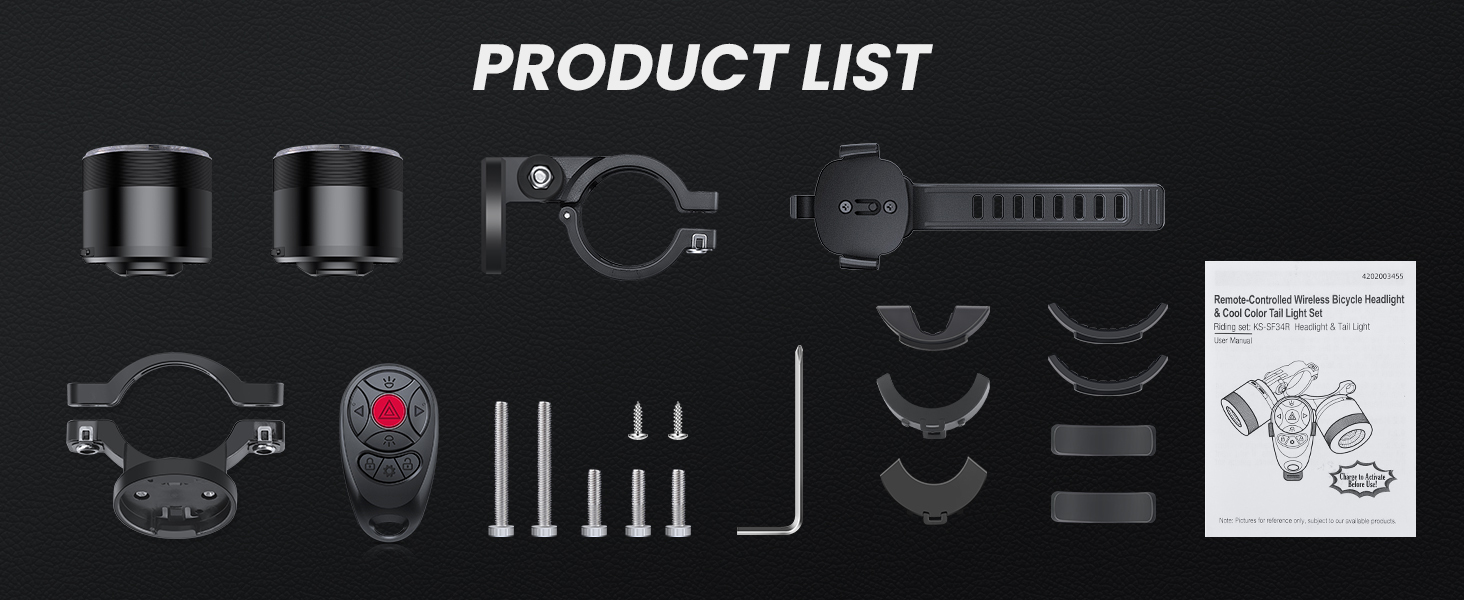
Figure 1: All components included in the Onvian bike light set package.
Setup and Installation
1. Headlight Installation
- Select the appropriate shim for your handlebar diameter.
- Attach the headlight mounting bracket to your handlebar using the provided screws and Allen wrench. Ensure it is securely fastened and positioned to illuminate the path ahead.
- Slide the headlight unit onto the bracket until it clicks into place.
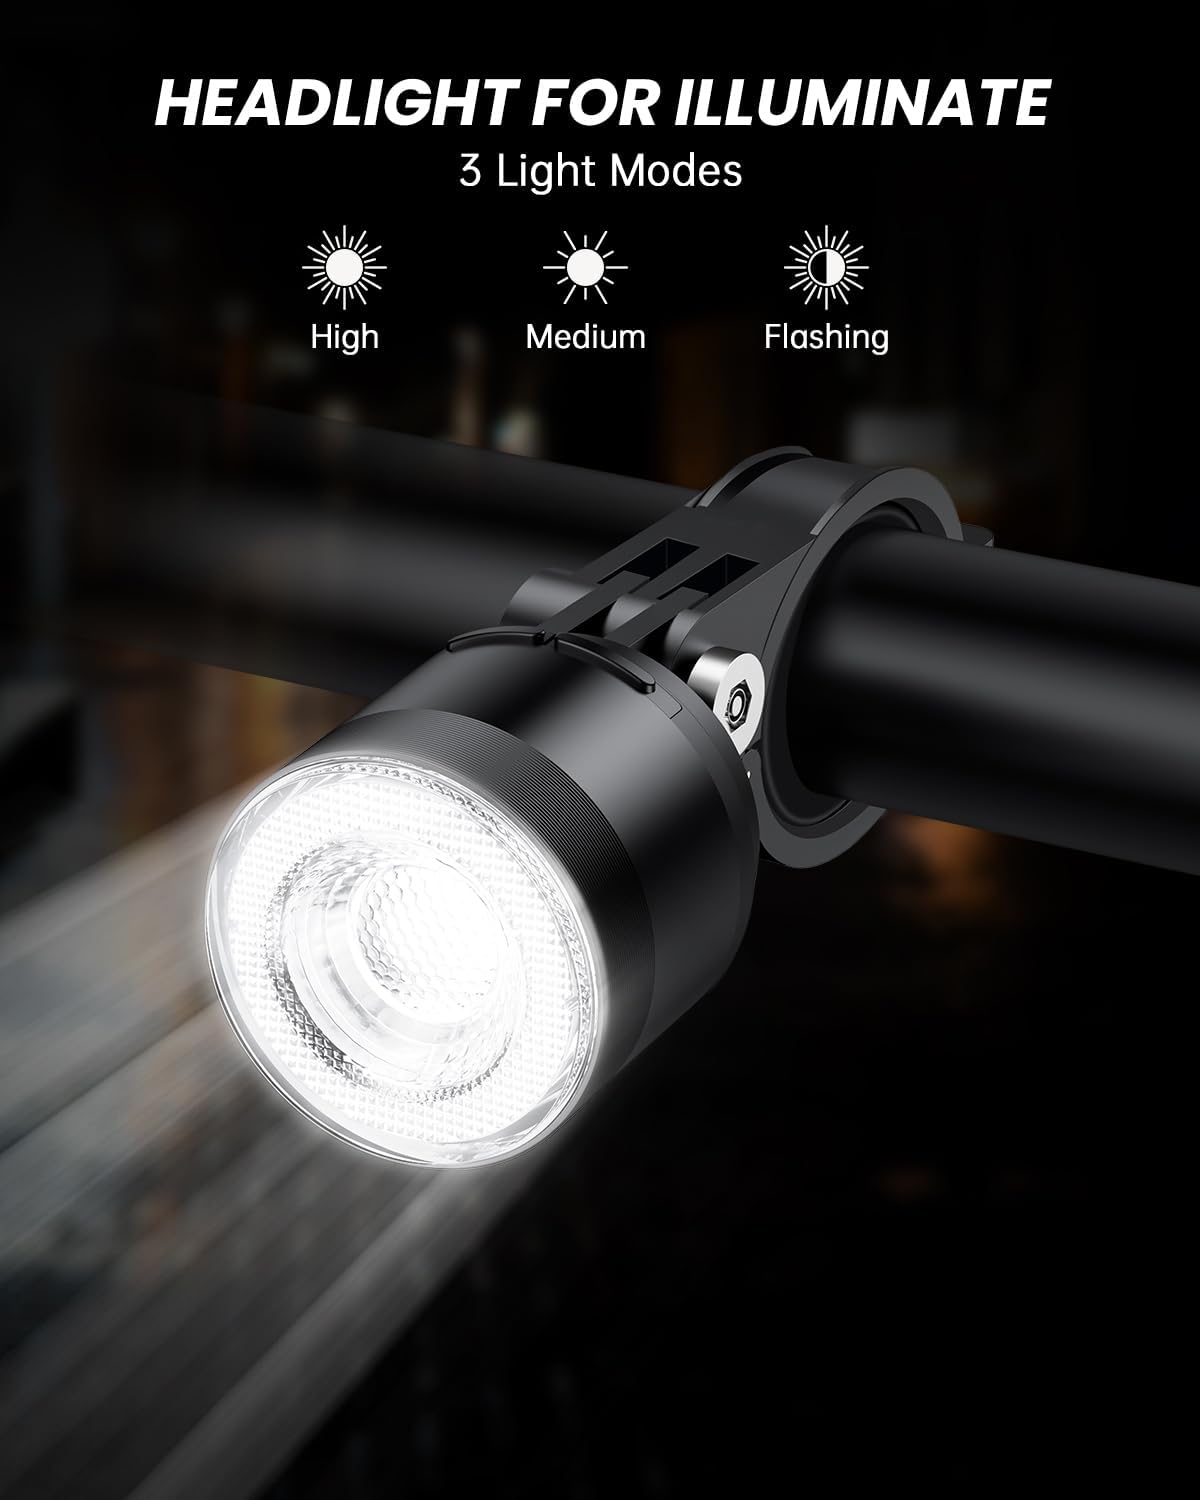
Figure 2: Headlight mounted on a bicycle handlebar.
2. Tail Light Installation
- Select the appropriate shim for your seatpost diameter.
- Attach the tail light mounting bracket to your seatpost. Ensure it is securely fastened and positioned for maximum rear visibility.
- Slide the tail light unit onto the bracket until it clicks into place.

Figure 3: Tail light mounted on a bicycle seatpost.
3. Remote Control Installation
- Attach the remote control to a convenient location on your handlebar, ensuring easy access with your thumb while riding.
- Secure the remote control using the provided strap or clamp.

Figure 4: Wireless remote control mounted on a bicycle handlebar.
Operating Instructions
Powering On/Off
- To power on the headlight or tail light, press and hold the respective power button on the unit or the "On" button on the wireless remote control.
- To power off, press and hold the power button on the unit or the "Off" button on the wireless remote control.
Headlight Modes
The headlight offers three distinct lighting modes:
- High: Provides maximum illumination for dark conditions.
- Medium: A balanced light output for general use.
- Flashing: Increases visibility during day or night.
Cycle through these modes by short-pressing the headlight button on the remote or the power button on the headlight unit.

Figure 5: Headlight modes (High, Medium, Flashing).
Tail Light Modes and Colors
The tail light features 15 lighting modes and 7 color options. Use the tail light button on the remote or the power button on the tail light unit to cycle through modes. The "Setting Key" on the remote allows for further customization of tail light modes.
- 7 Colors: Red, Green, Blue, Yellow, Cyan, Purple, White.
- 15 Modes: Including Taichi Fish, Three-body, Windmill, Chase Run, Roller Coaster, Heart of the Ocean, Propeller, Snake, Dolphin Dive, Stacking, Wind Fire Wheel, Blinking, Breathing, Slow Flash, and Steady Light.

Figure 6: Tail light color options.

Figure 7: Tail light 15 lighting modes.
Wireless Remote Control Functions
The wireless remote control provides convenient access to various functions:
- On/Off Buttons: Power the lights on or off.
- Headlight Button: Cycles through headlight modes.
- Tail Light Button: Cycles through tail light modes.
- Left Turn Button: Activates the left turn signal on the tail light.
- Right Turn Button: Activates the right turn signal on the tail light.
- Emergency Flasher Button: Activates emergency flashing mode on the tail light.
- Setting Key: Used to adjust specific tail light settings.
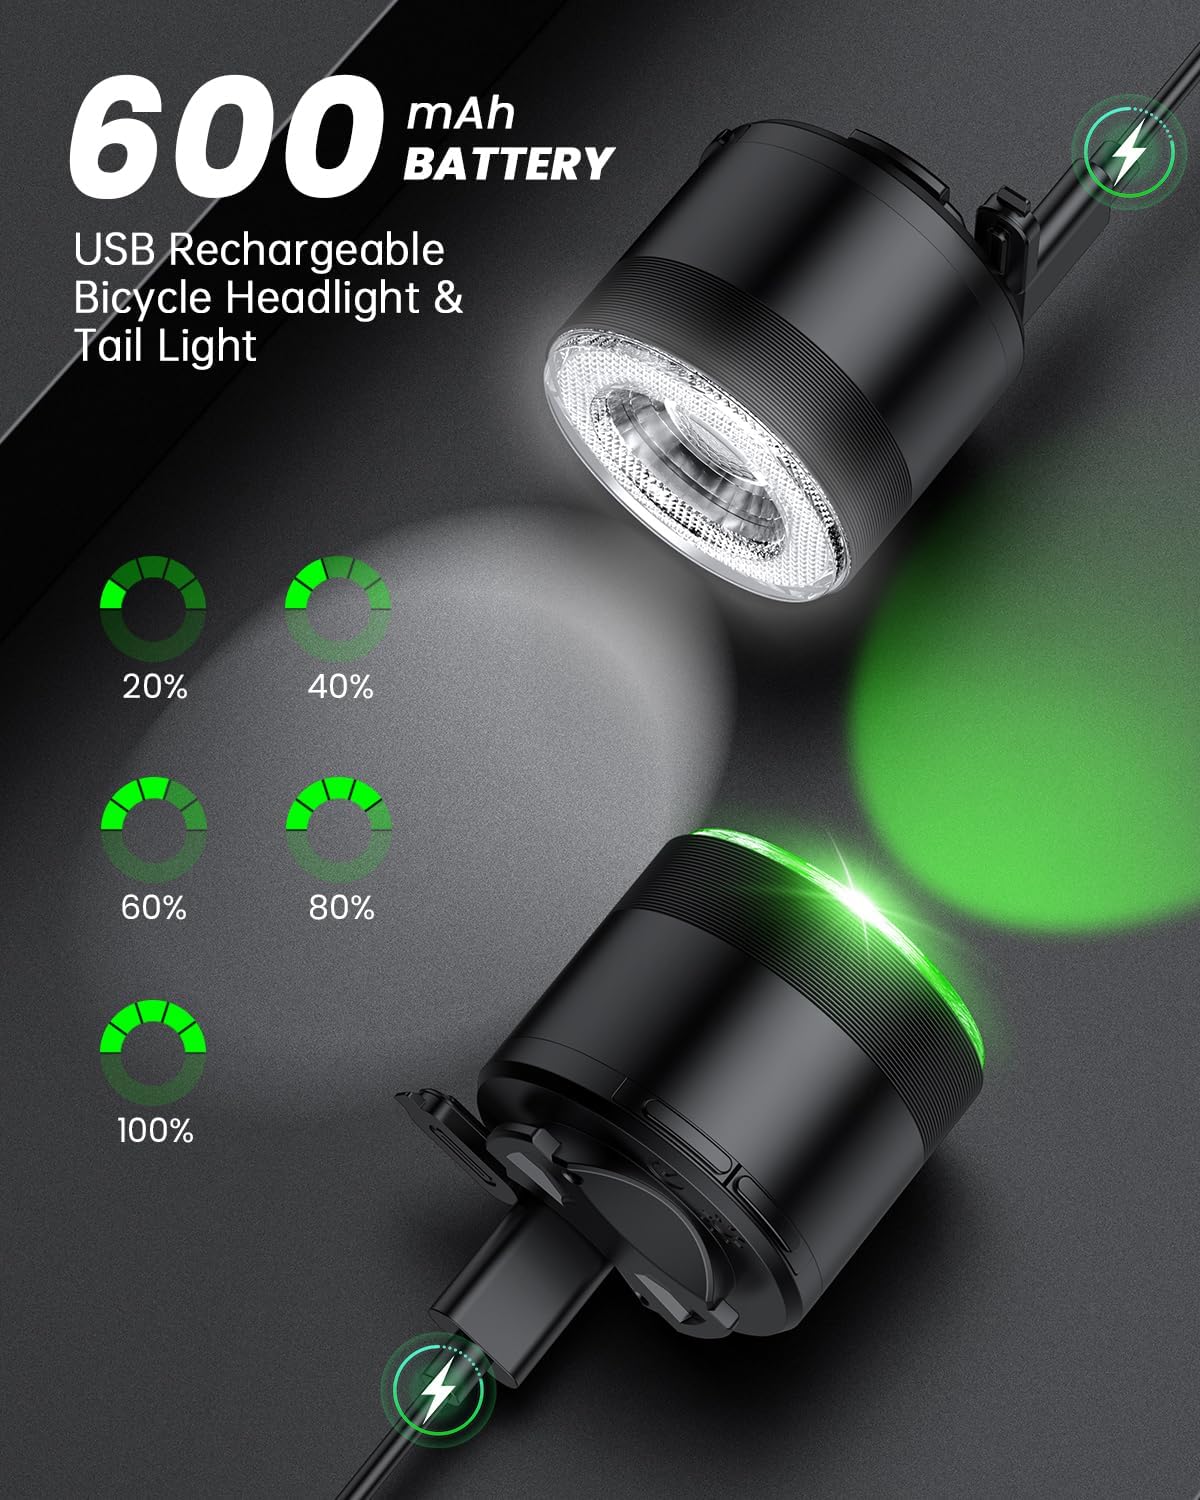
Figure 8: Wireless remote control layout and functions.

Figure 9: Using the remote control for turn signals.
Intelligent Features
- Automatic On/Off: For Slow Flash, Breathing, and Blinking modes, the tail light may automatically switch on in low-light conditions and turn off in strong light.
- Brake Deceleration Reminder: The tail light will highlight for 2 seconds to indicate deceleration or braking, enhancing safety.

Figure 10: Intelligent automatic on/off function.

Figure 11: Brake deceleration reminder feature.
Charging Instructions
Both the headlight and tail light units are equipped with a 600mAh USB rechargeable battery.
- Locate the USB charging port on each light unit.
- Connect the provided USB charging cable to the light unit and to a standard USB power source (e.g., computer, wall adapter, power bank).
- The charging indicator will show the charging status. A full charge typically provides several hours of illumination, depending on the mode used.
- Disconnect the cable once fully charged to preserve battery life.

Figure 12: USB charging for headlight and tail light.
Maintenance
- Cleaning: Wipe the light units with a soft, damp cloth. Do not use abrasive cleaners or solvents.
- Waterproofing: The lights have an IP66 waterproof rating, making them resistant to strong jets of water and dust. However, avoid submerging them in water. Ensure the USB port cover is securely closed after charging to maintain water resistance.
- Battery Care: For optimal battery life, charge the lights regularly and avoid complete discharge. If storing for an extended period, charge the battery to about 50% every few months.
- Storage: Store the lights in a cool, dry place away from direct sunlight when not in use.

Figure 13: Lights are IP66 waterproof for riding in various weather conditions.
Troubleshooting
| Problem | Possible Cause | Solution |
|---|---|---|
| Lights do not turn on. | Battery is depleted. | Charge the light units using the provided USB cable. |
| Lights do not respond to remote control. | Remote control battery is low or out of range. | Ensure the remote control is close to the lights. Replace the remote control battery if necessary (check manual for battery type). |
| Light output is dim. | Low battery. | Recharge the light unit. |
| Water ingress after rain. | USB port cover not properly sealed. | Ensure the USB port cover is firmly closed after charging. If damage is suspected, discontinue use and contact support. |
Specifications
- Brand: Onvian
- Model Numbers: KS-SF34R & WL02C
- Material: Plastic
- Power Source: Battery Powered (USB Rechargeable)
- Battery Capacity: 600mAh (each unit)
- Water Resistance Level: IP66 Waterproof
- Item Weight: Approximately 0.33 Ounces (total for set)
- Mounting Type: Handlebar (Headlight), Seatpost (Tail Light)
- Headlight Modes: High, Medium, Flashing
- Tail Light Modes: 15 modes, 7 colors
- Included Components: Remote control, charging line, mounting hardware
Warranty and Support
This Onvian product comes with a 1-year warranty from the date of purchase. For warranty claims, technical support, or any inquiries regarding your product, please contact Onvian customer service through their official channels or visit the Onvian Store on Amazon.
Please have your purchase receipt and product model number (KS-SF34R & WL02C) available when contacting support.
Ask a question about this manual
Ask about setup, troubleshooting, compatibility, parts, safety, or missing instructions. Manuals+ will review the question and use this page’s manual context to help answer it.