EasyByMall RT21B407305W666MFH28DHTO657AEQ
Dual-Function Geothood Pipe Clamp Instruction Manual
Model: RT21B407305W666MFH28DHTO657AEQ
Brand: EasyByMall
1. Introduction
This manual provides essential information for the safe and effective use of your EasyByMall Dual-Function Geothood Pipe Clamp. Designed for efficient removal and installation of geothood pipes, this versatile tool is suitable for various applications including pipeline repair, mechanical maintenance, and woodworking disassembly. Please read this manual thoroughly before operating the tool to ensure proper usage and longevity.
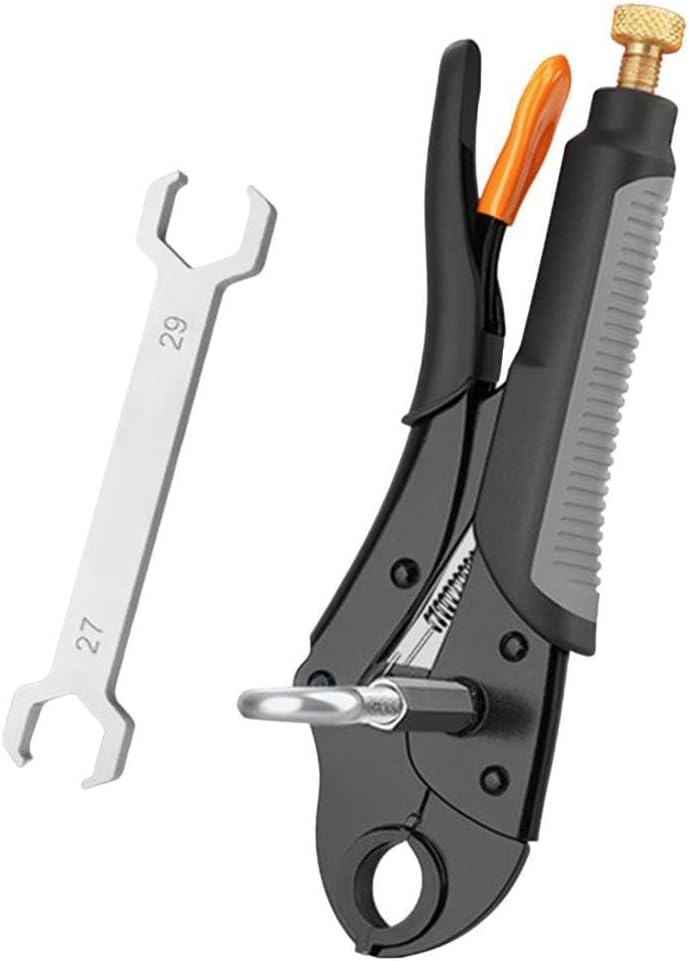
Figure 1.1: The EasyByMall Dual-Function Geothood Pipe Clamp, designed for efficient pipe handling.
2. Safety Instructions
Always follow basic safety precautions when using any hand tool. Failure to do so may result in injury or damage to the tool.
- Read Instructions: Familiarize yourself with all instructions before use.
- Wear Protective Gear: Always wear appropriate personal protective equipment, such as safety glasses and gloves, to prevent injury.
- Inspect Tool: Before each use, inspect the tool for any signs of damage, wear, or loose parts. Do not use if damaged.
- Secure Workpiece: Ensure the pipe or workpiece is stable and securely held before applying force with the clamp.
- Proper Grip: Maintain a firm grip on the tool during operation.
- Keep Clear: Keep hands and fingers clear of the clamping jaws during operation.
- Storage: Store the tool in a dry, secure place, out of reach of children and unauthorized users.
- Intended Use: Use the tool only for its intended purpose of removing and installing geothood pipes.
3. Components and Features
The EasyByMall Dual-Function Geothood Pipe Clamp is engineered for durability and ease of use. Key components include:
- Main Clamp Body: Constructed from high carbon steel for strength.
- Adjustable Jaw: Features a maximum opening of 55mm to accommodate various pipe sizes.
- Rotating Tail Nut: Allows for precise adjustment of the jaw opening.
- Ergonomic Handle: Designed for comfortable and secure grip.
- Screwdriver Insertion Point: A dedicated slot for inserting a screwdriver to provide leverage during operation.
- Accompanying Wrenches: Two open-end wrenches (sizes 27mm and 29mm) are included for additional utility.

Figure 3.1: Detailed view of the clamp's adjustable jaw, highlighting the 55mm maximum opening and the rotating tail nut.

Figure 3.2: The two open-end wrenches (27mm and 29mm) provided with the tool.
4. Technical Specifications
| Attribute | Specification |
|---|---|
| Product Name | Floor Heating Pipe Removal Pliers |
| Material | High Carbon Steel + Rubber |
| Color | Black |
| Size (approx.) | 222–255 mm / 8.74–10 inches |
| Telescopic Height | 98–150 mm / 3.8 x 5.9 inches |
| Max Jaw Opening | 55 mm |
| Suitable For | Disassembly and installation of geothamzns pipes |
| Product Dimensions | 23 x 5 x 3 cm |
| Item Weight | 790 Grams |
| Model Number | RT21B407305W666MFH28DHTO657AEQ |
5. Setup and Preparation
Before using the Dual-Function Geothood Pipe Clamp, ensure you are prepared for the task:
- Unpack: Carefully remove the clamp and any accessories from its packaging.
- Initial Inspection: Visually inspect the tool for any manufacturing defects or shipping damage. Ensure all moving parts operate smoothly.
- Familiarization: Take a moment to understand the adjustable jaw mechanism and the rotating tail nut. Practice opening and closing the jaws to get a feel for the tool.
- Prepare Work Area: Ensure your work area is clean, well-lit, and free of obstructions.
- Gather Tools: Have a suitable screwdriver ready for use with the clamp's leverage point.
6. Operating Instructions
The Dual-Function Geothood Pipe Clamp is designed for both installation and removal of pipes using a simple leverage mechanism.
6.1. Adjusting Jaw Size
To adjust the jaw opening, rotate the golden tail nut at the end of the clamp. Turn clockwise to reduce the opening and counter-clockwise to increase it, up to a maximum of 55mm. Ensure the jaw size is appropriate for the pipe you are working with for a secure grip.
6.2. Installing Geothood Pipes
- Adjust the clamp jaws to fit around the geothood pipe.
- Position the clamp firmly on the pipe.
- Insert a screwdriver into the designated slot on the clamp's body.
- Lever the screwdriver upwards. This action will expand the clamp's jaws, allowing for the installation of the geothood pipe into its fitting.
- Once the pipe is seated, release the leverage and remove the clamp.

Figure 6.1: Illustrates the upward leverage motion for pipe installation.
6.3. Removing Geothood Pipes
- Adjust the clamp jaws to fit around the geothood pipe.
- Position the clamp firmly on the pipe.
- Insert a screwdriver into the designated slot on the clamp's body.
- Lever the screwdriver downwards. This action will contract the clamp's jaws, facilitating the removal of the geothood pipe from its fitting.
- Once the pipe is loosened, remove the clamp and the pipe.

Figure 6.2: Illustrates the downward leverage motion for pipe removal.
7. Maintenance and Care
Proper maintenance will extend the life of your tool and ensure its continued performance:
- Cleaning: After each use, wipe down the clamp with a clean, dry cloth to remove any dirt, debris, or moisture.
- Lubrication: Periodically apply a light coat of machine oil to the pivot points and the threads of the rotating tail nut to ensure smooth operation and prevent rust.
- Storage: Store the clamp in a dry environment, away from direct sunlight and extreme temperatures. A tool box or drawer is ideal.
- Inspection: Regularly inspect the jaws for wear or damage. The precision manufacturing minimizes burrs and welding issues, but consistent heavy use may cause wear over time.
8. Troubleshooting
If you encounter issues while using your Dual-Function Geothood Pipe Clamp, refer to the following common problems and solutions:
- Problem: Clamp not gripping the pipe firmly.
Solution: Ensure the rotating tail nut is tightened sufficiently to secure the jaws around the pipe. Verify that the pipe diameter is within the clamp's 55mm maximum opening. - Problem: Difficulty in operating the leverage mechanism (too stiff).
Solution: Apply a small amount of lubricant to the pivot points and the screwdriver insertion mechanism. Ensure no debris is obstructing the movement. - Problem: Visible wear or damage to the jaws.
Solution: If significant wear or damage is present, the tool's effectiveness may be compromised. Consider replacing the tool if its integrity is affected. - Problem: Tool feels unstable or wobbly.
Solution: Check all fasteners and ensure they are tight. The double-sided adjustable design is secured with nuts; ensure these are not loose.
9. Warranty Information
This EasyByMall product is manufactured to high-quality standards and is designed for durability. While specific warranty terms may vary by retailer or region, EasyByMall stands behind the quality of its products. Please retain your proof of purchase for any warranty claims.
10. Customer Support
For further assistance, technical support, or inquiries regarding your EasyByMall Dual-Function Geothood Pipe Clamp, please contact your original retailer or visit the EasyByMall official website for contact information. When contacting support, please have your model number (RT21B407305W666MFH28DHTO657AEQ) and purchase details ready.
Ask a question about this manual
Ask about setup, troubleshooting, compatibility, parts, safety, or missing instructions. Manuals+ will review the question and use this page’s manual context to help answer it.