1. Product Overview
The EOQIFJM Mosaic Craft Kit provides all necessary materials for adults to create unique porcelain tile mosaic art pieces. This kit is designed to be an engaging and relaxing activity, resulting in decorative items suitable for home display or as handmade gifts.
2. What's in the Box
Carefully unpack your EOQIFJM Mosaic Craft Kit. Verify that all components listed below are present and undamaged.
- Porcelain Tiles (Mixed Colours, 3 packs)
- Wooden Base Templates (e.g., feather shapes)
- Solid Adhesive
- Grouting Powder
- Gloves
- Sponge
- Scraper/Spatula
- Brushes and Spoons
- Lanyards and Rings (for hanging)
- Instruction Manual (this document)
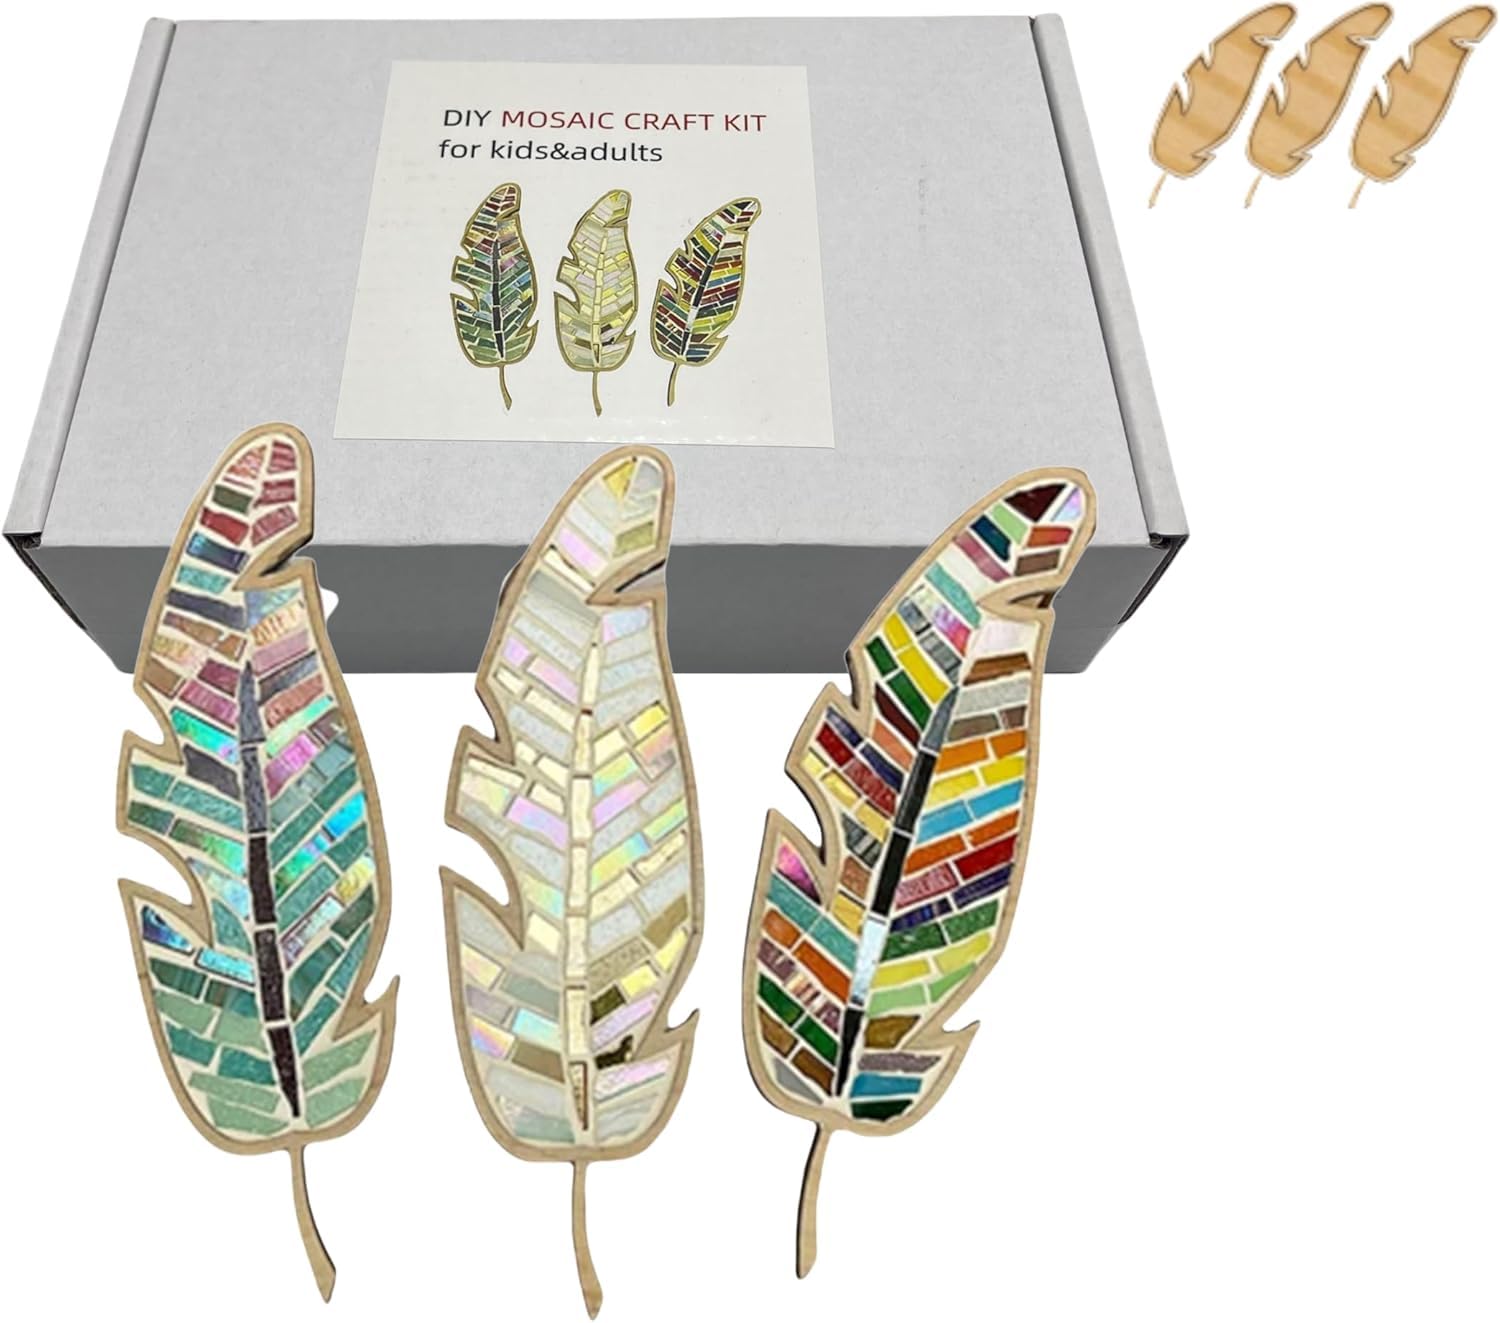
Image: All components included in the EOQIFJM Mosaic Craft Kit.
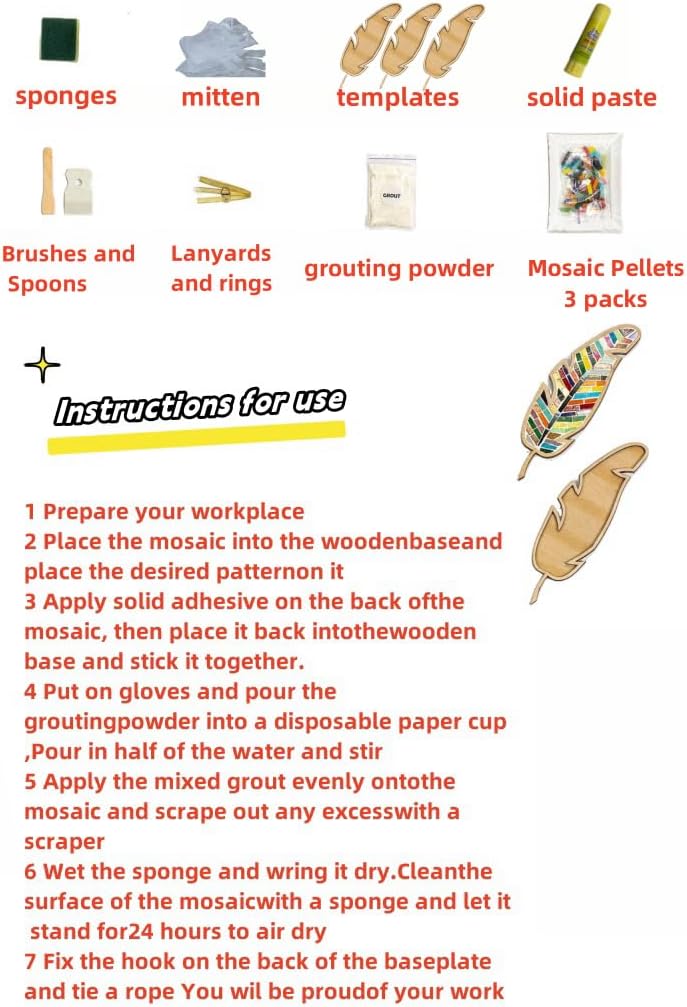
Image: Unpacked kit showing various components and the instruction sheet.
3. Setup
- Prepare Your Workspace: Choose a clean, flat, and well-lit surface. Cover the surface with newspaper or a protective sheet to prevent spills or damage.
- Organize Components: Lay out all the kit components within easy reach. Separate the mosaic tiles by color or as desired for your design.
- Review Instructions: Read through all the steps in this manual before beginning your project.
4. Operating Instructions: Creating Your Mosaic Art
Follow these steps carefully to create your mosaic art piece.

Image: Detailed instruction sheet for mosaic creation.
- Prepare Your Workplace: Ensure your work area is clean and protected.
- Place Mosaic Tiles on Wooden Base: Take a wooden base template. Arrange the porcelain mosaic tiles within the recessed areas of the wooden base according to your desired pattern. Experiment with different color combinations and arrangements before applying adhesive.
- Apply Solid Adhesive: Once satisfied with your tile arrangement, apply the solid adhesive to the back of each mosaic tile. Carefully place the adhesive-backed tiles into the wooden base, pressing gently to secure them. Allow the adhesive to dry completely as per adhesive instructions (typically a few hours).
- Prepare Grout: Put on the provided gloves. Pour the grouting powder into a disposable paper cup. Add water gradually, stirring continuously with a spoon until a thick, paste-like consistency is achieved. Note: The exact amount of water is not specified; add small amounts at a time until the desired consistency is reached. It should be thick enough to spread but not too watery.
- Apply Grout: Using the scraper or spatula, apply the mixed grout evenly over the mosaic tiles, ensuring all gaps between the tiles are filled. Scrape off any excess grout from the surface of the tiles.
- Clean Surface: Wet the sponge and wring it out thoroughly until it is damp, not dripping. Gently wipe the surface of the mosaic to clean off any remaining grout residue from the tiles. Allow the mosaic to dry for 24 hours.
- Fix Hanging Hook: Once the mosaic is completely dry, fix the provided hook or lanyard and ring to the back of the baseplate. Your mosaic art is now ready for display.
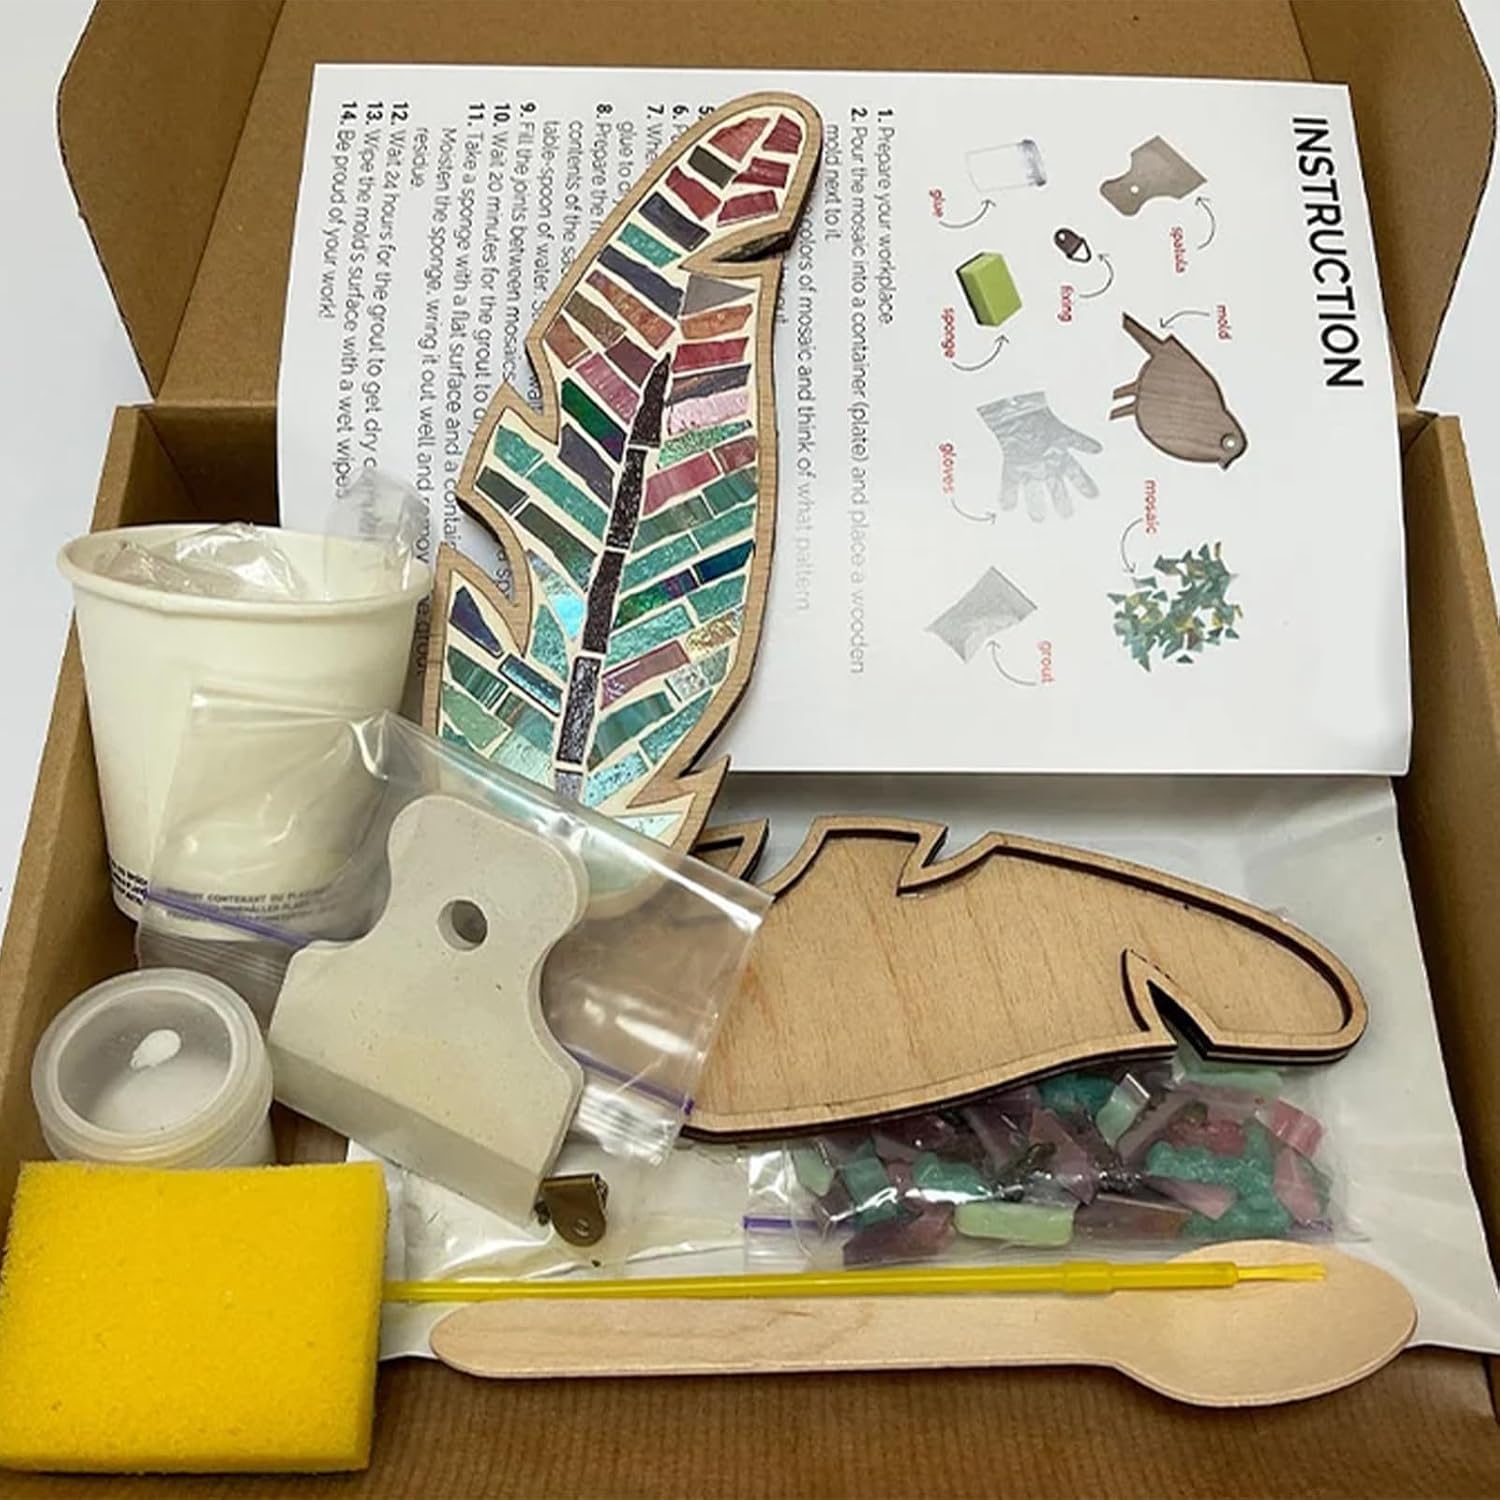
Image: Arranging mosaic tiles on the wooden base.

Image: Example of a finished mosaic art piece.

Image: Multiple finished mosaic art pieces.
5. Maintenance
- Cleaning: To clean your finished mosaic art, gently wipe the surface with a soft, damp cloth. Avoid abrasive cleaners or harsh chemicals, as these may damage the grout or tiles.
- Storage: If storing, keep the mosaic in a dry place away from direct sunlight to prevent fading or damage to the materials.
- Handling: Handle finished pieces with care to prevent tiles from dislodging or the wooden base from breaking.
6. Troubleshooting
- Grout is too thin/watery: If the grout mixture is too thin, add a small amount of additional grouting powder and mix thoroughly until the desired paste-like consistency is achieved.
- Grout is too thick/crumbly: If the grout mixture is too thick, add a very small amount of water (a few drops at a time) and mix thoroughly until it becomes a workable paste.
- Tiles not sticking: Ensure sufficient adhesive is applied to the back of each tile and that the adhesive has adequate time to dry before grouting. Press tiles firmly into place.
- Grout residue on tiles after drying: If a haze or residue remains on the tiles after the grout has dried, gently buff the tiles with a clean, dry cloth. For stubborn residue, a slightly damp cloth followed by a dry buff may be effective.
7. Specifications
| Feature | Detail |
|---|---|
| Brand | EOQIFJM |
| Model Name | adult craft kits |
| Material | Porcelain |
| Item Dimensions (L x W x H) | 8 x 5.3 x 2.4 inches |
| Item Weight | 9.9 ounces |
| Age Range (Description) | Teen |
| Included Components | Porcelain tiles, instruction manual, adult-friendly tools |
8. Warranty and Support
For any questions regarding the EOQIFJM Mosaic Craft Kit, please refer to the seller's contact information on the platform where the product was purchased. Specific warranty details are not provided with this manual. Please retain your proof of purchase for any potential support inquiries.