
1. Introduction
Thank you for choosing the HOME VISION Heavy Duty Full Motion TV Wall Mount. This manual provides essential information for the safe and proper installation, operation, and maintenance of your new TV wall mount. Please read all instructions carefully before beginning installation to ensure optimal performance and safety.
This wall mount is engineered to securely hold large flat or curved televisions ranging from 48 to 120 inches, with a maximum weight capacity of 200 lbs. Its full motion design allows for extensive swivel, tilt, and extension adjustments, providing a customizable viewing experience from various angles.
2. Safety Information
- Weight Capacity: Do not exceed the maximum weight capacity of 200 lbs (90 kg). Exceeding this limit can result in serious injury or property damage.
- TV Size: This mount is designed for TVs between 48 and 120 inches. Ensure your TV falls within this range.
- Wall Type: This mount is intended for installation on solid concrete walls, brick walls, or wood stud walls. DO NOT install on drywall alone.
- Stud Spacing: Compatible with 16", 24", and 32" wood stud spacing. Verify your wall's stud spacing before installation.
- Professional Installation: If you are unsure about the installation process or the suitability of your wall, consult a qualified professional installer.
- Tools: Use appropriate tools for installation. Always wear safety glasses.
- Children: Keep children and pets away from the installation area.
- Maintenance: Regularly check the mount for any signs of wear, damage, or loose connections. Tighten fasteners as needed.
3. Package Contents
Please verify that all components are present and undamaged before beginning installation. If any parts are missing or damaged, contact HOME VISION customer support.
- Wall Plate Assembly (x1)
- TV Bracket Arms (x2)
- Mounting Hardware Kit (various screws, washers, spacers, anchors)
- Leveling Tool (x1)
- Instruction Manual (this document)
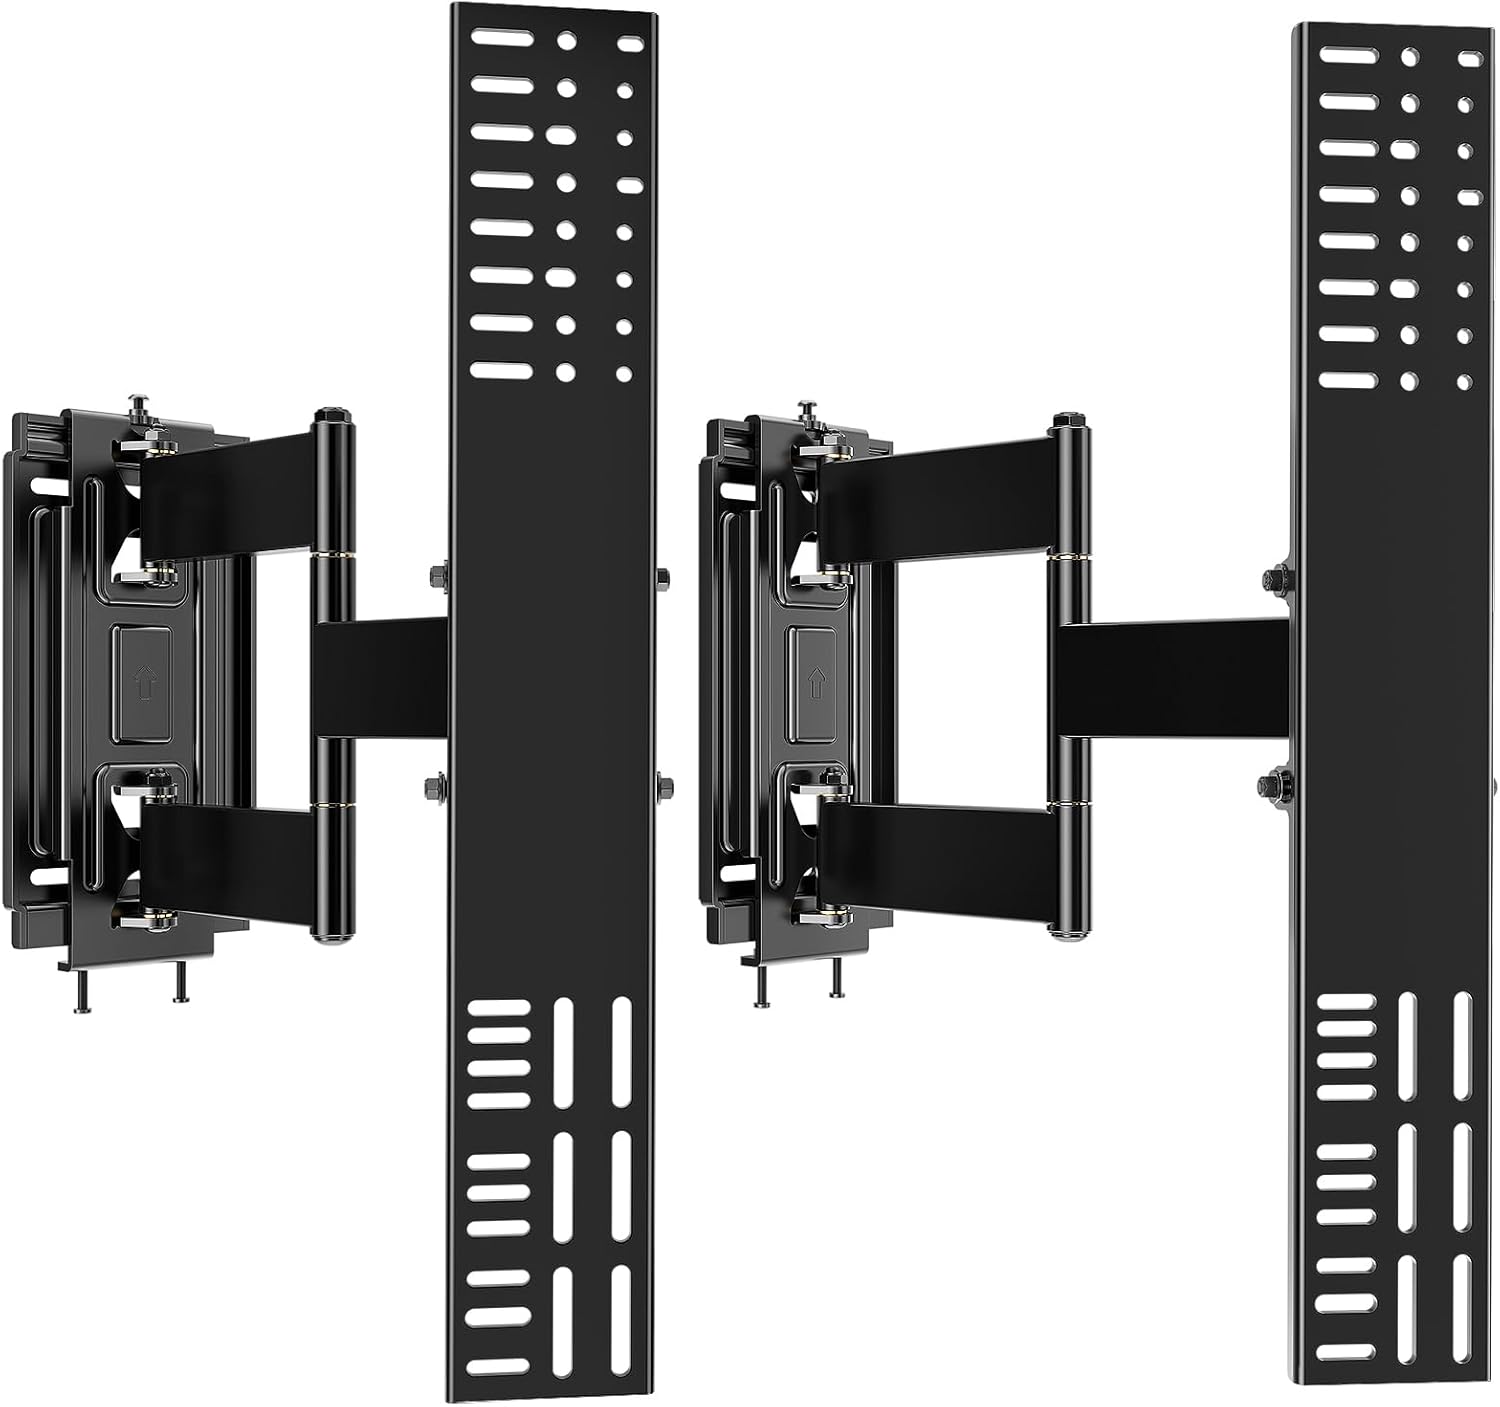
Image: Overview of the HOME VISION Heavy Duty Full Motion TV Wall Mount components, including the wall plate and two TV bracket arms.
4. Setup and Installation
Follow these steps carefully for a secure and successful installation.
Step 4.1: Prepare Your TV and Attach Brackets
- Carefully place your TV face-down on a soft, clean surface to prevent scratches.
- Identify the VESA mounting holes on the back of your TV. This mount supports horizontal VESA patterns with no limit and vertical VESA from 300mm to 600mm.
- Select the appropriate screws, washers, and spacers from the hardware kit that fit your TV's VESA holes.
- Attach the two TV bracket arms to the back of your TV, ensuring they are oriented correctly (as indicated by arrows or markings). If necessary, use spacers to prevent cable blockage or to accommodate curved TV backs.

Image: Illustration showing how to attach the TV bracket arms to the back of a television, highlighting VESA compatibility and the use of spacers.
Step 4.2: Install the Wall Plate
- Determine the desired height and location for your TV. Use a stud finder to locate the center of your wood studs if installing on a wood stud wall. For concrete or brick walls, mark the drilling points.
- Hold the wall plate against the wall at the marked location and use a level to ensure it is perfectly horizontal. Mark the drilling points through the holes on the wall plate.
- Drill pilot holes at the marked locations. The drill bit size will vary depending on your wall type (wood, concrete, or brick) and the type of anchors used.
- Secure the wall plate to the wall using the appropriate lag bolts and washers. For concrete or brick walls, insert wall anchors into the drilled holes before securing the lag bolts. Ensure all bolts are tightened firmly.

Image: Visual guide for installing the wall plate on different wall types: wood studs, concrete, and brick, showing the secure fastening process.

Image: Diagram illustrating the compatible wall types for installation: wood studs, concrete wall (requires anchors), and brick wall (requires anchors). Emphasizes not to install on drywall only.
Step 4.3: Hang the TV
- With assistance, carefully lift the TV with the attached brackets and hook the brackets onto the wall plate. Ensure the TV is securely seated on the wall plate.
- Engage any safety locks or screws to prevent the TV from accidentally lifting off the mount.
- Use the leveling screws on the TV bracket arms to make minor height adjustments (+/-10mm) and ensure the TV is perfectly level after installation.

Image: Illustration demonstrating how to hang the TV onto the installed wall plate, showing the detachable hooks and leveling screws for post-installation adjustment.
5. Operating Instructions
Your HOME VISION Full Motion TV Wall Mount offers versatile adjustments for optimal viewing.
- Extension: Gently pull the TV away from the wall to extend the arms. The mount can extend up to 16 inches (40.6 cm) from the wall.
- Retraction: Push the TV gently back towards the wall until it is as close as possible, retracting to just 2 inches (5.1 cm) for a low-profile look.
- Swivel: Pivot the TV left or right to achieve your desired viewing angle. The dual arms allow for a wide range of swivel motion.
- Tilt: Adjust the vertical angle of the TV. The mount allows for a 2° downward tilt to reduce glare and a 4° upward tilt. Loosen the tilt knobs, adjust the angle, and then re-tighten the knobs to secure the position.
- Leveling: After initial installation, if the TV is not perfectly level, use the post-installation leveling adjustment (+/-1°) to fine-tune the horizontal alignment.
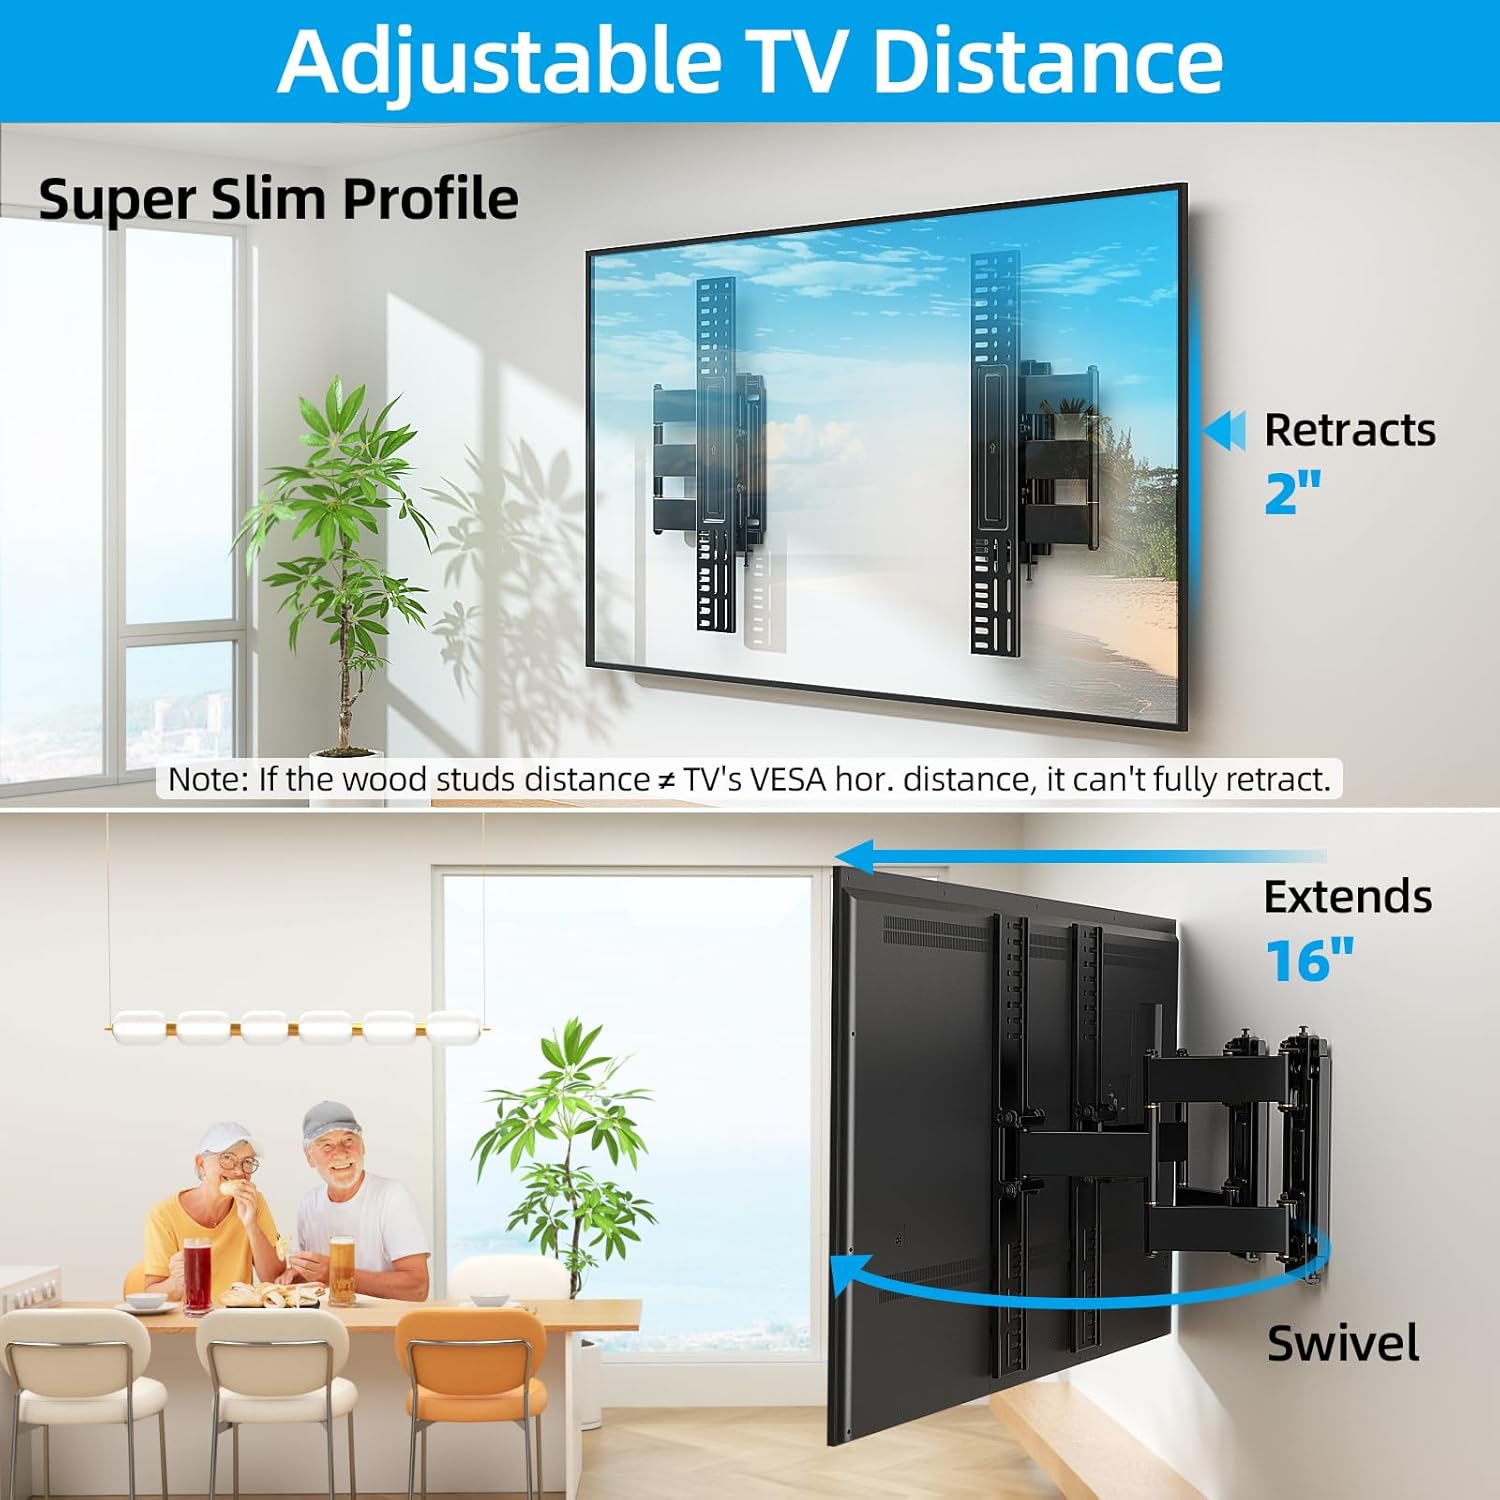
Image: Demonstrates the adjustable TV distance, showing the mount retracting to 2 inches and extending to 16 inches, along with the swivel functionality.
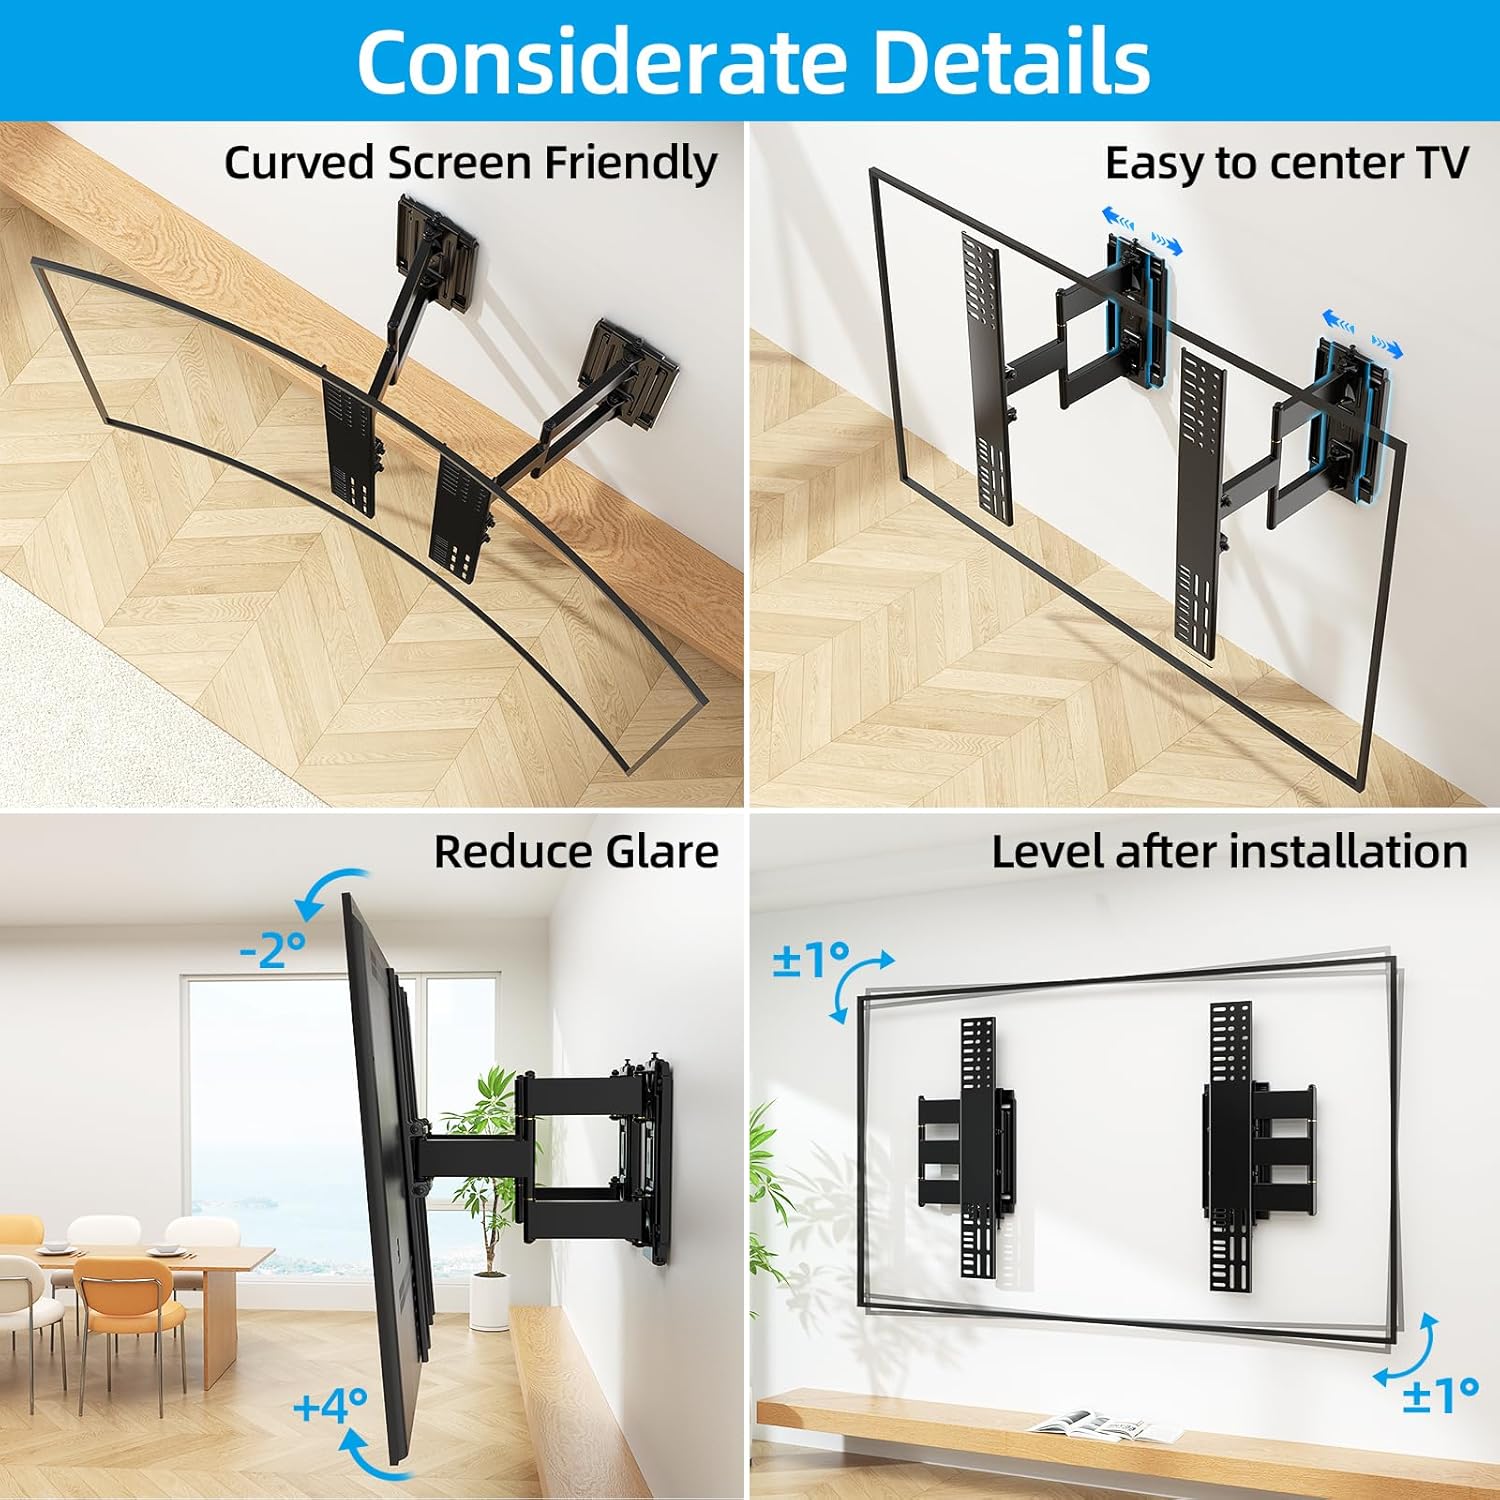
Image: Highlights key features such as compatibility with curved screens, ease of centering the TV, tilt options for glare reduction (-2° to +4°), and post-installation leveling (+/-1°).
6. Maintenance
Regular maintenance ensures the longevity and safe operation of your TV wall mount.
- Cleaning: Wipe the mount with a soft, dry cloth to remove dust. Do not use abrasive cleaners or solvents.
- Inspection: Periodically check all screws and bolts to ensure they are tight and secure. Re-tighten if necessary.
- Movement: If the mount's movement becomes stiff, a small amount of silicone-based lubricant can be applied to the pivot points. Avoid oil-based lubricants.
- Damage: If any part of the mount appears damaged or worn, discontinue use immediately and contact customer support for assistance.
7. Troubleshooting
Here are solutions to common issues you might encounter:
| Problem | Possible Cause | Solution |
|---|---|---|
| TV is not level after installation. | Minor misalignment during installation. | Use the post-installation leveling screws on the TV bracket arms to adjust the TV's horizontal alignment. |
| Mount feels stiff or difficult to move. | Lack of lubrication or dust accumulation. | Apply a small amount of silicone-based lubricant to the pivot points. Clean any dust or debris from the moving parts. |
| TV seems unstable or wobbly. | Loose bolts or incorrect installation. | Immediately remove the TV from the mount. Re-check all wall plate and TV bracket bolts for tightness. Ensure the mount is correctly installed on a suitable wall type. If unsure, consult a professional. |
| Cannot fully retract the TV to 2 inches. | TV's VESA horizontal distance is not compatible with the wood stud distance. | This is a design limitation based on stud spacing. The mount will retract as far as possible given the installation constraints. |
8. Specifications
| Brand: | HOME VISION |
| Model: | 48-120 Inch Full Motion |
| Compatible TV Sizes: | 48 - 120 Inches |
| Weight Capacity: | 200 lbs (90 kg) |
| VESA Compatibility (Horizontal): | No Limit |
| VESA Compatibility (Vertical): | 300mm - 600mm |
| Extension from Wall: | 2 inches (min) to 16 inches (max) |
| Tilt Angle: | 2° Downward, 4° Upward |
| Post-Installation Leveling: | +/-1° |
| Material: | Alloy Steel |
| Color: | Black |
| Item Weight: | 22.9 pounds |
| Package Dimensions: | 27.25 x 14.25 x 2.75 inches |

Image: Detailed diagram illustrating VESA compatibility, showing unlimited horizontal VESA and vertical VESA from 300-600mm, along with the 3-row hole design for securing large TVs.
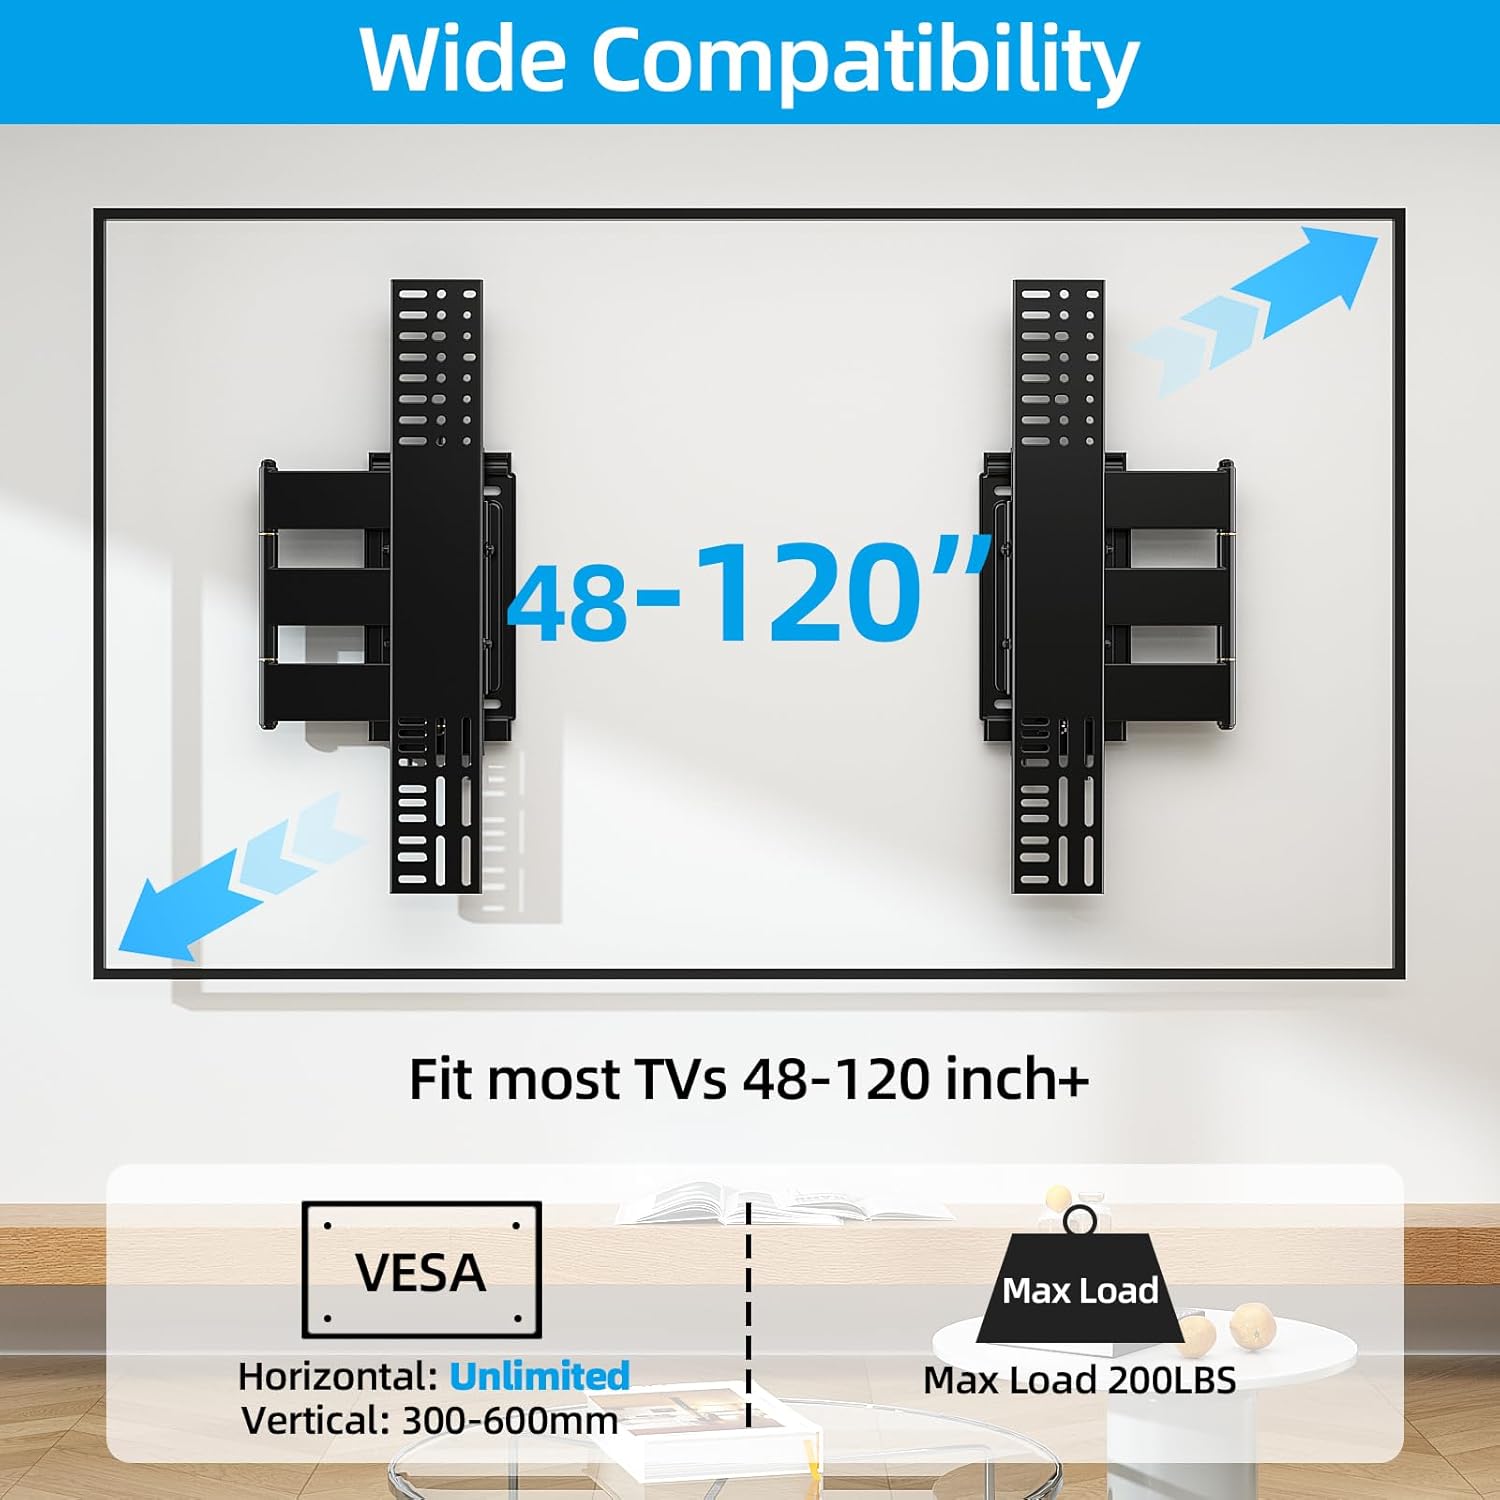
Image: Illustrates the wide compatibility of the mount, designed to fit most TVs from 48-120 inches with a maximum load capacity of 200 lbs, and specifying VESA horizontal (unlimited) and vertical (300-600mm) ranges.
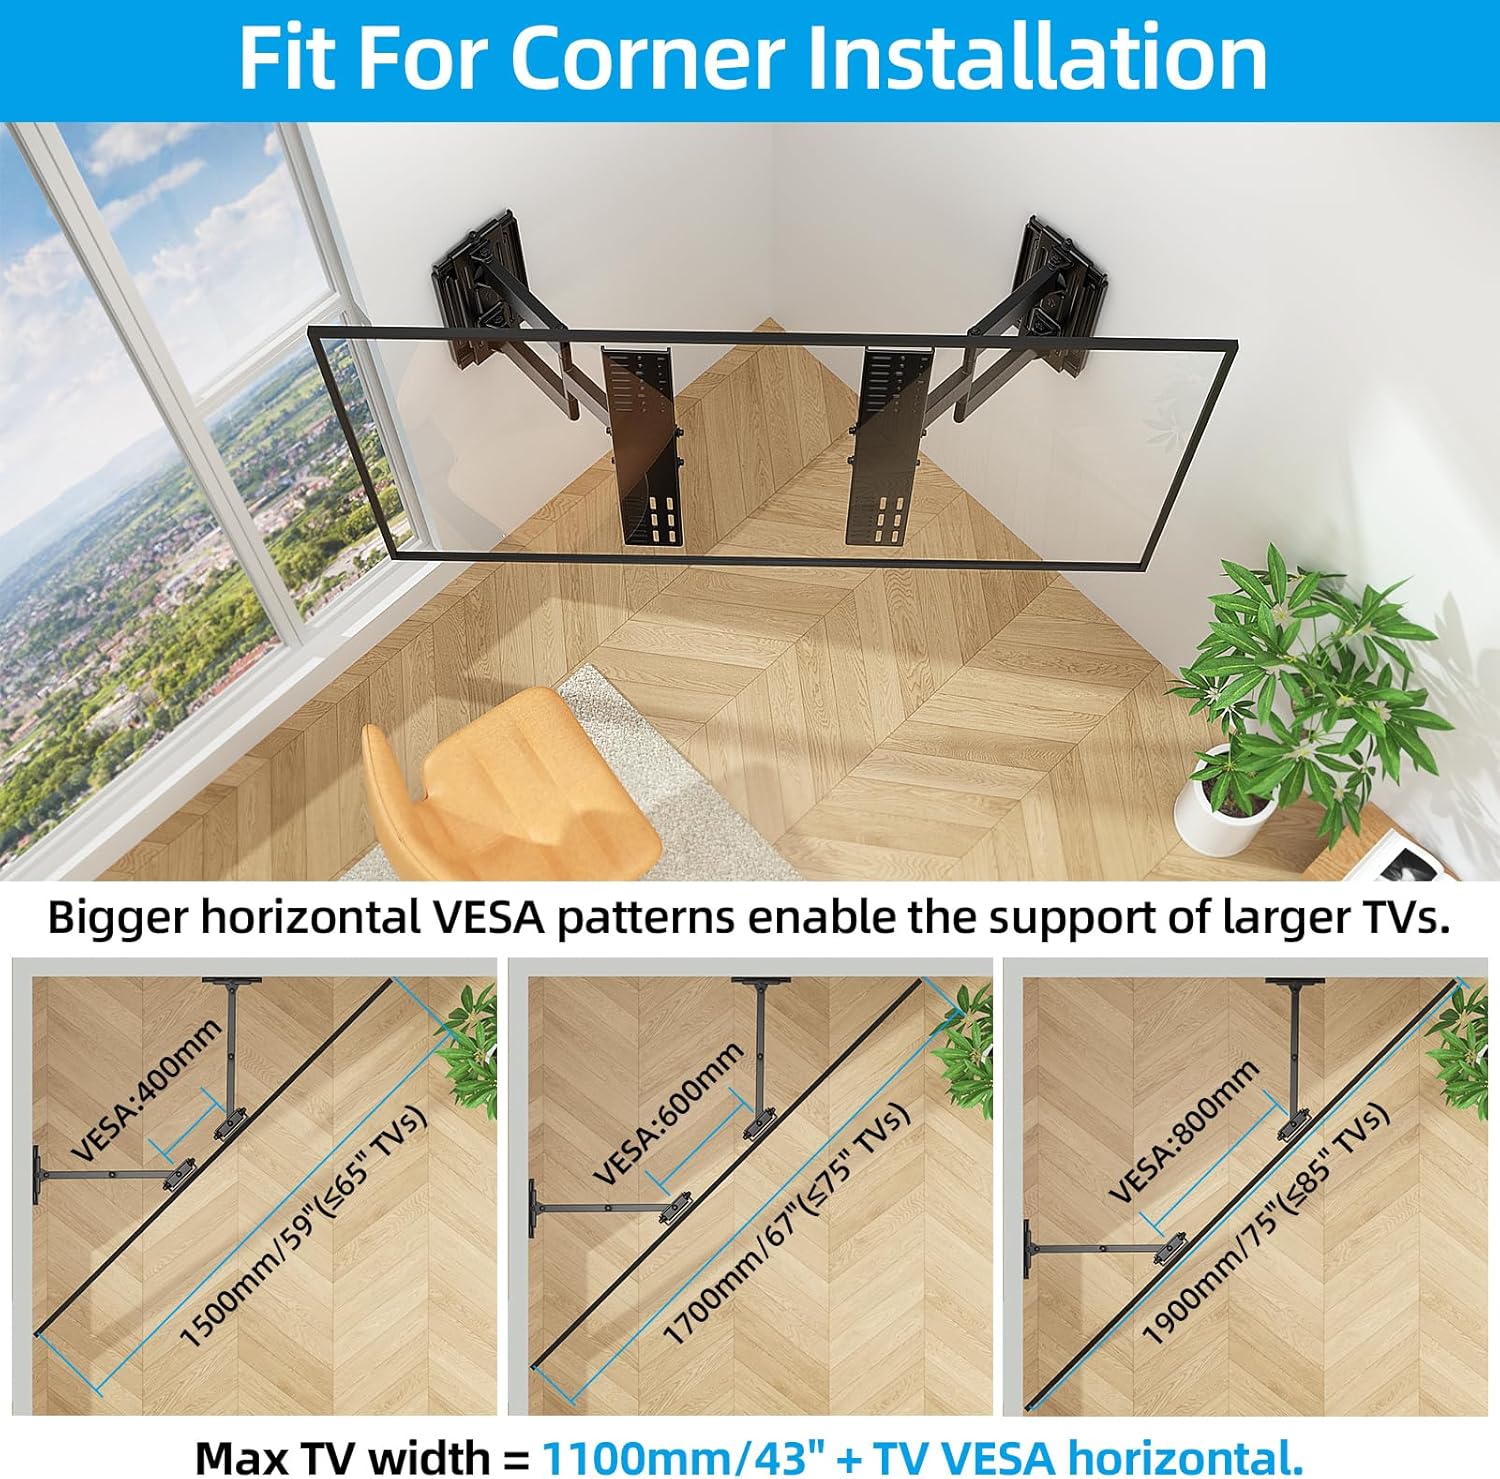
Image: Shows how the mount can be effectively used for corner installations, providing examples of maximum TV widths supported by different horizontal VESA patterns (400mm, 600mm, 800mm) in a 90-degree corner.
9. Customer Support
HOME VISION is committed to providing high-quality products and excellent customer service. If you have any questions, concerns, or require assistance with your TV wall mount, please do not hesitate to contact our professional after-sales team. We are dedicated to providing you with a total solution.
Please refer to the product packaging or the official HOME VISION website for the most current contact information.
