Introduction
This manual provides comprehensive instructions for the safe and effective operation, maintenance, and troubleshooting of your Subsun 2024 Upgraded Walking Pad. Please read this manual thoroughly before using the treadmill and retain it for future reference.
Safety Information
To ensure your safety and prolong the life of your treadmill, please adhere to the following precautions:
- Always place the treadmill on a flat, stable surface.
- Ensure adequate clearance around the treadmill (at least 2 feet on all sides).
- Do not allow children or pets near the treadmill while it is in operation.
- Always attach the safety key to your clothing before starting the treadmill. In case of emergency, pulling the safety key will immediately stop the machine.
- Wear appropriate athletic footwear during use.
- Do not operate the treadmill if it is damaged or malfunctioning.
- Consult a physician before starting any new exercise program.
- Maximum user weight capacity: 265 lbs (120 kg).
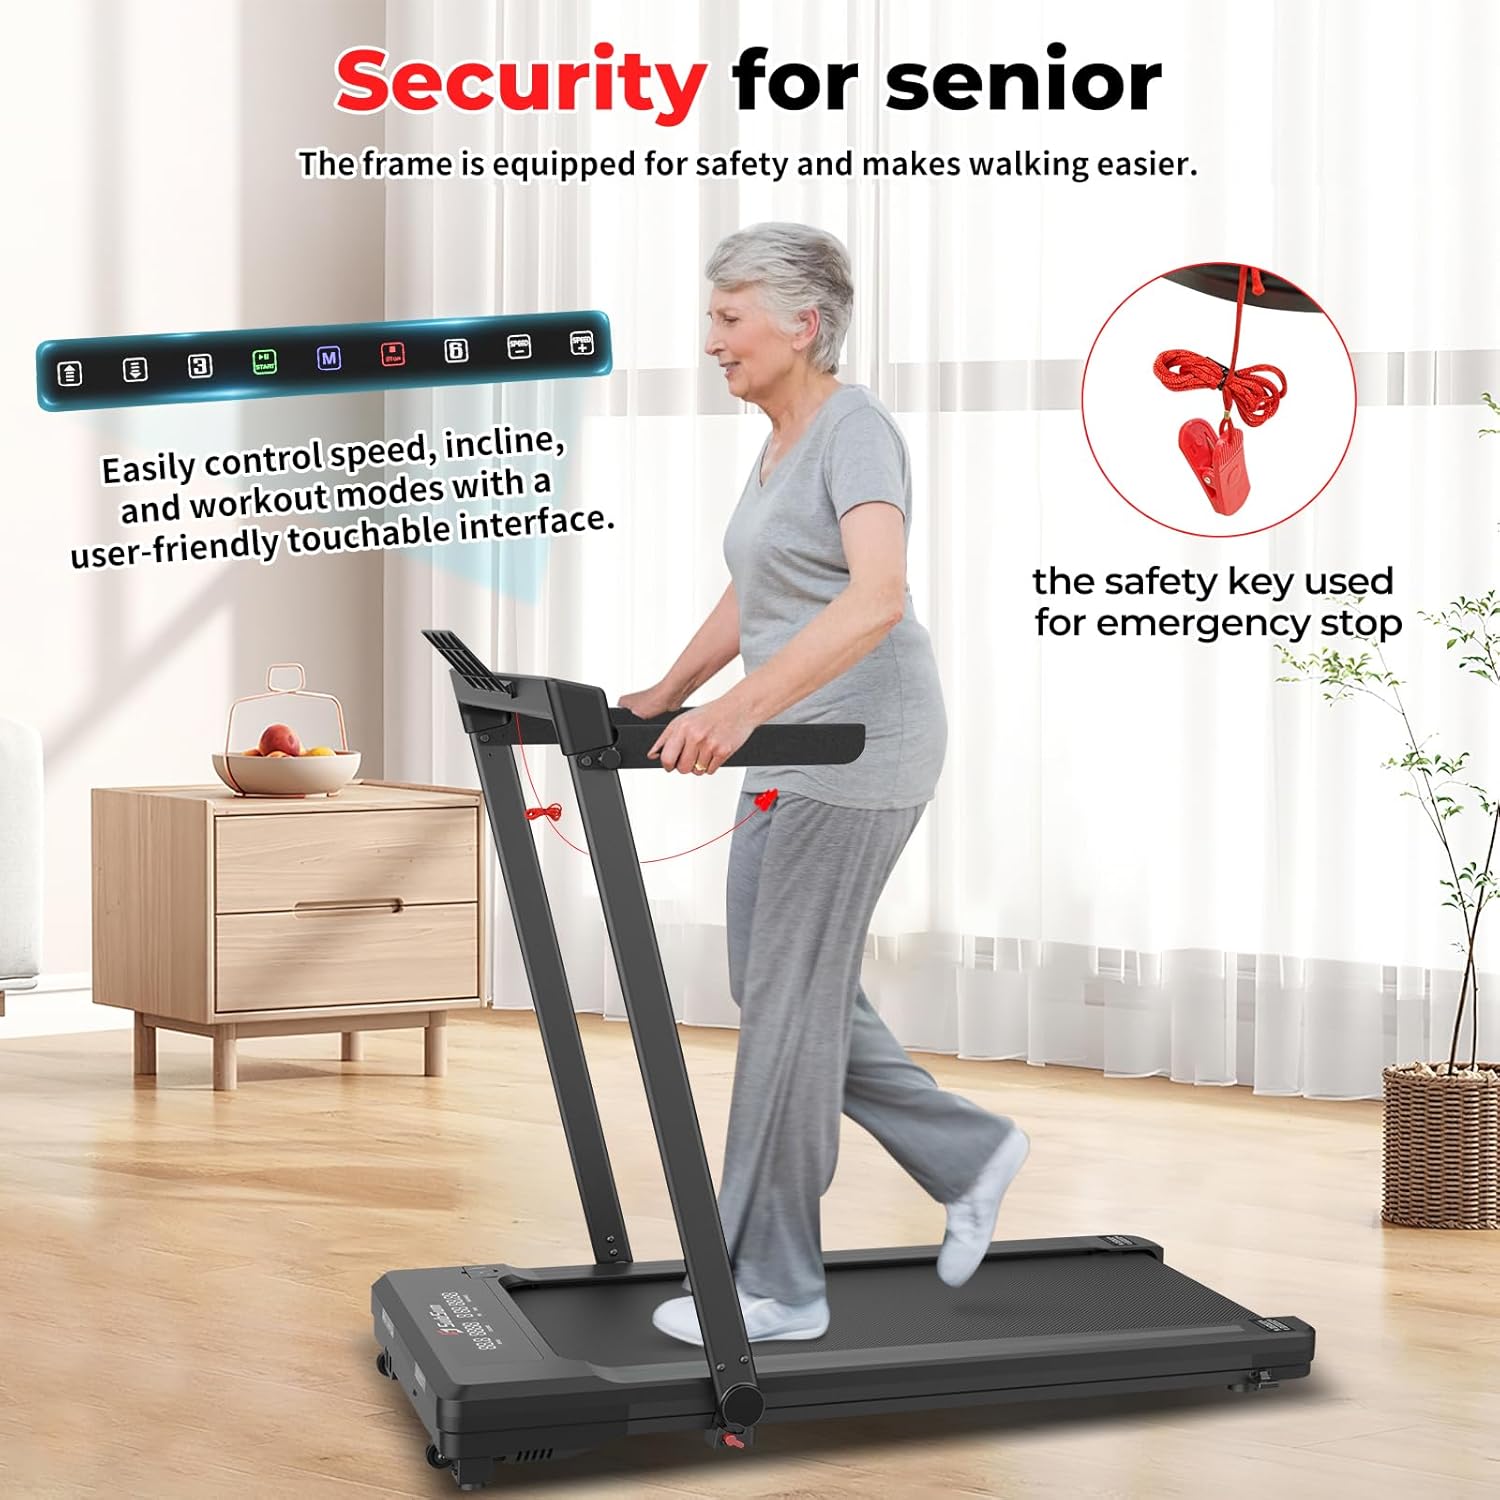
Image: The safety key, shown in red, is crucial for emergency stops. The console is designed for easy control of speed, incline, and workout modes.
Package Contents
Upon unpacking, verify that all components are present:
- Subsun Walking Pad Treadmill
- Remote Control
- Power Cord
- Safety Key
- Lubricant
- Tool Kit (for belt adjustment)
- User Manual (this document)
Product Overview
Key Features:
- Foldable Design: Compact storage with foldable handlebar and collapsible side handrails.
- Automatic Incline: 4-level automatic incline (0%, 5%, 7%, 9%) for varied workouts.
- User-Friendly Console: Intuitive touchable console and LCD display for real-time tracking.
- Spacious Running Surface: 17.32 x 42.52-inch (44 x 108 cm) running area.
- Quiet Operation: Low-noise motor for a smooth workout experience.
- Speed Range: 0.6 to 7.6 MPH (1 to 12.2 km/h).
- Safety Features: Safety key for emergency stops, shock-absorbing running surface.
- Portability: Equipped with transport wheels for easy movement.
Components:
Familiarize yourself with the main parts of your treadmill:
- Running Belt
- Motor Cover
- Console/Display
- Handlebars (foldable)
- Side Handrails (collapsible)
- Safety Key Slot
- Power Switch
- Power Cord Inlet
- Transport Wheels
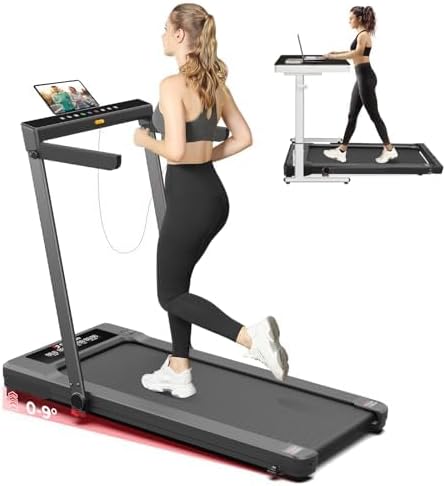
Image: The Subsun Walking Pad in its operational state, demonstrating its use as both a standalone treadmill and an under-desk walking pad.

Image: Detailed view of the treadmill's dimensions (50.78 inches length, 27.2 inches width, 40.94 inches height) and internal features including a 6-layer running belt, shock pads, and non-slip surface for knee protection.
Setup
- Unpacking: Carefully remove the treadmill from its packaging.
- Placement: Place the treadmill on a firm, level surface. Ensure there is sufficient space around the unit for safe operation and access.
- Unfolding:
- Gently lift the handlebar until it locks into the upright position.
- Extend the side handrails if desired for additional support.
- Power Connection: Insert the power cord into the treadmill's power inlet and then into a grounded electrical outlet.
- Power On: Flip the main power switch, usually located near the power cord inlet, to the 'ON' position. The display should illuminate.

Image: Illustration of the treadmill's easy-folding mechanism for compact storage (folded size: 53.9 x 27.2 x 5.5 inches) and close-ups of the smooth-rolling transport wheels.
Operating Instructions
Remote Control:
The treadmill is primarily controlled via the included remote. Ensure batteries are installed correctly.
- Start/Stop Button: Initiates or pauses the treadmill.
- +/- Buttons: Adjust speed.
- Mode (M) Button: Cycles through different workout modes (Manual, Countdown).
- Incline Buttons: Adjust the incline level (if applicable, usually integrated with speed or separate buttons).
Starting a Workout:
- Attach the safety key clip to your clothing.
- Stand on the side rails of the treadmill, not on the belt.
- Press the 'Start' button on the remote control. A 3-second countdown will begin, and the belt will start moving at a low speed (e.g., 0.5 MPH).
- Carefully step onto the moving belt.
- Use the '+/-' buttons to adjust the speed to your desired level.
Workout Modes:
- Manual Mode: Allows you to manually control speed and incline. The display will cycle through distance, calories burned, elapsed time, and speed.
- Countdown Modes:
- Time Countdown: Set a target workout duration.
- Distance Countdown: Set a target distance to walk/run.
- Calorie Countdown: Set a target number of calories to burn.
- Program Mode: The treadmill may include pre-set programs (P1-P12). Refer to the specific program table in your remote's manual for details on speed and incline variations within these programs.

Image: Visual representation of the treadmill's versatility, illustrating working mode (0.6-2 MPH), walking mode (2-4 MPH), and running mode (4-7.6 MPH).
Automatic Incline Adjustment:
This treadmill features a 4-level automatic incline system. Use the dedicated incline buttons on the remote or console to adjust the slope:
- 0% Incline: Flat surface.
- 5% Incline: Gentle uphill simulation.
- 7% Incline: Moderate uphill simulation.
- 9% Incline: Steepest uphill simulation for enhanced cardio and muscle engagement.
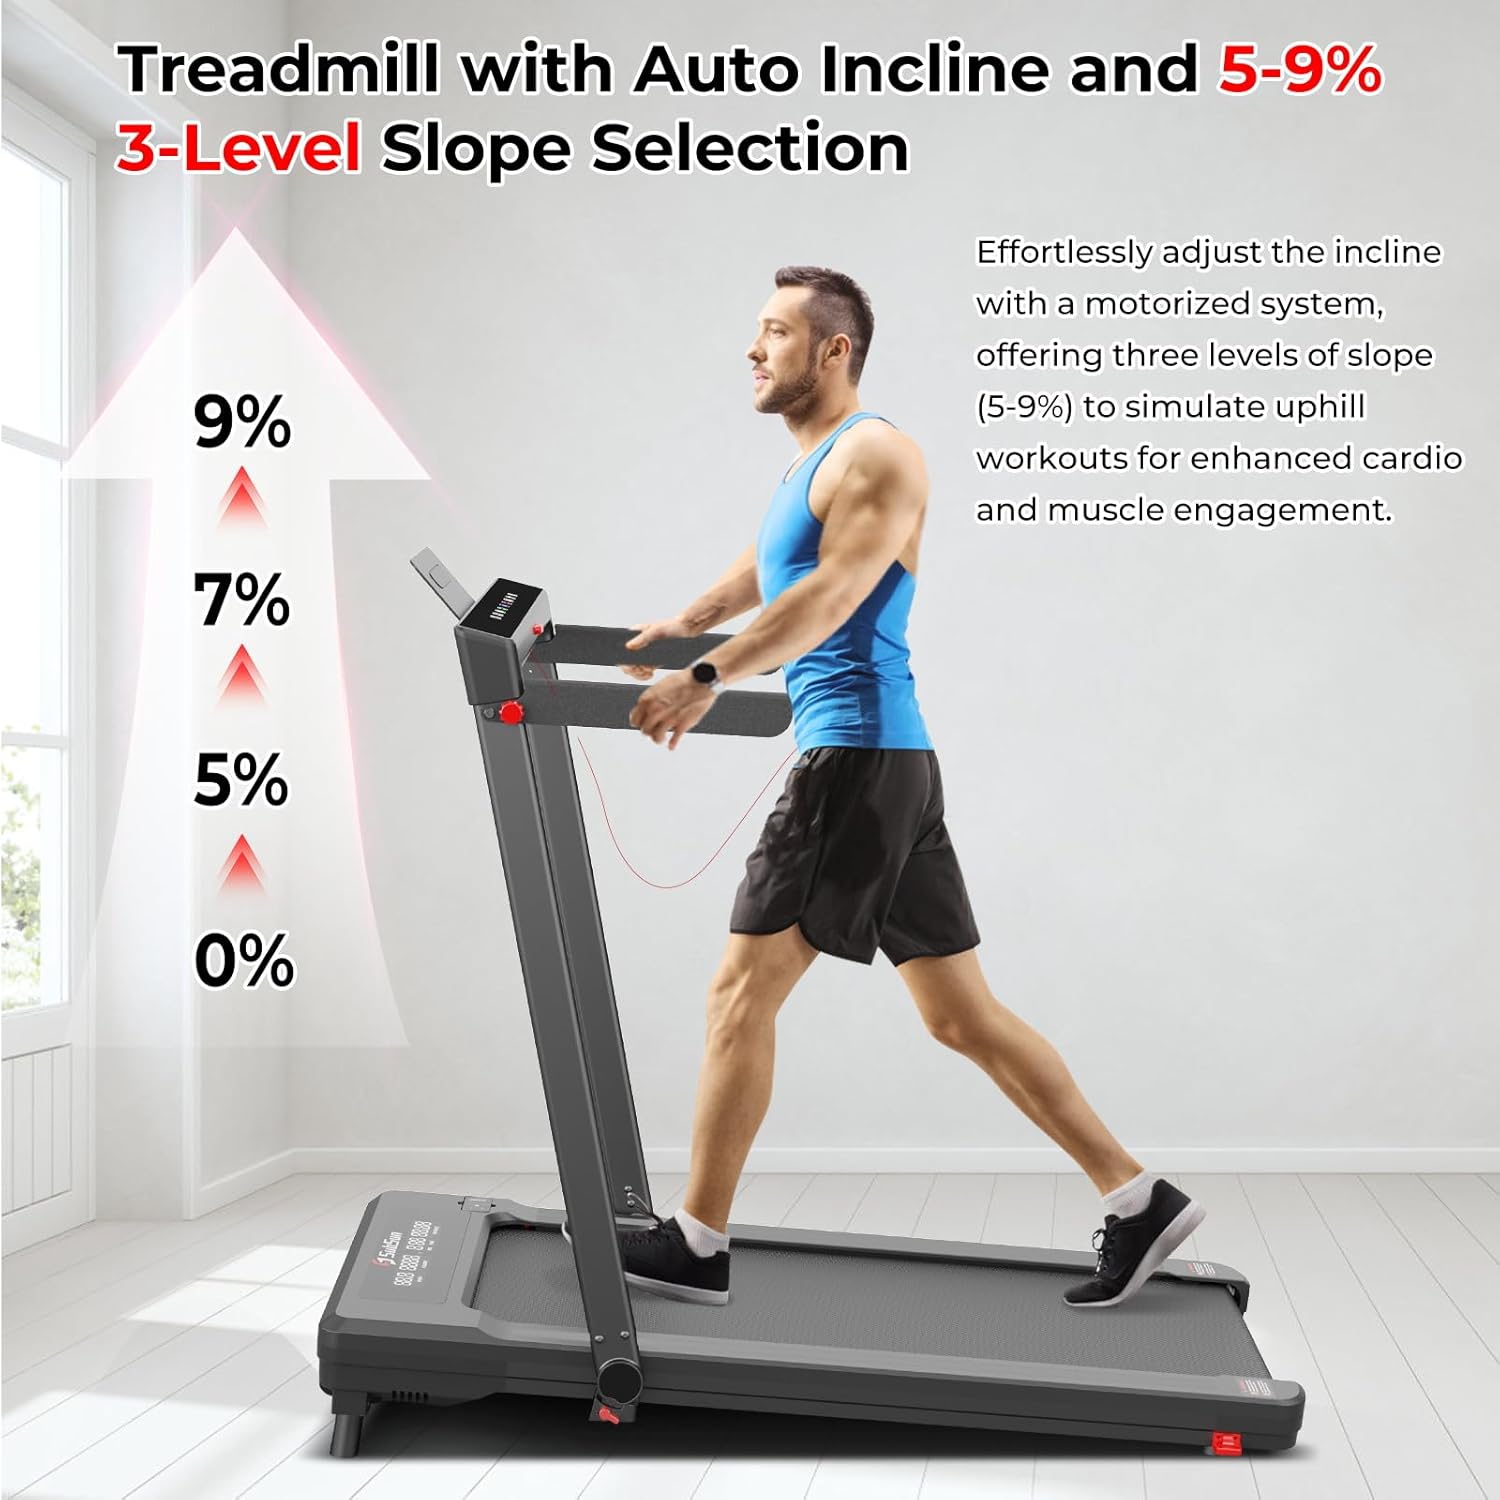
Image: A user on the treadmill demonstrating the auto-incline feature, with indicators for 0%, 5%, 7%, and 9% incline levels.

Image: Diagram illustrating the treadmill's shock absorption system, highlighting the 6 shock pads and the multi-layered running belt designed to reduce stress on the user's knees.

Image: A user walking on the treadmill, emphasizing the low-noise motor feature, with dimensions of the running surface (17.32 inches width, 42.52 inches length) indicated.
Maintenance
Regular maintenance ensures optimal performance and longevity of your treadmill.
Lubrication:
The running belt requires periodic lubrication to reduce friction and wear. Use the provided lubricant.
- Turn off and unplug the treadmill.
- Lift the edge of the running belt on one side.
- Apply a small amount of lubricant in a Z-pattern directly onto the deck under the belt.
- Repeat on the other side.
- Plug in the treadmill and run it at a low speed (e.g., 1 MPH) for 5 minutes to distribute the lubricant evenly.
- Lubricate every 3-6 months, or after every 50 hours of use, depending on frequency.
Belt Adjustment:
If the running belt becomes misaligned (drifts to one side) or feels loose/tight, it may need adjustment. Use the Allen key from the tool kit.
- Centering the Belt:
- If the belt drifts to the right, turn the right rear roller bolt clockwise in small increments (1/4 turn).
- If the belt drifts to the left, turn the left rear roller bolt clockwise in small increments (1/4 turn).
- Run the treadmill for a few minutes at a moderate speed after each adjustment to check alignment. Repeat until centered.
- Tensioning the Belt:
- If the belt slips during use, it may be too loose. Turn both rear roller bolts clockwise by equal small increments (1/4 turn) to tighten.
- If the belt feels too tight or makes excessive noise, turn both rear roller bolts counter-clockwise by equal small increments (1/4 turn) to loosen.
- Do not overtighten the belt, as this can cause excessive wear on the motor and belt.
Cleaning:
Wipe down the treadmill surfaces with a damp cloth after each use to remove sweat and dust. Do not use abrasive cleaners or solvents.
Troubleshooting
| Problem | Possible Cause | Solution |
|---|---|---|
| Treadmill does not power on. | Power cord not connected; Power switch off; Circuit breaker tripped. | Ensure power cord is securely plugged in. Turn power switch to 'ON'. Check household circuit breaker. |
| Belt does not move. | Safety key not in place; Treadmill in pause mode; Motor issue. | Ensure safety key is fully inserted. Press 'Start' on remote. If problem persists, contact customer support. |
| Belt slips during use. | Belt too loose; Insufficient lubrication. | Adjust belt tension (see Maintenance section). Apply lubricant to the running deck. |
| Unusual noise from treadmill. | Lack of lubrication; Loose components; Belt misalignment. | Lubricate the belt. Check for any loose screws or parts and tighten. Adjust belt alignment. |
| Incline not adjusting. | Incline motor issue; Obstruction. | Check for any obstructions under the treadmill. If problem persists, contact customer support. |
Specifications
- Model: S600C
- Product Dimensions: 128.98 x 69.09 x 103.99 cm (50.78 x 27.2 x 40.94 inches)
- Folded Dimensions: 53.9 x 27.2 x 5.5 inches
- Running Area: 17.32 x 42.52 inches (44 x 108 cm)
- Item Weight: 33.5 kg (73.85 lbs)
- Maximum Weight Capacity: 265 lbs
- Speed Range: 0.6 - 7.6 MPH (1 - 12.2 km/h)
- Horsepower: 2.5 HP
- Incline Levels: 4 (0%, 5%, 7%, 9%)
- Power Source: Corded Electric
- Material: Metal, Acrylonitrile Butadiene Styrene (ABS)
- Display Metrics: Calories Burned, Distance, Incline, Speed, Time
Warranty and Support
For warranty information, technical support, or replacement parts, please contact SubSun customer service. Refer to the contact information provided with your purchase documentation or visit the official SubSun website.
Please have your model number (S600C) and purchase date available when contacting support.