Giantex GX11385-PN
Giantex Portable Propane Grill & Camping Stove User Manual
Model: GX11385-PN
Introduction
This manual provides essential information for the safe and efficient operation, maintenance, and troubleshooting of your Giantex Portable Propane Grill & Camping Stove. Please read this manual thoroughly before assembly and use, and retain it for future reference.
Safety Information
WARNING: For outdoor use only. Do not store or use gasoline or other flammable vapors and liquids in the vicinity of this or any other appliance.
- Always operate the stove on a level, stable, non-combustible surface.
- Keep children and pets away from the stove during operation.
- Ensure adequate ventilation. Never use indoors or in enclosed spaces.
- Check for gas leaks before each use. Use a soapy water solution on connections; bubbles indicate a leak.
- Do not leave the operating stove unattended.
- Allow the stove to cool completely before cleaning or storing.
- Use only the regulator and hose assembly provided with the stove.
Package Contents
- 1 x Giantex Portable Propane Grill & Camping Stove Unit
- 1 x Hose with Regulator
- 1 x Instruction Manual (this document)
- Detachable Legs (4 pieces)
Setup
Follow these steps to set up your portable grill and camping stove:
- Unpack the Unit: Carefully remove all components from the packaging.

Image: The Giantex Portable Propane Grill and Camping Stove fully assembled with its detachable legs, ready for use. A propane hose with regulator is connected to the side.
- Attach the Legs (for freestanding use): Locate the four detachable metal legs. Screw each leg firmly into the designated sockets on the underside of the stove unit. Ensure all legs are securely tightened for stability.
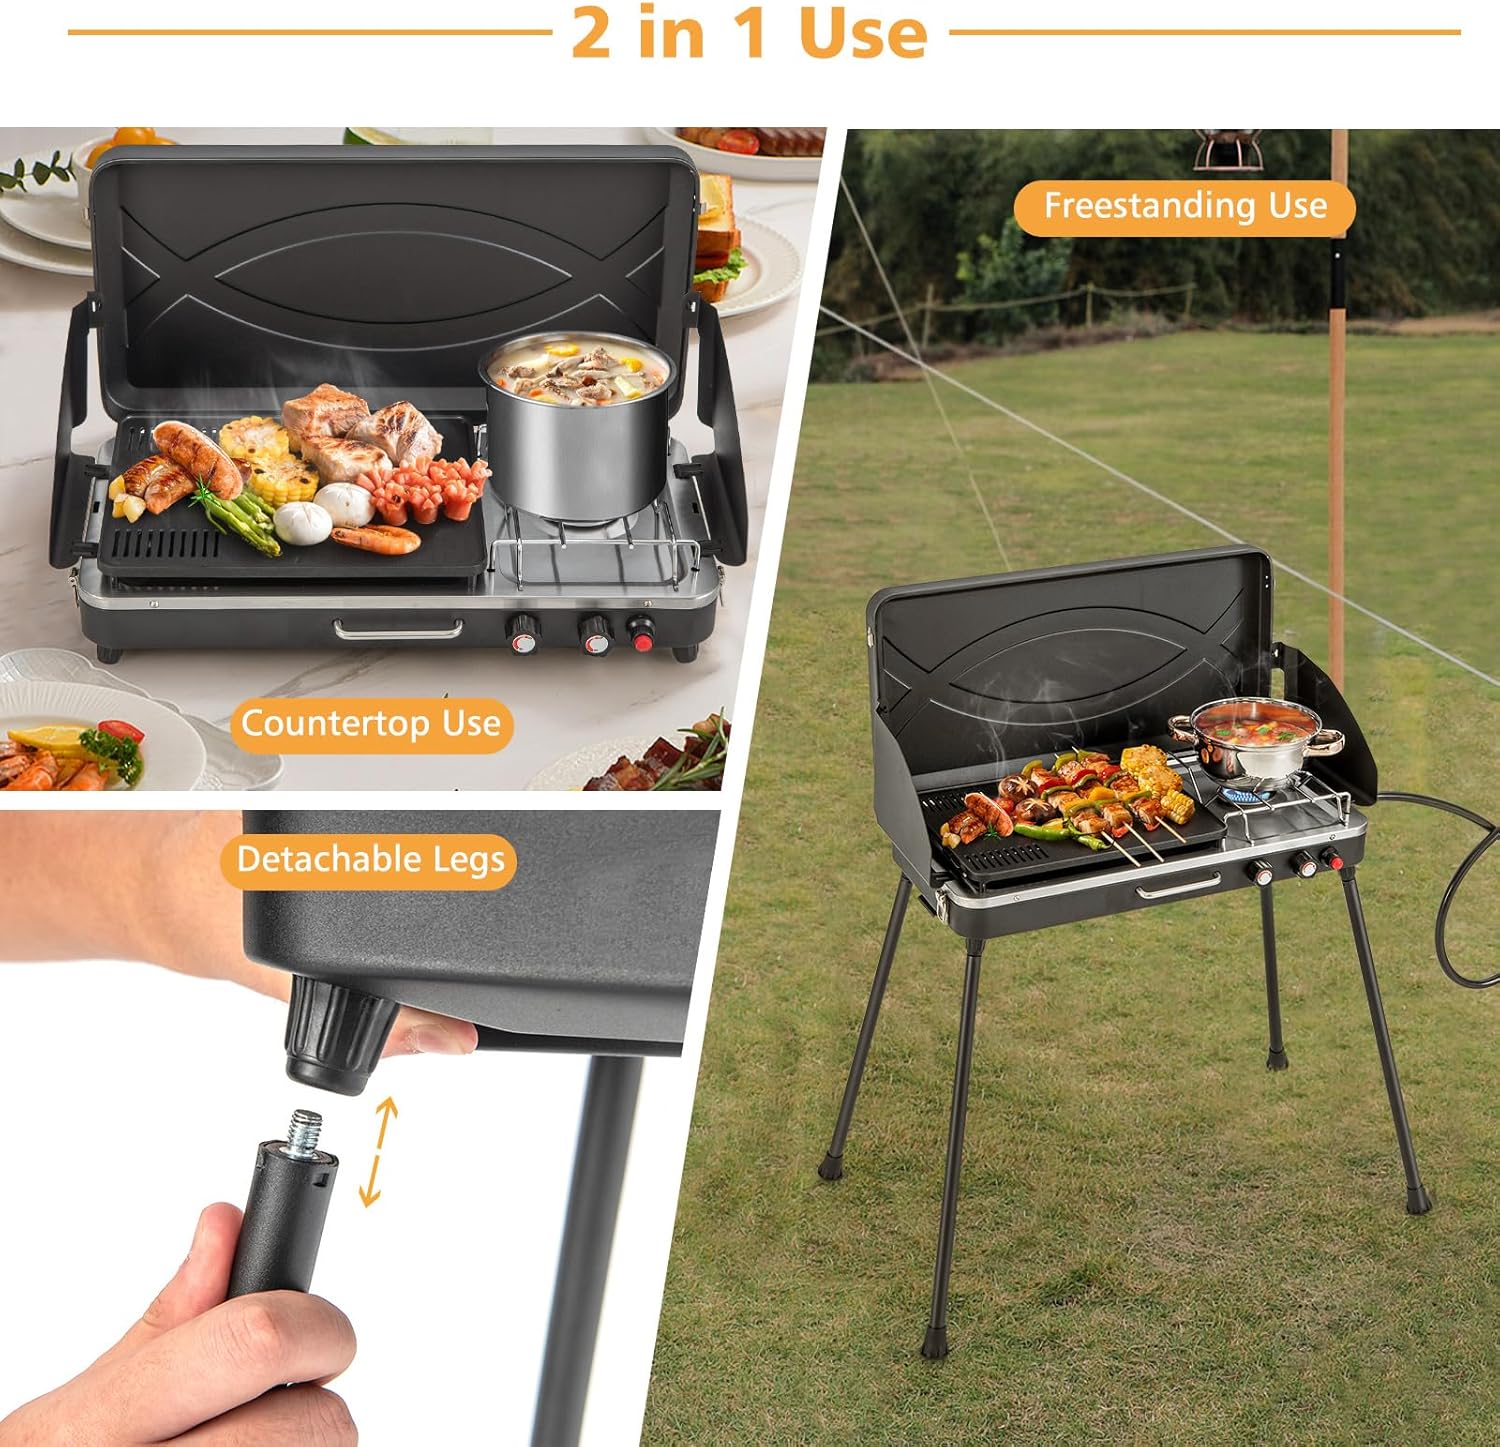
Image: A detailed view demonstrating how to attach the detachable legs to the stove unit by screwing them into place. The image also shows the stove in both freestanding and countertop configurations.
Note: For countertop use, the legs can be detached, allowing the stove to be placed directly on a stable surface.
- Connect the Propane Tank: Attach the provided hose with regulator to the gas inlet on the side of the stove. Connect the other end of the regulator to your propane tank (not included). Ensure all connections are hand-tight.
Leak Test: Before first use and after every tank change, perform a leak test. Apply a soapy water solution to all gas connections. If bubbles appear, there is a leak. Tighten connections or replace parts as necessary. Do not use if a leak is detected.
Operating Instructions
Your Giantex stove features a versatile 2-in-1 cooking design with independent temperature control for the grill and stove burner.
Ignition
- Ensure a 1 AAA battery (not included) is installed for the one-click ignition.
- Open the propane tank valve slowly.
- Turn the desired burner control knob (either grill or stove) to the "ON" position.
- Press the red ignition button repeatedly until the burner ignites. If it doesn't ignite within 5 seconds, turn the knob to "OFF", wait 5 minutes, and repeat the process.

Image: A close-up view highlighting the control knobs for easy fire power adjustment and the one-click ignition button, along with a visual representation of the 20,000 BTU total heating efficiency.
Temperature Control
Use the dual control knobs to adjust the heat independently for the grill and the stove burner. Turn the knob clockwise to decrease flame size and counter-clockwise to increase it.

Image: An overhead diagram illustrating the partition cooking design, showing the 154 sq. inch grilling area and the stove burner area which accommodates 10-inch and 12-inch pans, suitable for barbecue, soups, and frying.
Wind Guard Usage
The 3-sided wind guard helps maintain stable flames in breezy conditions. Ensure the side panels are extended upwards during operation to protect the burners from wind. These panels can also be adjusted to accommodate larger cookware.

Image: A visual breakdown of key features including the foldable wind guard, air vents for proper combustion, and the easily accessible removable grease collector for convenient cleaning.
Maintenance and Cleaning
Regular cleaning and maintenance will ensure the longevity and optimal performance of your stove.
- Cool Down: Always allow the stove to cool completely before attempting any cleaning.
- Removable Grease Tray: The stove features a removable grease tray for easy disposal of grease and drippings. Slide out the tray from the front or side of the unit, empty its contents, and wash with warm, soapy water.

Image: A hand demonstrating the removal of the grease collector tray from the bottom of the stove, highlighting the ease of cleaning.
- Cooking Surfaces: Clean the stainless steel and aluminum-coated cooking surfaces with a damp cloth and mild detergent. Avoid abrasive cleaners or scouring pads that could scratch the finish.
- Exterior: Wipe down the exterior with a damp cloth. For stubborn stains, use a mild cleaner.
- Storage: When not in use, ensure the stove is clean and dry. Detach the legs and fold the unit for compact storage. Store in a cool, dry place away from direct sunlight and moisture.

Image: Two images illustrating the portability of the stove: one showing the folded unit being carried by its handle, and another showing it easily fitting into a car trunk, emphasizing its compact size for transportation.
Troubleshooting
If you encounter issues with your stove, refer to the following common problems and solutions:
| Problem | Possible Cause | Solution |
|---|---|---|
| Burner does not ignite. | No gas flow; Ignition battery dead/missing; Clogged burner port. | Check propane tank connection and ensure valve is open. Replace AAA battery. Clean burner ports with a thin wire. |
| Low flame or inconsistent flame. | Low propane level; Regulator issue; Clogged burner. | Check propane tank level. Ensure regulator is properly connected. Clean burner ports. |
| Gas smell detected. | Gas leak. | Immediately turn off gas supply. Perform a leak test with soapy water. Do not use until leak is resolved. |
If the problem persists after attempting these solutions, please contact customer support.
Specifications
| Feature | Detail |
|---|---|
| Brand | Giantex |
| Model Name | Portable Propane Grill & Camping Stove |
| Product Dimensions (Overall) | 29'' x 18.5'' x 25'' (L x W x H) |
| Folded Dimensions (without legs) | 23'' x 11'' x 4'' (L x W x H) |
| Grill Pan Dimensions | 14'' x 11'' (L x W) |
| Cooking Surface Area | 154 Square Inches |
| Total Cooking Power | 20,000 BTUs (11,000 BTUs Grill, 9,000 BTUs Stove) |
| Fuel Type | Propane Gas |
| Material | Stainless Steel, Alloy Steel |
| Item Weight | 16.5 lbs |
| Special Features | 2-in-1 Cooking Design, Detachable Legs, Independent Temperature Control, 3-Sided Wind Guard, Removable Grease Tray |

Image: A diagram illustrating the key dimensions of the Giantex Portable Propane Grill & Camping Stove, both in its assembled freestanding configuration and its compact, folded state.
Warranty and Support
For warranty information or technical support, please refer to the contact details provided by Giantex at the point of purchase or visit the official Giantex website. Keep your purchase receipt for warranty claims.
Protection plans may be available for extended coverage. Please check with your retailer for details.
Ask a question about this manual
Ask about setup, troubleshooting, compatibility, parts, safety, or missing instructions. Manuals+ will review the question and use this page’s manual context to help answer it.