1. Introduction
The Flashforge Adventurer 5X is an advanced 3D printer designed for high-speed, multi-color printing. It features an Intelligent Filament System (IFS) for flexible multi-material printing, a maximum speed of 600 mm/s, and a compact integrated design for ease of use. This manual provides essential information for setting up, operating, maintaining, and troubleshooting your Adventurer 5X 3D printer.
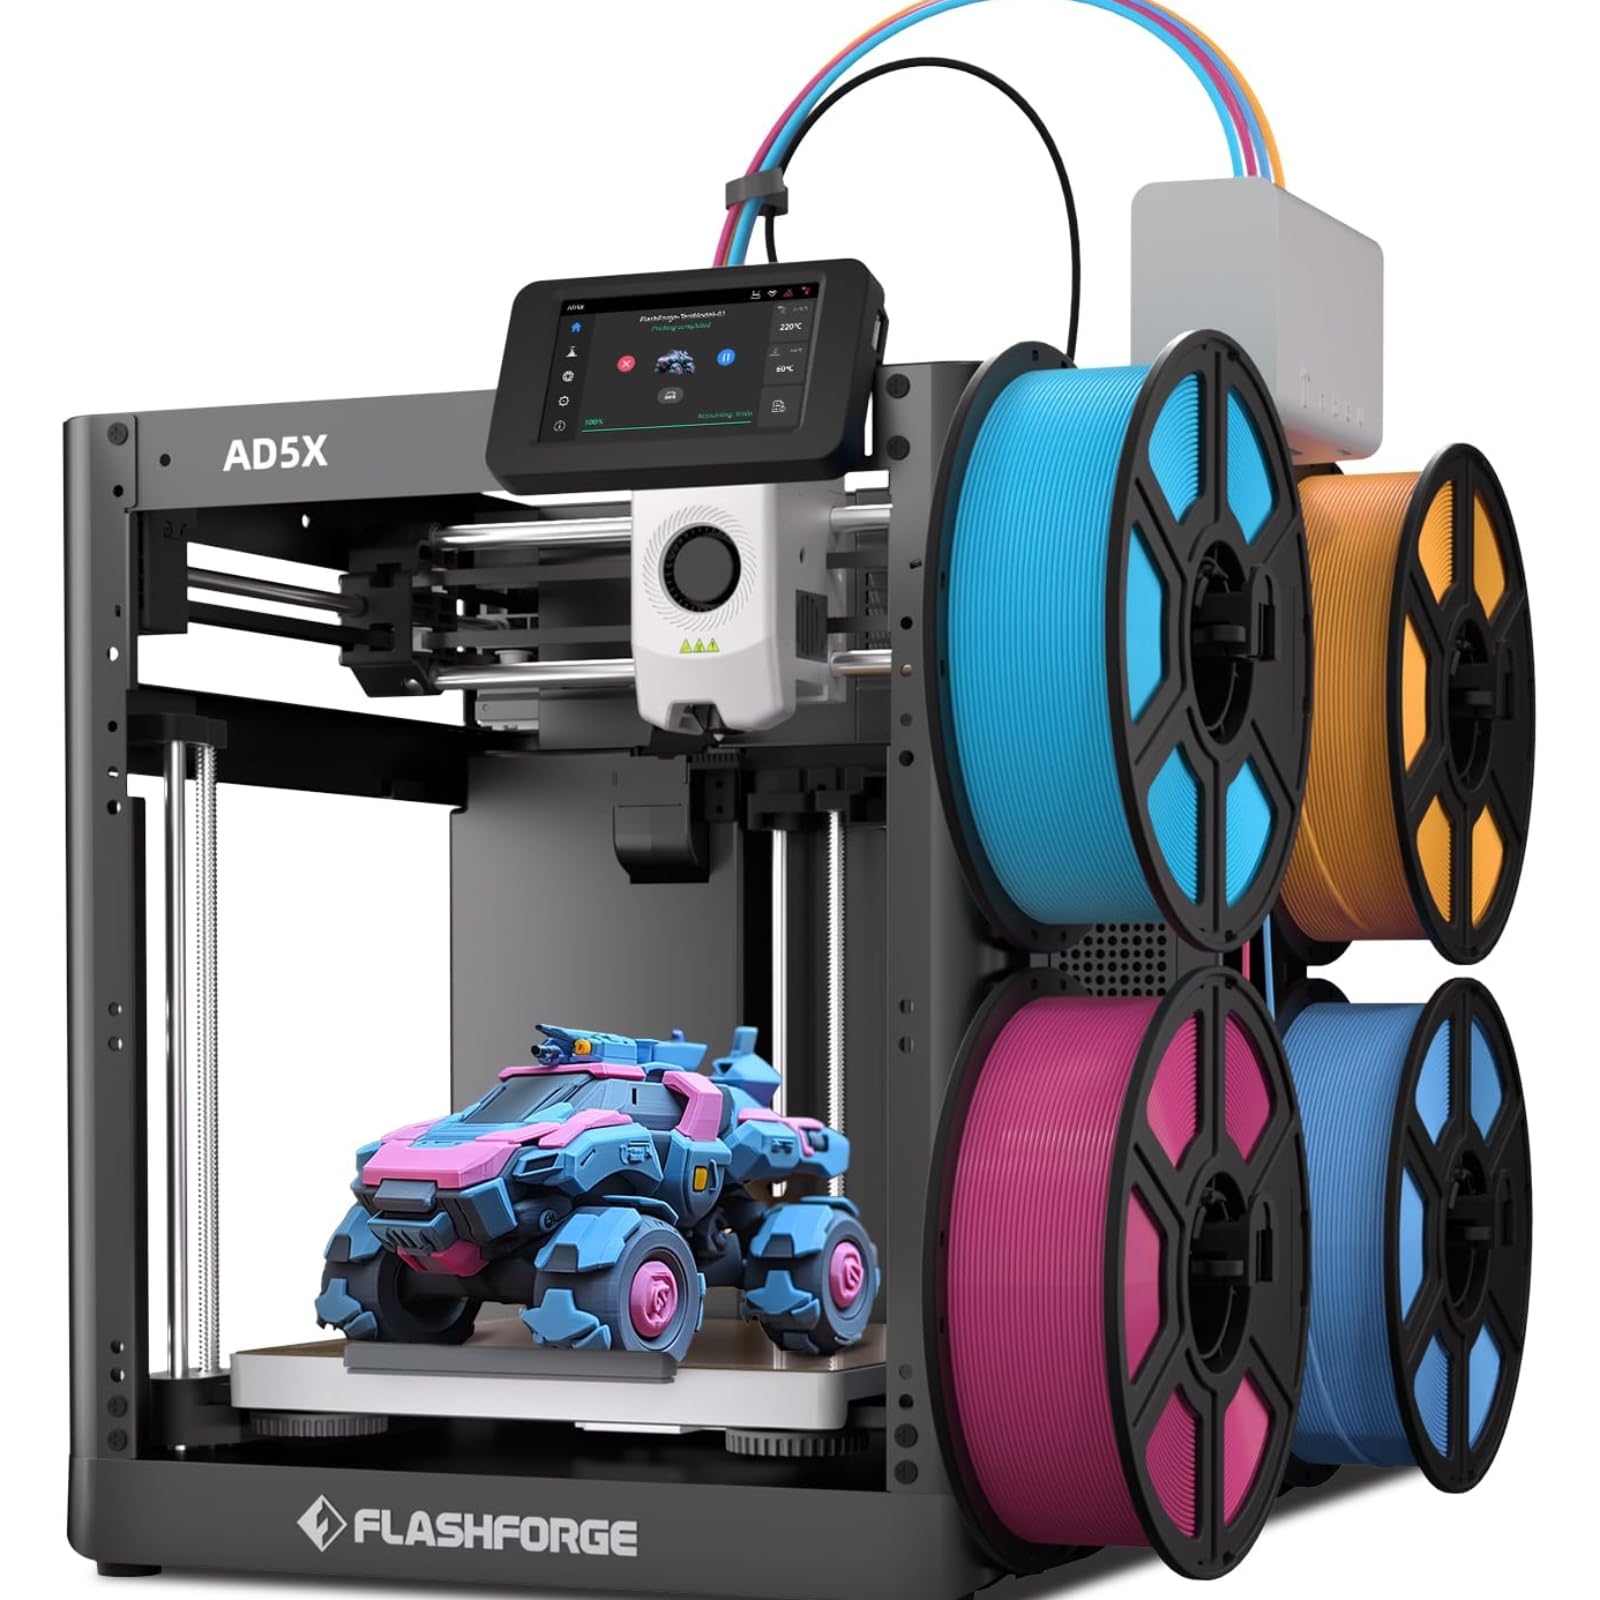
Figure 1: The Flashforge Adventurer 5X 3D Printer, showcasing its compact design and filament holders.
2. Package Contents
Before beginning setup, ensure all components are present in the package. Refer to the image below for a visual guide to the included items.

Figure 2: Detailed list of items included in the Flashforge Adventurer 5X package, such as the 3D printer, filament, power cord, tools, and documentation.
- Flashforge Adventurer 5X 3D Printer
- Filament (starter rolls)
- Power Cord
- Service Card
- IFS Connection Cable
- Quick Start Guide
- Display Screen
- Grease
- Spool Holder (4 units)
- 4-in-1 Guide Tube
- Mounting Plate
- 4-Color Module (IFS)
- Screws (M3x6 * 4)
- Cable Clip
- Glue
- Diagonal Pliers
- Phillips Screwdriver
- Allen Wrench Kits
3. Setup and Initial Configuration
The Adventurer 5X is designed for quick setup. Initial assembly typically takes 30 to 45 minutes. Follow these steps for first-time use:
- Unboxing: Carefully remove all components from the packaging.
- Assembly: Attach the display screen and the Intelligent Filament System (IFS) module as per the Quick Start Guide.
- Power Connection: Connect the power cord to the printer and a suitable power outlet.
- Filament Loading: The printer features automatic filament loading. Insert the filament into the designated slot, and the system will guide it into the extruder.
- Auto-Leveling: The Adventurer 5X includes a one-click auto-leveling function. Initiate this process from the touchscreen interface to ensure optimal print bed calibration.
Video 1: An official product video demonstrating the setup process, including auto filament loading, touchscreen operation, and one-click auto-leveling.

Figure 3: The Adventurer 5X performing its automatic bed leveling procedure, ensuring a perfect first layer for prints.
4. Operating Instructions
4.1 Multi-Color Printing with IFS
The Adventurer 5X supports multi-color printing through its Intelligent Filament System (IFS). This system allows for flexible TPU multi-color printing and standard multi-color series printing. The IFS automatically manages up to four filament rolls, enabling seamless color changes during a print.

Figure 4: The Adventurer 5X demonstrating its multi-color printing capabilities with various printed objects and multiple filament spools.
The IFS also features automatic filament loading and unloading, simplifying the process of changing or refilling materials. It includes jam detection to prevent printing failures due to filament feed issues.

Figure 5: Diagram illustrating the IFS Intelligent Filament System, showing how multiple filaments are fed into the printer.
4.2 High-Speed Printing
The Adventurer 5X boasts a maximum print speed of 600 mm/s and an acceleration of 20,000 mm/s². This high-speed capability significantly reduces print times while maintaining print quality.

Figure 6: Graphic illustrating the high-speed performance of the Adventurer 5X, showing a comparison of print times.
4.3 User Interface and Control
The printer features an intuitive 4.3-inch color touchscreen interface for easy operation. You can manage print jobs, monitor status, and adjust settings directly from the screen.
For remote management, the Adventurer 5X can be controlled using Flash Maker and Orca-Flashforge applications. These tools allow you to manage multiple printers, monitor their status in real-time, and control filament colors and types remotely.

Figure 7: Screenshot of the Flash Maker/Orca-Flashforge app interface on a laptop and smartphone, demonstrating remote control and monitoring of multiple 3D printers.
4.4 Supported Materials and Nozzles
The Adventurer 5X supports a wide range of filaments including PETG, PLA, PLA PRO/HS PLA, PLA Matte, PLA Silk, CF-PETG, and PETG-CF. The printer comes with a 0.4mm nozzle as default, with optional nozzles available in 0.25mm, 0.6mm, and 0.8mm diameters for various precision and efficiency requirements. The quick-detachable nozzle design allows for changes in approximately 30 seconds.

Figure 8: Illustration of the quick-detachable nozzle system and available nozzle diameters (0.25mm, 0.4mm, 0.6mm, 0.8mm) for the Adventurer 5X.

Figure 9: Display of various filament types supported by the Adventurer 5X, including PLA, PETG, and their variants, alongside example prints.
5. Maintenance
Regular maintenance ensures optimal performance and longevity of your 3D printer.
- Nozzle Cleaning/Replacement: Periodically check the nozzle for clogs or wear. The quick-detachable design makes replacement straightforward, requiring the removal of two screws and a small plastic block.
- Print Bed Cleaning: Clean the PEI flexible steel plate after each print with isopropyl alcohol to ensure good adhesion for subsequent prints.
- Lubrication: Apply grease to the moving parts (e.g., Z-axis lead screw, guide rails) as indicated in the Quick Start Guide to ensure smooth operation.
- Filament Path Inspection: Regularly inspect the filament guide tubes and the IFS module for any obstructions or wear.
- Firmware Updates: Check the Flashforge official website or the printer's interface for available firmware updates to ensure you have the latest features and bug fixes.
6. Troubleshooting
This section addresses common issues you might encounter:
| Issue | Possible Cause | Solution |
|---|---|---|
| Print not sticking to bed | Dirty print bed, incorrect bed temperature, improper bed leveling. | Clean the PEI plate with isopropyl alcohol. Verify bed temperature settings in slicing software. Perform auto-leveling. |
| Filament not extruding | Clogged nozzle, tangled filament, incorrect temperature, filament jam in IFS. | Clean or replace the nozzle. Ensure filament spool is untangled. Verify extruder temperature. Check IFS for jams. |
| Poor print quality (layer shifts, stringing) | Incorrect print speed, retraction settings, loose belts, worn nozzle. | Adjust print speed and retraction settings in your slicer. Inspect and tighten belts if necessary. Consider replacing the nozzle. |
| Printer not connecting to network | Incorrect Wi-Fi password, network interference, outdated firmware. | Verify Wi-Fi credentials. Ensure printer is within range of router. Update printer firmware. |
7. Specifications
Key technical specifications for the Flashforge Adventurer 5X 3D Printer:
| Feature | Detail |
|---|---|
| Extruder Quantity | 1 |
| Build Volume | 220 x 220 x 220 mm |
| Layer Thickness | 0.05 - 0.4 mm |
| Nozzle Diameter | 0.4mm (default), 0.25/0.6/0.8mm (optional) |
| Supported Filaments | PETG/PLA/PLA-CF/PETG-CF |
| Travel Speed | Max 600 mm/s |
| Print Speed | Max 300 mm/s |
| Acceleration | Max 20,000 mm/s² |
| Max Extruder Temp | 300°C |
| Max Bed Temp | 110°C |
| Build Plate | PEI flexible steel sheet |
| Auto Leveling | Yes |
| Filament Detection | Yes |
| Power Loss Recovery | Yes |
| Multi-Device Management | Yes |
| Connectivity | USB/Ethernet/Wi-Fi |
| Compatible Slicing Software | Orca-Flashforge, Orca Slicer |
| Product Dimensions | 49 x 45 x 45 cm |
| Item Weight | 14.5 kg |
8. Warranty and Support
Flashforge provides lifetime technical support and professional customer service available 12 hours a day. For any issues or inquiries, please refer to the contact information provided in your Quick Start Guide or visit the official Flashforge support website.