1. Introduction
This manual provides essential information for the safe and efficient operation of your RDYMONKEY GS-12KW-III 12000W Solar Hybrid Inverter. This low-frequency, split-phase pure sine wave inverter is designed to convert 48V DC power to 110/240V AC, suitable for various off-grid and hybrid solar applications. It features a built-in 2 MPPT solar charger controller and is UL 1741 certified, ensuring reliability and safety.
Please read this manual thoroughly before installation and operation to ensure proper use and to prevent damage to the unit or injury.

Figure 1: RDYMONKEY GS-12KW-III Solar Hybrid Inverter overview.
2. Safety Instructions
Adherence to these safety guidelines is critical for personal safety and to prevent damage to the inverter and connected equipment.
- Qualified Personnel: Installation and maintenance must be performed by qualified personnel familiar with electrical systems and safety standards.
- Ventilation: Ensure adequate ventilation around the inverter to prevent overheating. Do not block ventilation openings.
- Environment: Install the inverter in a dry, cool, and dust-free environment, away from flammable materials and corrosive gases.
- Grounding: The inverter must be properly grounded to prevent electrical shock.
- DC Disconnect: Always disconnect DC power from the battery bank and solar array before performing any wiring or maintenance.
- AC Disconnect: Ensure AC input and output are disconnected before servicing.
- UL 1741 Certification: This inverter is ETL certified to UL 1741 standards, indicating compliance with safety requirements for inverters, converters, controllers, and interconnection system equipment for use with distributed energy resources.

Figure 2: The inverter incorporates multiple intelligent protection systems for safe operation.
3. Product Overview
The RDYMONKEY GS-12KW-III is a robust solar hybrid inverter designed for reliable power conversion. Key features include:
- 12000W Pure Sine Wave Output (36000W Peak)
- 48V DC Input to 110/240V AC Output (Settable)
- Low Frequency Transformer Design
- Built-in 2 x 80A MPPT Solar Charger Controllers (Total 160A)
- Maximum Charging Current: 200A (Selectable 0-100%)
- Compatible with various battery types: AGM, GEL, Lead Acid, Lithium-ion, LiFePO4
- Automatic Generator Start (AGS) function
- Multiple Protections: Over/low voltage, overtemperature, overload, short circuit.
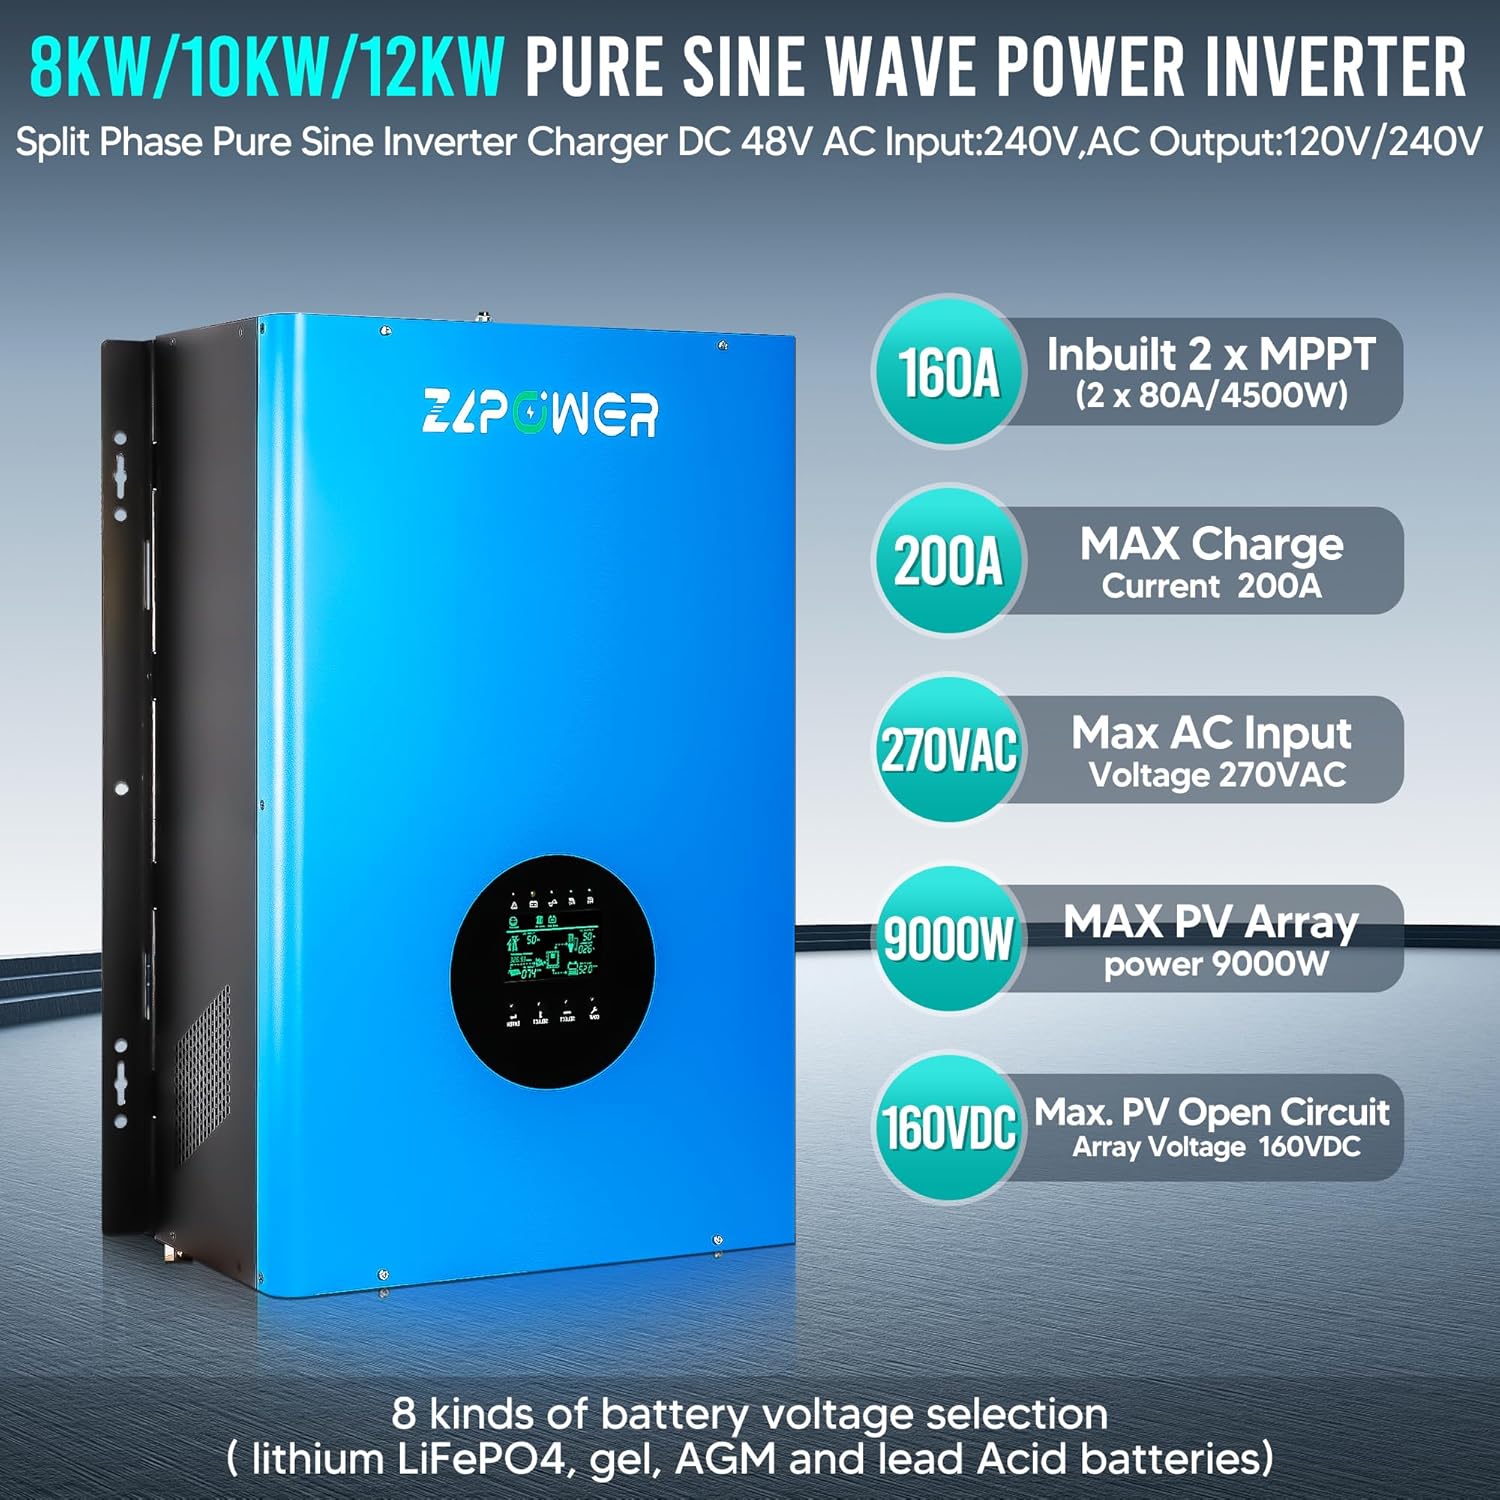
Figure 3: Key specifications and features of the 12KW Pure Sine Wave Power Inverter.
4. Setup and Installation
4.1 Mounting
Mount the inverter vertically on a sturdy, non-flammable surface. Ensure there is sufficient clearance around the unit for proper airflow and heat dissipation. Avoid direct sunlight and heat sources.
4.2 Wiring Connections
All wiring must comply with local electrical codes and standards. Use appropriately sized cables for all connections.
- Grounding Terminal: Connect the inverter to an earth ground using a suitable grounding wire.
- Battery Connections (48V DC): Connect the positive and negative terminals of your 48V battery bank to the corresponding battery positive and negative terminals on the inverter. Ensure correct polarity.
- Solar Panel Input: Connect your solar array to the MPPT solar input terminals. Observe correct polarity and ensure the PV open circuit voltage does not exceed 160VDC.
- AC Input (Utility/Generator): Connect the AC utility grid or a generator to the AC input terminals. This allows for battery charging and load powering from an external AC source.
- AC Output (Loads): Connect your AC loads (e.g., ovens, refrigerators, washing machines) to the AC output terminals. The inverter provides 110/240V AC output, settable via the LCD screen.

Figure 4: Wiring terminal identification for the inverter.

Figure 5: Typical application diagram for the GSLL series hybrid inverter.
4.3 Battery Compatibility
The inverter is compatible with a wide range of 48V battery types. Ensure your battery bank capacity is sufficient for your load requirements, typically recommending more than 200Ah for optimal performance.
- Lithium Iron Phosphate (LiFePO4)
- Flooded Lead Acid (FLD)
- Absorbent Glass Mat (AGM)
- Sealed Lead Acid (SLD)
- Gel
- Lithium-ion
Note: When using Gel or Deep Cycle batteries, avoid using ordinary lead-acid battery settings as this may damage the battery or prevent desired performance. Always match the battery type setting on the inverter to your installed battery type.

Figure 6: The inverter supports multiple battery types.
5. Operating Instructions
5.1 Initial Power-Up
- Ensure all wiring connections are secure and correct.
- Turn on the DC breaker from the battery bank.
- Turn on the AC input breaker (if connected to utility/generator).
- Turn on the main power switch on the inverter.
- Observe the LCD display for status indicators and initial settings.
5.2 LCD Display and Settings
The LCD screen allows you to monitor system status and configure various parameters, including:
- Output Voltage (110V/240V)
- Output Frequency (50Hz/60Hz)
- Battery Type and Charging Parameters
- Maximum Charging Current (0-100% selectable, up to 200A)
- Automatic Generator Start (AGS) thresholds
Refer to the detailed settings menu in the full product manual for specific navigation and parameter adjustments.
6. Maintenance
Regular maintenance ensures the longevity and optimal performance of your inverter.
- Cleaning: Periodically clean the inverter's exterior and ventilation openings to prevent dust buildup. Use a dry, soft cloth.
- Connections: Annually check all electrical connections for tightness and corrosion. Tighten any loose connections.
- Battery Inspection: Inspect battery terminals for corrosion and ensure proper electrolyte levels for flooded batteries.
- Environment: Ensure the installation environment remains within specified temperature and humidity ranges.
7. Troubleshooting
This section provides solutions to common issues. For problems not listed here, contact technical support.
| Problem | Possible Cause | Solution |
|---|---|---|
| Inverter not turning on | No DC input from batteries; DC breaker off; Inverter switch off. | Check battery connections and voltage; Ensure DC breaker is on; Turn on inverter power switch. |
| No AC output | Overload; Short circuit; Low battery voltage; AC output breaker off. | Reduce load; Check for short circuits; Charge batteries; Turn on AC output breaker. |
| Overload warning | Connected loads exceed inverter capacity. | Disconnect some loads; Ensure total load is within inverter's continuous power rating. |
| Overtemperature warning | Insufficient ventilation; High ambient temperature. | Ensure clear airflow around inverter; Reduce ambient temperature if possible. |
| Battery not charging | Solar panels not connected/producing; AC input not present; Charging settings incorrect. | Check solar panel connections and output; Verify AC input; Adjust charging parameters on LCD. |
8. Specifications
Detailed technical specifications for the RDYMONKEY GS-12KW-III Solar Hybrid Inverter:
| Parameter | Value |
|---|---|
| Model | GS-12KW-III |
| Brand | RDYMONKEY |
| Rated Power | 12000 Watts |
| Peak Power | 36000 Watts |
| DC Input Voltage | 48 Volts |
| AC Output Voltage | 110/240V (Settable) |
| AC Output Frequency | 50/60 Hz (Settable) |
| Waveform | Pure Sine Wave |
| MPPT Solar Charger | Built-in 2 x 80A (Total 160A) |
| Max Charging Current | 200A (Selectable 0-100%) |
| Max PV Array Power | 9000W |
| Max PV Open Circuit Voltage | 160VDC |
| Certification | UL 1741, ETL |
| Dimensions (L x W x H) | Approx. 16.38in x 8.03in x 24.68in |
| Net Weight | Approx. 157.63 lbs |
| UPC | 768556874147 |

Figure 7: Solar Inverter Dimensions and Weight.
9. Warranty and Support
For warranty information, technical support, or service inquiries, please contact RDYMONKEY customer service. Keep your purchase receipt and product serial number handy for faster assistance.
Please refer to the official RDYMONKEY website or your purchase documentation for the most current warranty terms and conditions.