1. Important Safety Information
Please read this instruction manual thoroughly before using the VERWINT Automatic Upper Arm Blood Pressure Monitor. Retain this manual for future reference.
- This device is intended for adult home use to measure blood pressure and pulse rate. It is not intended for use on infants or children.
- Consult your physician for interpretation of blood pressure measurements. Self-diagnosis and treatment based on measurements can be dangerous.
- Do not use this device in a moving vehicle.
- Avoid eating, drinking alcohol, smoking, exercising, and bathing for 30 minutes before measurement.
- Rest for at least 5 minutes before taking a measurement.
- Do not use this device for purposes other than measuring blood pressure.
- Keep the device out of reach of children and pets.
- Do not disassemble or attempt to repair the device.
2. Product Overview
The VERWINT Automatic Upper Arm Blood Pressure Monitor is designed for accurate and convenient blood pressure and pulse rate measurement at home. It features a large LCD backlit display, adjustable cuff, and memory for multiple users.
2.1 Package Contents
- VERWINT Blood Pressure Monitor Unit
- Upper Arm Cuff (8.7"-16.5" circumference)
- 4 x AA Batteries
- USB Type-C Cable
- Instruction Manual
2.2 Device Components

The monitor features a large LCD display showing time, date, user selection, systolic pressure, diastolic pressure, pulse rate, and indicators for irregular pulse and WHO classification. Buttons include MEM (Memory), START/STOP, and User Selection (1/2/3).

3. Setup
3.1 Power Supply Installation
The monitor can be powered by 4 AA batteries or via the included USB Type-C cable.

Using Batteries:
- Open the battery compartment cover on the back of the monitor.
- Insert 4 AA batteries according to the polarity indicators (+/-).
- Close the battery compartment cover securely.
Using USB Type-C Cable:
- Connect the USB Type-C cable to the port on the side of the monitor.
- Connect the other end of the cable to a compatible USB power adapter (not included) or a computer USB port.
3.2 Cuff Application
- Ensure the cuff is connected to the monitor's air jack.
- Place the cuff on your bare upper arm, approximately 1-2 cm above the elbow joint. The air tube should run down the center of your arm in line with your middle finger.
- Wrap the cuff snugly around your arm, ensuring it is not too tight or too loose. The bottom edge of the cuff should be above the elbow.
- The cuff is designed for arm circumferences between 8.7 inches and 16.5 inches.
4. Operation
4.1 Taking a Measurement
The VERWINT monitor features a one-button operation for ease of use.
- Sit comfortably with your back supported and feet flat on the floor. Place your arm on a table so the cuff is at heart level.
- Select your user profile (1, 2, or 3) by pressing the User Selection button.
- Press the START/STOP button. The cuff will automatically inflate, and the measurement will begin.
- Remain still and silent during the measurement.
- Once complete, the systolic pressure, diastolic pressure, and pulse rate will be displayed on the LCD screen. The result will be automatically saved to the selected user's memory.
- Press the START/STOP button again to turn off the device, or it will automatically shut off after 3 minutes of inactivity.
4.2 Accuracy and Indicators

- High-Sensitivity Sensor: The inbuilt inductor detects pressure changes for accurate results. The device will display an error if incorrect posture or cuff wrapping is detected.
- Irregular Heartbeat Detection: The monitor can detect irregular heartbeats during measurement and will display a corresponding icon. Consult your physician if this icon appears frequently.
- WHO Classification Indicator: A color strip on the left side of the display indicates the World Health Organization (WHO) blood pressure classification for reference.
- For the most accurate reading, it is recommended to take 5 measurements, allowing for less impact from breathing and movements.
5. Memory Functions
The VERWINT monitor supports up to 3 users, with each user having memory for 199 readings, totaling 597 records.
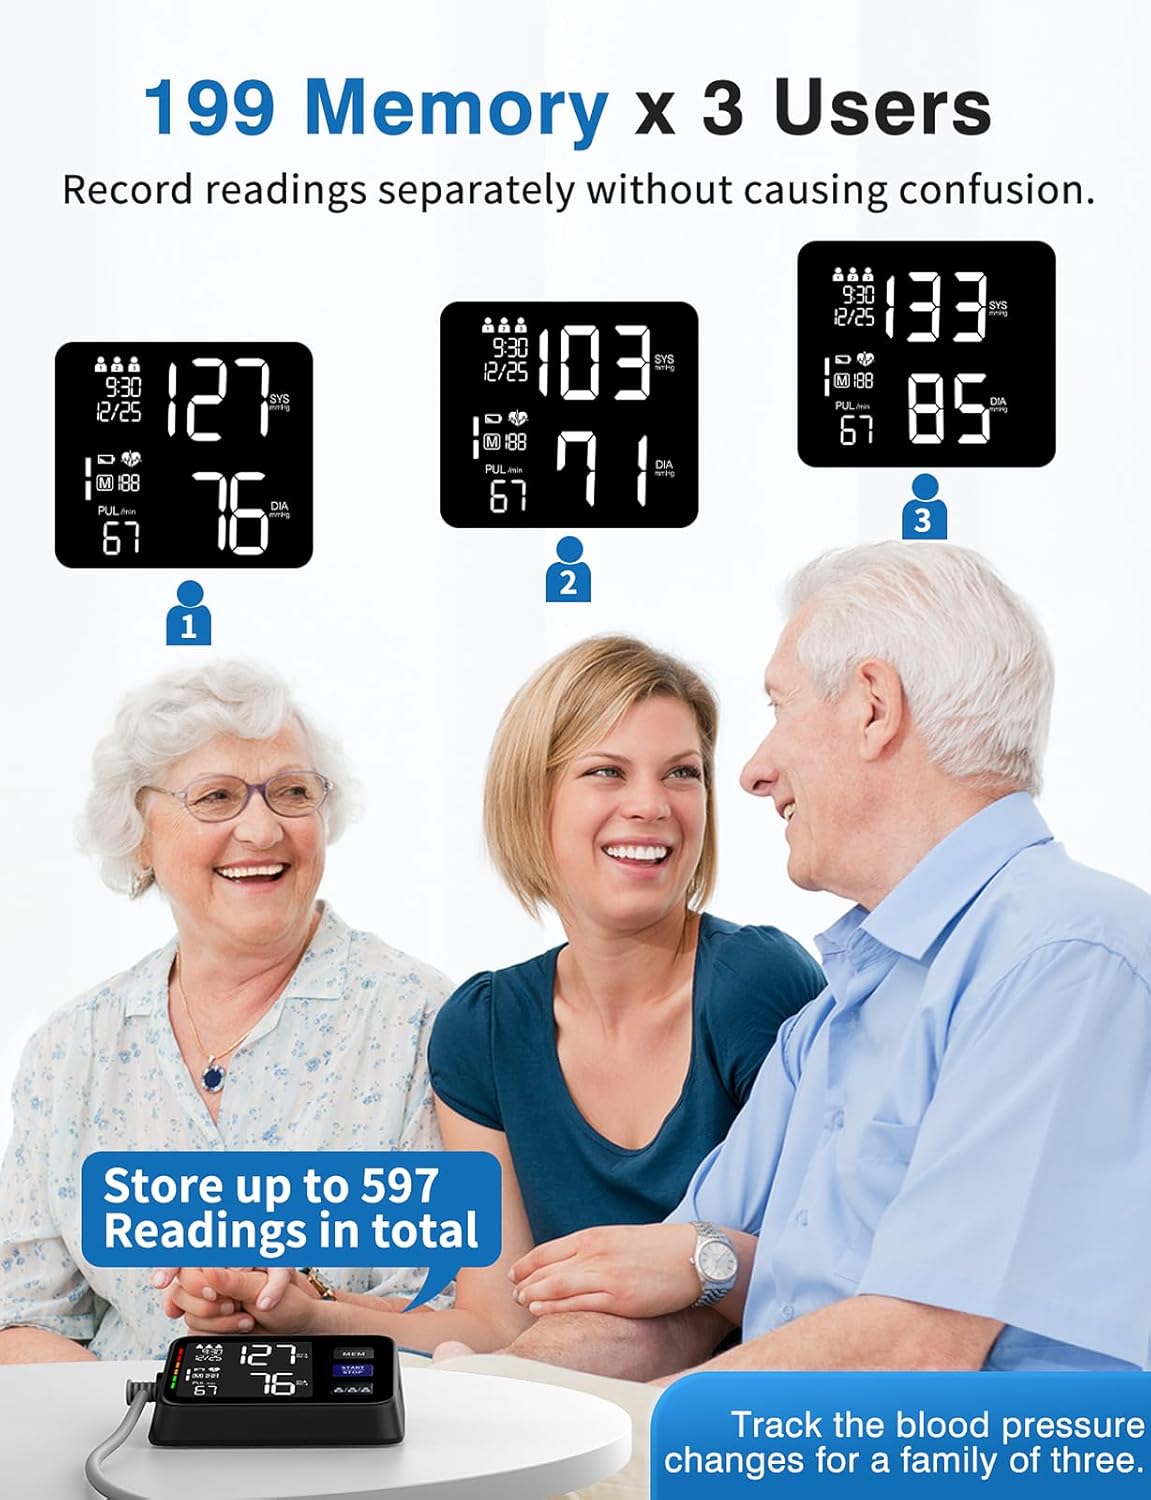
5.1 Selecting a User
Before taking a measurement, press the User Selection button (labeled 1/2/3) to choose the desired user profile. The selected user number will be displayed on the screen.
5.2 Viewing Memory Records
- With the device off, press the MEM button. The most recent reading for the currently selected user will be displayed.
- Press the MEM button repeatedly to scroll through older readings. Each reading will show the date, time, systolic pressure, diastolic pressure, and pulse rate.
- To exit memory mode, press the START/STOP button or wait for automatic shutdown.

5.3 Average Value Measurement

The monitor can display the average of your last 3 measurements. This feature provides a more stable and representative blood pressure value, reducing the impact of single-measurement fluctuations. To view the average, navigate through the memory records; the average will typically be displayed as the first entry or indicated specifically.
6. Maintenance
6.1 Cleaning
- Clean the monitor and cuff with a soft, dry cloth.
- If necessary, use a cloth lightly dampened with water or a mild detergent, then wipe dry.
- Do not use abrasive cleaners, solvents, or immerse the device in water.
6.2 Storage
- Store the device in a clean, dry place away from direct sunlight, extreme temperatures, and humidity.
- If the device will not be used for an extended period, remove the batteries to prevent leakage.
- Avoid dropping the device or subjecting it to strong impacts.
7. Troubleshooting
| Problem | Possible Cause | Solution |
|---|---|---|
| No power/Display blank | Batteries are dead or incorrectly inserted; USB cable not connected. | Replace batteries, check polarity, or connect USB Type-C cable. |
| Error message (e.g., 'E1', 'E2') | Cuff not applied correctly; excessive movement during measurement; air leakage. | Reapply cuff correctly, remain still, check cuff for damage. Retake measurement. |
| Inaccurate readings | Incorrect cuff placement; not resting before measurement; talking/moving during measurement. | Ensure proper cuff placement at heart level, rest for 5 minutes, remain still and silent. Take multiple readings. |
| Cuff does not inflate | Air tube disconnected; cuff damaged. | Check air tube connection to monitor and cuff. If damaged, contact support. |
8. Specifications
| Feature | Detail |
|---|---|
| Model | B0DMW2KW95 |
| Display Type | Large LCD Backlit Display |
| Measurement Method | Oscillometric |
| Cuff Size | Adjustable, fits arm circumference 8.7"-16.5" |
| Memory | 3 users x 199 sets (total 597 records) |
| Power Source | 4 x AA Batteries (included) or USB Type-C Cable (included) |
| Automatic Shut-off | 3 minutes of inactivity |
| Product Dimensions | 3.9"L x 2.7"W x 1.5"Th |
| Weight | 1.21 Pounds (approx.) |
| UPC | 724087456900 |
9. Warranty and Support
VERWINT is committed to providing high-quality products and excellent customer service.
9.1 Warranty Information
Please refer to the product packaging or the official VERWINT website for specific warranty terms and conditions. Typically, medical devices come with a limited warranty covering manufacturing defects.
9.2 Customer Support
If you have any questions, concerns, or require assistance with your VERWINT Blood Pressure Monitor, please contact our customer support team. Contact information can usually be found on the product packaging or the VERWINT brand store on Amazon.
For returns or replacements, please refer to the retailer's return policy, which typically allows for returns within 30 days of purchase.