1. Introduction
The SVBONY TransAir2 is a high-performance 4K wireless HDMI transmitter and receiver system designed for seamless audio and video transmission. It supports 4K resolution at 30Hz, offers ultra-low latency of 0.06 seconds, and can transmit signals up to 300 meters (984 feet) in open environments. This system is ideal for various applications, including home entertainment, gaming, business meetings, and live streaming, providing a clear and stable viewing experience without the need for extensive cabling.
This manual provides detailed instructions for the proper installation, operation, and maintenance of your TransAir2 system. Please read it thoroughly before use to ensure optimal performance and safety.
2. Safety Information
Please observe the following safety precautions to prevent damage to the device and ensure user safety:
- Do not expose the device to moisture, rain, or extreme temperatures.
- Avoid placing the device near heat sources or in direct sunlight.
- Use only the provided power adapters and cables.
- Do not attempt to disassemble or modify the device. This will void the warranty.
- Keep the device away from strong electromagnetic fields.
- Ensure proper ventilation to prevent overheating.
- Disconnect power during lightning storms or when unused for long periods.
3. Package Contents
Verify that all items are present in your package:
- 1 x SVBONY TransAir2 HDMI Wireless Transmitter (TX)
- 1 x SVBONY TransAir2 HDMI Wireless Receiver (RX)
- 2 x IR Cables (for remote control extension)
- 2 x Type-C to USB Power Cables
- 4 x Antennas
- 1 x User Manual
- 2 x HDMI Cables

Image: Contents of the SVBONY TransAir2 package, including the transmitter, receiver, cables, antennas, and user manual.
4. Product Overview
The SVBONY TransAir2 system consists of a Transmitter (TX) and a Receiver (RX). Both units feature a durable aluminum alloy casing and detachable antennas for optimal signal reception.

Image: The SVBONY TransAir2 Transmitter (TX) and Receiver (RX) units, showcasing their design and antennas.
4.1. Transmitter (TX) and Receiver (RX) Ports and Indicators
Both the Transmitter and Receiver units share similar port layouts and indicator lights:

Image: Detailed diagram of the Transmitter and Receiver, highlighting power indicator, video indicator, reset button, IR-OUT/IR-IN ports, HDMI OUT/HDMI IN ports, and USB-C 5V power input.
- Power Indicator: Lights up when the device is powered on.
- Video Indicator: Lights up when a video signal is detected.
- Link Indicator: Lights up when a stable wireless connection is established between TX and RX.
- Reset Button: Press and hold for approximately 5 seconds to reset the device.
- IR-OUT (TX) / IR-IN (RX): Ports for connecting the IR extension cables for remote control functionality.
- HDMI OUT (TX) / HDMI IN (TX): HDMI output (loop-out) and input on the Transmitter.
- HDMI OUT (RX): HDMI output on the Receiver.
- USB-C 5V: Power input port (5V/2A).
5. Setup Instructions
Follow these steps to set up your SVBONY TransAir2 system:
5.1. Connecting the Transmitter (TX)
- Connect one end of an HDMI cable to the HDMI output of your source device (e.g., PC, Mac, game console, TV box).
- Connect the other end of the HDMI cable to the HDMI IN port on the TransAir2 Transmitter.
- Connect the USB-C power cable to the USB-C 5V port on the Transmitter and plug the USB-A end into a 5V/2A power adapter (not included) or a compatible USB port on your source device. The Power indicator will light up.
- (Optional) If you wish to loop out the signal to a local display, connect another HDMI cable from the HDMI OUT port on the Transmitter to your local display.
- (Optional) For IR remote control functionality, connect one IR cable to the IR-OUT port on the Transmitter.
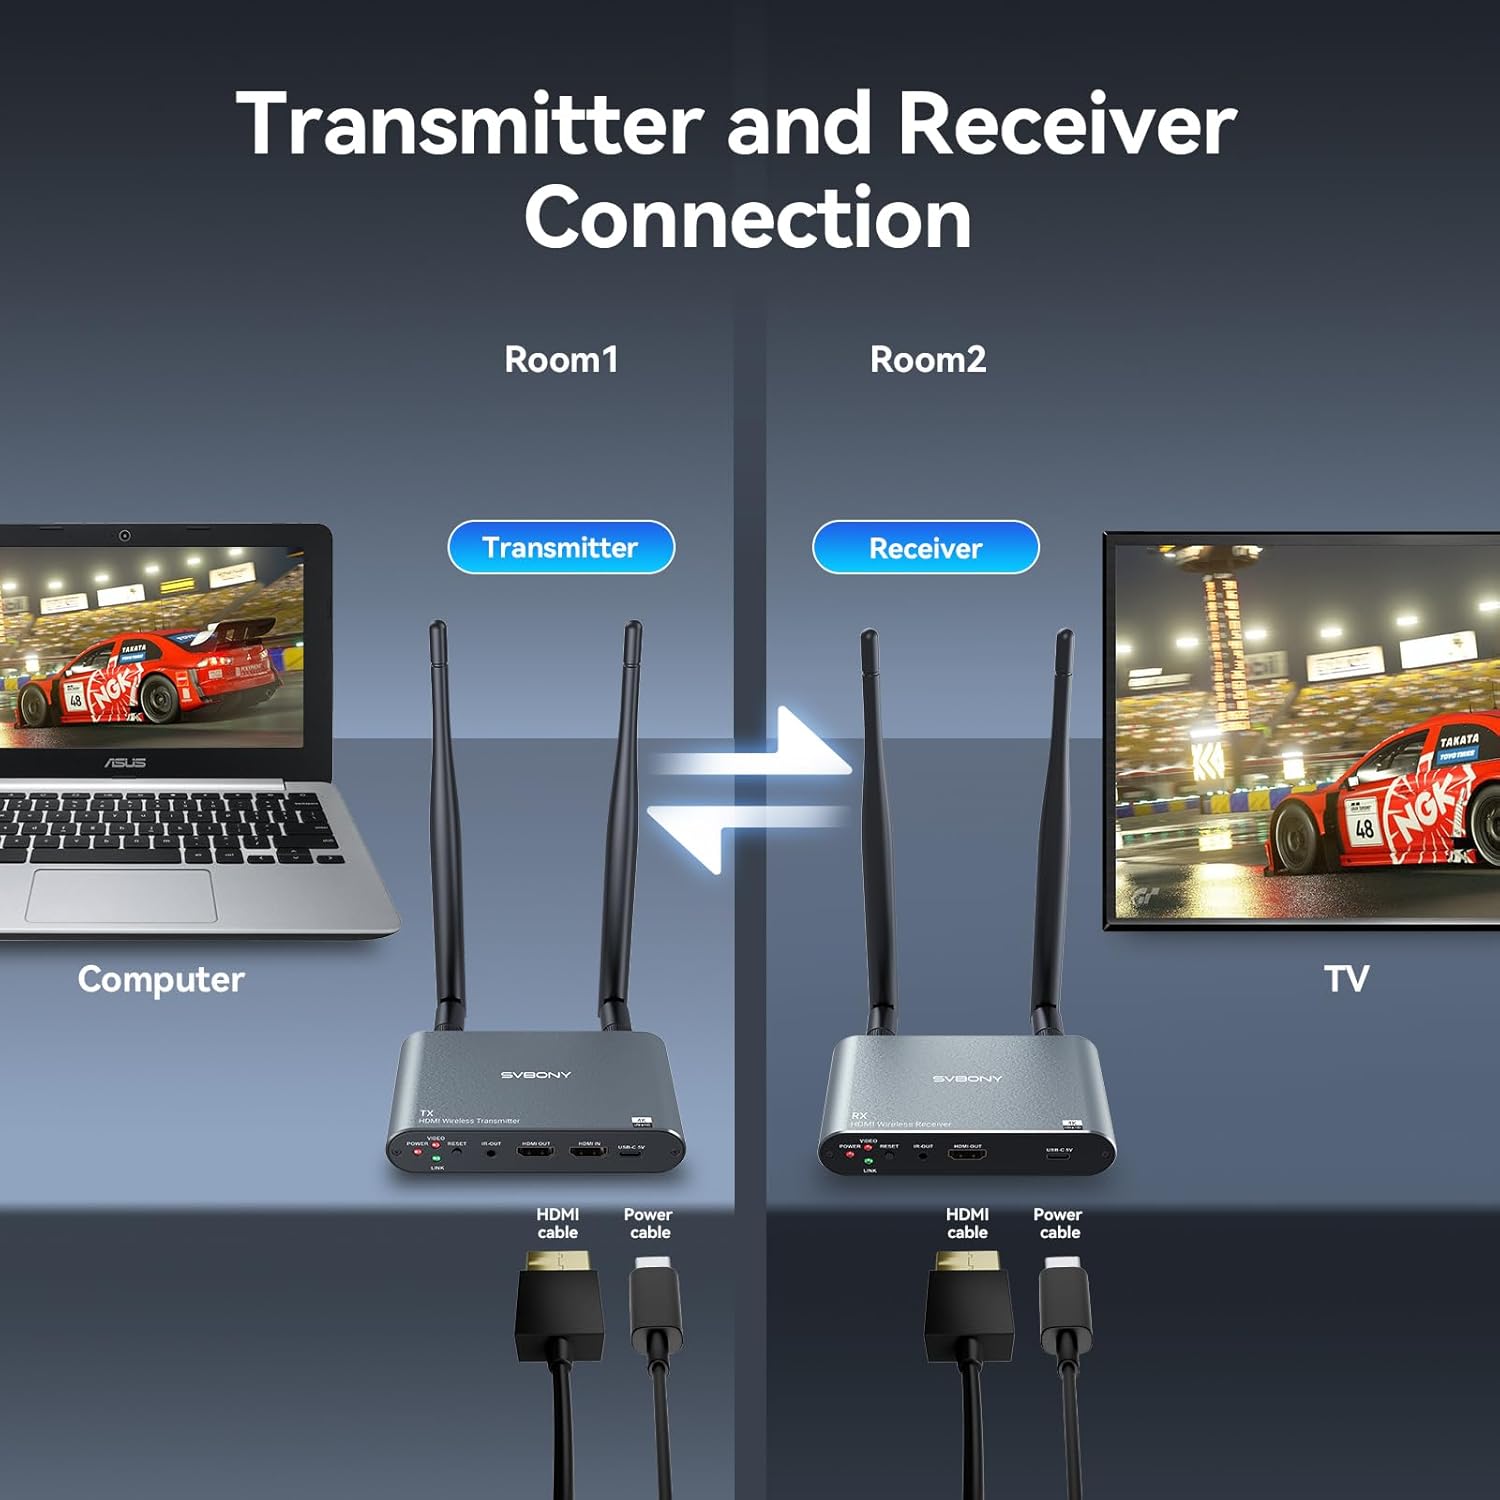
Image: Illustration of connecting the Transmitter to a computer via HDMI and power cables.
5.2. Connecting the Receiver (RX)
- Connect one end of an HDMI cable to the HDMI OUT port on the TransAir2 Receiver.
- Connect the other end of the HDMI cable to the HDMI input of your display device (e.g., TV, monitor, projector).
- Connect the USB-C power cable to the USB-C 5V port on the Receiver and plug the USB-A end into a 5V/2A power adapter (not included) or a compatible USB port on your display device. The Power indicator will light up.
- (Optional) For IR remote control functionality, connect the other IR cable to the IR-IN port on the Receiver.

Image: Illustration of connecting the Receiver to a TV via HDMI and power cables.
5.3. Automatic Connection (Plug and Play)
Once both the Transmitter and Receiver are powered on and connected, they will automatically pair within a few seconds. The Link indicator on both units will light up when a stable connection is established. The Video indicator will light up when a video signal is being transmitted.
Video: A demonstration of connecting the Transmitter and Receiver, showing the power and link indicators, and the successful display of the source device's screen on the monitor.
6. Operating Instructions
6.1. Basic Video Transmission
Once connected, the TransAir2 system will automatically transmit the video and audio signal from your source device to the connected display. Ensure your display is set to the correct HDMI input.

Image: The TransAir2 system providing a clear 4K 30Hz output on a display, illustrating high-definition video transmission.
6.2. IR Remote Control Functionality
The IR extension cables allow you to control your source device (e.g., TV box, DVD player) from the location of your receiver. This is particularly useful for cross-room setups.
- Connect the IR-OUT cable to the Transmitter and position its emitter head near the IR receiver of your source device.
- Connect the IR-IN cable to the Receiver and position its receiver head in a location where your remote control can easily point to it.
- You can now use your source device's remote control from the receiving end to control the device.
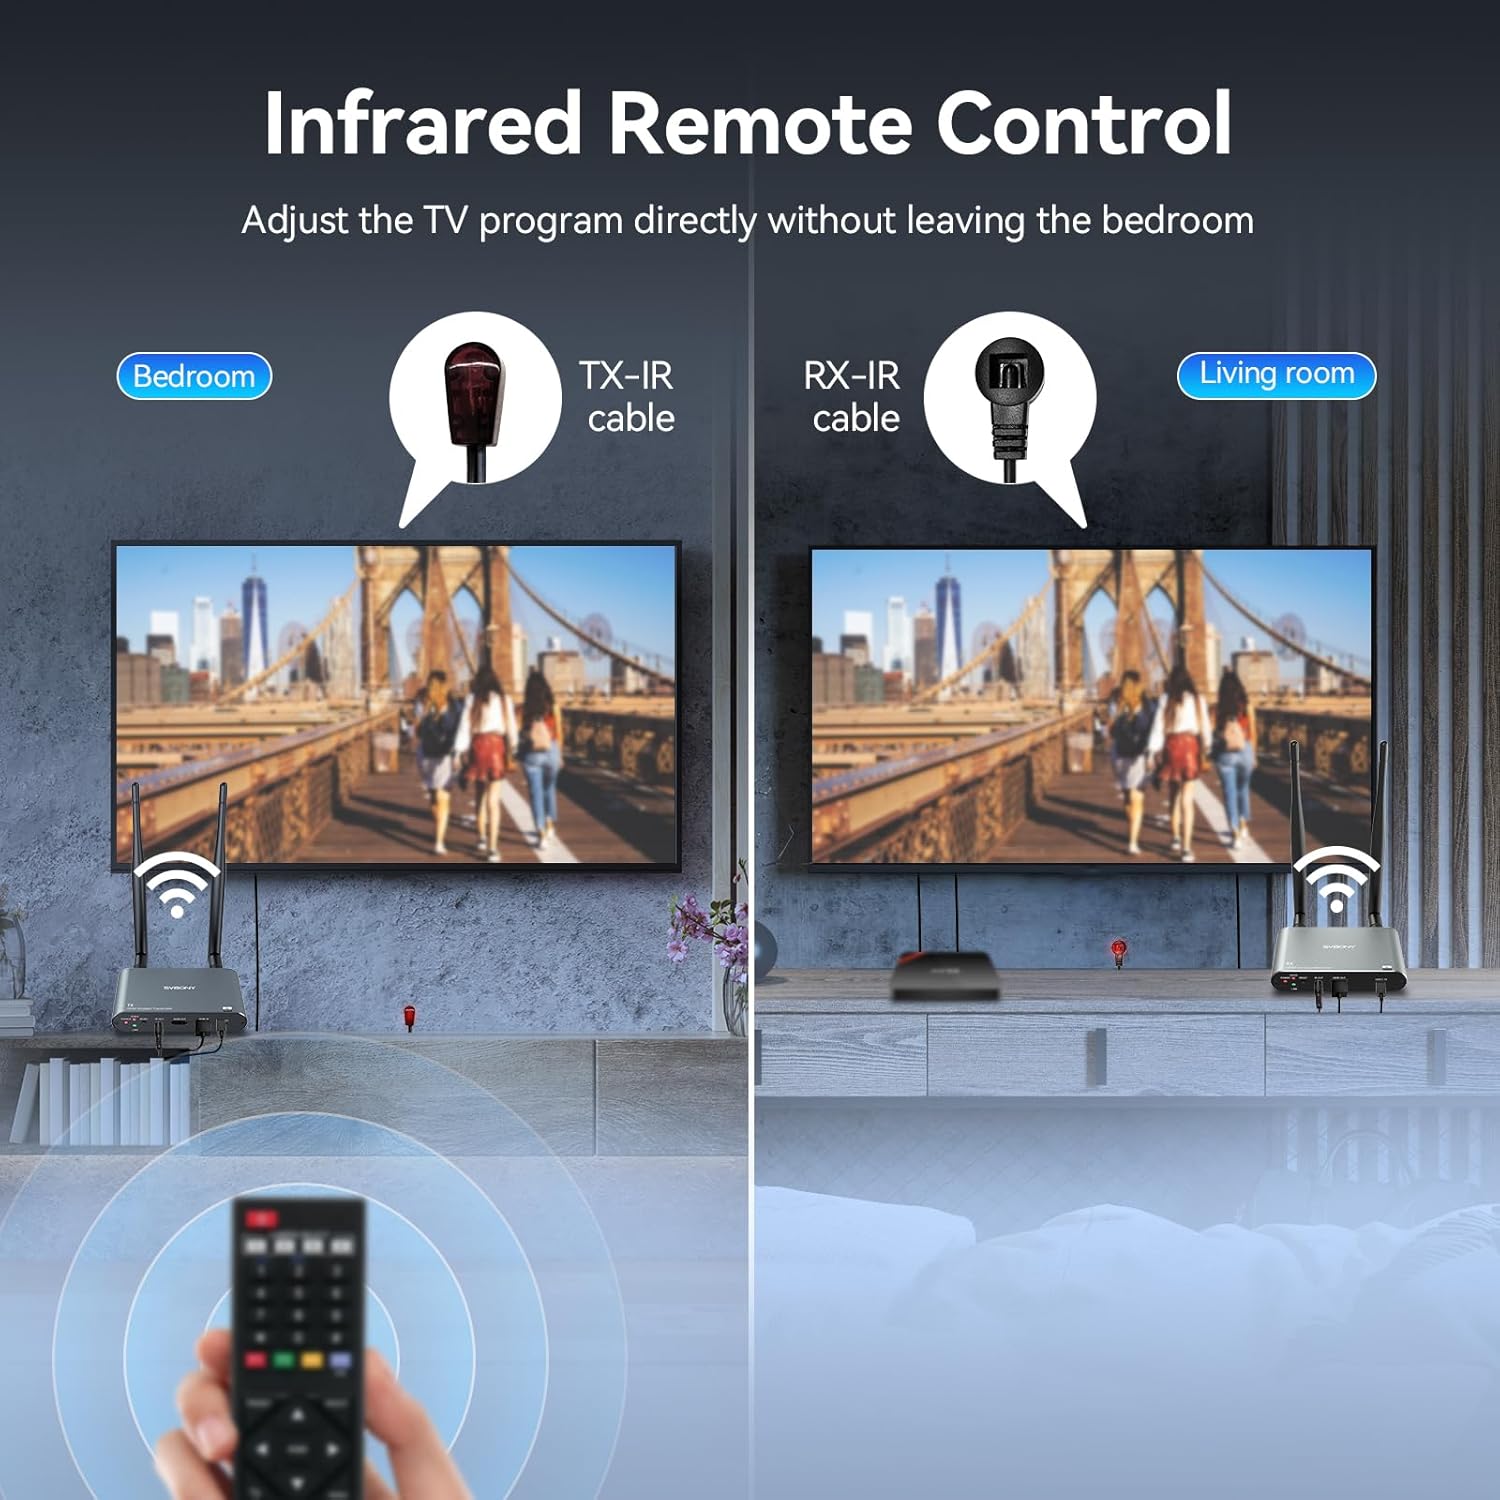
Image: Setup demonstrating the IR remote control feature, allowing control of a source device from a different room where the receiver is located.
Video: Demonstration of the IR remote control functionality, showing how to change channels or control a source device from a remote display.
6.3. Multi-Receiver Connection (1 TX to 4 RX Max)
The TransAir2 system supports connecting one Transmitter to up to four Receivers simultaneously. This allows you to broadcast the same content to multiple displays in different rooms.
- Ensure your Transmitter is set up as described in Section 5.1.
- Set up each additional Receiver as described in Section 5.2, connecting each to its respective display.
- The Transmitter will automatically connect to all powered-on Receivers within range.
Note: For optimal performance with multiple receivers, ensure sufficient signal strength and minimize obstructions. A recommended distance of 50m/164ft between units is advised for stable multi-receiver operation.

Image: Visual representation of one Transmitter broadcasting to multiple Receivers and displays, enabling content sharing across different rooms.
7. Key Features
- 4K Wireless Transmission: Supports up to 4K 30Hz output for sharp, fluid images and high-quality audio, ensuring an enjoyable visual experience.
- Ultra-Low Latency (0.06s): Minimizes audio-video desynchronization, providing a real-time gaming and viewing experience.
- Plug and Play: Simple setup with automatic pairing in seconds, no complex configuration required.
- IR Remote Control: Control your source device from a distance, even through walls, eliminating the need to move between rooms.
- Long Range Transmission: Stable transmission up to 300 meters (984 feet) in open environments, suitable for large homes, conference rooms, and small venues. (Note: Actual range may vary due to walls, metal obstacles, and wireless interference.)
- Multi-Receiver Support: One Transmitter can connect to up to four Receivers, allowing simultaneous display of content on multiple screens.
- USB Type-C Power: Equipped with standard USB Type-C interface, supporting 5V/2A power delivery from mobile phones or computer USB ports.
- Physical Reset Button: Integrated reset button for quick and easy restoration of stable transmission in case of issues. (Note: 3D effects are not supported.)
- Wide Device Compatibility: Transmitter is compatible with PS4/PS3, Xbox, computers, laptops, TV boxes. Receiver is compatible with TVs, Monitors, Projectors, and Electronic Whiteboards.
- Versatile Applications: Suitable for home theater, gaming entertainment, business meetings, church gatherings, and more.
8. Maintenance
- Cleaning: Use a soft, dry cloth to clean the device. Do not use liquid or aerosol cleaners.
- Storage: Store the device in a cool, dry place when not in use.
- Antennas: Ensure antennas are securely attached but do not overtighten. Handle with care to avoid damage.
- Cables: Regularly check all cables for signs of wear or damage. Replace any damaged cables immediately.
9. Troubleshooting
| Problem | Possible Cause | Solution |
|---|---|---|
| No video output on display. |
|
|
| Poor video quality or flickering. |
|
|
| IR remote control not working. |
|
|
| Device unresponsive. | Temporary software glitch. | Press and hold the Reset button for approximately 5 seconds on both units. |
10. Specifications
| Feature | Detail |
|---|---|
| Brand | SVBONY |
| Model | EUW9306A (TransAir2) |
| Max Resolution | 4K @ 30Hz |
| Latency | 0.06 seconds |
| Transmission Distance (Open Area) | Up to 300 meters (984 feet) |
| Multi-Receiver Support | 1 Transmitter to max 4 Receivers |
| Connectivity Technology | HDMI, Type-C, IR |
| Power Input | USB Type-C, 5V/2A |
| Compatible Devices (Transmitter) | PS4/PS3, Xbox, Computers, Laptops, TV boxes |
| Compatible Devices (Receiver) | TVs, Monitors, Projectors, Electronic Whiteboards |
| Dimensions | 6 x 2.3 x 11.4 cm (each unit) |
| Weight | 620 g (total package weight) |
| Color | Silver Grey |
11. Warranty and Support
SVBONY products are designed and manufactured to the highest quality standards. For information regarding warranty coverage, technical support, or service, please refer to the warranty card included in your package or visit the official SVBONY website. Please retain your proof of purchase for warranty claims.
For further assistance, you may contact SVBONY customer support through their official channels.