1. Introduction
Thank you for choosing the Jesverty DC Power Supply Variable and Digital Multimeter. This comprehensive instruction manual provides detailed information on the safe operation, setup, and maintenance of your new devices. The DC Power Supply (SPS-3010V) offers adjustable voltage and current output, along with convenient USB charging ports. The Digital Multimeter (HK33B) is a versatile tool for measuring various electrical parameters, including AC/DC voltage, current, resistance, temperature, and more. Please read this manual thoroughly before use to ensure proper functionality and safety.
2. Safety Instructions
Always observe the following safety precautions to prevent electric shock, injury, or damage to the devices.
- General Safety:
- Do not operate the devices if they appear damaged or are not functioning properly.
- Ensure proper ventilation for the power supply to prevent overheating.
- Keep the devices away from water, moisture, and flammable materials.
- Use only the specified power cord and accessories.
- DC Power Supply Safety:
- Always connect the load to the output terminals before turning on the output.
- Do not exceed the maximum voltage and current ratings.
- Ensure correct polarity when connecting to a circuit.
- Digital Multimeter Safety:
- Never apply voltage or current that exceeds the maximum rated input for each function.
- Do not use the multimeter on circuits with voltages exceeding 600V.
- Ensure the test leads are properly inserted into the correct input jacks for the selected measurement.
- Do not measure current on a live circuit without breaking the circuit and connecting the meter in series.
- Replace batteries and fuses only with the specified types.
3. Package Contents
Please check the package for the following items:
- Jesverty SPS-3010V DC Power Supply Variable
- Jesverty HK33B Digital Multimeter
- Power Cord for DC Power Supply
- Test Leads for Digital Multimeter
- K-Type Thermocouple (for Multimeter)
- User Manual (this document)
4. Product Overview: DC Power Supply (SPS-3010V)
The Jesverty SPS-3010V is an adjustable DC power supply featuring precise control and multiple output options.
4.1 Front Panel Layout

Image Description: This image displays the front panel of the Jesverty SPS-3010V DC Power Supply. Key features visible include the large 4-digit LED display showing voltage, current, and power, along with indicators for CV (Constant Voltage) and CC (Constant Current) modes. On the right side, there are four encoder knobs: V-COARSE, V-FINE, A-COARSE, and A-FINE for precise voltage and current adjustment. Below the display, USB-C and USB-A quick-charge ports are present, along with OCP (Over Current Protection) and OUT (Output) buttons. The main POWER button is located at the bottom left, and the output terminals (GND, +, -) are at the bottom right.
- LED Display: Shows real-time voltage (V), current (A), and power (W) output.
- V-COARSE / V-FINE Knobs: Adjust output voltage. V-COARSE sets the integer part, V-FINE sets the decimal part.
- A-COARSE / A-FINE Knobs: Adjust output current limit. A-COARSE sets the integer part, A-FINE sets the decimal part.
- USB-A & USB-C Ports: 20W quick-charge outputs for external devices.
- OCP Button: Toggles Over Current Protection.
- OUT Button: Toggles the main DC output.
- POWER Button: Turns the unit on/off.
- Output Terminals (GND, +, -): Connect test leads for DC output.
4.2 USB Charging Function
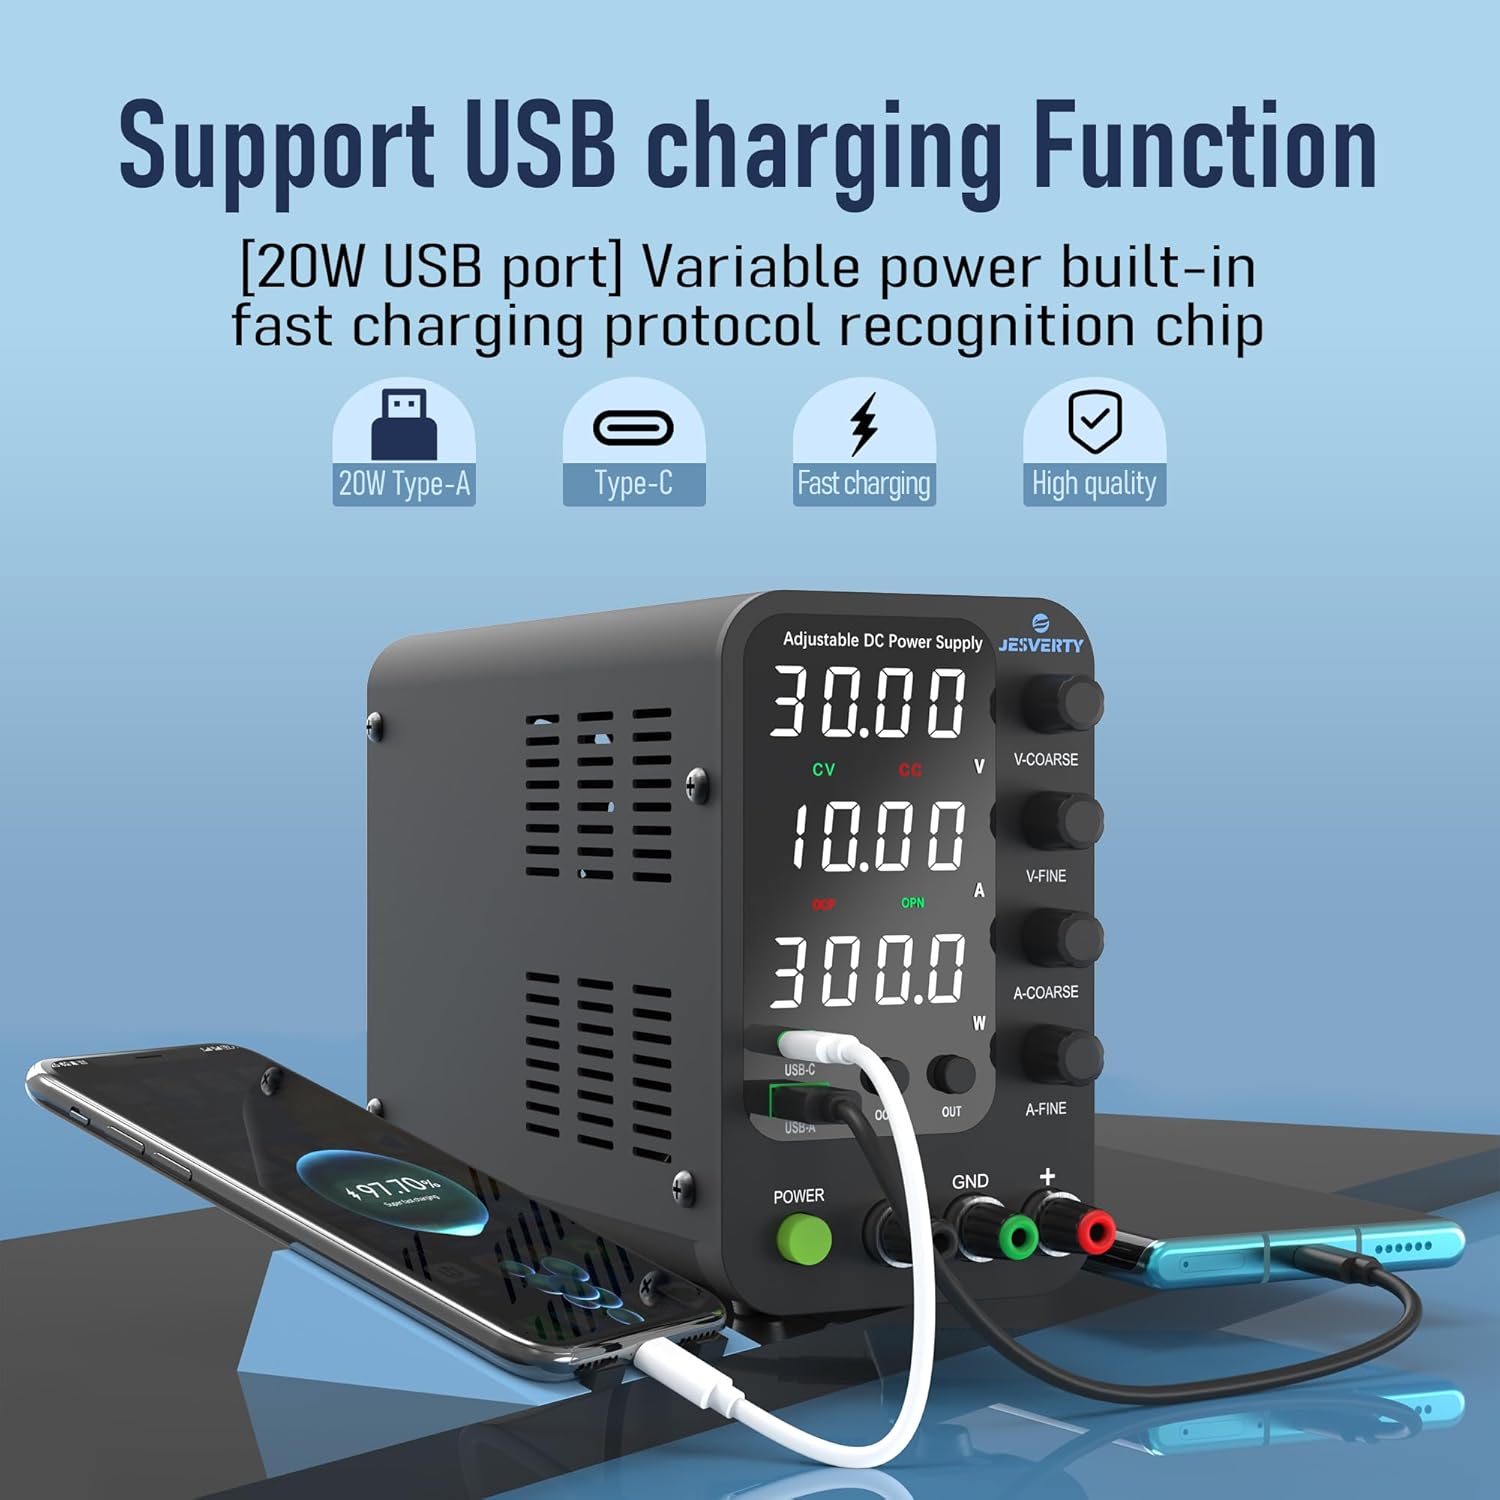
Image Description: This image shows the Jesverty SPS-3010V DC Power Supply actively charging a smartphone via its USB-C port and another device via its USB-A port. The display shows voltage and current settings. This highlights the integrated 20W USB-A and Type-C quick-charge functionality, allowing users to power or charge compatible devices directly from the power supply.
5. Product Overview: Digital Multimeter (HK33B)
The Jesverty HK33B is a 2000-count digital multimeter designed for accurate and versatile electrical measurements.
5.1 Multimeter Layout and Functions
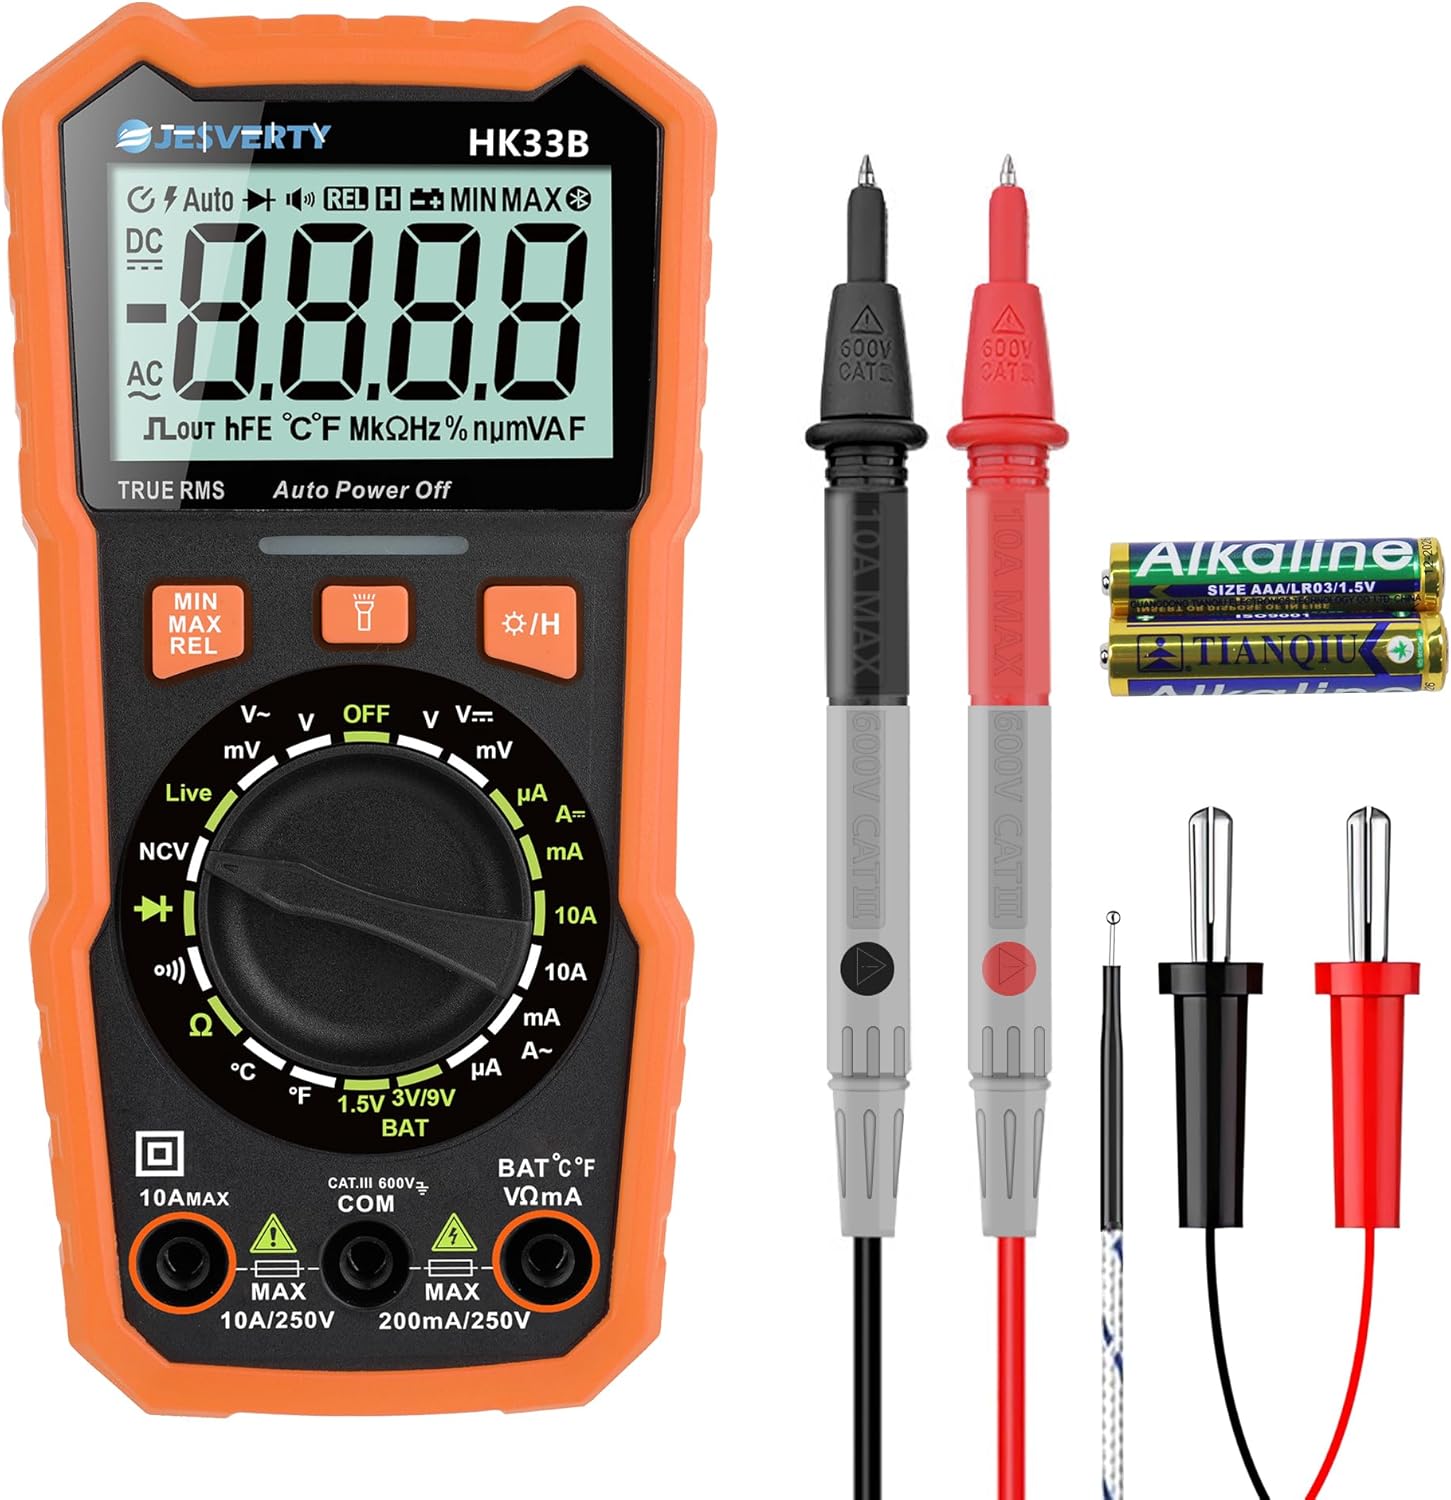
Image Description: This image displays the Jesverty HK33B Digital Multimeter along with its red and black test probes and a K-type thermocouple. The multimeter features a large LCD display, a central rotary dial for function selection, and several buttons for additional features like MIN/MAX, REL, and backlight. Input jacks for test leads are located at the bottom. This visual aids in identifying the device and its primary accessories.

Image Description: This image provides a close-up of the Jesverty HK33B Digital Multimeter's display and function indicators. It highlights the various measurement capabilities, including DC Voltage, AC Voltage, Live Wire detection, Battery Test, Duty Cycle, Diode, Resistance, DC Current, Continuity, Temperature (°C/°F), and AC Current. The clear icons and text on the display and around the rotary dial make it easy to understand the multimeter's extensive features.
- LCD Display: 2000 counts, shows measurement readings, units, and function indicators.
- Rotary Dial: Selects measurement functions (Voltage, Current, Resistance, Diode, Continuity, Temperature, NCV, Live).
- Function Buttons: Include MIN/MAX, REL (Relative Measurement), Data Hold, Backlight, and Flashlight.
- Input Jacks: COM (Common), VΩmA (Voltage, Resistance, small Current), 10A MAX (High Current).
- NCV (Non-Contact Voltage) Sensor: Detects AC voltage without direct contact.
- Live Wire Detection: Identifies live electrical wires.
6. Setup
6.1 DC Power Supply Setup
- Placement: Place the power supply on a stable, level surface with adequate ventilation around all sides.
- Power Connection: Connect the provided power cord to the AC input on the rear panel of the power supply, then plug it into a suitable AC outlet.
- Initial Power On: Press the POWER button on the front panel. The display should illuminate.
6.2 Digital Multimeter Setup
- Battery Installation: Open the battery compartment on the back of the multimeter. Insert the required batteries (typically AAA, check compartment for specifics) ensuring correct polarity. Close the compartment securely.
- Test Lead Connection:
- Insert the black test lead into the COM (Common) jack.
- For most measurements (voltage, resistance, continuity, diode, temperature, small current), insert the red test lead into the VΩmA jack.
- For high current measurements (up to 10A), insert the red test lead into the 10A MAX jack.
7. Operating Instructions: DC Power Supply (SPS-3010V)
7.1 Setting Voltage and Current
- Adjusting Voltage:
- Rotate the V-COARSE knob to set the integer part of the desired voltage.
- Rotate the V-FINE knob to set the decimal part of the desired voltage (0.01V resolution).
- Adjusting Current Limit:
- Rotate the A-COARSE knob to set the integer part of the desired current limit.
- Rotate the A-FINE knob to set the decimal part of the desired current limit (0.001A resolution).
- The current limit prevents damage to the connected load by limiting the maximum current drawn.
7.2 Enabling Output
- After setting the desired voltage and current limit, connect your load to the output terminals (GND, +, -).
- Press the OUT button to enable the DC output. The display will show the actual output voltage and current.
- Press the OUT button again to disable the output.
7.3 Over Current Protection (OCP)
- Press the OCP button to activate or deactivate the Over Current Protection function.
- When OCP is active, if the output current exceeds the set current limit, the power supply will automatically cut off the output to protect the load and the power supply itself.
- To reset OCP, disable the output, resolve the overcurrent condition, and then re-enable the output.
7.4 USB-A & USB-C Quick-Charge Ports
The integrated USB-A and USB-C ports provide 20W fast charging for compatible devices. These ports operate independently of the main DC output and can be used simultaneously.
- Connect your smartphone, Arduino UNO, Raspberry Pi, or other electronic modules to the USB-A or USB-C port using a compatible cable.
- The device will automatically negotiate the appropriate charging protocol.
8. Operating Instructions: Digital Multimeter (HK33B)
8.1 Basic Measurements
Turn the rotary dial to the desired function. Ensure test leads are connected to the correct input jacks.
- DC/AC Voltage Measurement (V~ / V=):
- Set the rotary dial to V~ for AC voltage or V= for DC voltage.
- Connect test leads in parallel to the circuit or component.
- DC/AC Current Measurement (A~ / A=):
- Set the rotary dial to A~ for AC current or A= for DC current.
- Important: Break the circuit and connect the multimeter in series with the load. Ensure the red lead is in the appropriate current jack (mA or 10A).
- Resistance Measurement (Ω):
- Set the rotary dial to Ω.
- Ensure the circuit is de-energized before measuring resistance. Connect test leads across the component.
- Continuity Test (Ω)))):
- Set the rotary dial to the continuity symbol.
- A continuous beep indicates a low resistance path (continuity).
- Diode Test (→|):
- Set the rotary dial to the diode symbol.
- Connect test leads across the diode. A good diode will show a voltage drop in one direction and open circuit in the other.
- Temperature Measurement (°C/°F):
- Set the rotary dial to °C/°F.
- Connect the K-type thermocouple to the input jacks (observe polarity).
- The display will show the temperature. Use the function button to switch between Celsius and Fahrenheit.
8.2 Special Functions
- NCV (Non-Contact Voltage):
- Set the rotary dial to NCV.
- Move the top of the multimeter near an AC voltage source. The device will beep and flash if AC voltage is detected.
- Live Wire Detection:
- Set the rotary dial to Live.
- Insert the red test lead into the VΩmA jack and touch the probe to the wire. The display will indicate if it's a live wire with an alarm.
- Data Hold: Press the HOLD button to freeze the current reading on the display. Press again to release.
- Backlight/Flashlight: Press the backlight button to turn on the display backlight. Long press to activate the flashlight.
- MIN/MAX: Press the MIN/MAX button to record the minimum and maximum readings during a measurement session.
9. Maintenance
9.1 Cleaning
- Wipe the devices with a dry, soft cloth. Do not use abrasive cleaners or solvents.
- Ensure the devices are powered off and disconnected from all power sources before cleaning.
9.2 Storage
- Store the devices in a cool, dry place, away from direct sunlight and extreme temperatures.
- If storing the multimeter for an extended period, remove the batteries to prevent leakage.
9.3 Multimeter Battery and Fuse Replacement
Refer to the back panel of the multimeter for specific battery and fuse types. Always replace with identical specifications.
- Battery Replacement: Open the battery compartment, remove old batteries, insert new ones with correct polarity, and close the compartment.
- Fuse Replacement: Fuses are typically located under the back cover. Disconnect test leads, remove the back cover screws, carefully replace the blown fuse with a new one of the correct rating, and reassemble.
10. Troubleshooting
- DC Power Supply Not Powering On:
- Check if the power cord is securely connected to both the unit and the AC outlet.
- Ensure the AC outlet is functional.
- No Output from DC Power Supply:
- Ensure the OUT button is pressed and the output is enabled.
- Check if OCP is active due to an overcurrent condition. Resolve the load issue and reset.
- Verify that the voltage and current limits are set above zero.
- Multimeter Display is Blank or Faint:
- Check and replace the batteries if they are low or depleted.
- Ensure the rotary dial is not in the OFF position.
- Incorrect Multimeter Readings:
- Verify that the test leads are correctly inserted into the appropriate input jacks for the selected measurement.
- Ensure the rotary dial is set to the correct function.
- Check if the multimeter's fuses are intact (for current measurements).
- Ensure the circuit is de-energized when measuring resistance or continuity.
11. Specifications
11.1 Jesverty SPS-3010V DC Power Supply
- Input Voltage: AC 110V/220V (switchable)
- Output Voltage: 0-32V (Adjustable)
- Output Current: 0-10A (Adjustable)
- Display: 4-Digit LED (Voltage, Current, Power)
- Voltage Resolution: 0.01V
- Current Resolution: 0.001A
- USB Output: USB-A & USB-C, 20W Quick-Charge each
- Protection: Over Current Protection (OCP)
- Dimensions: Approx. 18cm (7.1") x 9cm (3.6") x 16cm (6.2")
- Weight: Approx. 1.14kg

Image Description: This image illustrates the dimensions of the Jesverty SPS-3010V DC Power Supply, showing its approximate measurements as 18cm (7.1 inches) in length, 9cm (3.6 inches) in width, and 16cm (6.2 inches) in height. The image also highlights features such as low noise operation, USB-A/Type-C fast charging, a cooling fan, and a short circuit alarm, providing a comprehensive overview of its physical attributes and key functionalities.
11.2 Jesverty HK33B Digital Multimeter
- Display: 2000 Counts Backlight LCD
- DC Voltage: Up to 600V
- AC Voltage: Up to 600V
- DC Current: Up to 10A
- AC Current: Up to 10A
- Resistance: Up to 20MΩ
- Temperature: °C / °F (with K-type thermocouple)
- Special Features: NCV, Live Wire Test, Continuity, Diode, Data Hold, Backlight, Flashlight, MIN/MAX, Auto Power Off.
- Power Source: Battery Powered (e.g., AAA batteries)
- Safety Rating: CAT.III 600V

Image Description: This image highlights several practical features of the Jesverty HK33B Digital Multimeter. It shows the audible assurance (BUZZ) for continuity testing, the NCV (Non-Contact Voltage) function detecting live wires from a wall outlet, temperature measurement using a K-type thermocouple in a liquid, and the integrated support stand on the back of the device, which can be adjusted up to 90 degrees for convenient viewing.
12. Warranty Information
Jesverty products are manufactured to high-quality standards. This product is covered by a limited warranty against defects in materials and workmanship from the date of purchase. Please retain your proof of purchase for warranty claims. The warranty does not cover damage caused by misuse, unauthorized modification, accident, or neglect. For specific warranty terms and conditions, please refer to the product packaging or contact customer support.
13. Customer Support
If you have any questions, encounter issues, or require technical assistance with your Jesverty DC Power Supply or Digital Multimeter, please do not hesitate to contact our customer support team. We are committed to providing excellent service and support.
- Contact Information: Refer to the contact details provided on the product packaging or the official Jesverty website.
- Online Resources: Visit the Jesverty brand store on Amazon or the official website for FAQs, product updates, and additional resources.


