1. Introduction
This manual provides instructions for the installation, operation, and maintenance of your Miuputake STN601 Non-Programmable Digital Thermostat. This thermostat is designed for single-stage heating and cooling systems, offering reliable temperature control with a clear, backlit LCD display.
Key features include:
- Easy-to-read backlight LCD display.
- Adjustable temperature differential (swing) for energy optimization.
- Support for temperature display calibration.
- Convertible °C/°F units.
- Compressor delay protection (selectable on or off).
- Dual power supply: 24VAC or 2 AAA batteries.

Image: Overview of the Miuputake STN601 thermostat and its main features.
2. Safety Information
Please read all instructions carefully before installing or operating this thermostat. Failure to follow these instructions could result in property damage, personal injury, or death.
- Always turn off power to the heating/cooling system at the main fuse or circuit breaker box before installing or servicing the thermostat.
- This thermostat is designed for 24VAC low voltage systems only. Do not use on line voltage applications (110-240V).
- All wiring must conform to local electrical codes and ordinances.
- Do not short (jumper) across terminals on the gas valve or at the system circuit board to test the system. This will damage the thermostat and void the warranty.
3. Package Contents
Verify that your package contains the following items:
- Miuputake STN601 Thermostat
- Installation Manual and Operating Manual
- Two Screws and Anchors
- Cable Label
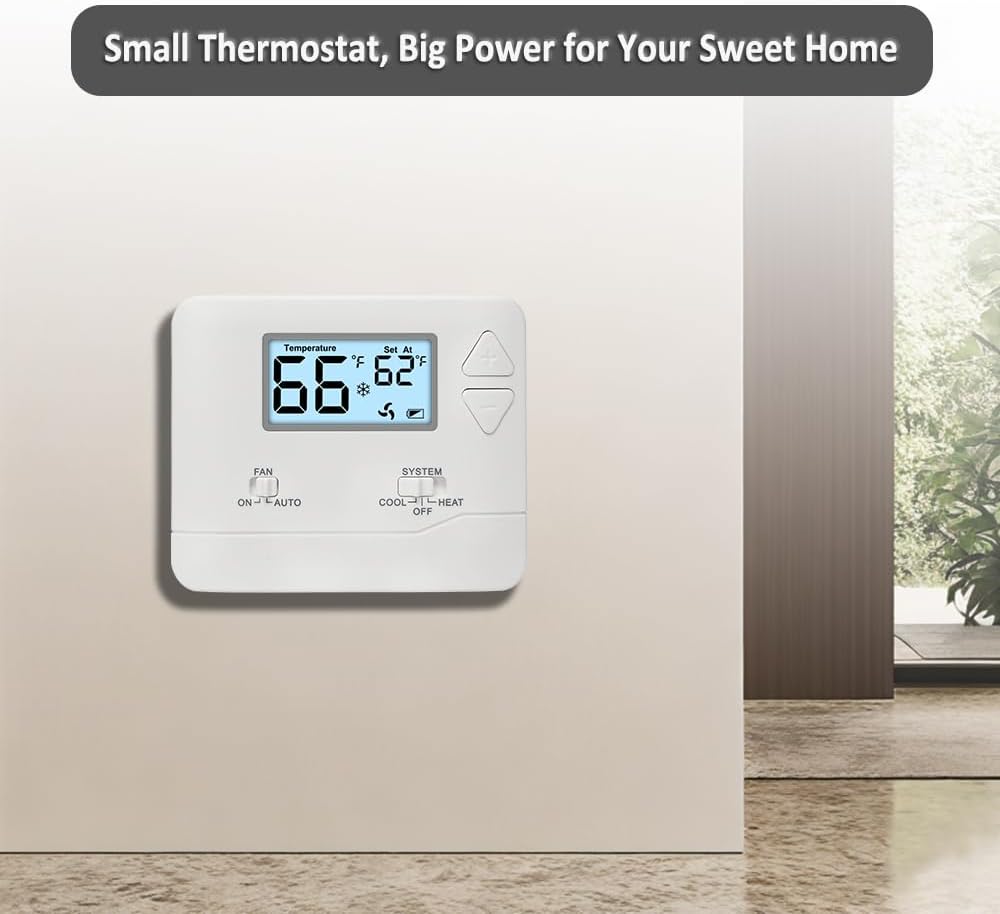
Image: What's in the Box - STN601 Thermostat and accessories.
4. System Compatibility
The Miuputake STN601 thermostat is designed for single-stage heating and cooling systems. Please review the compatibility information below to ensure it works with your HVAC system.
Compatible Systems:
- Forced air (gas, oil, or electric)
- Electric furnace
- Hot water steam or gravity radiant heat
- Heat only systems
- Heat pump without auxiliary or emergency heat
- Millivolt systems
- Gas fireplaces (24V)
- Floor or wall furnaces
- Cool only systems
Not Compatible With:
- Heat pump with auxiliary or emergency heat
- Dual fuel/hybrid heating systems
- Electric baseboard heat (110-240 volts)
- Line voltage systems
- Convectors
- Radiant-ceiling heat
- Mini split systems
- 12V RV systems

Image: System Compatibility Chart for 1 Heat, 1 Cool Single Stage Thermostat.
5. Product Overview and Controls
The STN601 thermostat features a simple, user-friendly interface for manual temperature control.

Image: Thermostat Layout and User Interface.
Display:
- Temperature Display Range: 32°F to 99°F (0°C to 40°C).
- Temperature Set Range: 44°F to 90°F (7°C to 32°C).
- Accuracy: ±2°F for consistent comfort.
- Low Battery Indicator: An icon will be displayed when the 2 AAA batteries are low and need replacement.
Controls:
- Up/Down Buttons: Large, adjustable buttons for setting the desired temperature.
- FAN Switch: Selects fan operation mode (ON or AUTO).
- SYSTEM Switch: Selects system operation mode (COOL, OFF, HEAT).
- Battery Compartment: Easy-access front-load compartment for 2 AAA alkaline batteries (not supplied).
6. Installation
Installation can typically be completed within 30 minutes. Ensure power is off before beginning.
Pre-Installation Checklist:
- Turn off power: Disconnect power to your heating and cooling system at the main fuse or circuit breaker.
- Remove old thermostat: Carefully remove your old thermostat from the wall. Note the wiring connections.
- Check dimensions: Confirm that the new thermostat's dimensions (4.72"W x 3.86"H x 0.98"D) can completely cover any traces or marks from your old thermostat.

Image: Heating and Cooling Thermostat Dimensions.
Mounting:
- Separate the thermostat from its sub-base.
- Position the sub-base on the wall where you want to mount the thermostat. Use the provided screws and anchors to secure it.
Power Supply:
The thermostat can be powered by 24VAC from your HVAC system or by 2 AAA batteries. A common wire (C-wire) is not required on most systems, but if available, it provides a backup power source, maintaining settings during power outages.
7. Wiring
Proper wiring is crucial for correct thermostat operation. Refer to the diagrams below and use the provided cable labels.
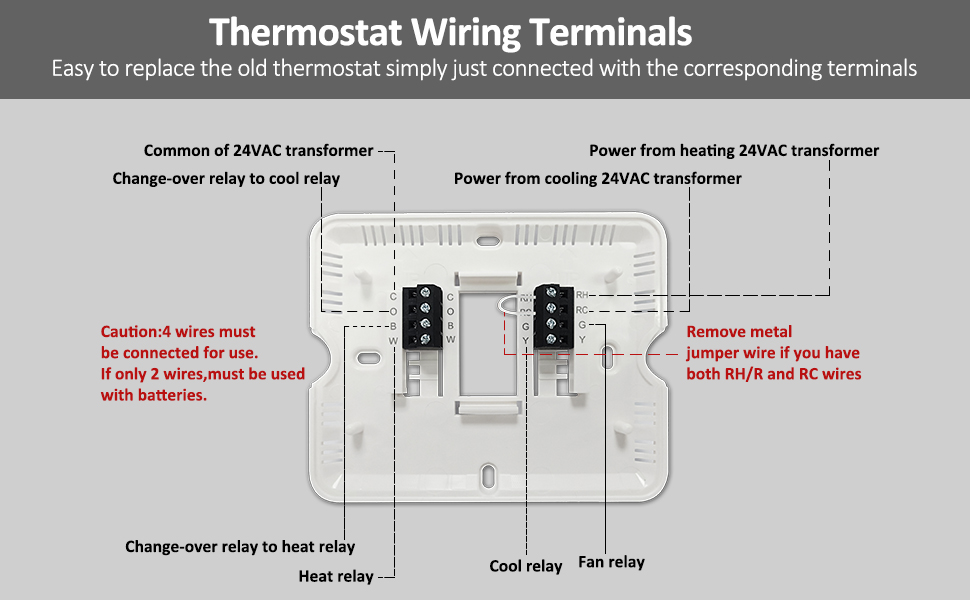
Image: Digital Wall Thermostat Wiring Layout.
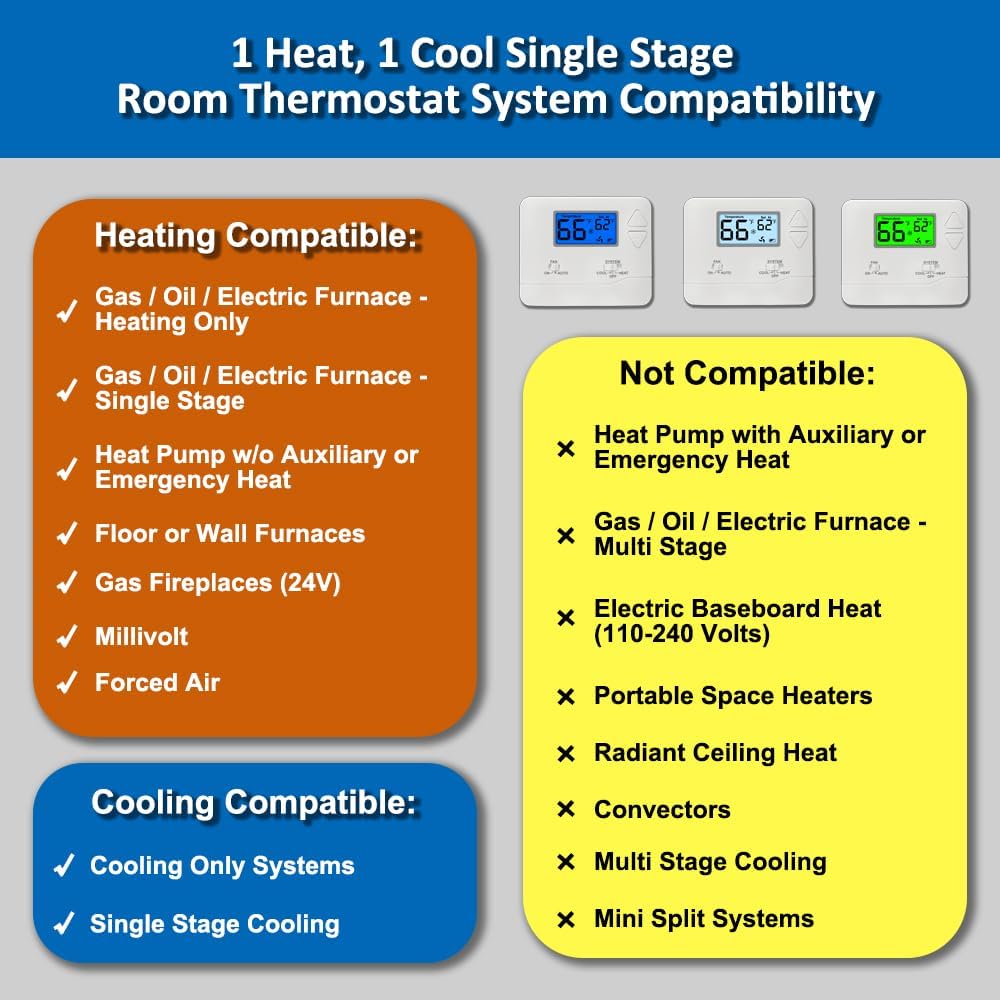
Image: Thermostat Wiring Terminals and Connections.
Terminal Designations:
- C: Common 24VAC (system power supply)
- O: Reversing Valve Cool
- B: Reversing Valve Heat
- W: Heat
- RH: 24VAC (system power supply) - Heat = RH to W
- RC: 24VAC (system power supply) - Cool = RC to Y, Fan = RC to G
- G: Fan
- Y: Cool
Wiring Instructions:
- Connect the wires from your HVAC system to the corresponding terminals on the thermostat's sub-base. Use the provided cable labels for organization.
- If you have both RH and RC wires, remove the metal jumper wire that connects them on the thermostat.
- Important: 4 wires must be connected for full functionality. If only 2 wires are available, the thermostat must be used with batteries.
- Ensure the Electric/Gas switch on the back of the thermostat is set correctly for your system type.
- Once wiring is complete, carefully attach the thermostat faceplate to the sub-base.
- Restore power to your HVAC system at the main fuse or circuit breaker.
8. Operation
Operating your Miuputake STN601 thermostat is straightforward.
Setting the Temperature:
Use the large Up (▲) and Down (▼) buttons on the right side of the thermostat to adjust the desired set temperature. The display will show both the current room temperature and the set temperature.
System Switch (COOL/OFF/HEAT):
Slide the SYSTEM switch to select the desired operating mode:
- COOL: Activates the cooling system when the room temperature rises above the set temperature.
- OFF: Turns off both heating and cooling systems.
- HEAT: Activates the heating system when the room temperature falls below the set temperature.
Fan Switch (ON/AUTO):
Slide the FAN switch to select the desired fan operation:
- ON: The fan runs continuously, regardless of whether the heating or cooling system is active.
- AUTO: The fan runs only when the heating or cooling system is actively operating.
Temperature Unit Conversion (°C/°F):
Refer to the full installation manual for instructions on how to switch between Celsius and Fahrenheit display units, as this is typically a setting accessed during initial setup or via a specific button combination.
9. Maintenance
Your Miuputake STN601 thermostat requires minimal maintenance to ensure optimal performance.
Cleaning:
Wipe the exterior of the thermostat with a soft, damp cloth. Do not use abrasive cleaners or solvents, as these can damage the finish and electronic components.
Battery Replacement:
When the low battery indicator appears on the display, replace the two AAA alkaline batteries promptly. The battery compartment is located on the front of the thermostat for easy access. Ensure correct polarity when inserting new batteries.
10. Troubleshooting
If you experience issues with your thermostat, try the following common troubleshooting steps:
- No Display/Blank Screen: Check if the power to the HVAC system is on. If using batteries, replace them with fresh AAA alkaline batteries.
- System Not Responding: Ensure the SYSTEM switch is set to COOL or HEAT, not OFF. Verify that the fan switch is set correctly (ON or AUTO). Check circuit breakers for your HVAC system.
- Incorrect Temperature Reading: The thermostat has a temperature display calibration feature. Refer to the full operating manual for instructions on how to adjust this setting if you suspect an inaccurate reading.
- Fan Runs Continuously: Check if the FAN switch is set to ON. If you prefer the fan to run only with heating/cooling, set it to AUTO.
- Heating/Cooling Cycles Too Frequently/Infrequently: The adjustable temperature differential (swing) can be optimized. Consult the operating manual for details on adjusting this setting.
If problems persist after attempting these steps, please contact customer support.
11. Specifications
Detailed technical specifications for the Miuputake STN601 Non-Programmable Digital Thermostat:

Image: Single Stage Thermostat Parameters.
| Feature | Specification |
|---|---|
| Brand | Miuputake |
| Model Name | STN601 |
| Product Dimensions (D x W x H) | 0.98"D x 4.72"W x 3.86"H (2.49cm D x 11.99cm W x 9.8cm H) |
| Controller Type | Push Button |
| Special Features | Separate Heating and Cooling Swing (Cycle Rate), Low Battery Indicator, Temperature Calibration, °C/°F Conversion, Compressor Delay Protection |
| Specific Uses | Heating and Cooling Controls |
| Temperature Control Type | Manual |
| Power Source | 24VAC or 2 AAA batteries (not included) |
| Voltage | 24 Volts (AC) |
| Display Type | LCD |
| Control Method | Touch (buttons) |
| Mounting Type | Wall Mount |
| Material Type | Plastic |
| Item Weight | 0.37 Pounds |
| UPC | 635403033326 |
12. Warranty and Support
For warranty information or technical support, please refer to the contact details provided with your purchase or visit the Miuputake official website. Keep your purchase receipt as proof of purchase.