
1. Introduction
This manual provides detailed instructions for the installation, operation, and maintenance of the Foxeer Reaper F4 128K 65A BL32 4in1 Electronic Speed Controller (ESC). This 4-in-1 ESC is designed for racing drones, integrating four individual ESCs into a single compact unit. It supports BLHeli32 firmware and DShot1200 protocol, offering precise motor control and high performance for demanding flight applications.
2. Safety Information
Read all instructions carefully before use. Failure to follow these instructions may result in damage to the product, property, or serious injury. Always observe the following safety precautions:
- Ensure correct polarity when connecting power. Incorrect polarity will cause irreversible damage.
- Operate in a well-ventilated area to prevent overheating.
- Keep away from water, moisture, and extreme temperatures.
- Disconnect power before performing any maintenance or making connections.
- High current can be dangerous. Handle with care and use appropriate safety equipment.
- This product is not a toy. Keep out of reach of children.
3. Product Overview and Features
The Foxeer Reaper F4 128K 65A BL32 4in1 ESC is a high-performance electronic speed controller designed for demanding FPV racing and freestyle applications. Its compact design and robust capabilities make it suitable for various drone builds.
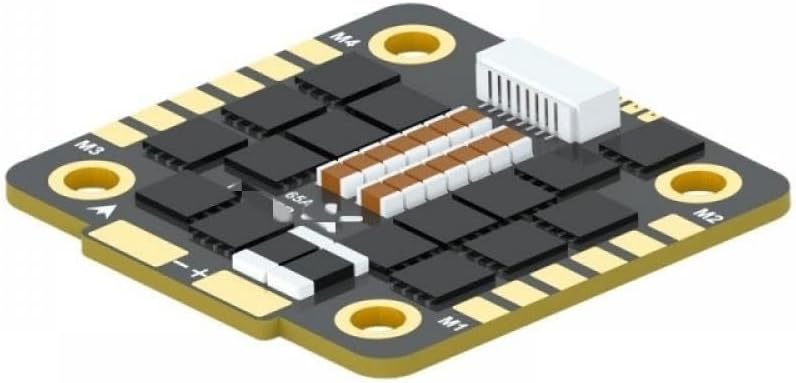
Figure 3.1: Top view of the Foxeer Reaper F4 128K 65A BL32 4in1 ESC, highlighting the motor output pads and main power connections.
Key features include:
- Model: Foxeer Reaper F4 128K 65A BL32
- Input Voltage: Compatible with 3-8S LiPo batteries (DC 9V ~ 40V) for versatile power options.
- Current: Delivers 65A continuous current per motor, with a burst current of 100A, suitable for demanding racing scenarios.
- Firmware: Supports BLHeli32 firmware for advanced configuration and performance tuning.
- Protocols: Supports DShot 150 / 300 / 600 / 1200, MultiShot, and OneShot for fast and responsive throttle control.
- Mounting: Standard 30.5 x 30.5mm mounting hole pattern with M3 holes for secure and stable installation.
- Telemetry: Built-in telemetry support for real-time data feedback to the flight controller.

Figure 3.2: Angled view of the ESC, illustrating the signal wire connector and motor output pads.
4. Specifications
| Parameter | Value |
|---|---|
| Firmware | Reaper F4 65A 128 Multi 32 9 (BLHeli32) |
| Continuous / Burst Current | 65A x 4 / 100A x 4 |
| Input Voltage | DC 9V ~ 40V (3-8S Lipo) |
| BEC | No |
| Telemetry | Supported |
| ESC Programming | BLHeli32 |
| Input Protocols | DShot 150 / 300 / 600 / 1200 / MultiShot / OneShot |
| Working Temperature | -20 ~ +55°C |
| Working Humidity | 20-95% |
| Storage Temperature | -20 ~ +70°C |
| Mounting Hole | 30.5 x 30.5mm, 4mm / M3 |
| Dimension | 42.5 x 42 x 5.5mm |
| Weight | 14.8g |
5. Setup and Installation
Proper installation is crucial for the performance and longevity of your ESC. Follow these steps carefully:
- Mounting: Secure the ESC to your drone frame using M3 screws through the 30.5 x 30.5mm mounting holes. Ensure there is adequate clearance and airflow around the ESC for cooling.
- Power Connection: Solder the main battery leads (positive and negative) from your power distribution board (PDB) or battery connector to the large '+' and '-' pads on the ESC. Double-check polarity before soldering.
- Motor Connections: Solder the three motor wires from each of your four motors to the corresponding M1, M2, M3, and M4 pads on the ESC. The order of the motor wires can be adjusted later in the BLHeli32 configurator if motors spin in the wrong direction.
- Flight Controller Connection: Connect the signal wires from the ESC to the appropriate motor output pins on your flight controller. Typically, a multi-pin connector is used for this purpose. Ensure the ground (GND), signal (S1-S4), and telemetry (TLM) pins are correctly aligned and connected.

Figure 5.1: Underside view of the ESC, showing mounting points and component layout.
6. Operating Instructions
After physical installation, the ESC requires configuration using the BLHeli32 Suite software.
- Software Installation: Download and install the latest BLHeli32 Suite configurator from the official BLHeli website.
- Connect to PC: Connect your flight controller to your computer via USB. The ESC is typically connected to the flight controller via a dedicated harness, allowing the flight controller to act as a pass-through for ESC configuration.
- Detect ESCs: Open the BLHeli32 Suite, select the correct COM port for your flight controller, and click 'Connect'. Then click 'Read Setup' to detect and read the current settings of your ESCs.
- Firmware Update (Optional): It is recommended to update to the latest BLHeli32 firmware for optimal performance and bug fixes. Select 'Flash All' and choose the appropriate firmware version (Reaper F4 65A 128 Multi 32 9).
- Configuration: Adjust settings such as motor direction, Damped Light mode, PWM frequency, and other parameters according to your motor and flight controller setup. Ensure motor direction is correct for your drone's propeller configuration.
- Save Settings: After making changes, click 'Write Setup' to save the new configuration to the ESCs.
- Telemetry: If your flight controller supports ESC telemetry, ensure it is enabled in both the BLHeli32 Suite and your flight controller firmware (e.g., Betaflight, EmuFlight) to receive real-time motor RPM, temperature, and current data.

Figure 6.1: Detailed top view of the ESC, useful for identifying components during configuration.
7. Maintenance
Regular maintenance helps ensure the longevity and reliable operation of your ESC.
- Inspection: Periodically inspect the ESC for any signs of physical damage, loose solder joints, or burnt components.
- Cleaning: Gently clean the ESC with a soft brush or compressed air to remove dust, dirt, or debris that may accumulate and affect cooling. Avoid using liquids.
- Firmware: Keep the BLHeli32 firmware updated to the latest stable version to benefit from performance improvements and bug fixes.
- Storage: Store the ESC in a dry, cool environment when not in use.
8. Troubleshooting
If you encounter issues with your ESC, refer to the following common troubleshooting steps:
- Motors Not Spinning:
- Check all solder connections for continuity and cold joints.
- Verify motor direction and settings in BLHeli32 Suite.
- Ensure signal wires from the flight controller are correctly connected.
- Check for bent or damaged motor pins on the flight controller.
- ESC Not Detected in BLHeli32 Suite:
- Ensure the flight controller is powered and connected to the PC.
- Verify the correct COM port is selected in the configurator.
- Check the connection between the ESC and the flight controller.
- Try a different USB cable or port.
- Overheating:
- Ensure adequate airflow around the ESC.
- Check for motor desync issues or incorrect motor timing settings in BLHeli32.
- Verify that the motors are not drawing excessive current (e.g., due to damaged bearings or incorrect propeller size).
9. Warranty and Support
This product is covered by a limited manufacturer's warranty against defects in materials and workmanship. For specific warranty terms and conditions, please refer to the documentation provided at the time of purchase or contact your retailer. For technical support, please reach out to the product manufacturer or your authorized dealer.


