1. Product Overview
The Hyuduo ATU-120 is an automatic shortwave antenna tuning unit designed for ham radio enthusiasts. It features a robust aluminum alloy construction and is engineered to provide stable signal transmission across a wide frequency range. This manual provides essential information for the proper setup, operation, and maintenance of your ATU-120 tuner.
Key Features:
- Utilizes a PIC16F1938 MCU and a 7-group LC combination for reliable performance and extended lifespan.
- Incorporates an HF4100 and 3A relay, ensuring stable signal transmission across the 1.9-54MHz frequency range.
- Features 7 groups of 3KV high-voltage ceramic capacitors or 1KV, 1206 four-group high-voltage ceramic capacitors arranged in series and parallel for efficient tuning.
- Equipped with 8 magnetic inductors for low heat generation and enhanced durability.
- Connection points are designed for optimal performance, ensuring stable operation and ease of use.
2. Package Contents
Please verify that all items are present in the package:
- 1 x Hyuduo ATU-120 Antenna Tuner
- 1 x Connection Line
- 1 x Power Plug
3. Setup Instructions
Follow these steps to properly set up your ATU-120 antenna tuner:
- Connect Power: Connect the provided power plug to the DC 12V input port on the tuner. Ensure the power source provides stable 12V DC.
- Connect Transceiver: Use a suitable coaxial cable to connect your ham radio transceiver's antenna output to the 'IN' port on the ATU-120.
- Connect Antenna: Connect your antenna to the 'ANT' port on the ATU-120 using a suitable coaxial cable.
- Ground Connection: For optimal performance and safety, connect the 'GND' terminal on the tuner to a reliable ground point.
- Power On: Flip the 'POWER' switch on the front panel to the ON position. The display should illuminate.
Important Safety Note: Always ensure all cables are connected correctly before powering on the device. Incorrect connections can lead to product damage.

Figure 1: Rear panel connections of the ATU-120 tuner, showing ANT, GND, IN, and DC 12V ports.
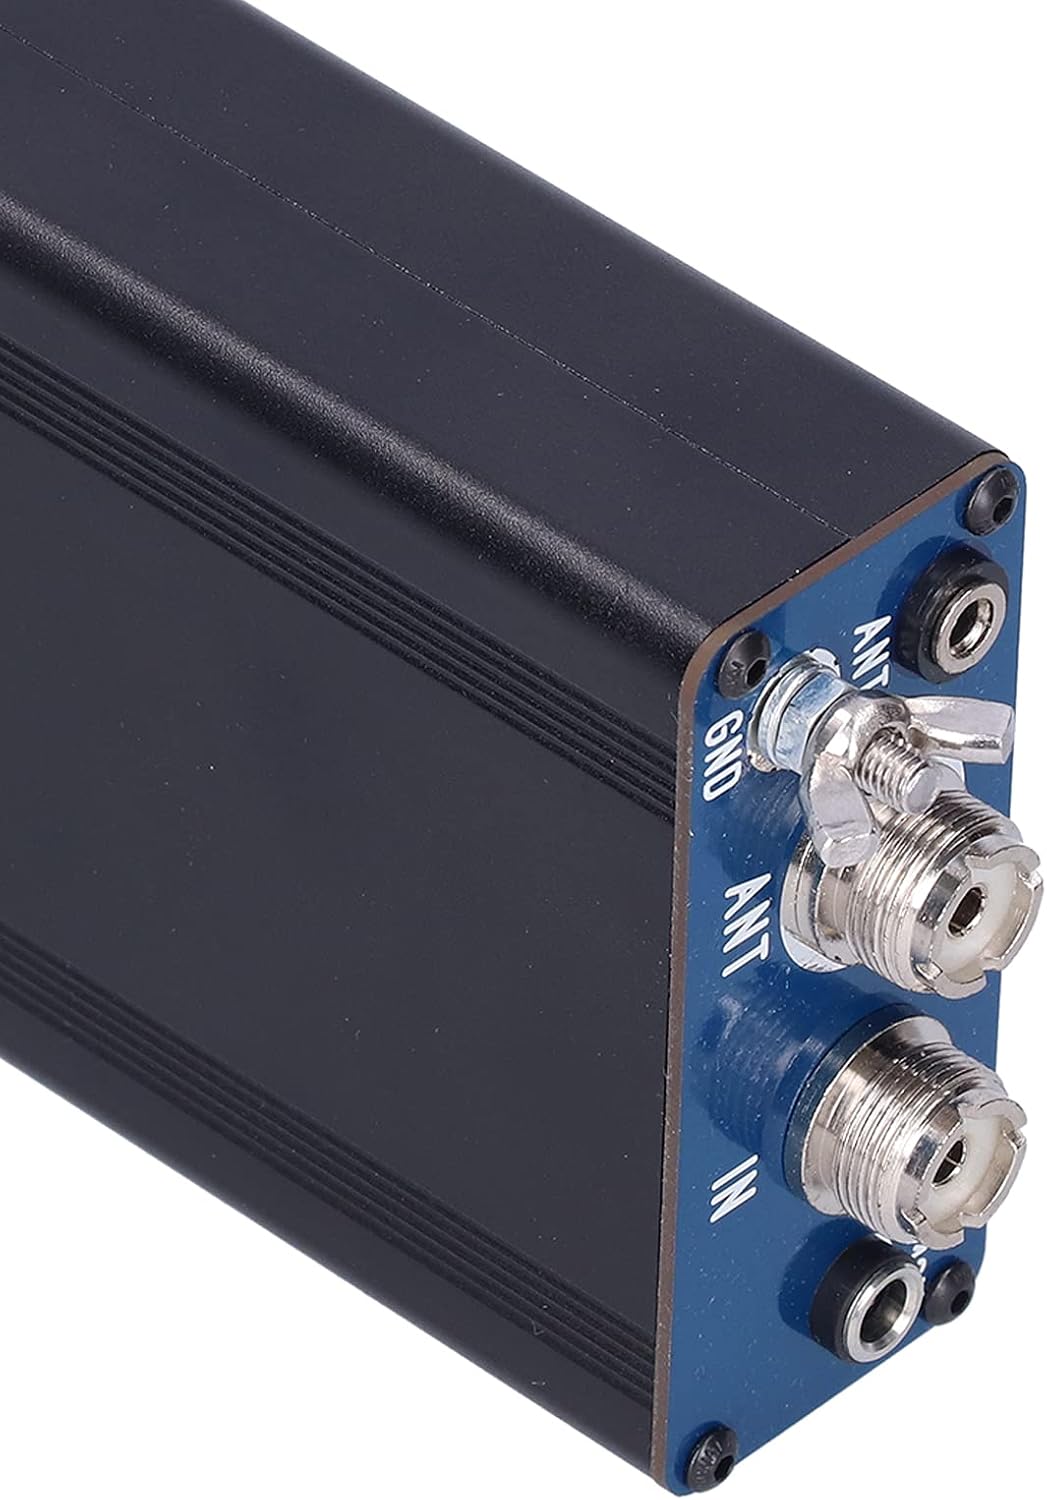
Figure 2: Detailed view of the input/output ports on the ATU-120 tuner.
4. Operating Instructions
The ATU-120 is designed for automatic antenna tuning. Here's how to operate it:
- Automatic Tuning: After connecting the tuner and powering it on, transmit a low-power signal (e.g., 5-10W CW or FM carrier) from your transceiver. The ATU-120 will automatically detect the signal and begin the tuning process to achieve the lowest possible Standing Wave Ratio (SWR). The display will show the tuning status.
- Manual Tune (if applicable): If the automatic tuning does not achieve satisfactory results, or for specific adjustments, press the 'TUNE' button. The tuner will initiate a tuning cycle.
- Bypass Mode: To bypass the tuning unit and connect the antenna directly to the transceiver, press the 'AUTO BYPASS' button. This is useful for antennas that are already perfectly matched or for diagnostic purposes.
- Monitoring: Observe the SWR meter on your transceiver or the tuner's display (if available) to confirm successful tuning. A low SWR (ideally 1.5:1 or lower) indicates an efficient match.

Figure 3: Product dimensions and front panel controls of the ATU-120 tuner.
5. Specifications
| Feature | Specification |
|---|---|
| Model | ATU-120 |
| Material | Aluminum Alloy |
| Dimensions (excluding protrusions) | Approx. 88 x 155 x 38mm / 3.5 x 6.1 x 1.5in |
| Maximal Power (SSB) | ≥120W (recommended continuous use ≤100W) |
| Maximal Power (FT8, CW, FM) | ≥60W |
| Frequency Range | 1.9-54MHz (affected by antenna length and SWR) |
| Tuning Impedance Range | 5Ω-1.0KΩ |
| MCU | PIC16F1938 |
| Relay | HF4100 and 3A relay |
| Capacitors | 7 groups of 3KV high voltage ceramic capacitors or 1KV, 1206 four groups of high voltage ceramic capacitors in series and parallel |
| Inductors | 8 magnetic inductors |
6. Maintenance
To ensure the longevity and optimal performance of your ATU-120 tuner, follow these maintenance guidelines:
- Cleaning: Keep the unit clean and free from dust. Use a soft, dry cloth for cleaning. Avoid using liquid cleaners or solvents.
- Environment: Operate and store the tuner in a dry environment, away from direct sunlight, extreme temperatures, and high humidity.
- Connections: Periodically check all cable connections to ensure they are secure and free from corrosion.
- Power: Always use the specified 12V DC power supply. Using an incorrect voltage can damage the unit.
7. Troubleshooting
If you encounter issues with your ATU-120 tuner, consider the following:
- Unit Not Powering On:
- Ensure the power cable is securely connected to the DC 12V port and the power source.
- Verify that the power source is providing 12V DC and is functional.
- Check the power switch on the front panel is in the ON position.
- High SWR After Tuning:
- Confirm that the antenna is properly connected to the 'ANT' port and the transceiver to the 'IN' port.
- Ensure the ground connection is secure.
- Check the antenna itself for any damage or issues. The tuner can only compensate for a certain range of impedance mismatches.
- Try initiating another tuning cycle by transmitting a low-power signal or pressing the 'TUNE' button.
- No Tuning Activity:
- Ensure your transceiver is transmitting a signal when attempting to tune. The ATU-120 requires an RF signal to initiate tuning.
- Verify that the 'AUTO BYPASS' button is not engaged, which would prevent tuning.
If problems persist, consult a qualified technician or contact customer support.
8. Warranty and Support
Specific warranty information for the Hyuduo ATU-120 is not provided in this document. Please refer to the product packaging or the retailer's website for details regarding warranty coverage and return policies.
For technical support or further assistance, please contact Hyuduo customer service through the vendor's official channels or the platform where the product was purchased.