Introduction
This manual provides detailed instructions for the installation, operation, and maintenance of your AudioControl Bass Bundle. The bundle includes the AudioControl EPICENTER Bass Restoration Processor, the AudioControl EPIC1000 Monoblock 1000W Car Audio Subwoofer Amplifier, and a Stinger 2-Channel 3 FT 6000 Series RCA Interconnect Cable. Please read this manual thoroughly before installation and use to ensure proper function and safety.
Safety Information
- Always disconnect the vehicle's battery before performing any electrical work.
- Ensure all wiring is properly insulated and secured to prevent short circuits and damage.
- Install components in a location that is dry, well-ventilated, and protected from extreme temperatures.
- Use appropriate gauge wiring for power and ground connections to prevent overheating.
- Consult a professional car audio installer if you are unsure about any installation steps.
Package Contents
Verify that all items are present in your AudioControl Bass Bundle:
- AudioControl EPICENTER Bass Restoration Processor (Black)
- AudioControl EPIC1000 Monoblock 1000W Car Audio Subwoofer Amplifier
- Stinger 2-Channel 3 FT 6000 Series RCA Interconnect Cable
- ACR-1 Dash Remote Control (for EPICENTER)
- ACR-E Dash Remote Control (for EPIC1000)
- Associated wiring harnesses and mounting hardware

Image: The AudioControl EPICENTER Bass Restoration Processor shown with its included dash remote and wiring.
Setup and Installation
1. Mounting the Components
- EPICENTER Processor: Mount the EPICENTER in a secure, dry location, away from direct heat or moisture. Ensure adequate ventilation around the unit.
- EPIC1000 Amplifier: The EPIC1000 is a compact monoblock amplifier designed for flexible installation. Mount it securely to a solid surface, ensuring proper airflow for cooling. Its dimensions are approximately 6.1 inches (W) x 9.41 inches (L) x 2.01 inches (H).

Image: Top view of the EPICENTER processor, showing control knobs and input/output connections.

Image: Top view of the EPIC1000 amplifier, highlighting its compact design.
2. Wiring Connections
Follow these steps for proper electrical and signal connections:
- Power and Ground (EPIC1000): Connect the amplifier's +12V terminal to the vehicle's battery using an appropriate gauge power wire with an inline fuse. Connect the Ground terminal to a clean, chassis ground point.
- Remote Turn-On (EPIC1000): Connect the Rmt In terminal to your head unit's remote turn-on output.
- Signal Input (EPIC1000): Use the Stinger 2-Channel RCA Interconnect Cable to connect the RCA outputs from the EPICENTER processor to the Inputs (CH1) of the EPIC1000 amplifier. The EPIC1000 also supports line-level inputs for use with most aftermarket head units.
- Speaker Output (EPIC1000): Connect your subwoofer(s) to the Mono Sub Output terminals. The EPIC1000 is stable at 4Ω, 2Ω, or 1Ω. For bridged operation, it can deliver up to 2000W at 2 ohms.
- EPICENTER Power: The EPICENTER Link port on the EPIC1000 provides +12V power, ground, and remote-turn on with built-in fuse protection for the EPICENTER processor. Connect the EPICENTER to this port. Alternatively, the EPICENTER can be wired directly to power, ground, and remote sources.
- EPICENTER Signal: Connect the RCA outputs from your head unit or signal processor to the Balanced L Inputs R on the EPICENTER. Connect the L Outputs R from the EPICENTER to the RCA inputs of the EPIC1000 amplifier.

Image: Rear panel of the EPIC1000 amplifier, detailing power, ground, remote, and mono subwoofer output connections.
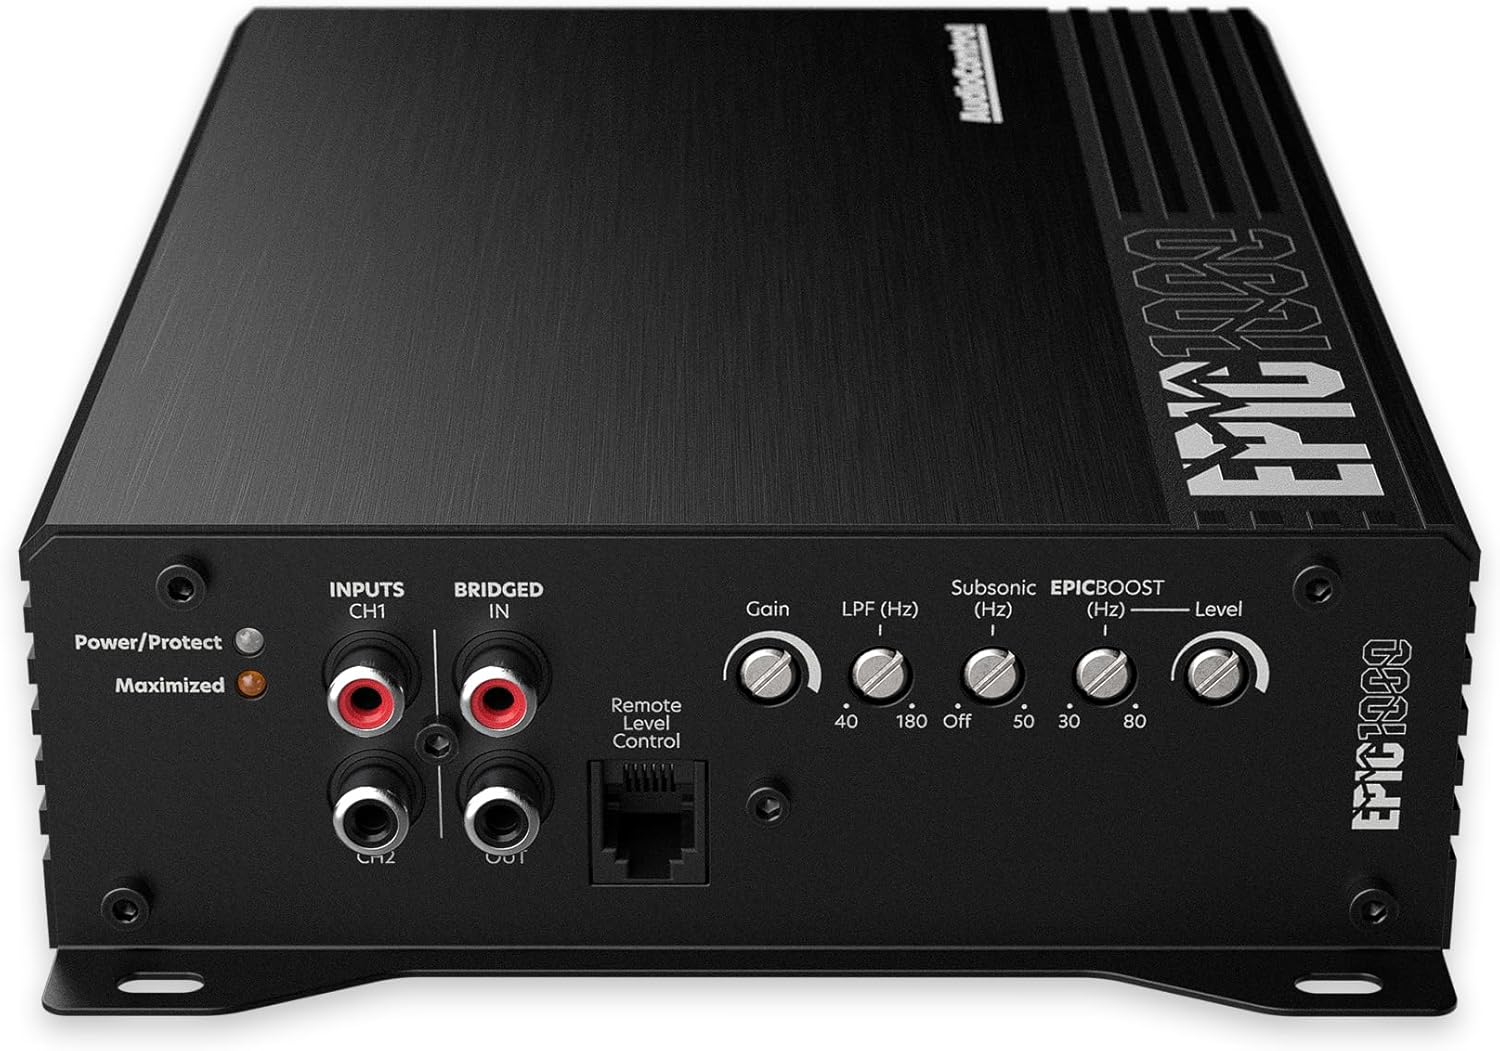
Image: Front panel of the EPIC1000 amplifier, showing RCA inputs, gain, crossover, and EPICBOOST controls.

Image: The Stinger 2-Channel 3 FT 6000 Series RCA Interconnect Cable, featuring oversized OFC conductors and nickel-plated connectors for optimal signal transfer.

Image: Connection diagram illustrating how the EPICENTER processor connects to an amplifier, demonstrating the signal flow for bass restoration.
Operating Instructions
1. AudioControl EPICENTER Bass Restoration Processor
The EPICENTER utilizes a patented bass restoration circuit to enhance low-frequency content in your audio system. It detects upper-range harmonics and synthesizes a powerful low-frequency foundation, injecting this signal back into your audio path for deeper bass impact.
- Sweep Control: This knob allows you to sweep the center frequency of the bass restoration from 27 Hz to 63 Hz. Adjust this to align the bass restoration with your vehicle's acoustic sweet spot.
- Wide Control: This control adjusts the bandwidth of the added bass signal. By adjusting the width, you can fine-tune the impact to perfectly suit your vehicle's environment and your listening preferences.
- ACR-1 Dash Remote: The included ACR-1 remote allows you to adjust the EPICENTER Effect levels conveniently from your listening position.
- PFM Subsonic Filter: The EPICENTER features a programmable frequency match (PFM) subsonic filter. This filter protects your subwoofer by removing ultra-low frequencies that are beyond its playable range, preventing wasted amplifier power and potential damage.
2. AudioControl EPIC1000 Monoblock Amplifier
The EPIC1000 amplifier provides robust power for your subwoofer system. Adjustments are made via the controls on the amplifier's front panel.
- Gain Control: Adjust this to match the output voltage of your EPICENTER processor or head unit. Start with the gain at minimum and slowly increase until desired volume is achieved without distortion.
- LPF (Low Pass Filter) (Hz): This control sets the upper frequency limit for the amplifier's output, ensuring only low frequencies are sent to your subwoofer. Adjust between 40 Hz and 180 Hz.
- Subsonic (Hz): This filter removes frequencies below a certain point, protecting your subwoofer from damage caused by playing frequencies too low for its design. Adjust between 30 Hz and 80 Hz, or turn off.
- EPICBOOST (Hz) and Level: This is a variable 0-12dB bass equalizer. The EPICBOOST (Hz) knob selects the center frequency for the bass boost, while the Level knob adjusts the amount of boost.
- ACR-E Dash Remote: The included ACR-E remote allows you to adjust the overall subwoofer volume from your listening position.
Maintenance
- Cleaning: Use a soft, dry cloth to clean the exterior surfaces of the EPICENTER and EPIC1000. Avoid using harsh chemicals or abrasive cleaners.
- Ventilation: Ensure that the ventilation openings on the amplifier are not blocked. Proper airflow is crucial for preventing overheating.
- Wiring Inspection: Periodically check all wiring connections for tightness and signs of wear or corrosion.
- Protection Modes: The EPIC1000 amplifier includes multiple built-in protection modes against low/high voltage, short-circuits, and thermal hazards. If the amplifier enters protection mode (indicated by a status light), identify and resolve the underlying issue before resuming operation.
Troubleshooting
| Problem | Possible Cause | Solution |
|---|---|---|
| No Power to Amplifier/Processor | Blown fuse, loose power/ground connection, no remote turn-on signal. | Check all fuses (inline and on unit). Verify power, ground, and remote wire connections are secure and receiving voltage. |
| No Sound Output | Incorrect input/output connections, gain set too low, speaker wires disconnected, amplifier in protection mode. | Verify RCA connections. Adjust gain. Check speaker wiring. Check amplifier status light for protection mode. |
| Distorted Sound | Gain set too high, incorrect crossover settings, damaged speaker. | Reduce gain. Adjust LPF and Subsonic filters. Inspect subwoofer for damage. |
| Amplifier Overheating | Insufficient ventilation, impedance too low, prolonged high-power operation. | Ensure proper airflow around the amplifier. Verify speaker impedance. Reduce volume or allow cooling time. |
| No Bass Restoration Effect | EPICENTER not powered, incorrect signal path, Sweep/Wide controls set to minimum, ACR-1 remote set to minimum. | Verify EPICENTER power and signal connections. Adjust Sweep and Wide controls. Check ACR-1 remote setting. |
Specifications
AudioControl EPICENTER Bass Restoration Processor
- Bass Restoration: Patented circuit for low-frequency synthesis
- Sweep Frequency: 27 Hz - 63 Hz (adjustable)
- Width Control: Adjustable bandwidth for bass signal
- Subsonic Filter: Programmable Frequency Match (PFM)
- Inputs: Balanced RCA
- Outputs: RCA
- Remote Control: ACR-1 Dash Remote
AudioControl EPIC1000 Monoblock Amplifier
- Model: EPIC1000
- Type: Digital Class D Monoblock
- Output Power: 1000 Watts RMS
- Bridged Power: Up to 2000W @ 2 ohms
- Channels: 1
- Signal-to-Noise Ratio: 92.1 dBa
- Dimensions (W x L x H): 6.1" x 9.41" x 2.01"
- Operating Temperature: 40 Degrees Fahrenheit (minimum)
- Protection Modes: Low/high voltage, short-circuit, thermal
- Inputs: Line-level RCA
- Controls: Gain, LPF (40-180 Hz), Subsonic (30-80 Hz/Off), EPICBOOST (variable frequency and level)
- Remote Control: ACR-E Dash Remote
Stinger 2-Channel 3 FT 6000 Series RCA Interconnect Cable
- Length: 3 Feet
- Channels: 2
- Conductors: Oversized Oxygen-Free Copper (OFC)
- Construction: Continuous Connection Construction (C3 Tech)
- Connectors: Split-tip nickel-plated
- Features: Designed for noise-free signal transfer
Warranty Information
AudioControl products are designed and manufactured to the highest quality standards. For specific warranty terms and conditions, please refer to the warranty card included with your product or visit the official AudioControl website. Keep your purchase receipt as proof of purchase for any warranty claims.
Support
If you encounter any issues or have questions regarding your AudioControl Bass Bundle that are not covered in this manual, please contact AudioControl customer support. You can find contact information and additional resources on the official AudioControl website: www.audiocontrol.com.