Introduction
This manual provides detailed instructions for the installation, operation, and maintenance of your SOLRIG 48" x 80" 1-Lite Mirror Sliding Closet Door. Please read all instructions carefully before beginning installation to ensure proper function and safety. Retain this manual for future reference.
Safety Information
Important Safety Instructions:
- Always wear appropriate personal protective equipment (PPE) such as safety glasses and gloves during installation.
- Ensure the installation area is clear of obstructions and well-lit.
- Handle mirror panels with extreme care to prevent breakage and injury.
- Verify that all mounting surfaces are structurally sound and capable of supporting the door's weight.
- Keep children and pets away from the work area during installation.
Package Contents
Before beginning installation, verify that all components are present and undamaged. If any parts are missing or damaged, contact customer support immediately.
- 2 x Mirror Door Panels (Actual panel size: 25" W x 78.58" H x 0.82" T each)
- Top Track System (includes 4x top connectors and 1x top track)
- Sliding Door Rollers
- Sliding Floor Guides
- Mounting Hardware (screws, anchors, etc.)
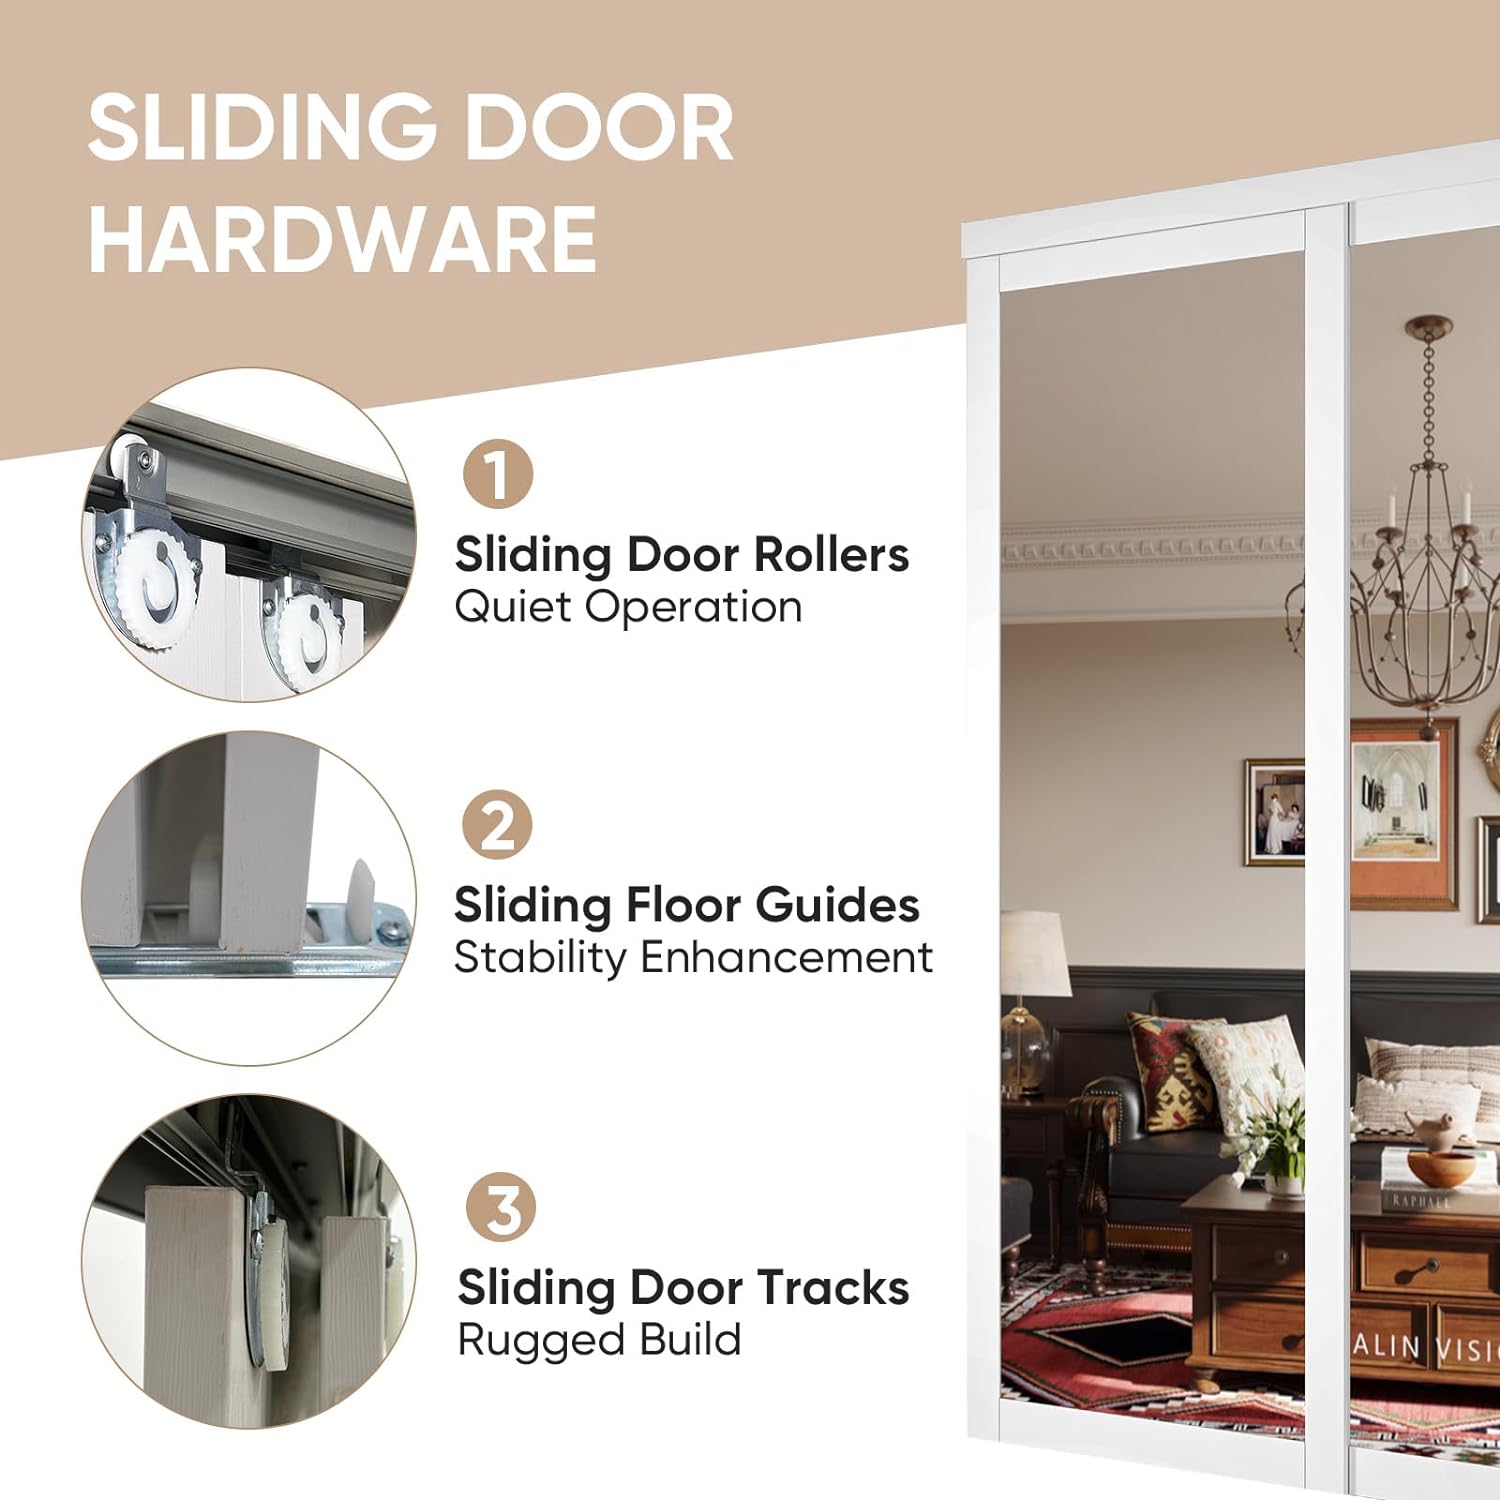
Figure 1: Illustration of the sliding door hardware, including rollers for quiet operation, floor guides for stability, and robust tracks.
Tools Required
- Measuring Tape
- Pencil
- Drill with appropriate drill bits
- Screwdriver (Phillips head recommended)
- Level
- Stud Finder (recommended)
- Utility Knife (for packaging)
Setup and Installation
This section outlines the steps for installing your SOLRIG sliding closet door. It is recommended to have two people for certain steps due to the size and weight of the door panels.
1. Prepare the Opening
- Measure the width and height of your door opening. This door system is suitable for 48" x 80" door openings.
- Ensure the opening is plumb, level, and square.
- Clear any debris or existing hardware from the opening.

Figure 2: Detailed size chart indicating actual panel dimensions (25" W x 78.58" H) and the recommended fit opening height (80").
2. Install the Top Track
- Position the top track within the door opening header.
- Mark the drilling locations for the mounting screws.
- Drill pilot holes and secure the top track using the provided screws. Ensure the track is level.
- Attach the 4 top connectors to the top track system.
3. Attach Rollers to Door Panels
- Carefully lay each door panel on a clean, protected surface.
- Attach the sliding door rollers to the top edge of each door panel according to the manufacturer's instructions. Ensure they are securely fastened.
4. Hang the Door Panels
- With assistance, lift the first door panel and engage the rollers into the top track.
- Repeat for the second door panel.
- Ensure both doors slide smoothly along the track.
5. Install Floor Guides
- Position the floor guides on the floor directly beneath the door panels.
- Adjust the guides to ensure the doors are properly aligned and do not swing.
- Mark the drilling locations, drill pilot holes, and secure the floor guides.
Operation
Your SOLRIG sliding closet doors are designed for smooth and quiet operation. To open or close the doors, gently push or pull the door panel along its track. Avoid forcing the doors, as this can cause damage to the rollers or track.

Figure 3: An example of the SOLRIG sliding mirror doors installed, demonstrating their aesthetic and functional integration into a living space.
Maintenance
Regular maintenance will ensure the longevity and smooth operation of your sliding closet doors.
- Cleaning the Mirrors: Use a soft, lint-free cloth and a non-abrasive glass cleaner. Spray the cleaner onto the cloth, not directly onto the mirror, to prevent liquid from seeping into the edges.
- Cleaning the Tracks: Periodically vacuum or wipe down the top and bottom tracks to remove dust, dirt, and debris that can impede smooth sliding.
- Lubrication: If the doors begin to stick or make noise, apply a silicone-based lubricant (do not use oil-based lubricants) to the rollers and tracks.
- Hardware Check: Annually inspect all screws and fasteners to ensure they are tight. Tighten any loose hardware.

Figure 4: An illustration detailing the construction of the safety glass mirrors, highlighting features like high-quality float glass, reflective aluminum film, passivator protective film, insulating waterproof protective paint, and explosion protection film.
Troubleshooting
| Problem | Possible Cause | Solution |
|---|---|---|
| Doors stick or are difficult to slide. | Debris in tracks, worn rollers, misaligned track. | Clean tracks thoroughly. Inspect and replace worn rollers if necessary. Check track alignment and adjust if needed. Apply silicone lubricant. |
| Doors make grinding or squeaking noises. | Lack of lubrication, debris, loose hardware. | Clean tracks and rollers. Apply silicone lubricant. Tighten any loose screws on rollers or tracks. |
| Doors are not plumb or level. | Improper installation of top track or floor guides. | Re-check the level of the top track and adjust. Ensure floor guides are correctly positioned and secured. |
| Door panel appears loose or wobbly. | Loose roller attachments, damaged rollers. | Tighten screws securing rollers to the door panel. Inspect rollers for damage and replace if necessary. |
Specifications
- Model: 48"(2 x 25") x 80" 1-lite Mirror Sliding Closet Door
- Brand: SOLRIG
- Overall Dimensions (Fit Opening): 48" (Width) x 80" (Height)
- Individual Panel Size: 25" (Width) x 78.58" (Height) x 0.82" (Thickness)
- Material: Engineered Wood (MDF), Explosion-proof Mirror
- Color: White frame with 1-lite Mirror
- Mounting Type: Floor Mount
- Item Weight: Approximately 35.4 kg (78 lbs)
- Included Components: Mirror door panels, hardware track kit, floor guide.
Warranty and Support
For any issues, missing parts, or damage regarding your SOLRIG sliding closet door, please contact our customer service. We are committed to providing excellent after-sales service and will assist you to ensure your satisfaction.
Refer to your purchase documentation for specific warranty details. For direct support, please visit the SOLRIG brand page on Amazon or contact the seller directly through your order history.