
1. Introduction
Thank you for choosing the Laviniar A27 Alarm Clock with 15W Wireless Charging. This device combines a digital alarm clock, a 15W fast magnetic wireless charger, a date and temperature display, and an adjustable night light into one compact unit. This manual provides detailed instructions for setup, operation, and maintenance to ensure optimal performance and longevity of your product.
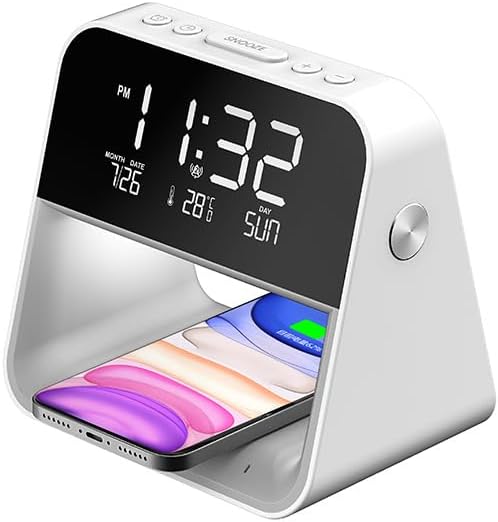
Image 1.1: The Laviniar A27 Alarm Clock with a smartphone charging on its integrated wireless charging pad.
2. Package Contents
- 1 x Laviniar A27 Wireless Charging Alarm Clock
- 1 x User's Manual
3. Product Overview
Familiarize yourself with the components of your Laviniar A27 Alarm Clock:

Image 3.1: Diagram of the Laviniar A27 Alarm Clock's components and control layout.
Key Components:
- LCD Screen Display: Shows time, date, day, and temperature. Features 3-level adjustable brightness.
- Setting Buttons: Located on the top for time, alarm, and brightness adjustments.
- Night Light Touch Dimmer: A metal key on the side for controlling the night light.
- Qi Wireless Charger: Integrated charging pad for compatible smartphones.
- Charging Indicator Light: Indicates wireless charging status.
4. Setup
4.1 Power Connection
- Connect the provided Type-C cable to the input interface on the back of the alarm clock.
- Plug the other end of the cable into a compatible power adapter (12V/2.5A or 9V/3A recommended, not included).
- The LCD display will illuminate, indicating the device is powered on.

Image 4.1: The alarm clock positioned on a nightstand, ready for use.
5. Operating Instructions
5.1 Setting Time and Date
Refer to the 'Time Setting' section in Image 3.1 for button identification.
- Press the 'Time Setting' button to enter time adjustment mode.
- Use the '+' and '-' buttons to adjust the hour. Press 'Time Setting' again to confirm and move to minutes.
- Adjust minutes with '+' and '-' buttons. Press 'Time Setting' to confirm and move to date.
- Adjust month, day, and year similarly.
- Press 'Time Setting' one last time to exit the setting mode.
- To switch between 12/24-hour format, press the '12/24h' button (refer to Image 3.1).
5.2 Setting Alarm
Refer to the 'Alarm Clock Setting' section in Image 3.1 for button identification.
- Press the 'Alarm Clock Setting' button to enter alarm adjustment mode.
- Use the '+' and '-' buttons to set the desired alarm hour. Press 'Alarm Clock Setting' to confirm and move to minutes.
- Adjust minutes with '+' and '-' buttons. Press 'Alarm Clock Setting' to confirm.
- To activate or deactivate the alarm, press the 'Alarm Clock Setting' button until the alarm icon appears or disappears on the display.
5.3 Snooze Function
When the alarm sounds, press the 'SNOOZE' button (located on top, refer to Image 3.1) to temporarily stop the alarm. The alarm will sound again after approximately 5 minutes.
5.4 Wireless Charging
The alarm clock features a 15W Qi-compatible wireless charging pad.
- Place your Qi-compatible smartphone directly onto the wireless charging pad located at the base of the alarm clock.
- Ensure the phone is centered on the charging pad for optimal charging.
- The charging indicator light will illuminate to confirm that charging has begun.
- Remove your phone once fully charged or when no longer needed.

Image 5.1: Detail of the 15W wireless charging pad and night light touch dimmer.
5.5 Night Light Operation
The night light offers three levels of brightness.
- Locate the metal touch dimmer key on the side of the alarm clock (refer to Image 3.1 and 5.1).
- Touch the key once to turn on the night light at the lowest brightness setting.
- Touch the key again to cycle through medium brightness, then high brightness.
- Touch the key a fourth time to turn off the night light.
5.6 Display Brightness Adjustment
The LCD screen display has 3 adjustable brightness levels.
- Press the 'Snooze/Brightness Setting' button (refer to Image 3.1) to cycle through the display brightness levels.
- Select the desired brightness for comfortable viewing.
5.7 Temperature Display
The alarm clock displays the ambient temperature. To switch between Fahrenheit (°F) and Celsius (°C), press the 'F/C' button (refer to Image 3.1).
6. Maintenance
6.1 Cleaning
- Ensure the device is unplugged before cleaning.
- Use a soft, dry cloth to wipe the surfaces of the alarm clock.
- Do not use abrasive cleaners, solvents, or chemical sprays, as these may damage the finish or internal components.
6.2 Storage
- Store the alarm clock in a cool, dry place away from direct sunlight and extreme temperatures.
7. Troubleshooting
| Issue | Possible Cause | Solution |
|---|---|---|
| Device does not power on. | Power cable not connected properly or power adapter faulty. | Ensure the Type-C cable is securely connected to both the alarm clock and a working power adapter. Try a different power outlet or adapter. |
| Wireless charging not working. | Phone not Qi-compatible, not positioned correctly, or phone case is too thick. | Verify your phone supports Qi wireless charging. Reposition the phone centrally on the charging pad. Remove thick phone cases. Ensure the alarm clock is powered on. |
| Alarm does not sound. | Alarm not activated or volume too low (if adjustable). | Check if the alarm icon is displayed on the screen. Re-set the alarm time. (Note: This model does not specify alarm volume adjustment). |
| Night light not responding. | Touch dimmer not activated correctly. | Ensure you are touching the metal key on the side. Try touching multiple times to cycle through settings. |
8. Specifications
| Feature | Detail |
|---|---|
| Model | A27 |
| Material | ABS+PC |
| Dimensions | 151x106x145mm / 5.94x4.17x5.70in |
| Input Interface | Type-C |
| Input | 12V/2.5A, 9V/3A |
| Wireless Charging Output | Maximum 15W |
| Display Type | LED Digital |
| Special Features | Adjustable Brightness, LED Display, Wireless Charging, Date, Temperature, Night Light |
| Item Weight | 2 pounds |
9. Warranty and Support
Laviniar aims to provide high-quality products. For any questions or support needs regarding your Laviniar A27 Alarm Clock, please refer to your purchase documentation or contact the seller directly. Specific warranty details are typically provided at the point of purchase or within the product packaging.