1. Introduction and Overview
This manual provides detailed instructions for the safe and efficient operation, setup, maintenance, and troubleshooting of your H HZXVOGEN 250A Multi-process Welder. Please read this manual thoroughly before operating the machine to ensure proper use and to prevent injury or damage.

Figure 1.1: H HZXVOGEN 250A Multi-process Welder with included accessories.
The H HZXVOGEN 250A is a versatile 6-in-1 welding machine designed for a wide range of welding tasks, suitable for both beginners and experienced professionals. It supports Gas MIG, Gasless Flux Core MIG, MMA (Stick), Spot welding, and Lift TIG processes. It is compatible with various wire types including solid wire, flux core wire, and aluminum wire.
2. Key Features
- Multiprocess Capability: Supports Gas MIG, Gasless Flux Core MIG, MMA (Stick), Spot welding, and Lift TIG. Compatible with .023’’/.030’’/.035’’/.039’’ solid wire, .030’’/.035’’/.039’’ flux core wire, and .035’’/.039’’ aluminum wire.
- Synergic MIG Technology: Digital control system automatically adjusts recommended current and wire feed speed based on wire diameter and gas material selection, simplifying operation.
- Advanced Multi-functionality: Includes adaptive crater, burn-back adjustment, pre-flow/post-flow, and 2T/4T welding capabilities. Allows storage of up to 10 preset settings per mode.
- Clear Large LED Display: Provides precise data display for easy reading, even with a welding helmet on. Enhances visibility and comfort during operation.
- Energy-Efficient Cooling: Features a cooling fan that operates only when needed, ensuring a quieter workspace.
- Safety Features: Equipped with VRD (Voltage Reduction Device), over current, over voltage, over-load, and overheating protection for enhanced safety.

Figure 2.1: Overview of the 6-in-1 multi-process welding capabilities.
3. Setup
3.1 Unpacking and Inspection
Carefully unpack the welder and all accessories. Inspect all components for any signs of damage during transit. If any damage is found, contact customer support immediately.
3.2 Package Contents
The standard package includes the following items:

Figure 3.1: Included components in the MIG250 package.
- MIG250 Welding Machine
- Graphene Tube (x2)
- Wire Wheel
- Conductive Nozzle
- Ground Clamp
- Electrode Holder
- 0.8mm Wire
- Manual
- Demolition Wrench
- MIG Torch
- Hose Clamp
3.3 Power Connection
The welder operates on 110V/220V. Ensure your power supply matches the machine's requirements and use the appropriate adapter if necessary. Always connect the machine to a grounded outlet.
3.4 Cable Connections
Proper connection of welding cables is crucial for safe and effective operation. Refer to the diagram below for typical connection setups for different welding modes.

Figure 3.2: Welder Cable Connections for different welding processes.
- Gas MIG: Connect the MIG torch, ground clamp, and gas hose to the appropriate ports.
- Flux Core MIG: Connect the MIG torch and ground clamp. No gas hose is required for flux core welding.
- Stick (MMA): Connect the electrode holder and ground clamp to the designated ports.
- Lift TIG: Connect the TIG torch (WP17V TIG torch sold separately) and ground clamp.
- Spool Gun: Connect the spool gun (sold separately) and ground clamp.
3.5 Wire Installation
Install the appropriate welding wire (solid, flux core, or aluminum) into the wire feeder mechanism. Ensure the wire diameter matches the selected drive roller and nozzle size. The welder is compatible with various wire types and sizes:
- Aluminum Wire: 1.0mm (0.039'')
- Flux Core Wire: 0.8/0.9/1.0mm (0.030''/0.035''/0.039'')
- Mild Mig Wire: 0.6/0.8/0.9/1.0mm (0.023''/0.030''/0.035''/0.039'')

Figure 3.3: Wire compatibility and feeding mechanism.
4. Operating Instructions
4.1 Control Panel Overview
The HZXVOGEN 250A features a clear large LED display and intuitive controls for easy operation and precise adjustments.
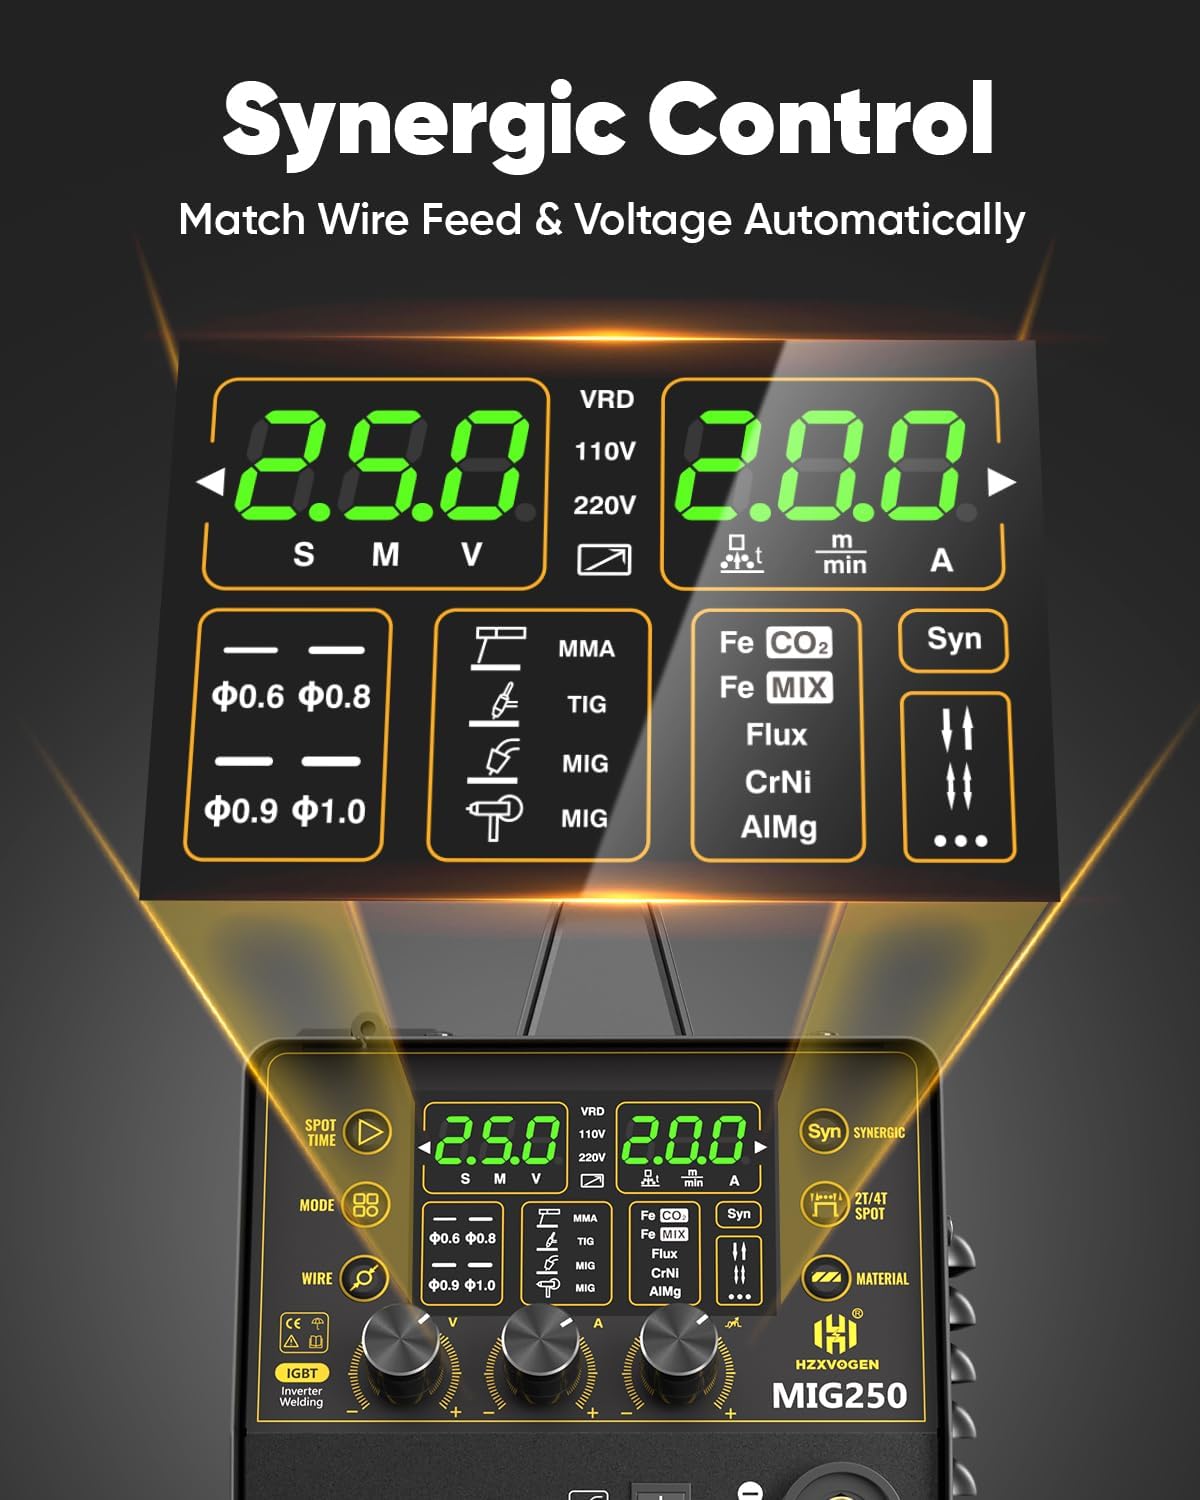
Figure 4.1: Synergic Control Panel and LED Display.
4.2 Synergic Control (SYN Mode)
For beginners, the SYN mode simplifies welding by automatically adjusting the recommended current and wire feed speed based on your selected wire diameter and gas material. Simply select the current, and the voltage will be automatically matched.

Figure 4.2: Synergic Mode for simplified welding.
Professionals can utilize the voltage compensation feature for precise voltage adjustments.
4.3 Welding Modes
Select the desired welding mode (MIG, Flux Core, MMA, Lift TIG, Spot) using the mode selection button on the control panel.
4.3.1 Spot Welding
The spot welding function allows for precise, timed welds. Adjust the spot time from 0-3 seconds by rotating the current button.

Figure 4.3: Spot Time adjustment for precise spot welds.
4.3.2 2T/4T Functionality
The welder supports both 2T (two-touch) and 4T (four-touch) trigger modes, providing flexibility for different welding applications.
- 2T Mode: Press and hold the trigger to weld; release to stop.
- 4T Mode: Press the trigger to start welding, release to continue welding, press again to stop. Useful for long welds to reduce hand fatigue.
4.4 Welding Parameters
Refer to the following tables for recommended welding parameters for various materials and processes. These are starting points and may require fine-tuning based on your specific application and material thickness.
4.4.1 STICK & LIFT TIG Welding Parameters

Figure 4.4: STICK & LIFT TIG Welding Parameters.
4.4.2 MIG Welding Parameters

Figure 4.5: MIG Welding Parameters.
5. Maintenance
Regular maintenance ensures the longevity and optimal performance of your welding machine. Always disconnect the welder from the power supply before performing any maintenance.
5.1 Cleaning
- Periodically clean the exterior of the machine with a dry, soft cloth.
- Use compressed air to blow out dust and debris from the cooling vents and internal components. Do this regularly, especially in dusty environments.
- Clean the welding torch nozzle and contact tip regularly to prevent spatter buildup.
5.2 Cable and Connection Inspection
- Inspect all welding cables, power cords, and connections for cuts, abrasions, or loose fittings before each use.
- Ensure ground clamp and electrode holder connections are secure and free of corrosion.
5.3 Wire Feeder Maintenance
- Check the wire feed rollers for wear and cleanliness. Clean any wire shavings or debris.
- Ensure the drive roller matches the wire size being used.
6. Troubleshooting
This section provides solutions to common issues you might encounter. For problems not listed here, or if solutions do not resolve the issue, contact customer support.
| Problem | Possible Cause | Solution |
|---|---|---|
| No power to the machine | Power cord unplugged, circuit breaker tripped, faulty power switch | Check power cord connection, reset circuit breaker, ensure power switch is ON. |
| No arc/poor arc stability | Loose ground clamp, incorrect settings, dirty contact tip/nozzle, wrong wire/gas combination | Secure ground clamp, adjust welding parameters, clean torch components, verify wire/gas type. |
| Wire feed issues (too fast/slow, inconsistent) | Incorrect wire feed speed setting, worn drive roller, tangled wire, clogged liner | Adjust wire feed speed, inspect/replace drive roller, untangle wire spool, clean/replace liner. |
| Overheating protection activated | Exceeded duty cycle, blocked cooling vents | Allow machine to cool down, ensure proper ventilation, clear any obstructions from vents. |
7. Specifications
| Feature | Detail |
|---|---|
| Model Number | MIG250 |
| Input Voltage | 110/220 Volts |
| Item Weight | 17.7 pounds |
| Package Dimensions | 19.25 x 13.3 x 12.6 inches |
| Material | ABS |
| Pattern | 6 IN 1 welder |
| Power Source | DC |
| Included Components | MIG250 welder, ground clamp, electrode holder, .030'' flux core wire, 110/220v adapter, hammer, gas tube, conductive nozzle, wrench, manual |
8. Warranty and Support
HZXVOGEN stands behind the quality of its products. This HZXVOGEN inverter comes with 2 years of quality support. Additionally, an extended 3-year warranty may be available.
For any inquiries, technical assistance, or warranty claims, please contact HZXVOGEN customer support. 24/7 customer support is available to assist you.

Figure 8.1: 24/7 Customer Support available.