1. Product Overview
The Ultimaxx TTL Flash with LCD is designed to provide versatile and professional lighting for a wide range of Nikon DSLR and mirrorless cameras. It features an intuitive LCD display for easy setting adjustments and supports various flash modes including TTL, Manual, Multi Flash, and Slave modes (S1, S2). The lightweight design ensures it can be mounted directly onto your camera without adding significant bulk, making it suitable for dynamic photography sessions.

Image 1.1: The Ultimaxx TTL Flash unit, shown with its included diffuser and protective carrying case.
2. What's in the Box
Verify that all items are present in your package:
- Flash Unit
- Protective Case
- Diffuser
3. Setup
3.1. Battery Installation
The flash unit requires 4 AA batteries for operation. These are not included in the package. You can use either alkaline or nickel-metal hydride (NiMH) batteries.
- Locate the battery compartment on the side of the flash unit.
- Open the battery compartment cover.
- Insert 4 AA batteries, ensuring correct polarity (+/-) as indicated inside the compartment.
- Close the battery compartment cover securely.
3.2. Attaching to the Camera
Follow these steps to securely mount the flash unit onto your Nikon camera's hot shoe:

Image 3.1: Visual guide for attaching the flash to a camera.
- Adjust the Locking Plate: Rotate the locking plate on the flash unit's foot upwards to its highest point.
- Attach the Speedlite: Slide the flash unit's mounting foot into the hot shoe of your camera. Ensure it is fully seated.
- Secure the Locking Plate: Rotate the locking plate downwards to tighten and secure the flash unit firmly to the camera's hot shoe.
4. Operating the Flash
4.1. Powering On/Off and LCD Display
To power on the flash, press the ON/OFF button. The intuitive LCD display will illuminate, showing current settings and parameters. To power off, press and hold the ON/OFF button.

Image 4.1: The LCD display provides clear, backlit information for easy adjustments.
4.2. Control Panel Overview
The flash unit features a user-friendly control panel for adjusting various settings. Refer to the diagram below for button identification:
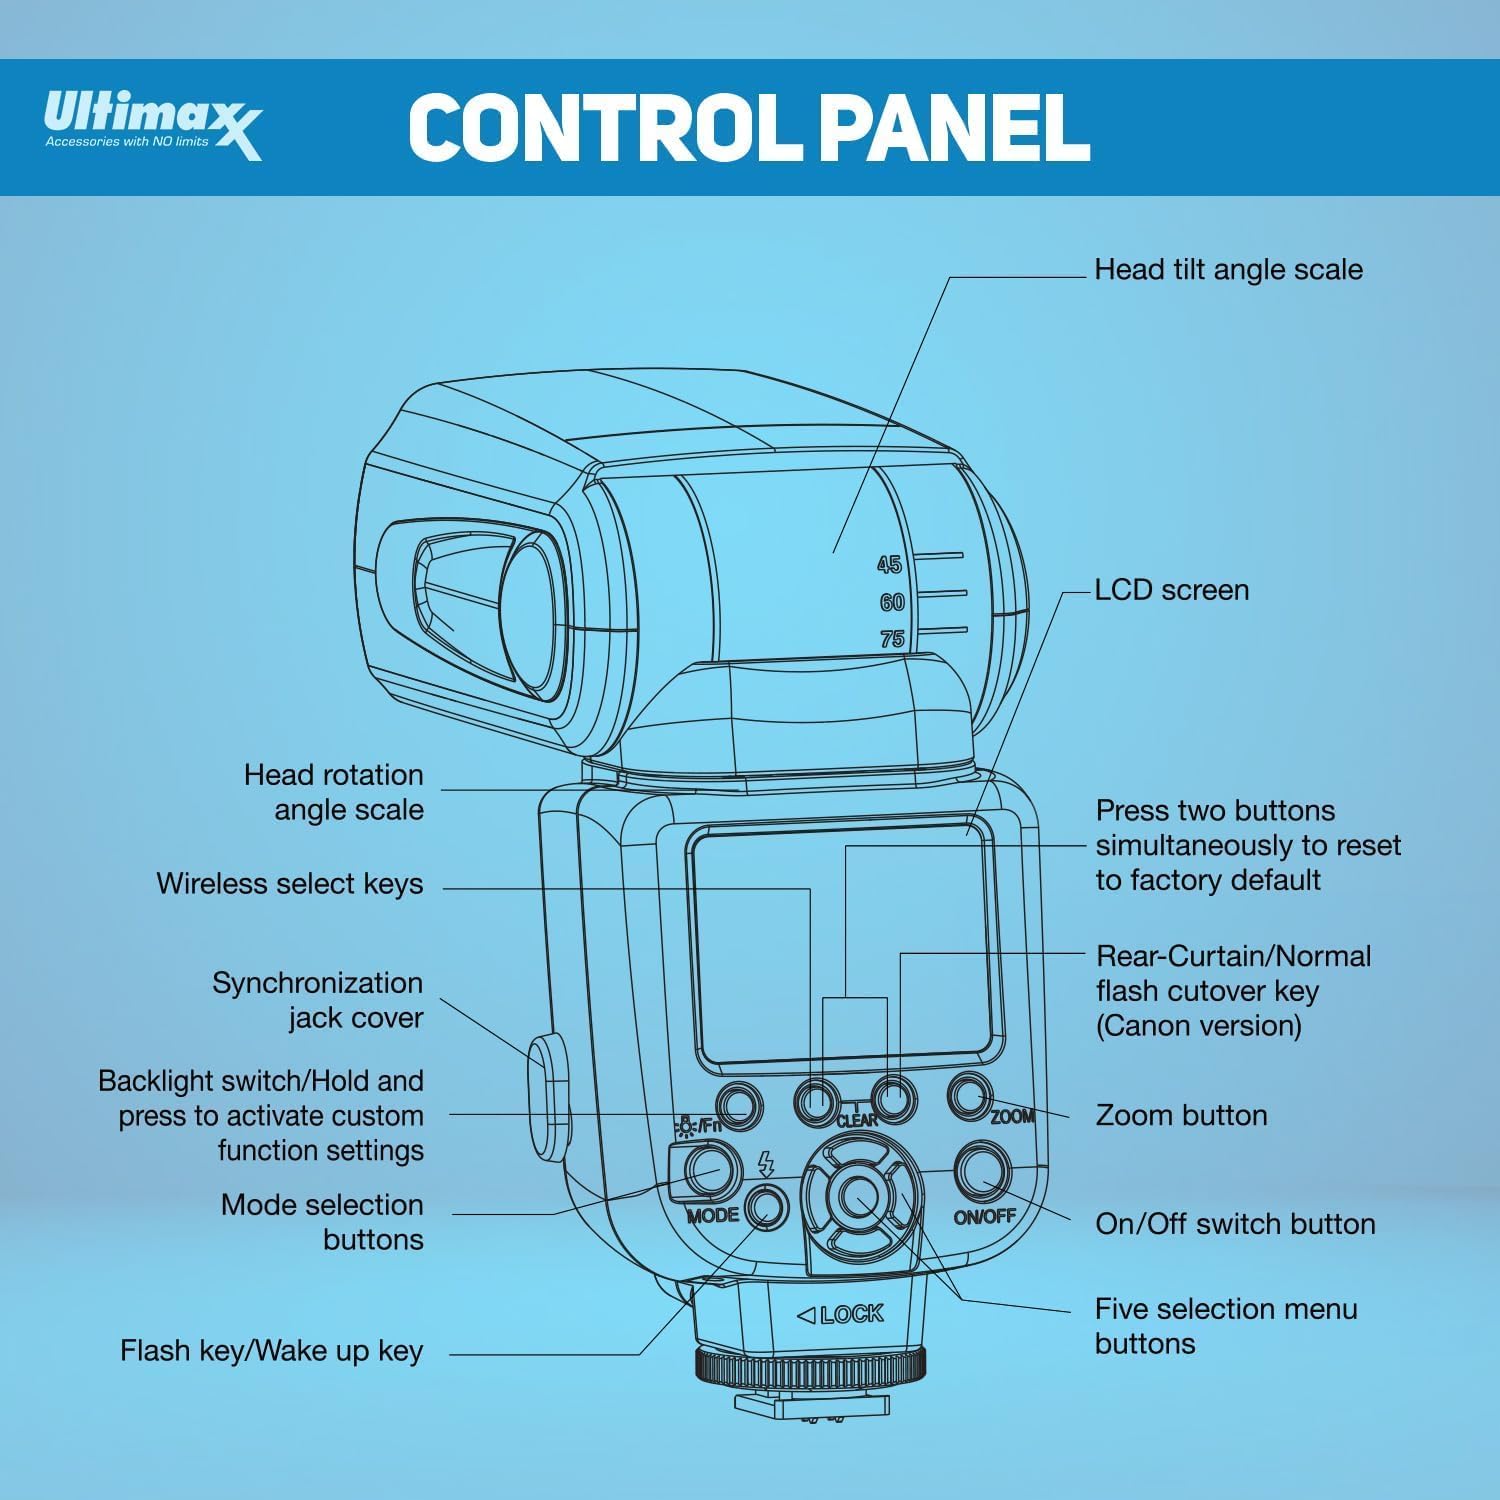
Image 4.2: Detailed diagram of the flash unit's control panel.
4.3. Flash Modes
The Ultimaxx TTL Flash supports several operating modes:
- TTL (Through The Lens): The flash automatically adjusts its output for accurate and consistent lighting based on the camera's metering system.
- Manual (M): Allows you to manually set the flash power output from 1/1 (full power) down to 1/128 for precise control.
- Multi Flash Mode: Creates multiple flashes in a single exposure for dynamic, creative effects.
- Slave Modes (S1, S2): Enables the flash to be triggered wirelessly by another flash unit. S1 mode triggers on the first flash, S2 ignores the pre-flash of a TTL system.
4.4. Using the Diffuser and Reflector
- External Diffuser: The included external diffuser can be attached to the flash head to soften harsh light, producing more natural-looking results.
- Built-in Wide-Angle Diffuser: Pull out the small white panel from the flash head to engage the built-in wide-angle diffuser, useful for broader light spread.
- Built-in Reflector Board: Pull out the small white card from the flash head to use it as a reflector, bouncing light forward to add catchlights or fill shadows.
4.5. Flash Exposures Bracketing Function (FEB)
This function allows the flash to automatically trigger three consecutive shots with varying exposures (one normal, one underexposed, one overexposed) with a single press of the shutter button. This helps in selecting the optimal lighting for your image.

Image 4.3: The Flash Exposures Bracketing function captures multiple exposures for optimal results.
4.6. Product Demonstration Video
Watch this video for a visual guide on the features and operation of the Ultimaxx TTL Flash:
Video 4.1: A demonstration of the Ultimaxx TTL Flash features and usage.
5. Maintenance
- Cleaning: Use a soft, dry cloth to clean the exterior of the flash unit. For the LCD screen, use a microfiber cloth. Avoid using harsh chemicals or abrasive materials.
- Storage: When not in use, store the flash unit in its protective case in a cool, dry place, away from direct sunlight and extreme temperatures.
- Batteries: Remove batteries from the flash unit if it will not be used for an extended period to prevent leakage and damage.
6. Troubleshooting
- Flash Not Firing:
- Ensure batteries are correctly installed and have sufficient charge.
- Check that the flash is securely mounted on the camera's hot shoe.
- Verify camera and flash settings are compatible (e.g., flash enabled in camera menu).
- Inconsistent Exposure:
- In TTL mode, ensure the flash head is pointed correctly (e.g., bounced off a ceiling or wall).
- In Manual mode, adjust power output as needed.
- Check for obstructions between the flash and subject.
- LCD Not Displaying:
- Confirm the flash is powered on.
- Replace batteries if they are low.
7. Specifications
| Feature | Detail |
|---|---|
| Brand | Ultimaxx |
| Compatible Camera Models | Nikon DSLRs & Mirrorless with i-TTL support (D7500, D500, D600, D610, D700, D750, D780, D800, D810, D850, D3100, D3200, D3300, D3400, D5100, D5200, D5500, D5600, Z30, Z5, Z6, Z6II, Z6III, Z7, Z7II, Z8, Z9 & More) |
| Guide Number | 58 (at ISO 100, 105mm) |
| Flash Modes | TTL, Manual, Multi, Slave (S1, S2) |
| Zoom Range | 24-105mm (Auto/Manual) |
| Rotation | 0-360° Horizontal, -7° to 90° Vertical |
| Display | Backlit LCD |
| Power Supply | 4 x AA batteries (not included) |
| Color Temperature | 5600K ±200K |
| Wireless Transmission | Optical Slave (S1/S2) |
| Sync Options | HSS, Rear Curtain Sync |
| Flash Sync Speed | 1/250 |
| Item Weight | 1.23 pounds |
| Package Dimensions | 9.49 x 3.98 x 3.23 inches |
| Battery Life | 6 Hours |
8. Warranty and Support
For warranty information, product support, or service inquiries, please contact Ultimaxx directly through their official channels. Details are typically provided with your purchase documentation or on the manufacturer's website.