Hikiddo 24V Kids UTV
Hikiddo 24V 4WD 2-Seater Kids UTV Electric Car Instruction Manual
Model: 24V Kids UTV
Introduction
This manual provides essential information for the safe assembly, operation, and maintenance of your Hikiddo 24V 4WD 2-Seater Kids UTV Electric Car. Please read it thoroughly before use and retain it for future reference.
Key features include a powerful 24V 10Ah battery with 4x200W motors, switchable 2WD/4WD modes, three speed settings, a spacious 21-inch wide two-seater design, and both manual and parental remote control options. It also features a one-click steering wheel assembly and a net-style toolbox for convenience.
Safety Information
- Always supervise children during operation.
- Ensure all safety belts are securely fastened before riding.
- Do not operate near roads, motor vehicles, steep inclines, swimming pools, or other bodies of water.
- Wear appropriate safety gear, such as helmets, when riding.
- Only use the provided charger and battery.
- Recommended age: 3-8 years. Maximum load capacity: 110 lbs.
Parts List
Before assembly, ensure all components are present and undamaged. Refer to the assembly video for visual identification of parts.
- Main vehicle body
- Wheels (4)
- Steering wheel
- Seats with safety belts
- Roll bar with lights
- Rear suspension components
- Motors (4)
- 24V 10Ah Battery
- Charger
- Remote control
- Assembly hardware (screws, nuts, washers, pins)
- Toolbox net
Setup and Assembly
Follow these steps carefully for proper assembly. For a visual guide, please refer to the official installation video below.
Video: Installation Video of Hikiddo 24V 4WD Kids UTV 2 Seater. This video provides a comprehensive step-by-step guide for assembling your UTV, covering all major components and connections.
- Prepare the Chassis: Carefully remove the main body from the packaging. Identify the front and rear sections.

Image: The main body of the Hikiddo 24V Kids UTV Electric Car, ready for assembly.
- Install Rear Suspension: Attach the rear suspension components to the chassis using the provided bolts and nuts. Ensure they are securely tightened.
- Connect Motors and Install Wheels:
- Connect the motor wires to the corresponding ports on the chassis.
- Slide the wheels onto the axles, ensuring the drive gears align with the motors.
- Secure each wheel with a washer and nut, then cover with the decorative hubcap.
- Attach Steering Wheel: Connect the steering wheel's electrical connector to the dashboard port. Align the steering wheel with the steering column and push firmly until it clicks into place.
- Install Side Handles: Insert the side handles into their designated slots on the vehicle's interior.
- Connect Battery: Locate the battery compartment (usually under the seat). Connect the red battery terminal to the red wire and the black terminal to the black wire. Ensure connections are secure.
- Secure Seats: Place the seats into the vehicle and secure them with the provided screws. Ensure the safety belts are accessible and functional.

Image: The spacious 2-seater interior of the UTV, showing the seats and safety belts.
- Attach Roll Bar and Toolbox Net: Install the roll bar assembly, ensuring the lights are correctly positioned and wired. Attach the mesh toolbox net to the rear of the vehicle.

Image: A child utilizing the rear storage net, demonstrating its capacity for toys.
Operating Instructions
Starting the Vehicle
- Press the "Start" button on the dashboard. The vehicle will power on.
- To move, press the foot pedal. Release to brake.
Driving Modes
- 2WD/4WD Switchable: Use the switch on the dashboard to select between 2-wheel drive (for extended battery life) and 4-wheel drive (for more power and varied terrains).
- Speed Settings: The vehicle offers 3 speed settings. Use the speed selection button on the dashboard to adjust.
Parental Remote Control
The remote control allows parents to operate the vehicle for younger children or to intervene for safety.
- Pairing: Follow the instructions in the remote control manual to pair it with the vehicle.
- Controls: The remote typically includes buttons for forward/backward, left/right steering, speed selection, and an emergency stop button.
- Safety Override: The remote control has priority over manual controls for safety.
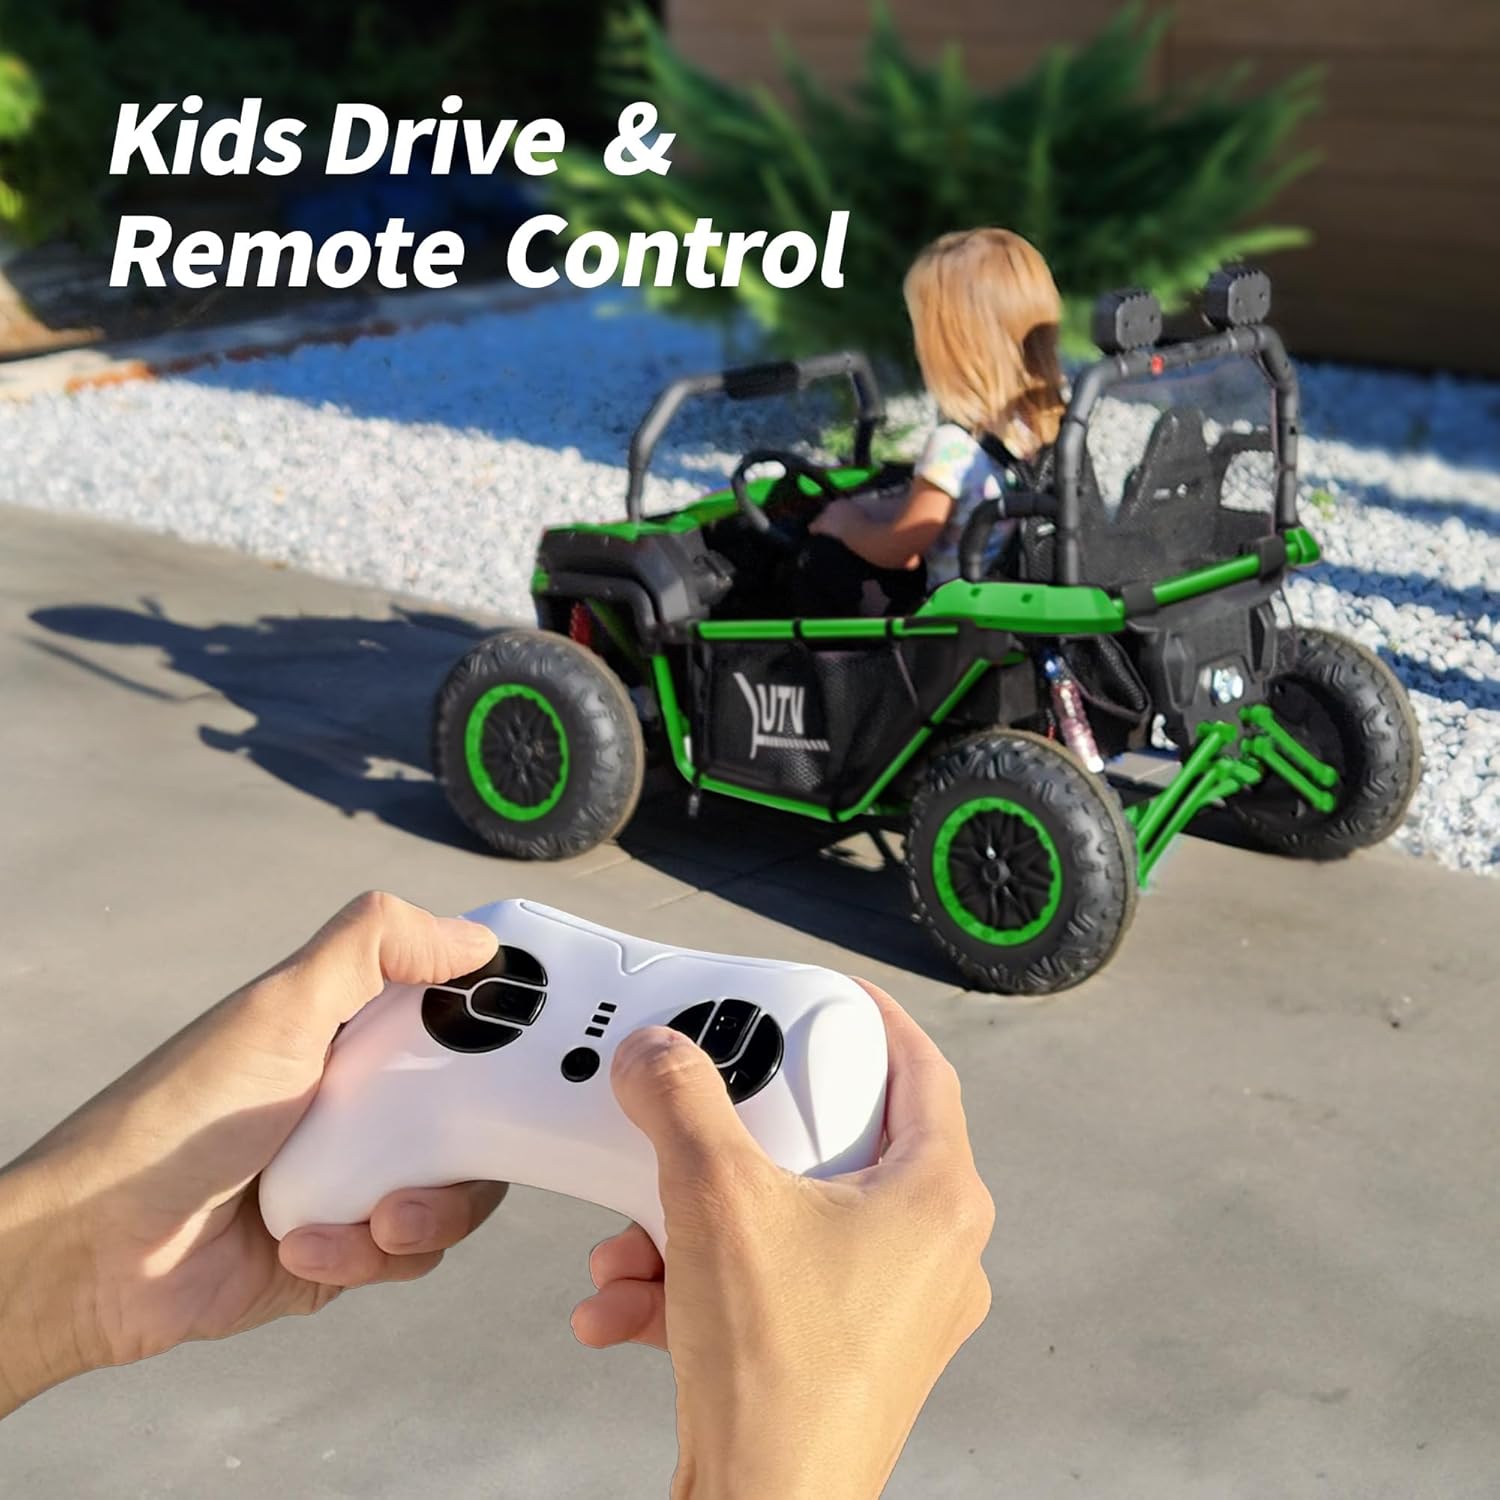
Image: A child driving the UTV while a parent uses the remote control, illustrating dual control functionality.
Media Features
- Bluetooth: Connect your mobile device via Bluetooth to play music through the vehicle's speakers.
- USB/AUX: Use the USB port or AUX input for additional audio playback options.

Image: The UTV dashboard displaying Bluetooth connectivity options for music playback.
Maintenance
- Charging: Charge the battery fully before first use (typically 8-12 hours). Do not overcharge. Charge after each use.
- Cleaning: Wipe the vehicle with a damp cloth. Do not use harsh chemicals or spray water directly onto electrical components.
- Storage: Store the vehicle in a dry, cool place away from direct sunlight. If storing for extended periods, charge the battery monthly.
- Inspection: Regularly check all nuts, bolts, and electrical connections for tightness and wear.
Troubleshooting
| Problem | Possible Cause | Solution |
|---|---|---|
| Vehicle does not move | Low battery; loose battery connection; blown fuse. | Charge battery; check connections; replace fuse. |
| Vehicle runs slowly | Low battery; overloaded; operating on rough terrain. | Charge battery; reduce load; switch to 4WD or smoother terrain. |
| Remote control not working | Remote not paired; remote batteries low. | Re-pair remote; replace remote batteries. |
Specifications
- Brand: Hikiddo
- Model: 24V Kids UTV
- Battery: 24V 10Ah
- Motors: 4 x 200W
- Speed Modes: 3-speeds (3.1-5.0 MPH)
- Drive: 2WD/4WD Switchable
- Seating: 2-seater (21" wide)
- Load Capacity: Up to 110 lbs
- Recommended Age: 3-8 years
- Product Dimensions: 47 x 32 x 33 inches

Image: Visual representation of the UTV's dimensions, recommended age, and load capacity.
Usage Examples
Video: Adventure Together - 24V Two Seater UTV with Parent Control! Demonstrates the UTV in action with children and parental remote control.
Video: Hikiddo Spacious 2-Seater UTV - Adventure for Two Kids! Shows two children comfortably riding in the UTV.
Video: Hikiddo 24V Electric UTV - The Perfect Ride for Kids. Highlights various features and the overall experience of the electric UTV.
Video: Hikiddo 24V 4WD Ride on Toy - Fun, Safe, and Powerful! Showcases the UTV's power and safety features in different environments.
Warranty and Support
For warranty information, product support, or to purchase replacement parts, please contact Hikiddo customer service. Keep your purchase receipt for warranty claims.
Visit the official Hikiddo store for more information: Hikiddo Store
Related Documents - 24V Kids UTV
 |
Hikiddo Kids Electric ATV 4 Wheeler 24V Ride-On Toy - Installation and Operating Instructions Comprehensive installation, operating, safety, and troubleshooting guide for the Hikiddo Kids 24V Electric ATV 4 Wheeler ride-on toy. Includes specifications, parts list, and charging instructions. |
 |
Digital Technology Equipment List - RoboCoast A comprehensive equipment list from RoboCoast, detailing various electronic components, sensors, motors, chassis, and power supply units suitable for robotics and digital technology projects. Includes product names, specifications, and purchase links. |
 |
FUNTOK 24V 2-Seater Ride-On Truck DLS-K03 Product Destruction & Refund Guidelines Detailed instructions for the destruction of a FUNTOK 24V 2-Seater Ride-On Truck (Model: DLS-K03) as part of a refund process. Includes safety warnings, step-by-step destruction procedures, photo submission requirements, and final disposal guidance. |
 |
Secure Park K and Part L with Screws Instructions for securing park K and part L using self-tapping screws. |
 |
24V 2-Seater Ride On Car Assembly Instructions and User Guide Comprehensive assembly instructions, user guide, safety precautions, and maintenance information for the 24V 2-seater ride-on car with 4 x 100W motors. Includes parts list, installation steps, function descriptions, and remote control operation. |
 |
Himimi 24V Ride-On Police Car User Guide and Installation Manual Comprehensive guide for the Himimi 24V ride-on police car, covering features, safety warnings, product specifications, detailed installation instructions, charging, maintenance, and remote control operation. |
Ask a question about this manual
Ask about setup, troubleshooting, compatibility, parts, safety, or missing instructions. Manuals+ will review the question and use this page’s manual context to help answer it.