WT-28-1
Instruction Manual for Commercial Hard Serve Ice Cream Machine
Brand: Generic | Model: WT-28-1
Introduction
This manual provides comprehensive instructions for the safe and efficient operation, maintenance, and troubleshooting of your new 13 Gallon/H Commercial Hard Serve Ice Cream Machine. This floor model machine is designed for commercial use, featuring an acrylic screw door, a sprayer for easy cleaning, a 5-inch touch control panel, and 5 pre-set programs for making various frozen desserts including hard ice cream, gelato, Italian ice, slush, and sorbet. Its robust stainless steel construction and mobility with 4 wheels make it suitable for various commercial settings.
Safety Information
Please read all safety warnings and instructions carefully before operating the machine to prevent injury or damage. Keep this manual for future reference.
- Ensure the machine is connected to a grounded power outlet with the correct voltage (110V 60Hz) and sufficient power (2200W).
- Do not operate the machine with a damaged power cord or plug.
- Keep hands and foreign objects away from moving parts during operation.
- Always unplug the machine before cleaning, maintenance, or when not in use.
- Do not immerse the machine's electrical components in water or other liquids.
- Ensure adequate ventilation around the machine to prevent overheating.
- This appliance is intended for commercial use only.
- Supervise children and unauthorized personnel to prevent them from operating the machine.
- Do not attempt to repair or modify the machine yourself. Contact qualified service personnel for assistance.
Product Overview
The Generic Commercial Hard Serve Ice Cream Machine is a high-capacity unit designed for efficient production of various frozen desserts. Key components include the 12L (3 gallon) cylinder, a 5-inch touch control panel, a transparent acrylic door for monitoring, and a built-in sprayer for cleaning.

Figure 1: Front view of the Hard Serve Ice Cream Machine, showcasing its sleek stainless steel design and the transparent dispensing area. A pan of strawberry ice cream is shown for context of the machine's output.
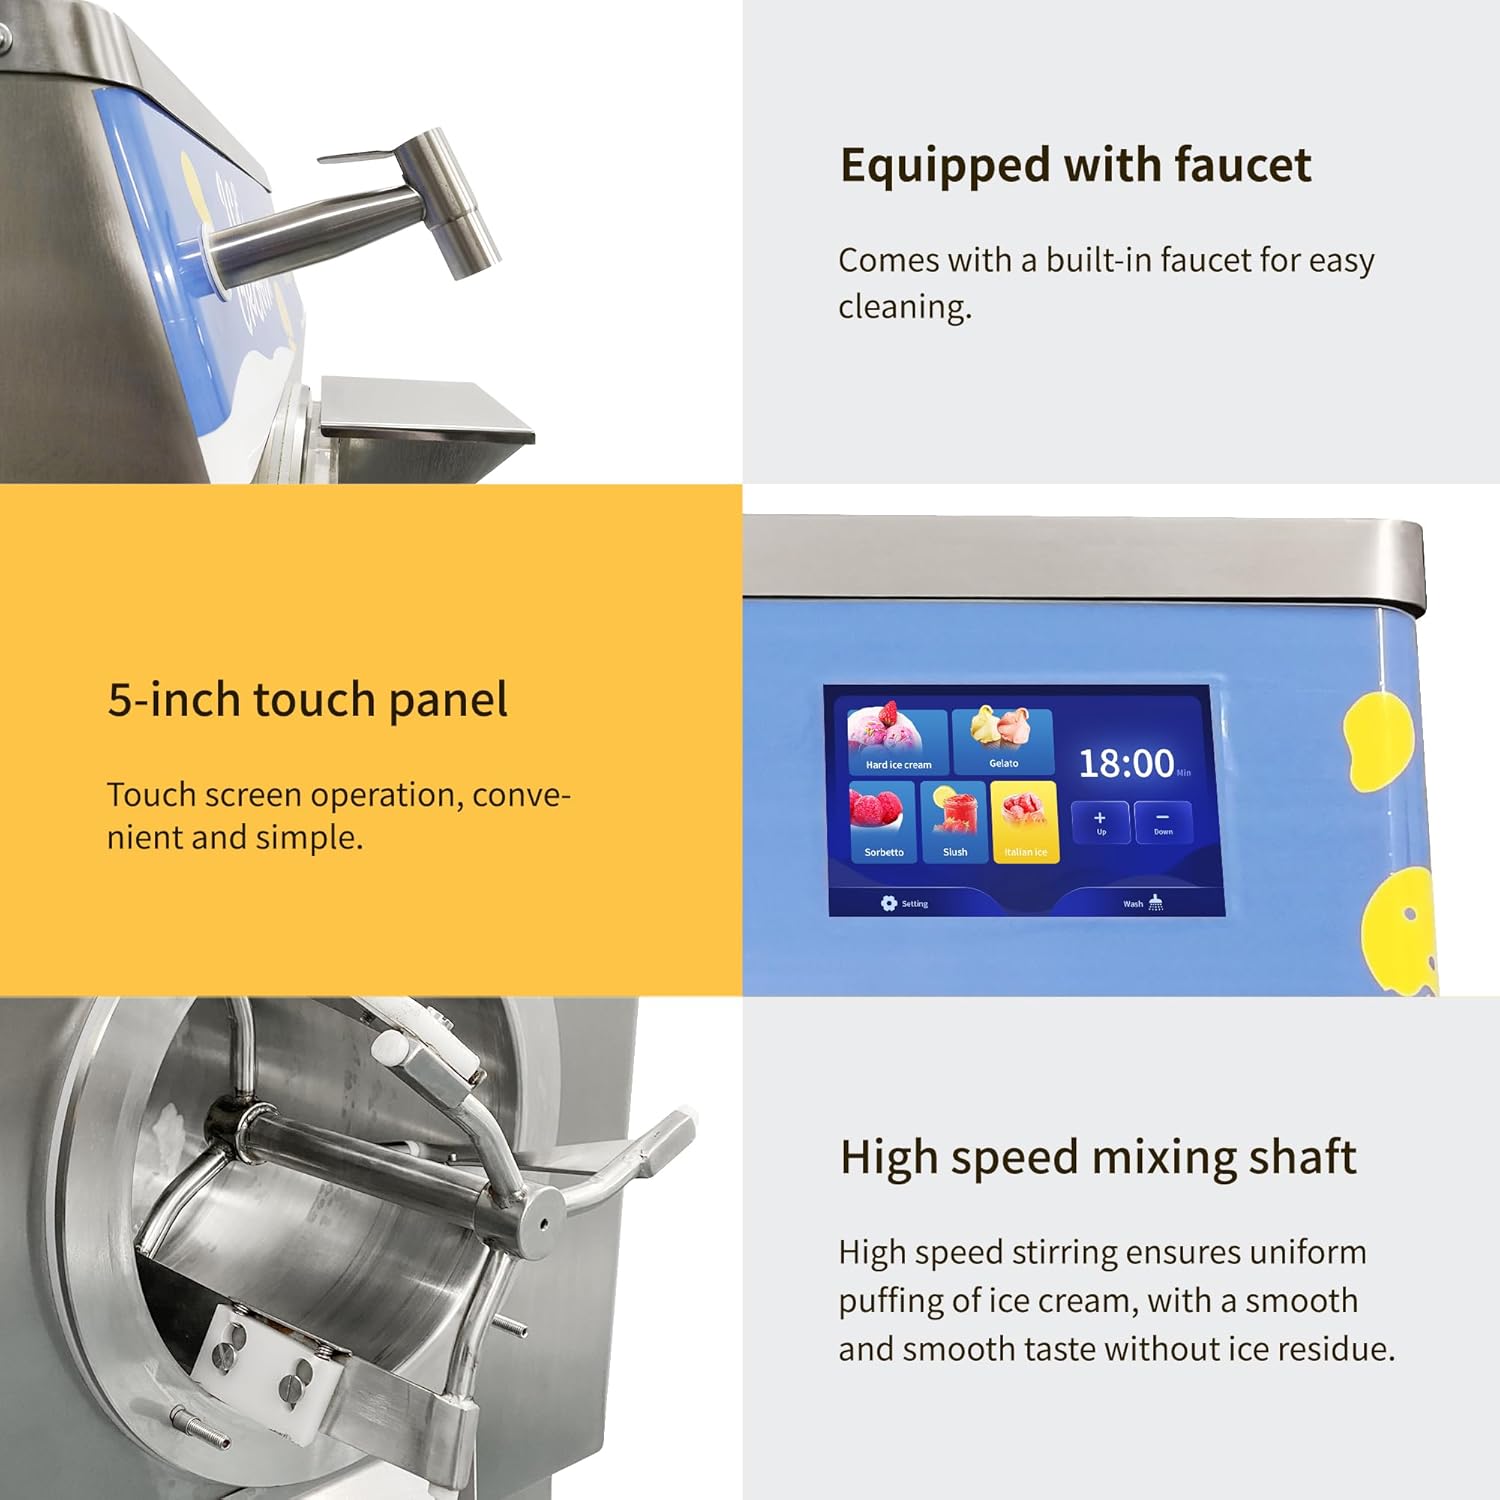
Figure 2: Detailed view of key features including the integrated faucet for easy cleaning, the intuitive 5-inch touch control panel, and the high-speed mixing shaft designed for smooth ice cream consistency.
Technical Specifications
| Feature | Value |
|---|---|
| Brand | Generic |
| Model Name | 28-1 (WT-28-1) |
| Color | Silver |
| Capacity | 12 Liters (3 Gallon Cylinder) |
| Production Rate | 48L/H (13 Gallon/H) |
| Power | 2200W |
| Voltage | 110V 60Hz |
| Special Features | Digital Display, Touchpad Control, Equipped with Sprayer, Low Noise |
| Material | Stainless Steel |
| Product Dimensions | 30"L x 20"W x 50"H |
| Item Weight | 340 pounds |
| Operation Mode | Automatic |
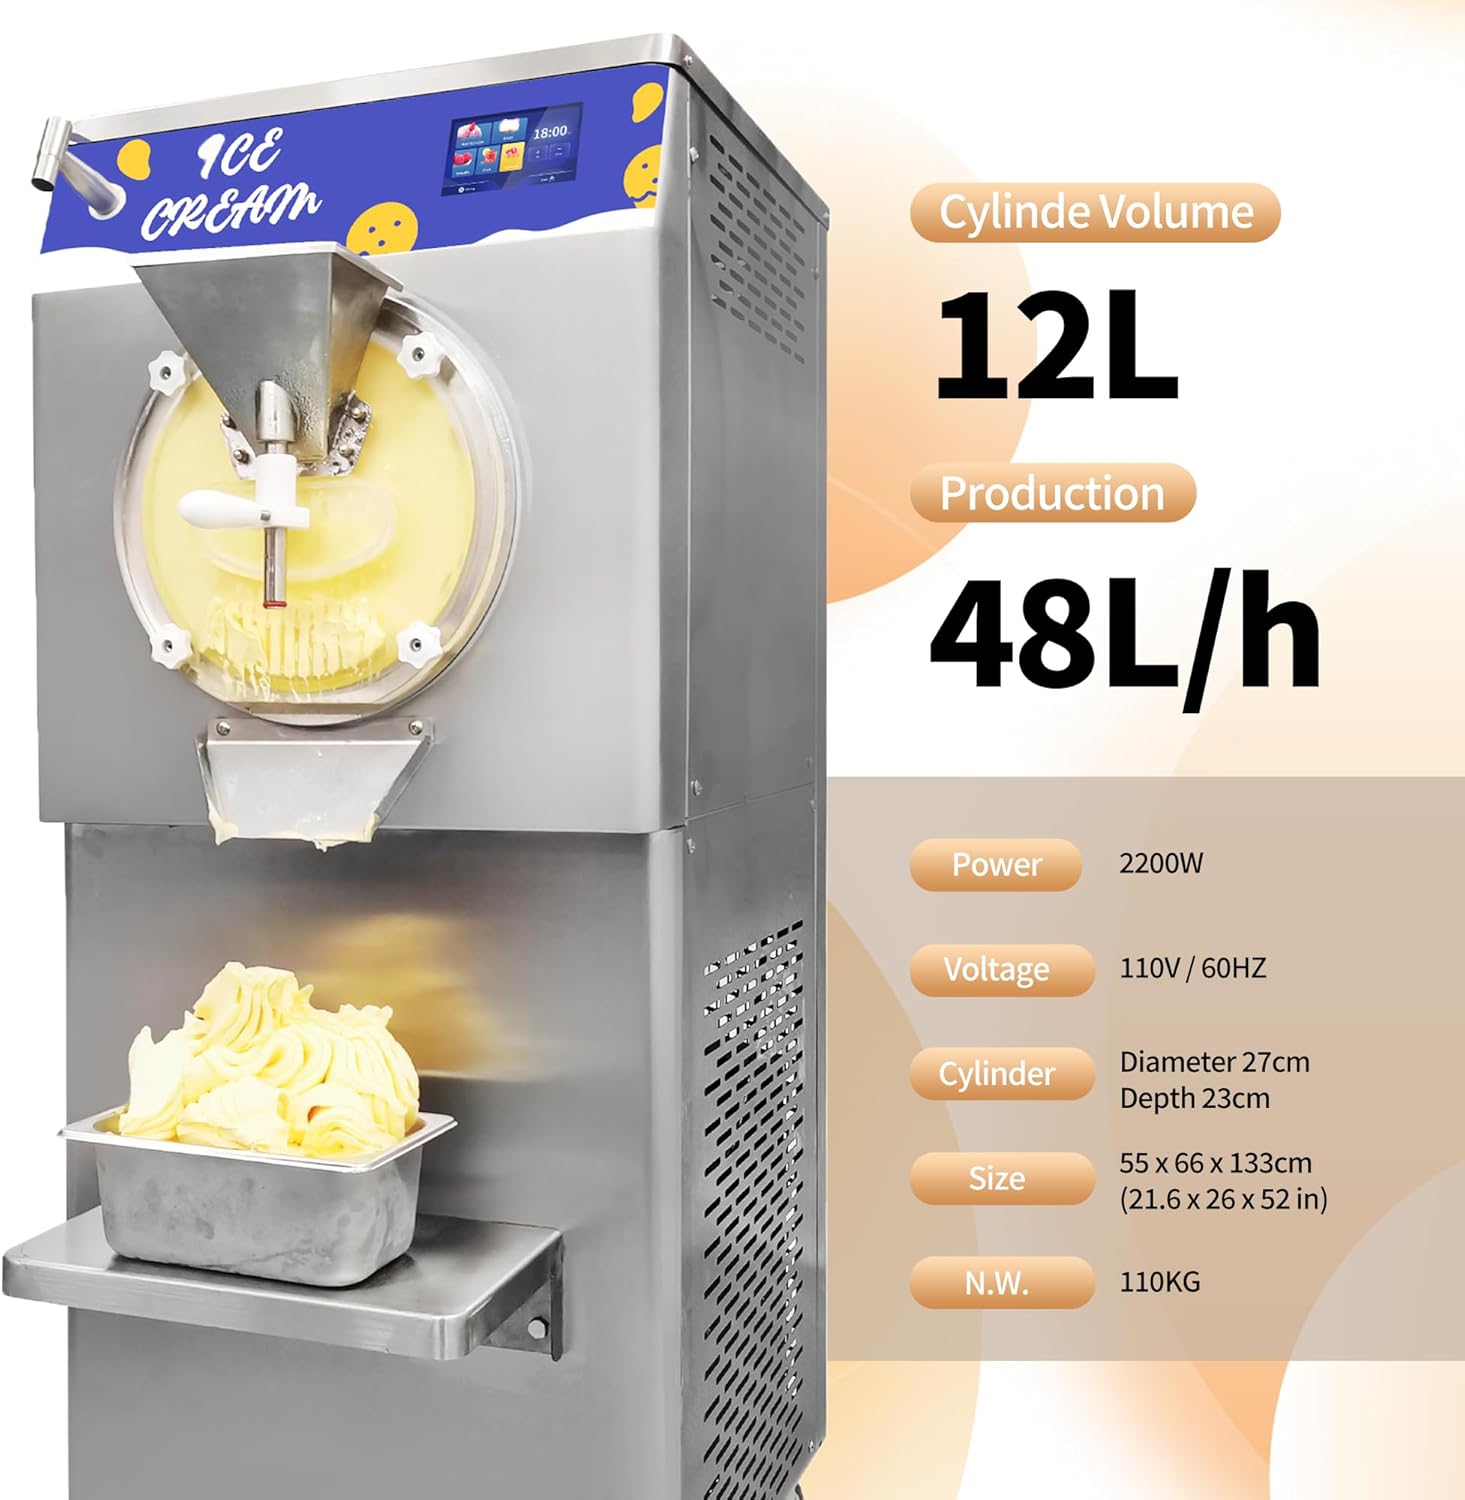
Figure 3: Visual representation of the machine's core specifications, including capacity, production rate, power, and physical dimensions.
Setup
Before first use, ensure the machine is properly set up and cleaned.
- Unpacking: Carefully remove the machine from its packaging. Inspect for any shipping damage.
- Placement: Position the machine on a stable, level surface in a well-ventilated area. Ensure there is sufficient space around the machine for air circulation and maintenance. The machine is equipped with 4 wheels for easy movement; lock the wheels once positioned.
- Power Connection: Connect the power cord to a dedicated 110V 60Hz, 2200W grounded electrical outlet.
- Initial Cleaning: Before first use, thoroughly clean all parts that will come into contact with food. Refer to the "Maintenance and Cleaning" section for detailed cleaning instructions.

Figure 4: Internal components and build quality, highlighting features like robust cooling systems and high-quality materials, ensuring durability and performance.
Operating Instructions
This machine offers 5 pre-set programs for various frozen desserts, controlled via an intuitive 5-inch touch panel.

Figure 5: The 5-inch touch control panel, illustrating the selection options for different frozen dessert types.

Figure 6: The transparent acrylic door allows for clear visibility of the ice cream production process, enabling monitoring of consistency.
Step-by-Step Operation

Figure 7: A visual guide detailing the six main steps for operating the machine, from preparation to serving.
- Prepare Mixture: Prepare your desired ice cream, gelato, slush, Italian ice, or sorbet mixture according to your recipe. Ensure the mixture is well-blended and free of large solids that could obstruct the machine.
- Pour Mixture: Open the top lid and carefully pour the prepared mixture into the 12L cylinder. Do not overfill.
- Select Program: Close the lid securely. On the 5-inch touch control panel, select the desired program (Hard Ice Cream, Gelato, Italian Ice, Slush, or Sorbet). The production time can be adjusted as needed.
- Start Production: Press the "Start" button. The machine will begin the churning and freezing process. Production typically takes 15-20 minutes per batch, depending on the selected program and mixture.
- Monitor Progress: Utilize the transparent acrylic door to observe the consistency of the frozen dessert as it churns.
- Dispense: Once the program is complete and the desired consistency is achieved, place a serving container under the dispensing chute. Activate the dispensing mechanism (usually by pressing a button or pulling a lever, often labeled "Wash" or "Discharge" on the panel for dispensing).
- Serve: Collect the freshly made frozen dessert and serve immediately or store in an appropriate freezer.
Video Demonstration
Video 1: A comprehensive demonstration of the 48L/H Hard Serve Ice Cream Machine in operation, showcasing its features and the process of making ice cream. This video is provided by the seller, Devonh.
Maintenance and Cleaning
Regular cleaning and maintenance are crucial for the longevity and hygienic operation of your ice cream machine. Always unplug the machine before cleaning.
- Daily Cleaning:
- After each use, dispense any remaining mixture.
- Use the built-in sprayer to rinse the cylinder and dispensing chute with warm water.
- Run a cycle with a mild, food-safe cleaning solution, then rinse thoroughly with clean water.
- Wipe down all exterior surfaces with a damp cloth.
- Deep Cleaning (Weekly/Bi-weekly):
- Disassemble the dispensing door, mixing shaft, and any removable parts.
- Hand wash these components with warm, soapy water. Ensure all residue is removed.
- Rinse thoroughly and allow to air dry completely before reassembling.
- Inspect seals and gaskets for wear and tear; replace if necessary.
- General Care:
- Do not use abrasive cleaners or scouring pads, as they can damage the stainless steel finish.
- Ensure the machine is completely dry before plugging it back in.
- Regularly check the air vents for dust and debris and clean as needed to ensure proper heat dissipation.
Troubleshooting
Refer to this section for common issues and their potential solutions. If the problem persists, contact customer support.
| Problem | Possible Cause | Solution |
|---|---|---|
| Machine does not power on. | No power supply; power cord loose; circuit breaker tripped. | Check power connection; ensure outlet is functional; reset circuit breaker. |
| Ice cream is too soft/not freezing. | Mixture too warm; insufficient freezing time; ambient temperature too high; refrigerant issue. | Pre-chill mixture; increase production time; ensure proper ventilation; contact service if refrigerant is suspected. |
| Ice cream is too hard. | Excessive freezing time; mixture too thick. | Reduce production time; adjust mixture consistency. |
| Unusual noise during operation. | Loose parts; motor issue; foreign object in cylinder. | Turn off and inspect for loose components; remove any foreign objects; contact service if motor noise persists. |
| Dispensing issues. | Chute clogged; dispensing mechanism obstructed. | Clean the dispensing chute; ensure no frozen residue is blocking the mechanism. |
Warranty and Support
For information regarding warranty coverage, service, or technical support, please refer to the warranty card included with your purchase or contact the seller directly. Keep your purchase receipt as proof of purchase.
For further assistance, you may visit the product page on Amazon.com or contact Generic customer support through the provided channels.