
HERZO HCT45X
HERZO Cutting Dust Shroud HCT45X User Manual
For 4-1/2 inch and 5 inch Angle Grinders
1. Introduction
This manual provides essential instructions for the safe and effective use of your HERZO HCT45X Cutting Dust Shroud. This accessory is designed to enhance dust collection during cutting operations with compatible 4-1/2 inch and 5 inch angle grinders, promoting a cleaner and safer working environment.
Please read this manual thoroughly before installation and operation. Keep it for future reference.
2. Safety Information
Always adhere to general power tool safety guidelines in addition to the following specific precautions when using the dust shroud:
- Eye Protection: Always wear ANSI-approved safety glasses or goggles to protect against flying debris.
- Respiratory Protection: Despite dust collection, wear a suitable dust mask or respirator to prevent inhalation of fine particles.
- Hearing Protection: Use hearing protection when operating angle grinders.
- Hand Protection: Wear appropriate work gloves.
- Secure Workpiece: Always secure the material being cut to prevent movement during operation.
- Tool Compatibility: Ensure the dust shroud is correctly fitted to your 4-1/2 inch or 5 inch angle grinder as specified.
- Vacuum Connection: Connect the dust port to a suitable vacuum cleaner or dust extractor for optimal dust control.
- Inspect Before Use: Before each use, inspect the shroud for any damage or wear. Do not use if damaged.
- Blade Selection: Use only cutting blades appropriate for the material and the angle grinder's specifications.
- Power Disconnection: Disconnect the angle grinder from the power source before making any adjustments, changing blades, or performing maintenance.
3. Package Contents
Verify that all items are present in your package:
- HERZO Cutting Dust Shroud (HCT45X)
- Diamond Cutting Blade (4.5 inch)
- Spanner Wrench
- Various Clamping Washers/Rings (for different grinder collar diameters)
- Universal Vacuum Hose Adapter
- Mounting Hardware (screws, bolts)

Figure 1: HERZO Cutting Dust Shroud (HCT45X) and its components, including the shroud, diamond cutting blade, spanner wrench, various clamping rings, and a vacuum adapter.
4. Setup and Installation
Follow these steps to attach the dust shroud to your angle grinder:
- Prepare Grinder: Ensure your angle grinder is unplugged. Remove any existing guard or flange.
- Select Clamping Washer: Check your angle grinder's collar diameter and select the appropriate clamping washer/ring from the provided set.
- Attach Shroud Base: Place the shroud's mounting pad onto the angle grinder spindle. Secure it by tightening the screw or clamping mechanism. Ensure it is firmly attached and does not wobble.
- Install Cutting Blade: Carefully install the diamond cutting blade onto the grinder spindle, ensuring it is oriented correctly. Use the spanner wrench to tighten the blade nut securely.
- Adjust Cutting Depth: The shroud features an adjustable cutting depth mechanism. Loosen the depth adjustment knob, set the desired cutting depth using the visible scale, and then securely tighten the knob. The maximum cutting depth is approximately 1-1/4 inches when using a 5-inch blade.
- Connect Vacuum: Attach the universal vacuum hose adapter to the dust port on the shroud. Connect a suitable vacuum cleaner or dust extractor hose to the adapter. The dust port can be adjusted 360 degrees for optimal hose routing.

Figure 2: Visual guide for installing the dust shroud, showing selection of clamping washer, attaching the shroud, installing the blade, and adjusting cutting depth.

Figure 3: Details of the adjustable depth setting and the 360-degree rotatable dust port for vacuum connection.
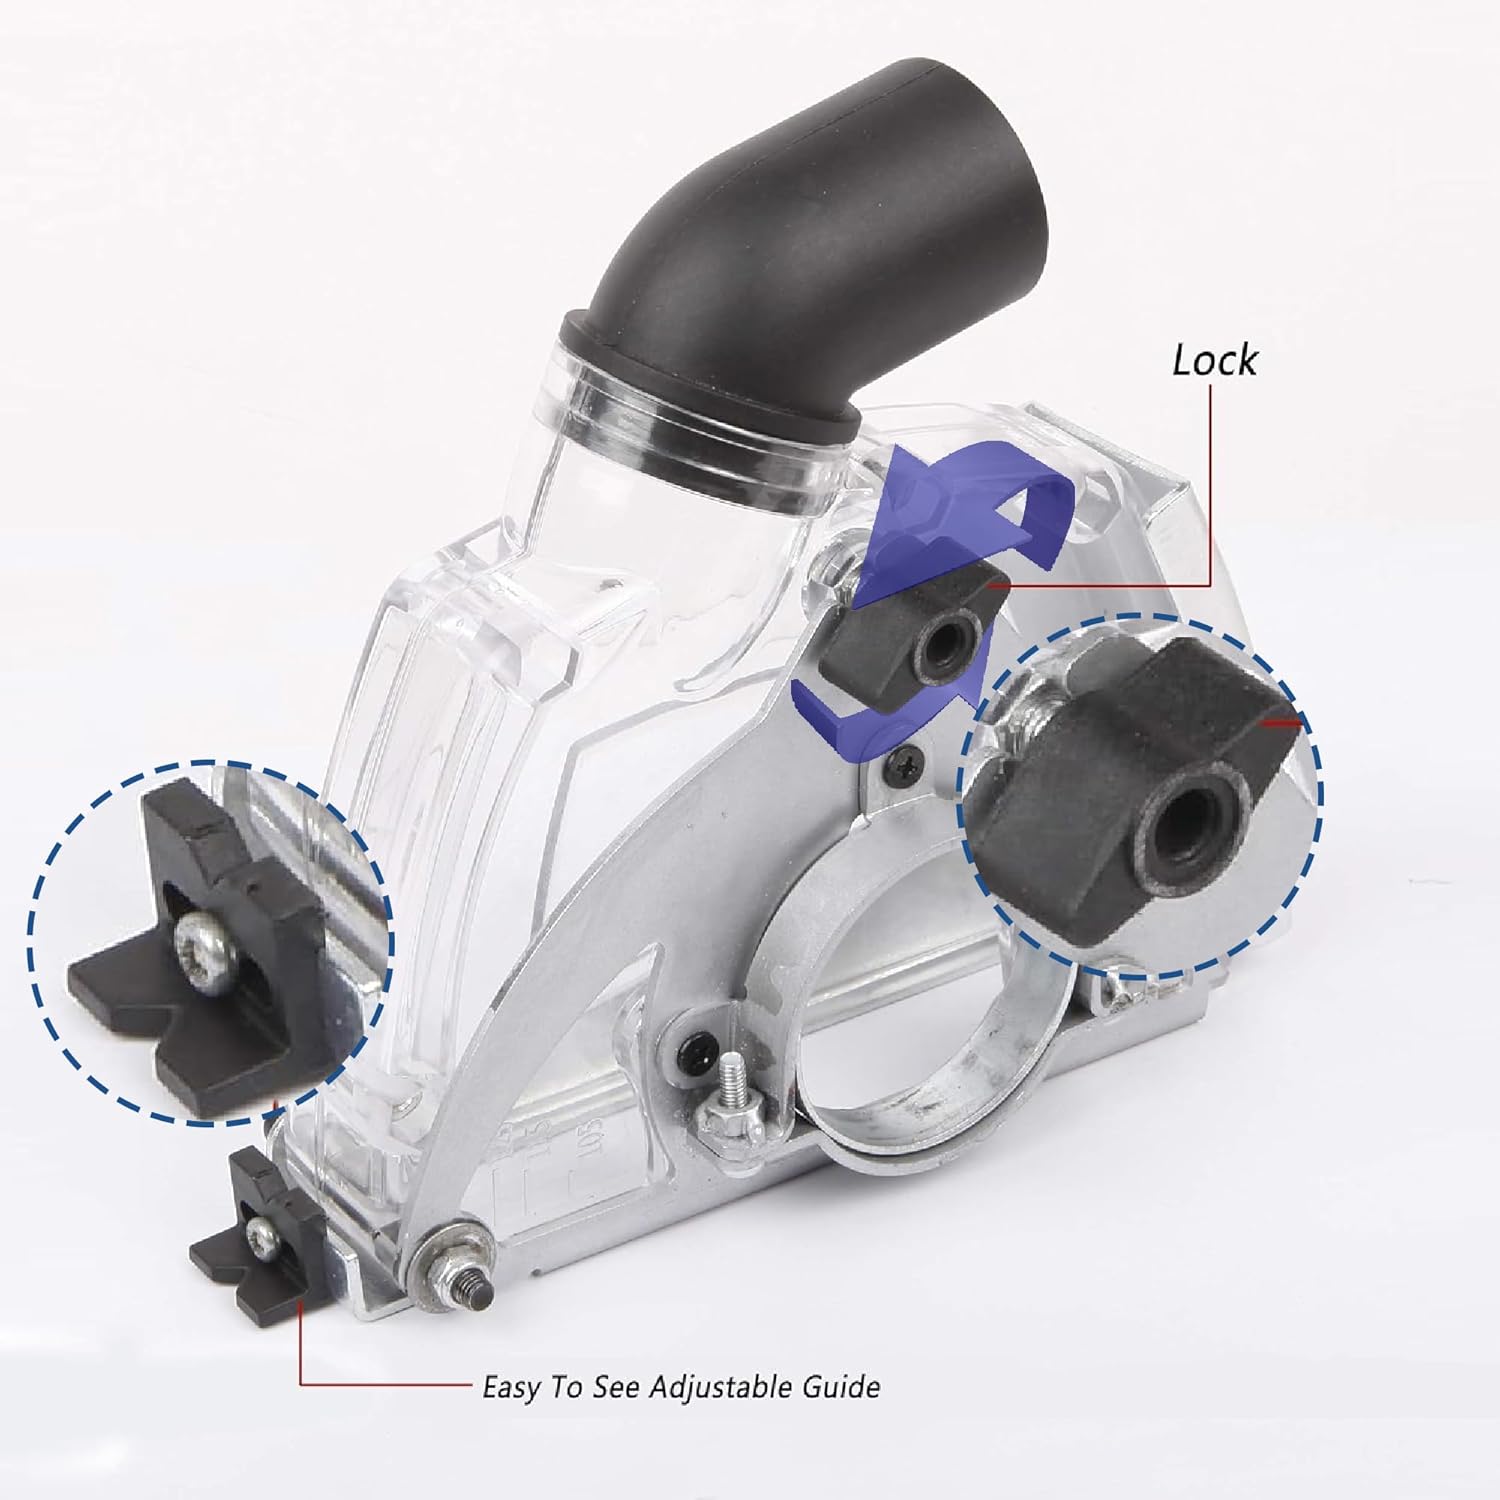
Figure 4: The adjustable guide and locking mechanism for precise cutting.

Figure 5: The universal vacuum hose adapter, demonstrating its connection to the dust shroud.
5. Operating Instructions
Once the dust shroud is securely installed and connected to a vacuum system, you can begin cutting operations:
- Power On: Turn on your vacuum cleaner first, then power on the angle grinder.
- Cutting: Guide the angle grinder with the attached shroud along your cutting line. The clear shroud allows for visibility of the cutting area, and the adjustable guide assists in maintaining straight cuts.
- Dust Control: The shroud is designed to capture dust effectively at the source, directing it into your connected vacuum system. This significantly reduces airborne particles.
- Material Compatibility: This dust shroud is suitable for cutting various materials including metal, stone, and wood, provided the correct blade is used.
- Depth Adjustment: The adjustable cutting depth allows for flexibility in various cutting tasks without needing to change tools frequently.
- Post-Operation: Once cutting is complete, turn off the angle grinder, then turn off the vacuum cleaner. Allow the blade to stop completely before setting the tool down.

Figure 6: The dust shroud actively collecting debris during a cutting operation, illustrating the airflow for dust extraction.

Figure 7: The dust shroud in practical use, connected to a vacuum system for efficient dust removal during cutting.
6. Maintenance
Regular maintenance ensures the longevity and optimal performance of your dust shroud:
- Cleaning: After each use, disconnect the shroud from the angle grinder and clean it thoroughly. The shroud can be easily removed for quick and efficient cleaning. Remove any accumulated dust or debris from inside the shroud and the dust port.
- Inspection: Periodically inspect the shroud for cracks, damage, or excessive wear, especially around the clamping points and the clear viewing window.
- Storage: Store the dust shroud in a clean, dry place away from direct sunlight and extreme temperatures.
7. Troubleshooting
If you encounter issues with your dust shroud, consider the following:
- Poor Dust Collection:
- Ensure the vacuum hose is securely connected to the dust port.
- Check if the vacuum cleaner's filter is clean and the bag (if applicable) is not full.
- Verify there are no blockages in the shroud's dust port or the vacuum hose.
- Confirm the shroud is properly sealed against the workpiece during cutting.
- Shroud Not Fitting Grinder:
- Ensure your angle grinder is within the compatible size range (4-1/2 inch or 5 inch).
- Verify you are using the correct clamping washer/ring for your grinder's collar diameter.
- Check for any obstructions preventing proper seating.
- Excessive Vibration:
- Ensure the cutting blade is correctly installed and securely tightened.
- Check if the shroud is firmly attached to the grinder without any looseness.
- Inspect the cutting blade for damage or imbalance.
8. Specifications
| Model: | HCT45X |
| Brand: | HERZO |
| Compatibility: | 4-1/2 inch and 5 inch Angle Grinders |
| Material: | Metal, PVC Plastic |
| Item Weight: | 1.1 kg |
| Parcel Dimensions: | 21.41 x 17.2 x 8.1 cm |
| Maximum Rotational Speed: | 11000 RPM (Grinder dependent) |
| Included Components: | Suction hood, Diamond cutting disc (as per product specifications) |
9. Warranty and Support
For warranty information or technical support regarding your HERZO Cutting Dust Shroud, please refer to the documentation provided with your purchase or contact HERZO customer service directly. Contact details can typically be found on the product packaging or the official HERZO website.
Ask a question about this manual
Ask about setup, troubleshooting, compatibility, parts, safety, or missing instructions. Manuals+ will review the question and use this page’s manual context to help answer it.