Anytone AT-D878UVII
Anytone AT-D878UVII Dual-Band DMR Handheld Instruction Manual
Model: AT-D878UVII | Brand: Anytone
1. Introduction
The Anytone AT-D878UVII is a versatile dual-band Digital Mobile Radio (DMR) handheld device designed for reliable communication across VHF and UHF frequencies. This manual provides essential information for setting up, operating, maintaining, and troubleshooting your radio to ensure optimal performance.
Key features include dual-mode digital and analog capabilities, a large color display, built-in GPS and APRS TX, and an upgraded USB Type-C rechargeable battery. With 2GB of memory, it supports up to 500,000 digital contacts and 250 zones, each with up to 250 channels. The radio is FCC Part 90 certified, making it suitable for various professional and amateur applications.
2. Package Contents
Verify that all items listed below are included in your package:
- Anytone AT-D878UVII Radio Unit
- 3100mAh USB Type-C Battery
- Charging Cradle with Power Supply
- USB Cable (for charging and programming)
- Programming Cable
- Belt Clip
- Lanyard
- Antenna
- Printed User Manual
3. Components Overview
Familiarize yourself with the main components of your AT-D878UVII radio.
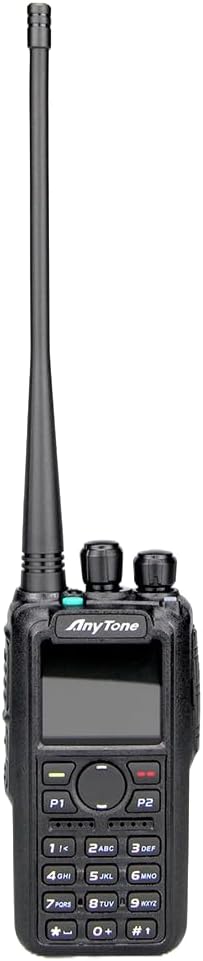
Figure 3.1: Front view of the Anytone AT-D878UVII radio, highlighting the display, keypad, and control knobs.

Figure 3.2: The Anytone AT-D878UVII radio alongside its detached battery, illustrating the USB Type-C charging port on the battery unit.

Figure 3.3: A detailed view of the USB Type-C charging port located on the AT-D878UVII battery.
4. Setup
4.1 Battery Installation and Charging
- Align the battery with the grooves on the back of the radio.
- Slide the battery upwards until it clicks securely into place.
- To charge, connect the USB Type-C cable directly to the battery's port or place the radio in the charging cradle. The charging indicator will show the status.
4.2 Antenna Attachment
- Screw the antenna clockwise into the connector on top of the radio until it is finger-tight. Do not overtighten.
5. Operating Instructions
5.1 Power On/Off and Volume Control
- To power on/off, rotate the top-left knob clockwise/counter-clockwise until you hear a click.
- Adjust the volume by rotating the same knob.
5.2 Channel Selection (VFO/Memory)
The radio supports both VFO (Variable Frequency Oscillator) mode for direct frequency input and Memory mode for pre-programmed channels.
- Use the navigation buttons or the top-right knob to select channels or adjust frequencies.
- Press the V/M button to switch between VFO and Memory modes.
5.3 DMR and Analog Mode Switching
The AT-D878UVII supports both Digital Mobile Radio (DMR) and traditional Analog communication.
- The radio automatically detects the mode for pre-programmed channels.
- In VFO mode, you can manually select the desired mode through the menu settings.
5.4 GPS and APRS TX
The integrated GPS module allows for location tracking, and APRS TX enables automatic position reporting.
- Access GPS and APRS settings via the main menu to configure reporting intervals and other parameters.
5.5 Programming and Codeplugs
The radio's extensive features are best managed through its Customer Programming Software (CPS). A codeplug is a configuration file that contains all your radio's settings, including channels, zones, contacts, and talkgroups.
For a detailed guide on understanding and creating codeplugs, refer to the video below. While the video demonstrates a similar model, the principles of codeplug creation and management are applicable to your AT-D878UVII.
Video 5.1: An Easy Intro to DMR Codeplugs. This video demonstrates the process of creating and managing codeplugs, a fundamental aspect of configuring your DMR radio. The concepts shown are applicable to the Anytone AT-D878UVII, though a different model is used for demonstration.
5.6 AES256 Encryption
The AT-D878UVII supports AES256 encryption for secure digital communications, primarily for commercial use.
Video 5.2: Digital/Analog Walkie-Talkie with AES256. This video illustrates the AES256 encryption feature, which provides enhanced security for digital transmissions. While a different radio model is shown, the encryption functionality is similar to that found in the Anytone AT-D878UVII.
5.7 Bluetooth PTT Button
The radio includes Bluetooth connectivity, allowing for wireless operation with a Push-To-Talk (PTT) button.
Video 5.3: BTECH DMR-6X2 PRO Feature Highlights. This video demonstrates various features including Bluetooth PTT functionality, which is also available on the Anytone AT-D878UVII for convenient wireless operation.
5.8 Text Messaging
Send and receive text messages over the DMR network.
- Navigate to the 'Messages' option in the main menu to compose, send, and view messages.
5.9 Copying Frequencies
The radio supports copying frequencies and sub-tones from other radios, simplifying channel setup.
Video 5.4: Copy a frequency and sub tone from other radio nearby. This video demonstrates how to quickly copy frequency and sub-tone settings from another radio, a useful feature for rapid channel configuration on your Anytone AT-D878UVII.
6. Maintenance
6.1 Battery Care
- Charge the battery fully before first use.
- Avoid overcharging or completely draining the battery to prolong its lifespan.
- Store the battery in a cool, dry place when not in use for extended periods.
6.2 Cleaning
- Wipe the radio's surface with a soft, damp cloth.
- Do not use harsh chemicals or abrasive cleaners.
- Ensure the radio is dry before use or storage.
7. Troubleshooting
| Problem | Possible Cause | Solution |
|---|---|---|
| Radio does not power on | Low or dead battery | Charge the battery fully. |
| No audio reception | Volume too low, incorrect frequency/channel, squelch too high | Increase volume, verify frequency/channel, adjust squelch level. |
| Cannot transmit | Incorrect frequency, low battery, transmit inhibit enabled | Verify frequency, charge battery, check programming for transmit inhibit. |
| GPS not acquiring signal | Obstructed view of sky, indoor use | Move to an open outdoor area with clear sky view. |
8. Specifications
| Feature | Detail |
|---|---|
| Model Number | AT-D878UVII |
| Frequency Range | 136-174MHz (VHF), 400-480MHz (UHF) |
| Number of Channels | 4000 |
| Digital Contacts | 500,000 |
| Zones | 250 (up to 250 channels per zone) |
| Battery Capacity | 3100mAh (USB Type-C) |
| Special Features | Dual Band, Digital DMR, Analog, GPS, APRS TX, AES256 Encryption |
| Talking Range Maximum | 5 Miles |
| Item Weight | 2 pounds |
| Water Resistance Level | Not Water Resistant |
| Voltage | 12 Volts (DC) |
9. Warranty and Support
9.1 Warranty Information
The Anytone AT-D878UVII radio comes with a 1-Year Limited Warranty from the manufacturer, 12 Volt Power. This warranty covers defects in materials and workmanship under normal use. Please retain your proof of purchase for warranty claims.
9.2 Customer Support
For technical assistance, troubleshooting, or warranty inquiries, please contact 12 Volt Power customer support through their official channels. Refer to the product packaging or the manufacturer's website for the most current contact information.
Related Documents - AT-D878UVII
 |
AnyTone AT-D878UV Series Operating Manual: Digital DMR and Analog UHF/VHF Two Way Radios Comprehensive operating manual for AnyTone AT-D878UV, AT-D878UV PLUS, AT-D878UVII, and AT-D878UVII PLUS Digital DMR and Analog UHF/VHF Two Way Radios. Covers setup, basic operations, advanced features, programming, safety, and technical specifications. |
 |
AnyTone AT-D878UV Series Operating Manual: Digital DMR and Analog UHF/VHF Two Way Radio Comprehensive operating manual for the AnyTone AT-D878UV series of Digital DMR and Analog UHF/VHF two-way radios, covering features, setup, operations, and technical specifications. |
 |
AnyTone AT-D878UV Series Operating Manual | Digital DMR & Analog Two-Way Radio Comprehensive operating manual for the AnyTone AT-D878UV, AT-D878UV PLUS, AT-D878UVII, and AT-D878UVII PLUS digital DMR and analog UHF/VHF two-way radios. Includes setup, programming, and advanced feature guides. |
 |
AnyTone AT-D878UV Series: Digital & Analog Two-Way Radio Operating Manual Comprehensive operating manual for the AnyTone AT-D878UV series of Dual Band Digital DMR and Analog UHF/VHF Two Way Radios, covering setup, operations, advanced features, and technical specifications. |
 |
AnyTone AT-D878UV Series Operating Manual: Digital DMR and Analog UHF/VHF Two Way Radios Comprehensive operating manual for AnyTone AT-D878UV, AT-D878UV PLUS, AT-D878UVII, and AT-D878UVII PLUS digital DMR and analog UHF/VHF two-way radios. Covers setup, features, operations, and troubleshooting. |
 |
AnyTone UVA1 Dual Band Analogue Handheld Two Way Radio Instruction Manual Comprehensive instruction manual for the AnyTone UVA1 Dual Band Analogue Handheld Two Way Radio, covering setup, operation, settings, specifications, and safety information. |
Ask a question about this manual
Ask about setup, troubleshooting, compatibility, parts, safety, or missing instructions. Manuals+ will review the question and use this page’s manual context to help answer it.