1. Introduction
This manual provides detailed instructions for the installation, operation, and maintenance of your Biorunn DUDUAUTO DUDU4 Android 10 Car Radio Stereo. Please read this manual thoroughly before using the product to ensure proper function and safety.
2. Safety Information
- Ensure professional installation to prevent damage to the vehicle's electrical system or the unit.
- Do not operate the unit in a manner that distracts you from driving.
- Avoid exposing the unit to extreme temperatures, moisture, or direct sunlight for prolonged periods.
- Disconnect the vehicle's battery before performing any electrical work.
3. Package Contents
Verify that all items listed below are included in your package:
- 1 x Car Stereo Head Unit
- 1 x Power Cord
- 2 x USB Cables
- 1 x RCA Cable
- 1 x Reversing Camera Input Cable
- 1 x GPS Antenna
- 1 x 4G Antenna
- 1 x Microphone (MIC)

Image: Contents of the DUDUAUTO DUDU4 car stereo package, including the head unit, various cables, and antennas.
4. Product Overview and Connections
Familiarize yourself with the main components and connection ports of the DUDUAUTO DUDU4 head unit.

Image: Rear view of the DUDUAUTO DUDU4 head unit showing labeled connection ports for power, USB, RCA, antennas, and camera inputs.
Rear Panel Connections:
- Power Cable (G): Connects to the vehicle's power supply.
- USB Ports (D, E): Three USB 2.0 ports for external devices.
- RCA Cable (A): For audio output and other auxiliary connections. Includes 4G card slot.
- Reverse Video Cable (C): For connecting a reversing camera.
- GPS Antenna (6): Connects the GPS antenna for navigation.
- 4G Antenna (4): Connects the 4G antenna for mobile data.
- Radio Antenna (8): Connects the vehicle's radio antenna.
- WIFI (7): Internal Wi-Fi module.
- Protocol Serial Use with Can-bus (F): For vehicle specific CAN-bus integration.
- 360° Panoramic Device: Optional connection for 360-degree camera systems.
- Cooling Fan: Integrated cooling system.
5. Setup and Installation
Professional installation is recommended. Ensure the vehicle's battery is disconnected before starting.
5.1 Wiring Connections
- Power Connection: Connect the main power harness to the vehicle's wiring, ensuring correct positive, negative, and accessory connections.
- Speaker Connections: Connect the speaker wires from the harness to the corresponding vehicle speaker wires.
- Antenna Connections:
- Connect the GPS antenna to the designated port (6) on the rear panel. Position the antenna in a location with a clear view of the sky.
- Connect the 4G antenna to its port (4).
- Connect the vehicle's radio antenna to port (8).
- USB Connections: Connect the provided USB cables to ports (D, E) and route them to a convenient location for external devices.
- RCA Connections: If using external amplifiers or other audio/video devices, connect the RCA cables (A) as needed.
- Reversing Camera: Connect the reversing camera input cable (C) to the camera's video output.
- Microphone: Connect the external microphone to the MIC input for improved call quality.
5.2 Initial Power On
After all connections are secure, reconnect the vehicle's battery. Turn on the ignition. The unit should power on and display the DUDU OS 3.1 interface.
6. Operating Instructions
6.1 DUDU OS 3.1 Interface
The DUDU4 operates on DUDU OS 3.1, an Android 10-based system. The main screen provides access to various functions and applications.

Image: The main user interface of the DUDUAUTO DUDU4, displaying a 3D car model, media controls, and system information.

Image: Various customization options within DUDU OS, including themes, dynamic wallpapers, and widget arrangements.
6.2 Wireless CarPlay / Android Auto
The unit supports both wireless and wired CarPlay and Android Auto for seamless smartphone integration.
- Wireless Connection:
- Ensure Bluetooth and Wi-Fi are enabled on your smartphone.
- On the head unit, navigate to the CarPlay/Android Auto application.
- Follow the on-screen prompts to pair your phone via Bluetooth. Once paired, the system will automatically establish a Wi-Fi connection for CarPlay/Android Auto.
- Wired Connection:
- Connect your smartphone to one of the USB ports using a certified USB cable.
- The unit should automatically detect your phone and launch CarPlay/Android Auto.

Image: Screenshots demonstrating the wireless CarPlay and Android Auto interfaces on the DUDUAUTO DUDU4 head unit.
6.3 GPS Navigation
The DUDU4 features a built-in GPS module with 3-mode L1 B1 E1 support. Access navigation applications from the main menu.

Image: The navigation interface displayed on the DUDUAUTO DUDU4, showing a map with search and point-of-interest options.
6.4 Bluetooth Connectivity
Pair your smartphone via Bluetooth 5.0 for hands-free calling and audio streaming.
- Go to the Bluetooth settings on the head unit.
- Enable Bluetooth on your smartphone and search for available devices.
- Select the DUDUAUTO device from the list and confirm the pairing code.
6.5 Radio Operation
Access the radio application to tune into FM/AM stations. The unit uses a TDA4755 radio IC.
6.6 DSP Audio Settings
Utilize the built-in AK7604 DSP to customize audio settings, including equalizer, balance, and fader, for an optimized listening experience.
6.7 OTA Updates
The DUDU4 supports Over-The-Air (OTA) updates. Connect the unit to Wi-Fi and check for system updates periodically in the settings menu to ensure you have the latest features and improvements.
7. Maintenance
7.1 Screen Cleaning
Use a soft, lint-free cloth slightly dampened with water or a screen cleaning solution. Do not use abrasive cleaners or solvents.

Image: Close-up view of the DUDUAUTO DUDU4's 9.5-inch In-Cell Screen, highlighting its clear 1280x720 resolution.
7.2 Software Updates
Regularly check for and install OTA software updates to maintain optimal performance and access new features.
7.3 General Care
Avoid placing heavy objects on the unit. Ensure proper ventilation around the unit to prevent overheating.
8. Troubleshooting
If you encounter issues, refer to the following common problems and solutions:
| Problem | Possible Cause | Solution |
|---|---|---|
| Unit does not power on | Incorrect wiring, blown fuse, vehicle battery issue | Check power connections, inspect fuses, verify vehicle battery voltage. |
| No sound output | Incorrect speaker wiring, volume too low, mute activated | Verify speaker connections, increase volume, check mute status, adjust DSP settings. |
| GPS signal lost or inaccurate | GPS antenna improperly placed or disconnected | Ensure GPS antenna has a clear view of the sky and is securely connected. |
| CarPlay/Android Auto not connecting | Bluetooth/Wi-Fi off, faulty USB cable, phone compatibility | Check phone's Bluetooth/Wi-Fi, try a different USB cable, ensure phone OS is compatible. |
| Touchscreen unresponsive | System freeze, debris on screen | Restart the unit (press RST button if available), clean the screen. |
9. Specifications
Key technical specifications for the DUDUAUTO DUDU4 Car Radio Stereo:
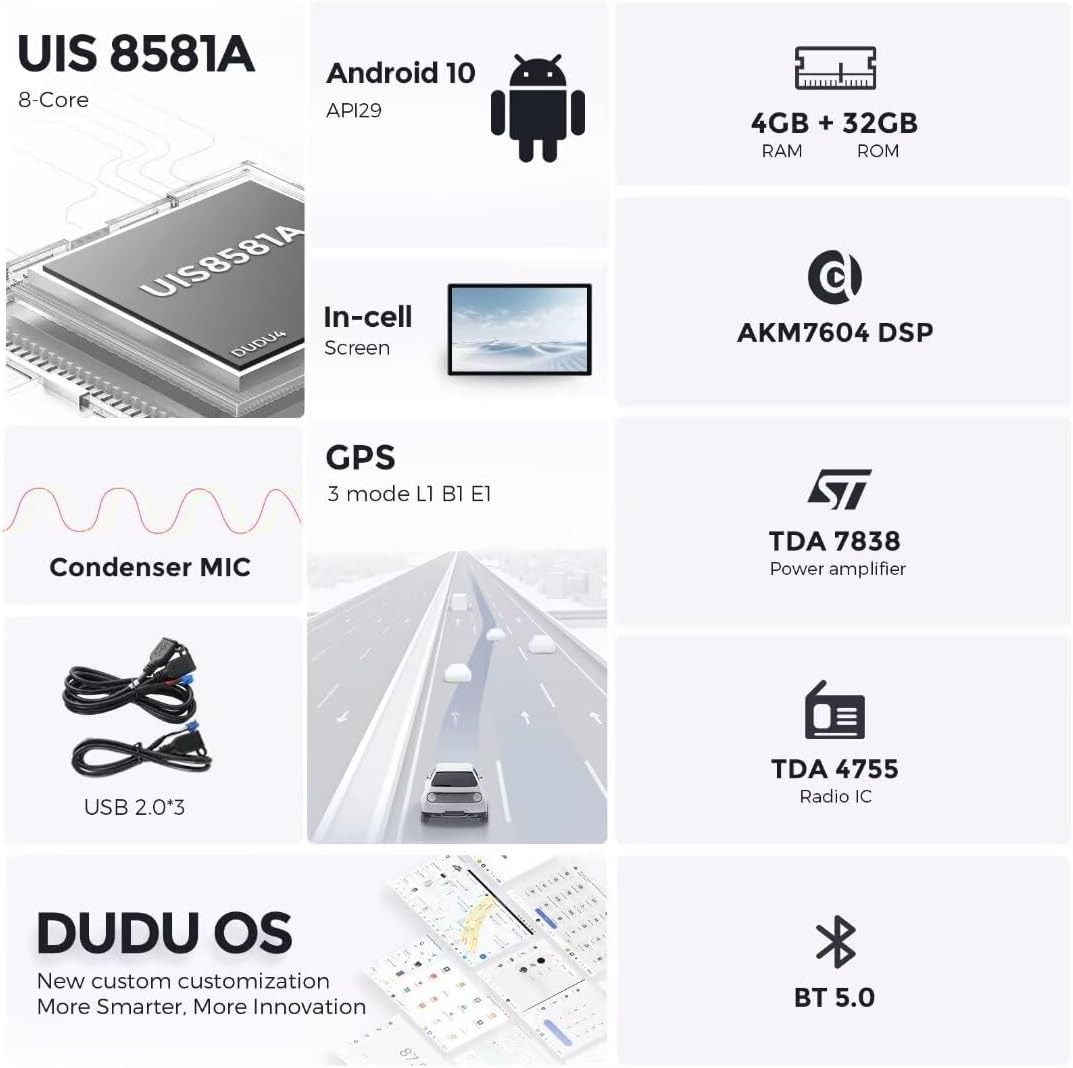
Image: An infographic detailing the core technical specifications of the DUDUAUTO DUDU4, including CPU, OS, RAM, ROM, screen type, and audio components.
| Feature | Specification |
|---|---|
| Operating System | Android 10 (DUDU OS 3.1) |
| CPU | 8-Core UIS7870 (A76 2.7GHz 6nm process) |
| RAM | 4GB |
| ROM | 64GB |
| Screen Size | 9.5 inches |
| Screen Resolution | 1280 x 720 |
| Screen Type | In-Cell Touch Screen |
| GPS | 3 mode L1 B1 E1 |
| Bluetooth | Bluetooth 5.0 |
| Wi-Fi | 5G Wi-Fi |
| Network | 4G LTE (external card slot) |
| CarPlay/Android Auto | Built-in wired + wireless |
| DSP | AK7604 |
| Power Amplifier | TDA7838 |
| Radio IC | TDA4755 |
| USB Interface | USB 2.0 * 3 |
| Audio Output | RCA 2.1 Channel |
10. Warranty and Support
For warranty information and technical support, please refer to the documentation provided with your purchase or contact Biorunn customer service. Keep your proof of purchase for warranty claims.