1. Introduction
Thank you for purchasing the KOORUI G3221SC 31.5-inch Curved Gaming Monitor. This manual provides essential information for setting up, operating, and maintaining your monitor to ensure optimal performance and longevity. Please read this manual thoroughly before using the product and keep it for future reference.

Figure 1.1: KOORUI G3221SC 31.5-inch Curved Gaming Monitor
2. Product Overview
2.1 Key Features
- Outstanding Display Image: Features a high-speed VA panel with 1440P (2560x1440) resolution, 170Hz refresh rate, 16:9 aspect ratio, 3000:1 static contrast ratio, and 300cd/㎡ brightness.
- Comfortable Gaming Experience: Achieves a 1ms MPRT response time and a maximum 170Hz refresh rate. Built-in Adaptive Sync technology minimizes lag and stuttering for ultra-smooth gameplay.
- Comfortable Viewing Experience: Includes Flicker-Free technology and a blue light cut filter for eye protection. Displays vivid images with 16.7 million colors, 3000:1 static contrast, 20 million:1 dynamic contrast, and 100% sRGB.
- Multi-functional Interface: Equipped with 2x HDMI 2.0, 1x DisplayPort 1.2, and 1x audio output ports for versatile connectivity with computers, game consoles, and laptops.
- Adjustable Design: The monitor can be adjusted from -5° to 20° tilt for ergonomic viewing.
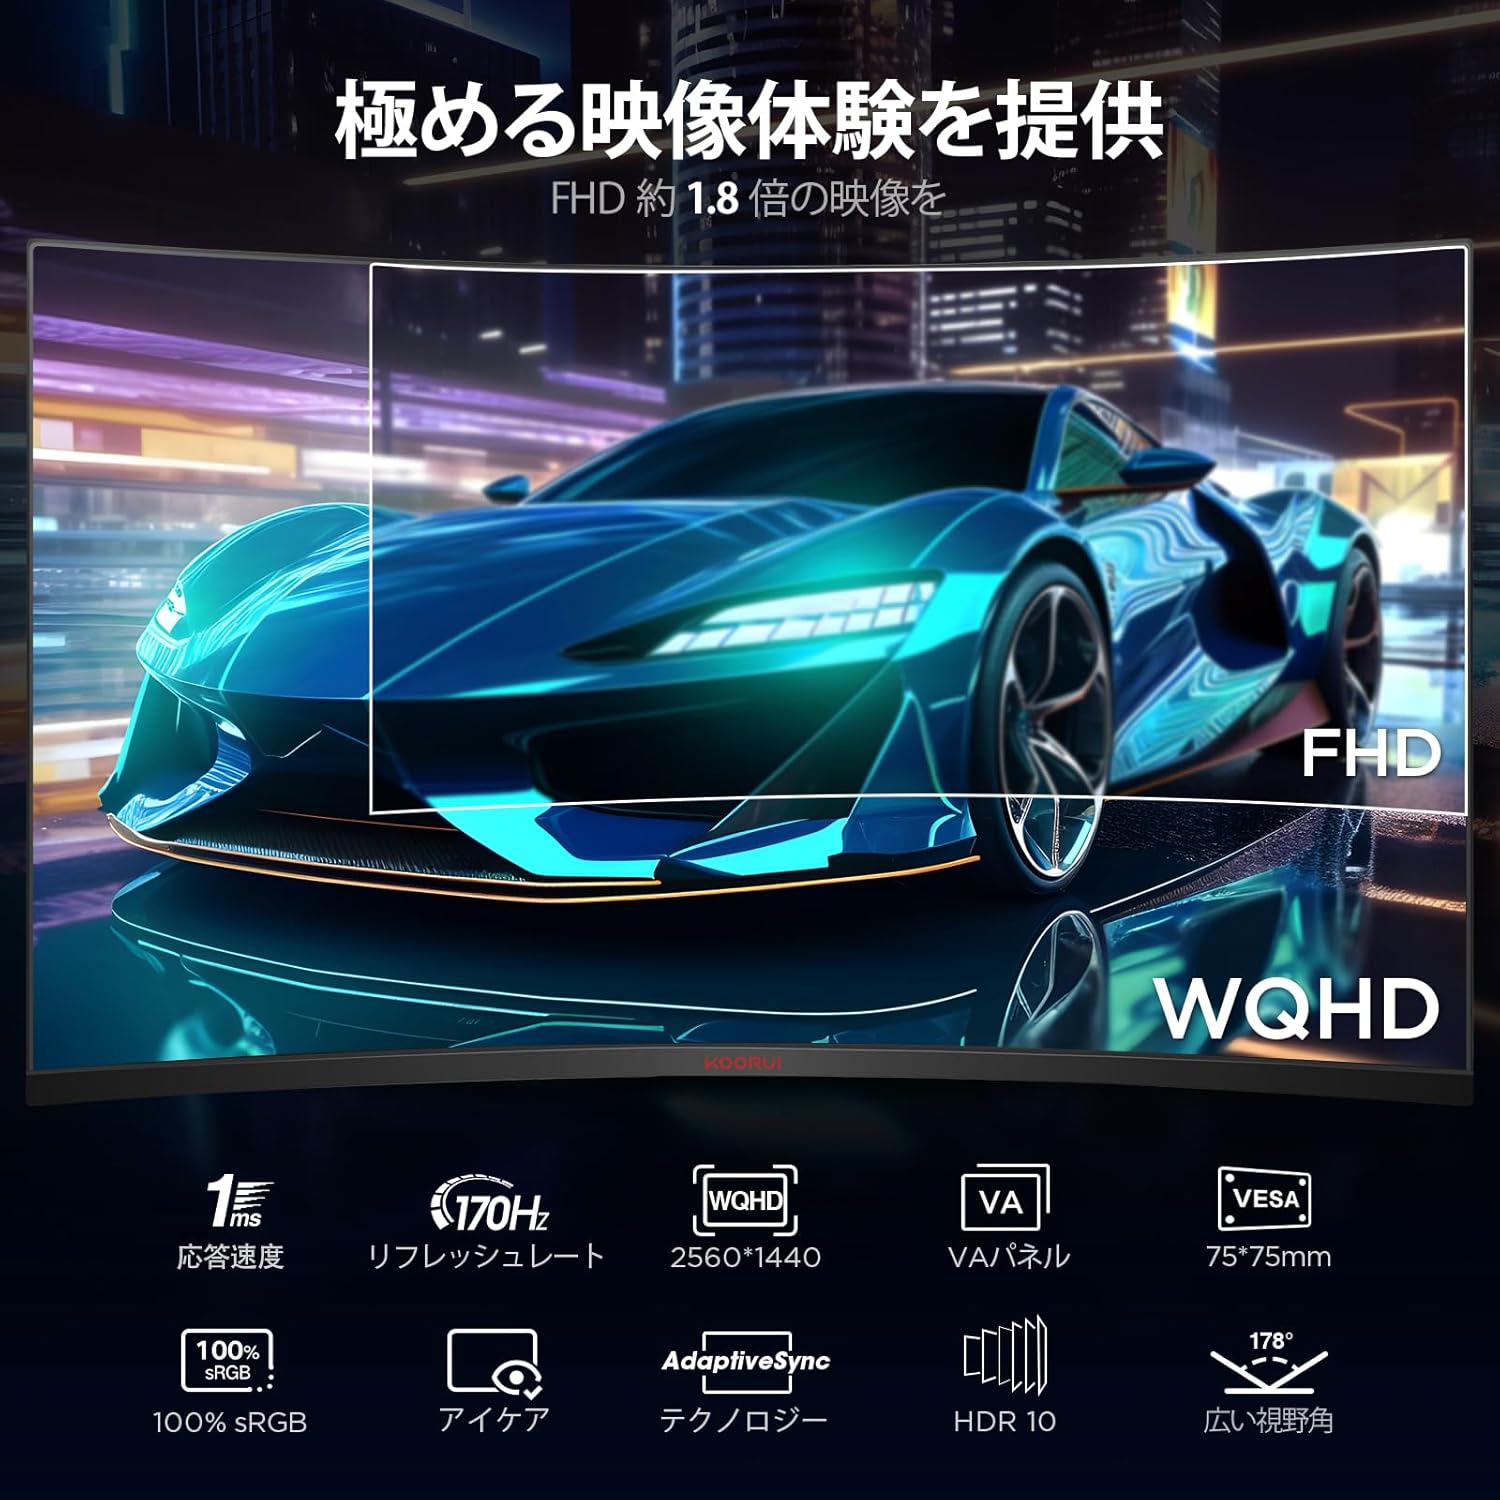
Figure 2.1: Visual representation of key features including WQHD resolution, 170Hz refresh rate, 1ms response time, VA panel, VESA compatibility, 100% sRGB, Eye Care, Adaptive Sync, HDR 10, and 178° wide viewing angle.

Figure 2.2: Visual comparison demonstrating the clarity provided by 1ms response time (left) versus a slower response time (right).
2.2 Package Contents
Please check the package contents upon unboxing. If any items are missing or damaged, contact customer support immediately.
- KOORUI G3221SC Monitor
- Monitor Stand (Base and Neck)
- Power Adapter and Cable
- HDMI Cable
- DisplayPort Cable
- User Manual (this document)
- Screws for Stand Assembly
3. Setup
3.1 Assembling the Stand
- Carefully place the monitor face down on a soft, clean surface to prevent scratches.
- Attach the stand neck to the monitor's rear panel using the provided screws.
- Attach the stand base to the stand neck and secure it with the thumb screw or designated fasteners.
- Carefully lift the assembled monitor and place it on a stable, flat surface.
3.2 VESA Mount Installation (Optional)
The monitor supports VESA 100mm x 100mm mounting for wall mounts or monitor arms.
- Remove the pre-installed stand if attached.
- Attach your VESA-compatible mount or arm to the four screw holes on the back of the monitor. Ensure proper screw length to avoid damaging internal components.

Figure 3.1: Detail of the VESA 100mm x 100mm mounting points on the monitor's rear.
3.3 Connecting to Devices
Connect the monitor to your computer or other devices using the appropriate cables.
- Power Connection: Connect the power cable to the monitor's power input and then to a power outlet.
- HDMI Connection: Use an HDMI cable to connect your device's HDMI output to one of the monitor's HDMI 2.0 ports.
- DisplayPort Connection: Use a DisplayPort cable to connect your device's DisplayPort output to the monitor's DisplayPort 1.2 port.
- Audio Output: Connect external speakers or headphones to the 3.5mm audio output jack if desired.

Figure 3.2: Rear panel connections including 2x HDMI 2.0, 1x DisplayPort 1.2, and audio jack, with integrated cable management.
4. Operating Instructions
4.1 Power On/Off
Press the power button located on the monitor to turn it on or off. The power indicator light will show the monitor's status.
4.2 On-Screen Display (OSD) Menu Navigation
The monitor features a joystick control for navigating the OSD menu. Press the joystick to open the OSD menu, then move it up/down/left/right to select and adjust settings.
4.3 Adjusting Display Settings
Access the OSD menu to customize various display settings:
- Brightness/Contrast: Adjust the overall luminance and contrast levels.
- Color Settings: Fine-tune color temperature, gamma, and individual RGB values.
- Refresh Rate: Ensure your device is set to output 170Hz for the smoothest experience. The monitor will automatically detect and display the current refresh rate.
- Response Time (MPRT): Adjust for optimal motion clarity.
- Adaptive Sync: Enable this feature for tear-free and stutter-free gaming with compatible graphics cards (FreeSync and G-Sync compatible).
- Low Blue Light: Activate to reduce blue light emission for eye comfort during long viewing sessions.
- Flicker-Free: This technology is built-in to reduce screen flickering, minimizing eye strain.
- HDR: Enable HDR10 for enhanced dynamic range and vibrant colors with compatible content.


Figure 4.1: Icons illustrating display features such as sRGB, contrast ratio, color depth, and eye care.

Figure 4.2: Visual demonstration of the difference between 75Hz and 170Hz refresh rates, highlighting smoother image reproduction at 170Hz.
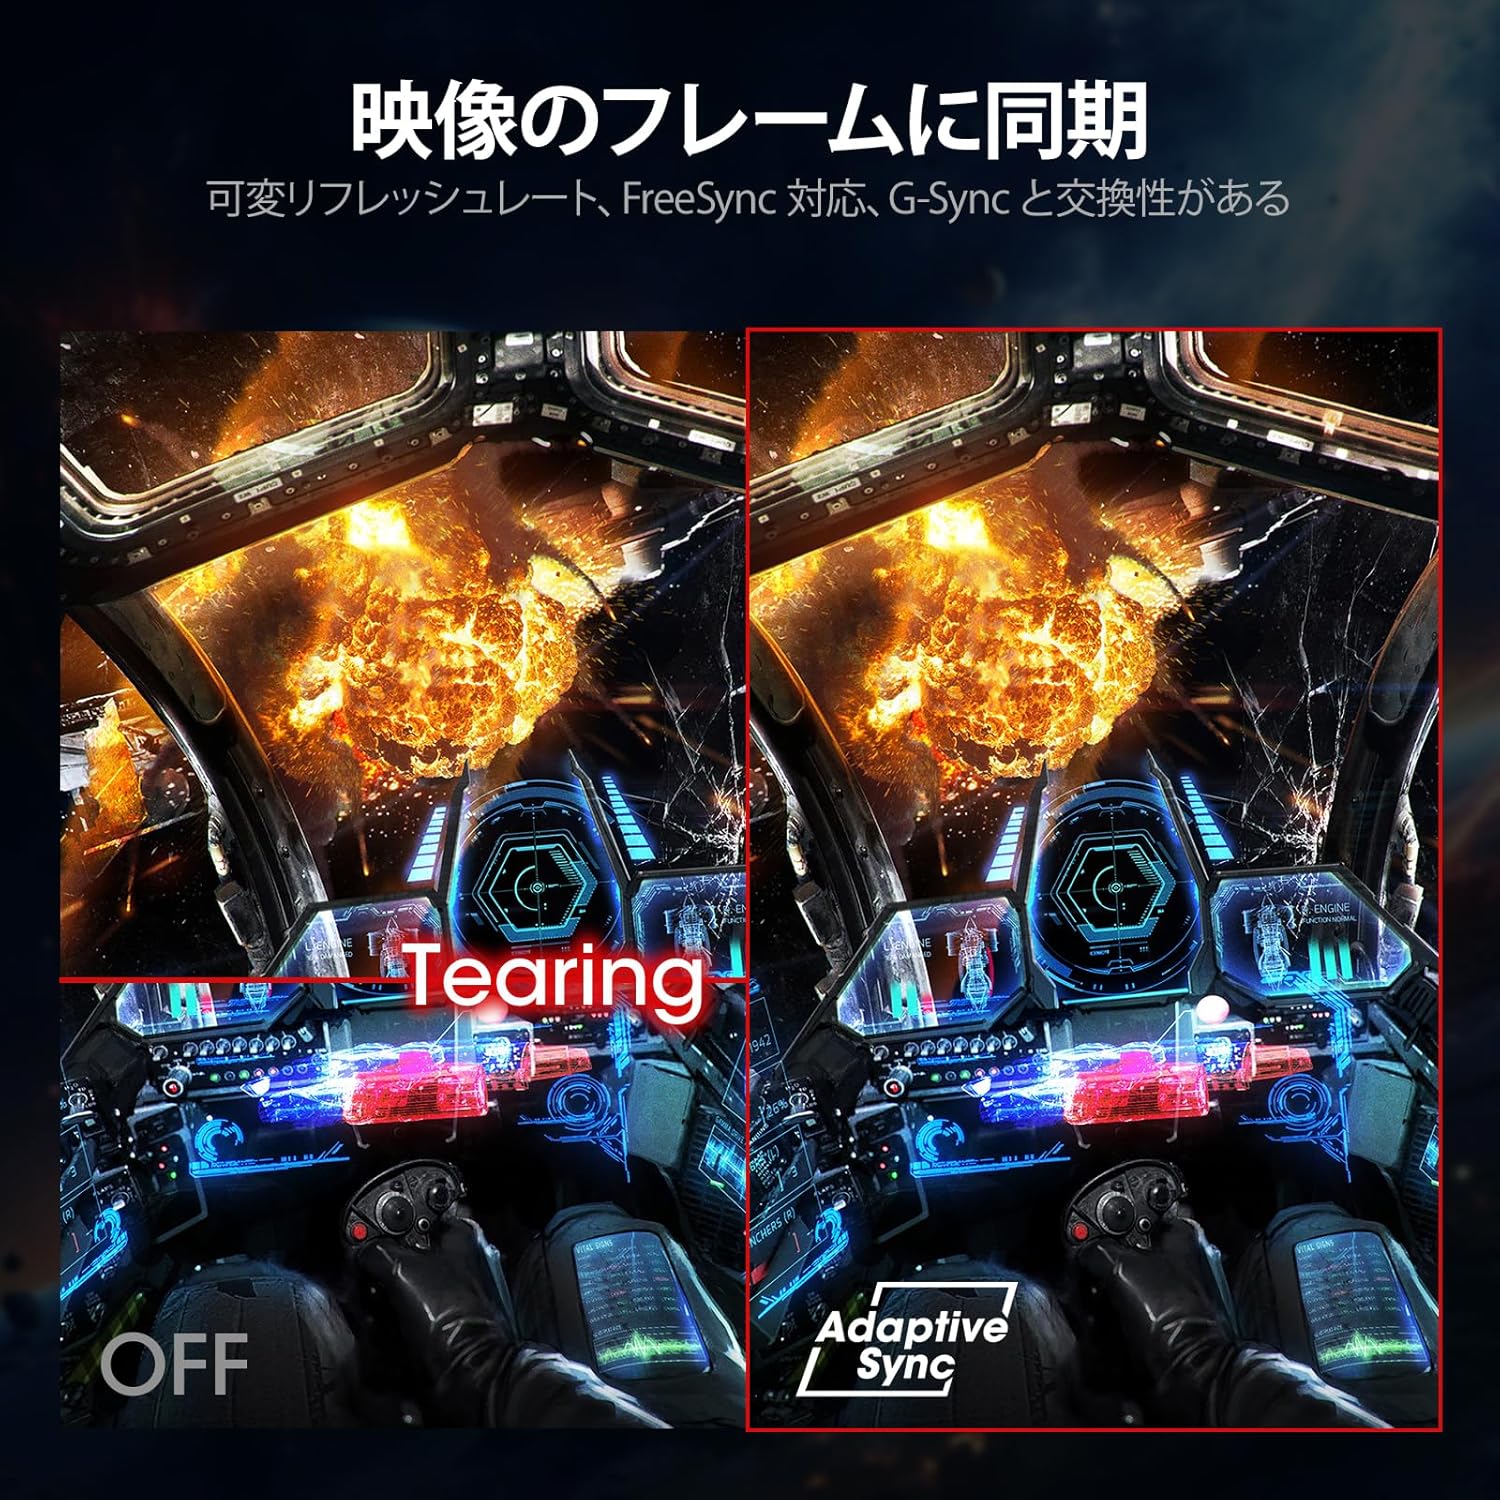
Figure 4.3: Illustration of screen tearing (left) and how Adaptive Sync eliminates it (right) for a smoother visual experience.
4.4 Gaming Console Compatibility
The KOORUI G3221SC monitor is compatible with various gaming consoles, supporting WQHD resolution at up to 170 frames per second (fps) via HDMI and DisplayPort connections.
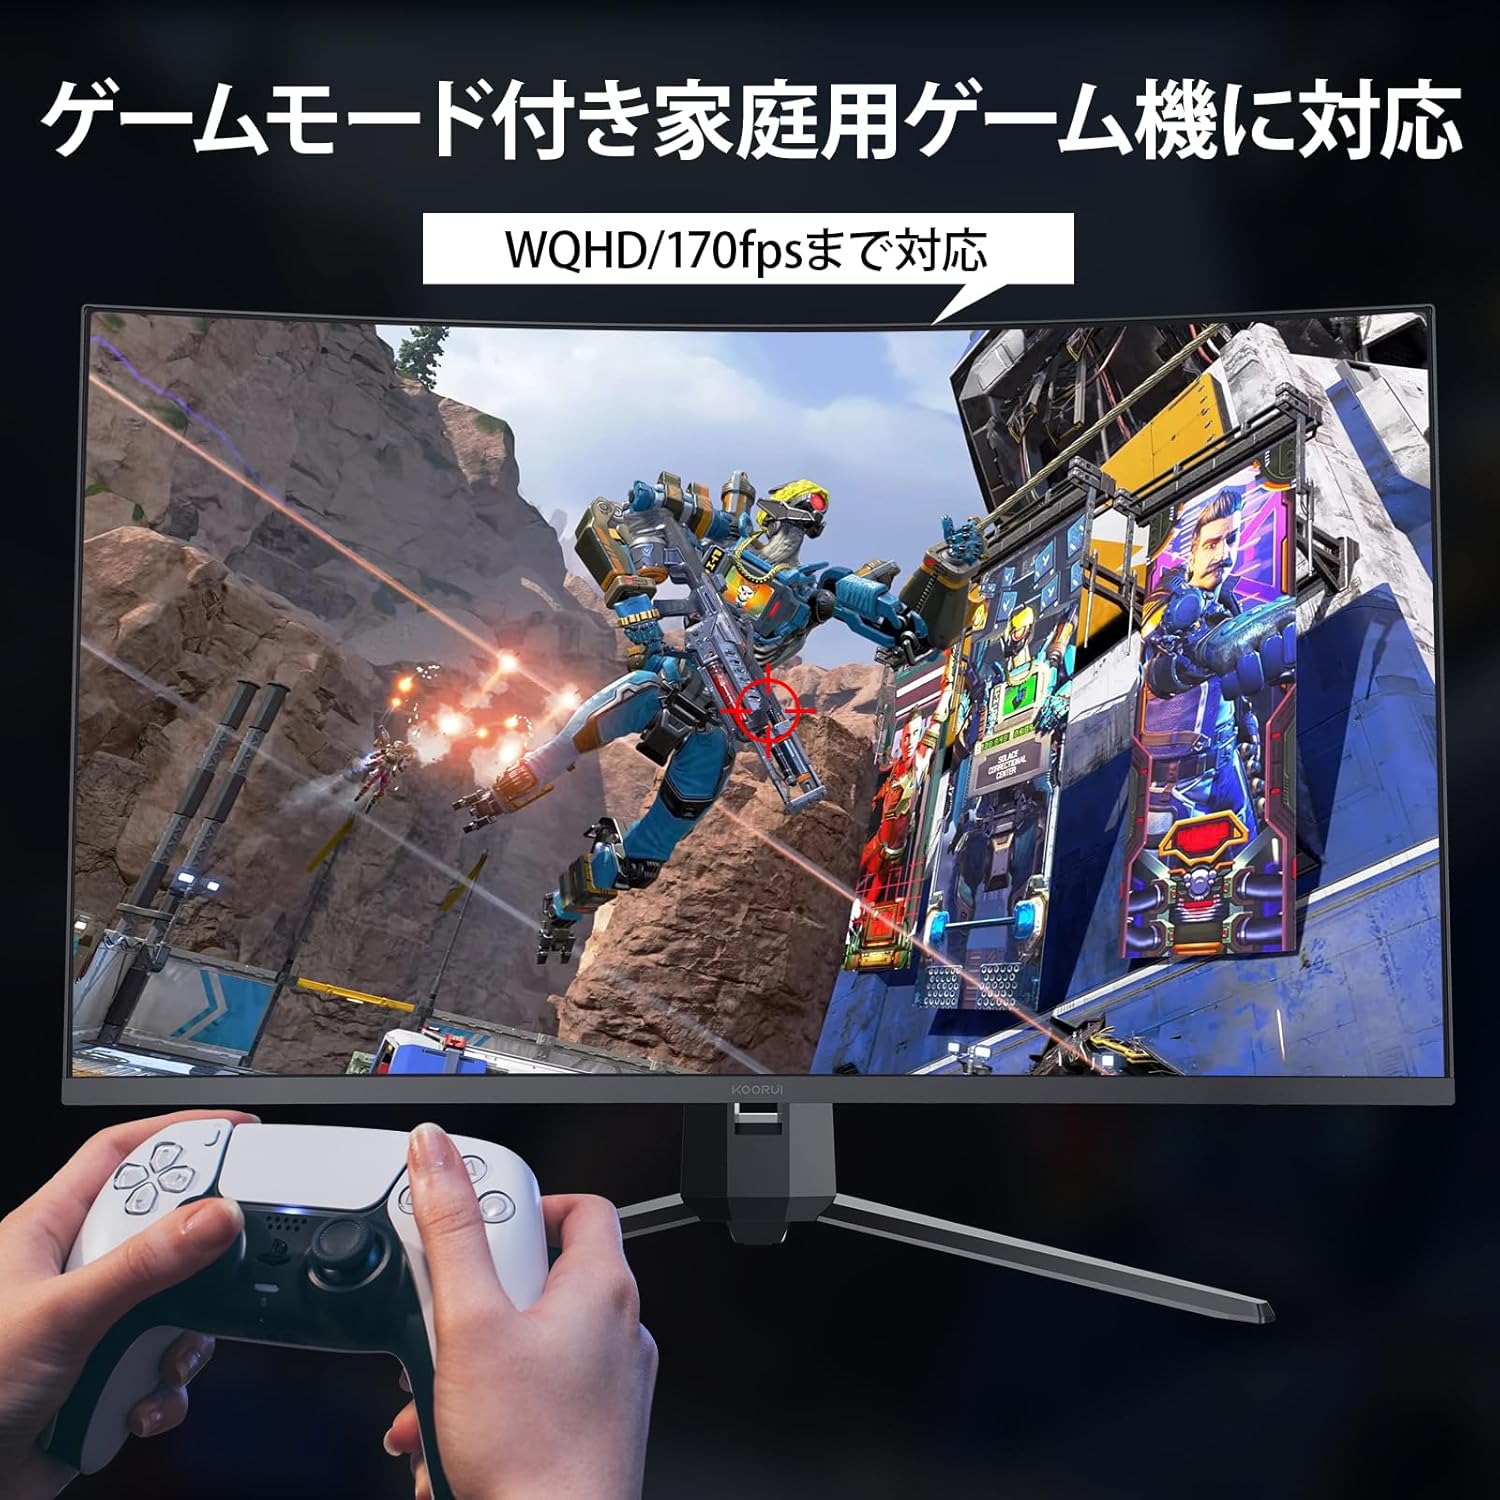
Figure 4.4: The monitor displaying a game, compatible with home gaming consoles like PS5.
5. Maintenance
Proper maintenance ensures the longevity and performance of your monitor.
- Cleaning the Screen: Gently wipe the screen with a soft, lint-free cloth. For stubborn marks, dampen the cloth with a small amount of non-ammonia, non-alcohol based screen cleaner. Do not spray cleaner directly onto the screen.
- Cleaning the Casing: Use a soft, dry cloth to wipe the monitor casing. Avoid using abrasive cleaners or solvents.
- Ventilation: Ensure the monitor's ventilation openings are not blocked. Do not place the monitor in an enclosed space without adequate airflow.
- Power Off When Not in Use: Turn off the monitor when not in use for extended periods to save energy and prolong its lifespan.
6. Troubleshooting
If you encounter issues with your monitor, refer to the following common troubleshooting steps. If the problem persists, contact KOORUI technical support.
| Problem | Possible Cause | Solution |
|---|---|---|
| No image on screen | Power cable disconnected; Video cable disconnected; Incorrect input source selected. | Check power and video cable connections; Select correct input source via OSD menu. |
| Image flickering or unstable | Video cable loose or damaged; Graphics card driver issue; Refresh rate mismatch. | Secure video cable; Update graphics drivers; Ensure refresh rate is set correctly in OS. |
| Colors appear incorrect | Color settings in OSD; Graphics card settings. | Adjust color settings in OSD; Check graphics card color calibration. |
| No audio | Audio cable disconnected; Volume too low; Incorrect audio output selected in OS. | Check audio cable; Increase volume; Select monitor as audio output in OS. |
7. Specifications
| Feature | Specification |
|---|---|
| Model | G3221SC |
| Screen Size | 31.5 inches |
| Panel Type | VA |
| Curvature | 1500R |
| Resolution | WQHD (2560 x 1440) |
| Refresh Rate | 170Hz |
| Response Time | 1ms (MPRT) |
| Aspect Ratio | 16:9 |
| Static Contrast Ratio | 3000:1 |
| Dynamic Contrast Ratio | 20,000,000:1 |
| Brightness | 300 cd/㎡ |
| Color Gamut | 100% sRGB, 16.7 Million Colors |
| Viewing Angle | 178° (H/V) |
| Connectivity | 2x HDMI 2.0, 1x DisplayPort 1.2, 1x Audio Out |
| VESA Compatibility | 100mm x 100mm |
| Tilt Adjustment | -5° to 20° |
| Dimensions (with stand) | 710mm (W) x 509mm (H) x 245mm (D) |
| Weight (with stand) | 6.6 KG |

Figure 7.1: Monitor dimensions and tilt adjustment range (-5° to 20°).
8. Warranty and Support
8.1 Warranty Information
KOORUI provides a 3-year warranty service for its computer monitors. The LCD panel itself is covered by a 1-year warranty, while other accessories are covered for 3 years.
- If a display defect occurs within 30 days of purchase, you may contact Amazon for a free return.
- If the issue arises after 30 days, you must contact KOORUI official technical support.
- If the product fails under normal use and environment, and KOORUI's technical support determines it is a malfunction, service will be provided by a local repair center in Japan.
- The shipping cost to the repair center for repairs will be borne by the customer. KOORUI will bear the return shipping cost of the monitor after repair.
8.2 Technical Support
For technical issues or inquiries, please contact KOORUI technical support:
- Email: JP.support@Koorui.net (Response within 24 hours)
- Phone: +81-5050506642 (Support hours: 9:30-17:30 JST, excluding weekends and holidays)
8.3 PC 3R Collection
KOORUI monitors are collected and recycled free of charge through the PC 3R program. You can apply for this service via the PC 3R website.


