1. Introduction
Thank you for choosing the FAHEFANA 20V Brushless Cordless Drill. This manual provides essential information for the safe and efficient operation, maintenance, and troubleshooting of your new tool. Please read this manual thoroughly before first use and keep it for future reference.

Image 1.1: The FAHEFANA 20V Brushless Cordless Drill with included accessories, including two batteries, charger, and various drill bits and screwdriver bits.
2. Safety Instructions
Always follow basic safety precautions to reduce the risk of fire, electric shock, and personal injury when using power tools.
General Power Tool Safety Warnings:
- Work Area Safety: Keep your work area clean and well-lit. Cluttered or dark areas invite accidents. Do not operate power tools in explosive atmospheres, such as in the presence of flammable liquids, gases, or dust.
- Electrical Safety: Avoid body contact with earthed or grounded surfaces. Do not expose power tools to rain or wet conditions.
- Personal Safety: Always wear eye protection. Use hearing protection when operating for extended periods. Dress properly; avoid loose clothing or jewelry. Secure long hair.
- Tool Use and Care: Do not force the power tool. Use the correct power tool for your application. Disconnect the battery pack from the power tool before making any adjustments, changing accessories, or storing power tools.
- Battery Pack Use and Care: Recharge only with the charger specified by the manufacturer. Do not use battery packs with any other power tools.
3. Package Contents
Verify that all items are present upon unpacking:
- FAHEFANA 20V Brushless Cordless Drill
- 2 x 2000mAh Lithium-ion Batteries
- 1 x Quick Charger
- 4 x Screwdriver Bits
- 3 x Twist Drill Bits
- 3 x Flat Drill Bits
- 9 x Socket Wrenches
- 1 x Socket Adapter
- 1 x Hex Screwdriver Mandrel
- 1 x Flexible Shaft Screwdriver
- User Manual

Image 3.1: A visual representation of the drill, two batteries, charger, and all 25 accessories included in the package.
4. Product Overview
Familiarize yourself with the components and features of your FAHEFANA 20V Brushless Cordless Drill.
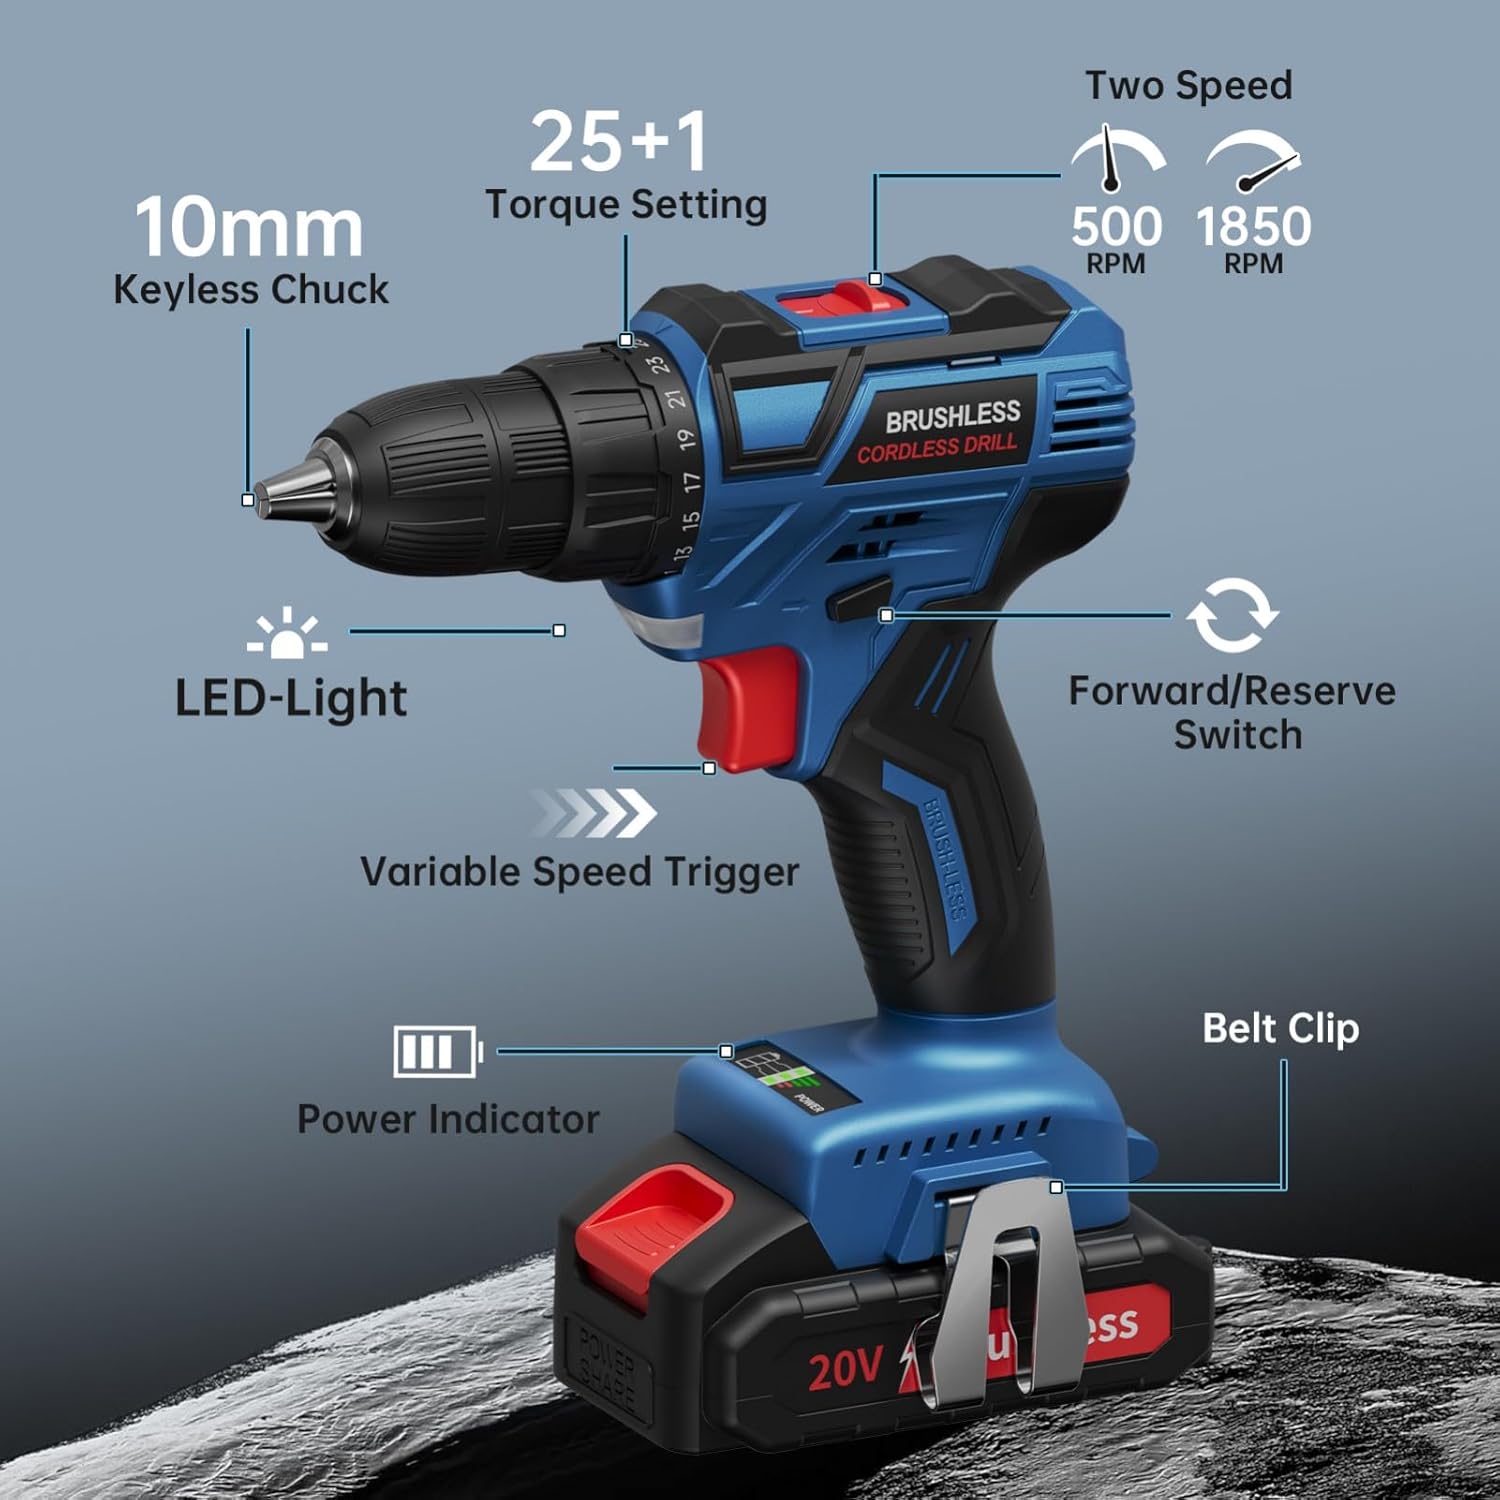
Image 4.1: A detailed diagram highlighting key components of the drill, including the 10mm Keyless Chuck, LED Light, Variable Speed Trigger, Power Indicator, Forward/Reverse Switch, Two Speed Selector, 25+1 Torque Setting, and Belt Clip.
Key Features:
- Brushless Motor: Provides up to 60 Nm of torque, enhancing safety and power output compared to traditional brushed motors.
- Dual Battery System: Includes two 2000mAh Lithium-ion batteries for extended operation and a quick charger for minimal downtime.
- Two-Speed Gearbox: Offers low speed (0-500 RPM) for driving and high speed (0-1850 RPM) for drilling.
- 25+1 Torque Settings: Allows precise torque adjustment to prevent damage to materials and fasteners.
- LED Work Light: Illuminates the work area for improved visibility in dimly lit conditions.
- 10mm Keyless Chuck: Facilitates quick and easy bit changes.
- Compact Design: Measures approximately 17.2 cm in length and 22 cm in height, making it suitable for various tasks.

Image 4.2: An internal cutaway view of the drill illustrating the brushless motor, emphasizing its compact design and efficient power delivery.

Image 4.3: A visual representation of the drill's compact size, with dimensions of 17.2cm in length and 22cm in height, demonstrating its suitability for various tasks.
5. Setup
5.1. Battery Charging
- Ensure the battery is securely inserted into the charger.
- Plug the charger into a standard power outlet.
- The charging indicator light on the charger will show the charging status. A full charge typically takes approximately one hour.
- Once fully charged, remove the battery from the charger.

Image 5.1: The FAHEFANA 20V Brushless Cordless Drill in use, with a spare 2000mAh Lithium-ion battery and charger visible in the background, illustrating the dual battery system.

Image 5.2: A visual of two batteries, one actively charging via the quick charger and another ready for immediate use, highlighting the continuous operation capability.
5.2. Attaching and Removing Accessories
- To attach a drill bit or screwdriver bit, rotate the chuck counter-clockwise to open the jaws.
- Insert the desired accessory into the chuck.
- Rotate the chuck clockwise to tighten the jaws securely around the accessory. Ensure the bit is centered and firmly held.
- To remove, rotate the chuck counter-clockwise until the jaws open sufficiently to release the accessory.
6. Operating Instructions
6.1. Selecting Speed
The drill features two speed settings, controlled by a switch located on top of the tool:
- Speed 1 (0-500 RPM): Ideal for driving screws and applications requiring higher torque and slower speed.
- Speed 2 (0-1850 RPM): Suitable for drilling and applications requiring higher speed.

Image 6.1: A visual comparison demonstrating the drill operating at low speed (0-500 RPM) for driving screws and high speed (0-1850 RPM) for drilling.

Image 6.2: The drill being used for a screwdriver application, indicating the recommended 0-500 RPM setting for such tasks.

Image 6.3: The drill being used for a drilling application, indicating the recommended 0-1850 RPM setting for such tasks.
6.2. Adjusting Torque (Clutch Settings)
The 25+1 torque ring allows you to adjust the amount of torque applied. This prevents over-tightening screws or stripping screw heads, and helps avoid damage to the workpiece.
- Rotate the torque adjustment ring to select the desired setting. Lower numbers are for smaller screws and softer materials, while higher numbers are for larger screws and harder materials.
- The drill setting (indicated by a drill bit icon) bypasses the clutch for maximum torque, suitable for drilling applications.
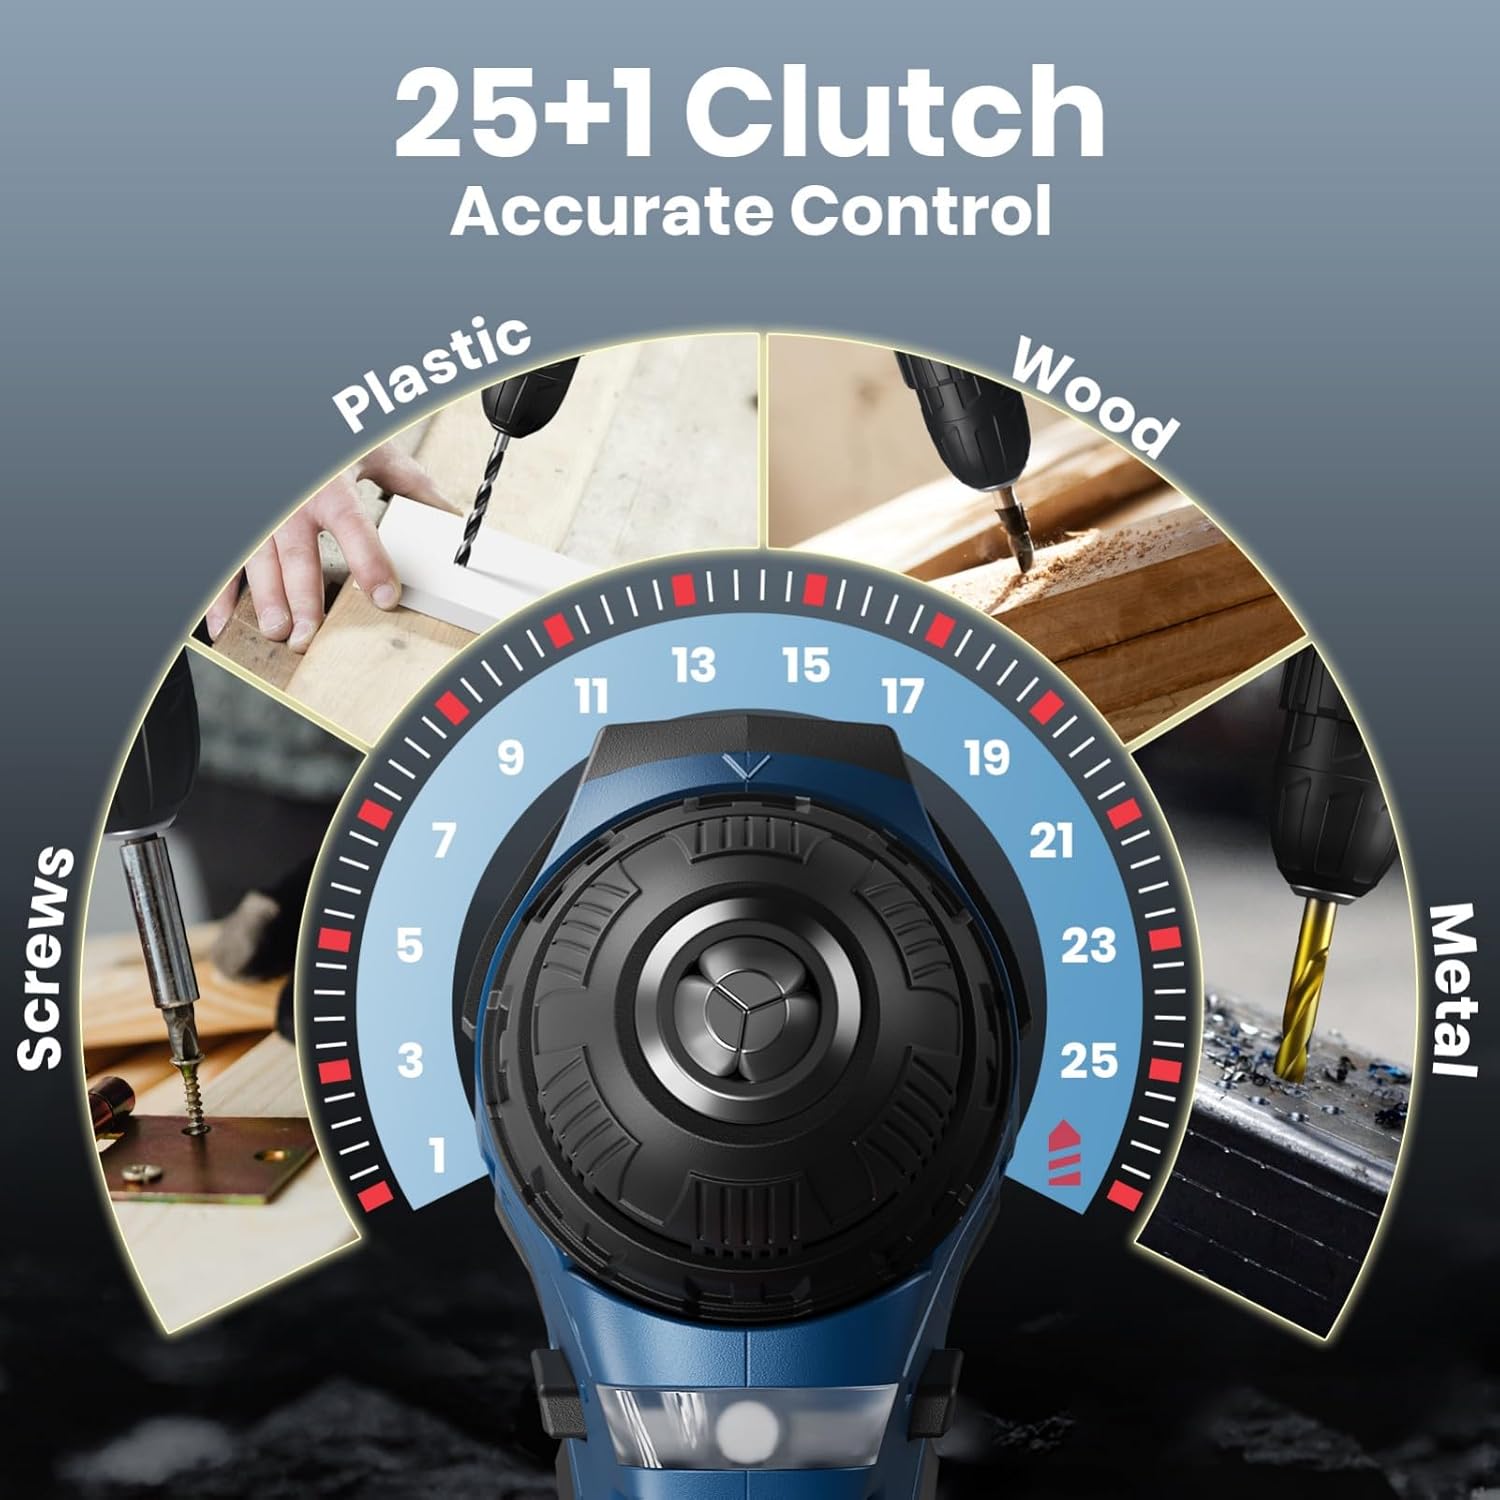
Image 6.4: A visual guide to the 25+1 clutch settings, showing recommended settings for different materials like plastic, wood, metal, and for driving screws.

Image 6.5: A close-up view of the drill's 25+1 torque adjustment ring, illustrating the infinitely variable speed control and precise torque settings.
6.3. Forward/Reverse Switch
The forward/reverse switch, located above the trigger, controls the direction of rotation. Push it to the left for forward rotation (driving screws/drilling) and to the right for reverse rotation (removing screws/backing out bits). Center position locks the trigger for safety.
6.4. Variable Speed Trigger
The trigger allows for variable speed control. Pressing the trigger further increases the speed. This provides precise control for starting holes or driving screws.
6.5. LED Work Light
The integrated LED light automatically illuminates when the trigger is pressed, providing visibility in dark or confined work areas.
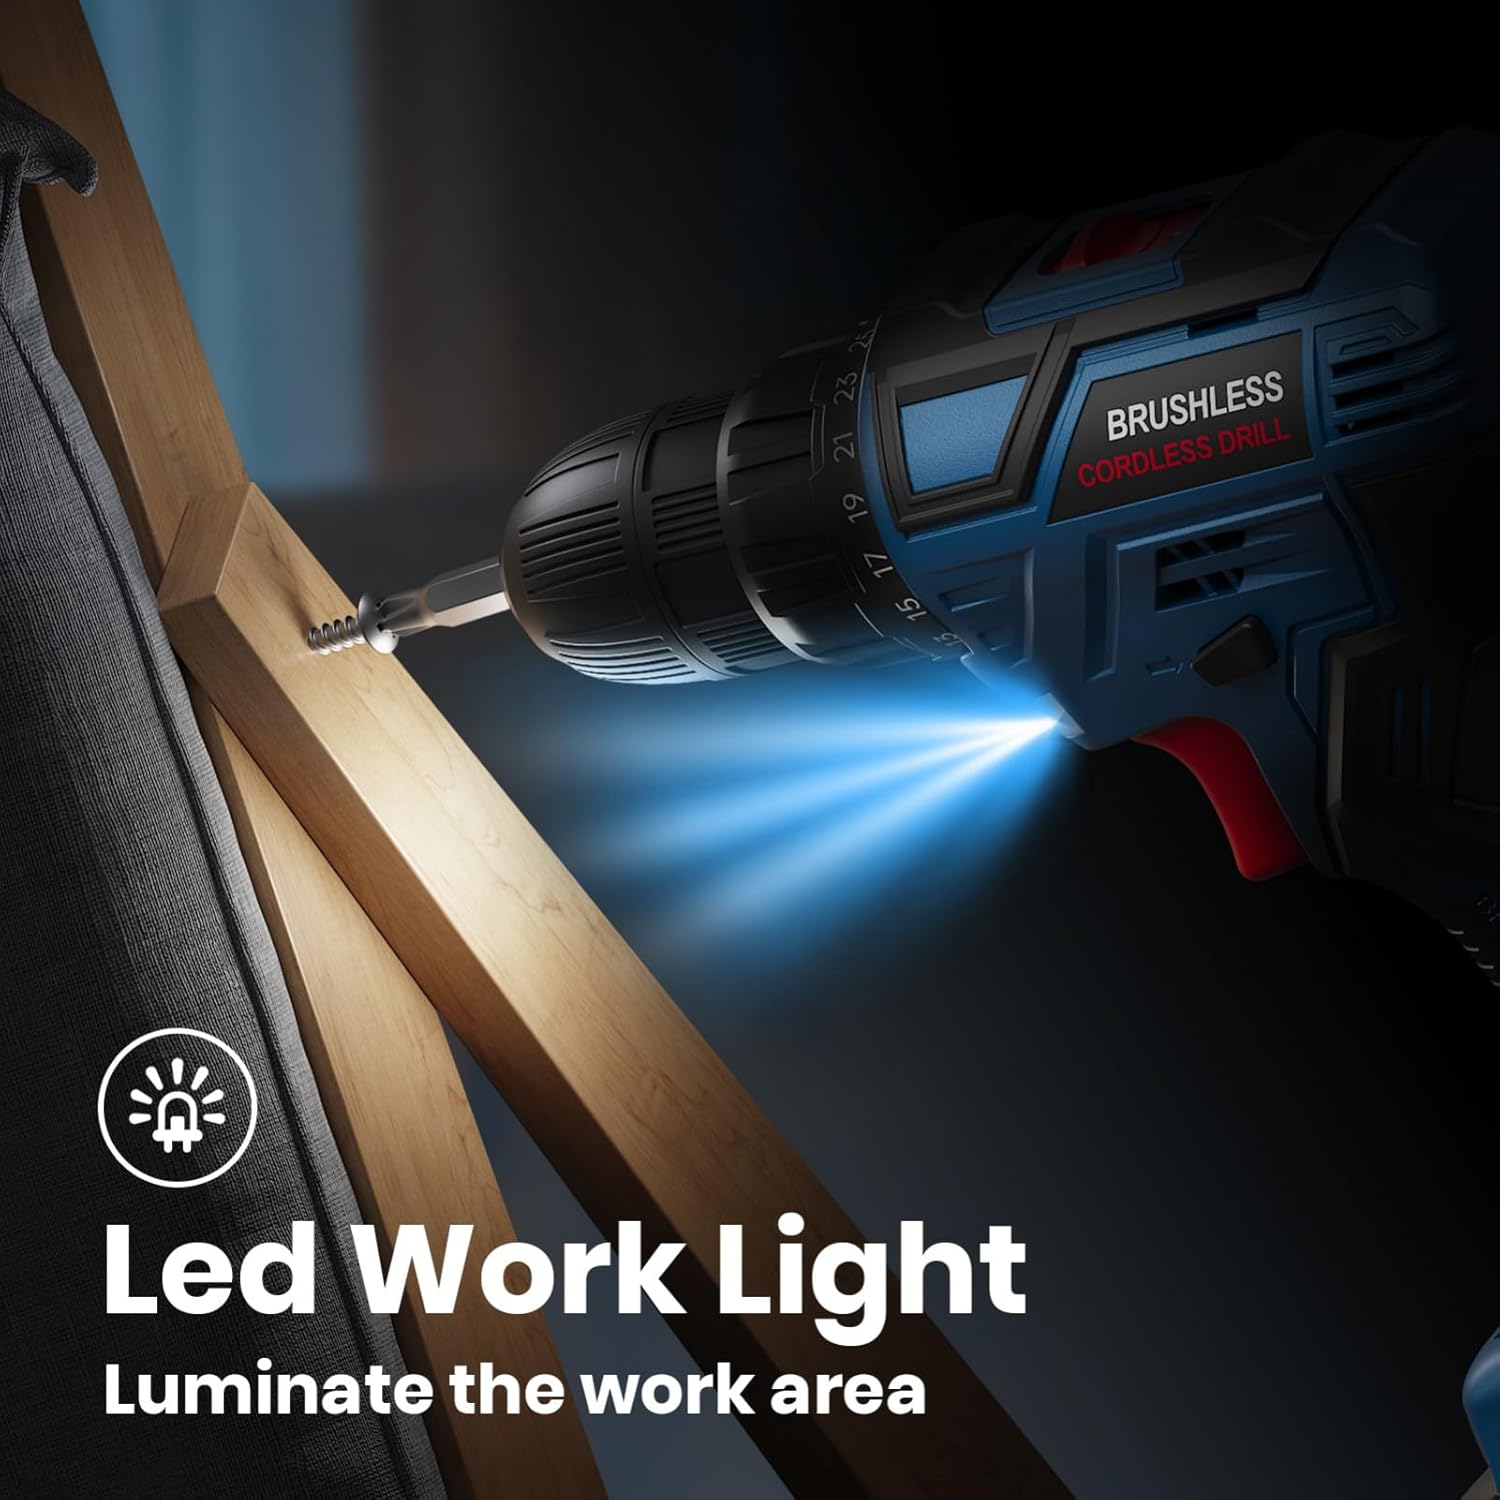
Image 6.6: The drill's LED work light actively illuminating the area where a screw is being driven into wood, enhancing visibility.

Image 6.7: A user operating the drill with the flexible shaft attachment, demonstrating how the LED light aids in working in dark and confined spaces.
7. Maintenance
7.1. Cleaning
- Always disconnect the battery pack before cleaning.
- Use a clean, damp cloth to wipe down the exterior of the tool. Do not use harsh chemicals or abrasive cleaners.
- Keep the ventilation openings clear of dust and debris to prevent overheating.
7.2. Battery Care
- Store batteries in a cool, dry place away from direct sunlight and extreme temperatures.
- Do not store batteries in a discharged state for extended periods. Recharge them periodically if not in use.
- Avoid dropping or subjecting batteries to impact.
8. Troubleshooting
| Problem | Possible Cause | Solution |
|---|---|---|
| Drill does not start | Battery not charged or improperly inserted. Forward/reverse switch in center (locked) position. | Charge battery and ensure it is fully inserted. Move forward/reverse switch to forward or reverse position. |
| Insufficient power/torque | Battery low. Torque setting too low. Incorrect speed setting. | Recharge battery. Increase torque setting. Select higher speed for drilling or lower speed for driving. |
| Bit wobbles or falls out | Chuck not tightened properly. Bit shank damaged. | Retighten chuck firmly. Replace damaged bit. |
| Overheating | Blocked ventilation slots. Continuous heavy use. | Clear ventilation slots. Allow tool to cool down. Reduce load. |
9. Specifications
| Feature | Specification |
|---|---|
| Brand | FAHEFANA |
| Model Number | 20VDZ |
| Voltage | 20V |
| Max Torque | 60 Nm |
| No-Load Speed (Low) | 0-500 RPM |
| No-Load Speed (High) | 0-1850 RPM |
| Torque Settings | 25+1 |
| Chuck Size | 10mm (3/8") Keyless |
| Battery Type | Lithium-ion |
| Battery Capacity | 2000 mAh |
| Power Source | Battery Powered |
| Product Dimensions | 21 x 8 x 25 cm |
| Item Weight | 2.56 kg |
| Material | Metal |
| Special Features | Compact, Quick-release chuck, Adjustable mode, Speed lock button, LED Light |
10. Warranty and Support
For warranty information or technical support, please refer to the documentation included with your purchase or contact FAHEFANA customer service through the retailer where the product was purchased. Keep your proof of purchase for any warranty claims.