1. Introduction
This manual provides detailed instructions for the installation, operation, and maintenance of your Generic 10-inch HD Multi-Function Touch Screen Car Recorder. Please read this manual thoroughly before using the device to ensure proper functionality and safety. This device is designed to record video footage from the front and rear of your vehicle, offering enhanced security and peace of mind.
2. Product Overview
The Generic 10-inch HD Multi-Function Touch Screen Car Recorder is a comprehensive vehicle recording system featuring a large touch screen display, front and rear cameras, and Wi-Fi connectivity. It is designed to capture high-definition video, providing clear evidence in case of incidents.
Key Features:
- 10-inch HD Touch Screen Display: Provides an intuitive interface for easy operation and clear viewing.
- Front and Rear Camera Recording: Offers comprehensive coverage of your vehicle's surroundings.
- Full HD 1080P Video Quality: Ensures crisp and detailed recordings.
- Wi-Fi Connectivity: Allows for seamless sharing and streaming of footage to your devices.
- G-Sensor: Automatically locks video files upon impact to prevent overwriting.
- Loop Recording: Continuously records by overwriting the oldest files when the memory card is full.
- Motion Detection: Initiates recording when motion is detected while parked, enhancing vehicle security.
- Adjustable Rear View Angle: Customize the rear camera's viewing perspective.
- Streaming Media Rear Camera: Provides a clear, real-time view from the rear camera on the display.

Image 2.1: The Generic 10-inch HD Multi-Function Touch Screen Car Recorder, showing the main unit and a separate rear camera. The display shows a split view of front and rear camera feeds.

Image 2.2: Visual representation of key features: G-Sensor for impact detection, Loop Recording for continuous recording, Motion Detection for parking surveillance, and Anti-Shake for stable video.
3. Setup Instructions
3.1 Unboxing and Component Identification
Carefully unpack all components from the box. Verify that all items listed in the packing list are present.

Image 3.1: The complete package contents, including the main dash cam unit, rear camera, power cable, USB cable, mounting straps, and user manual.
3.2 Memory Card Installation
- Ensure the device is powered off.
- Locate the TF Card Slot on the top edge of the main unit.
- Insert a high-speed (Class 10 or higher) microSD card into the slot until it clicks into place.
- To remove, gently push the card in again until it springs out.
3.3 Mounting the Main Unit
- Attach the main dash cam unit to your vehicle's existing rearview mirror using the provided rubber straps. Ensure it is securely fastened and does not obstruct your view.
- Adjust the front camera lens to capture the desired view of the road ahead.
3.4 Rear Camera Installation
- Mount the rear camera at the back of your vehicle, typically above the license plate or inside the rear window. Ensure it has a clear view.
- Route the rear camera cable discreetly through the vehicle's interior to the main dash cam unit.
- Connect the rear camera cable to the 'Rear Pull Hole' port on the main unit.
3.5 Power Connection
- Connect the car charger to the USB Hole port on the main unit.
- Plug the car charger into your vehicle's 12V power outlet (cigarette lighter socket).
- The device will typically power on automatically when the vehicle starts and power off when the vehicle is turned off.
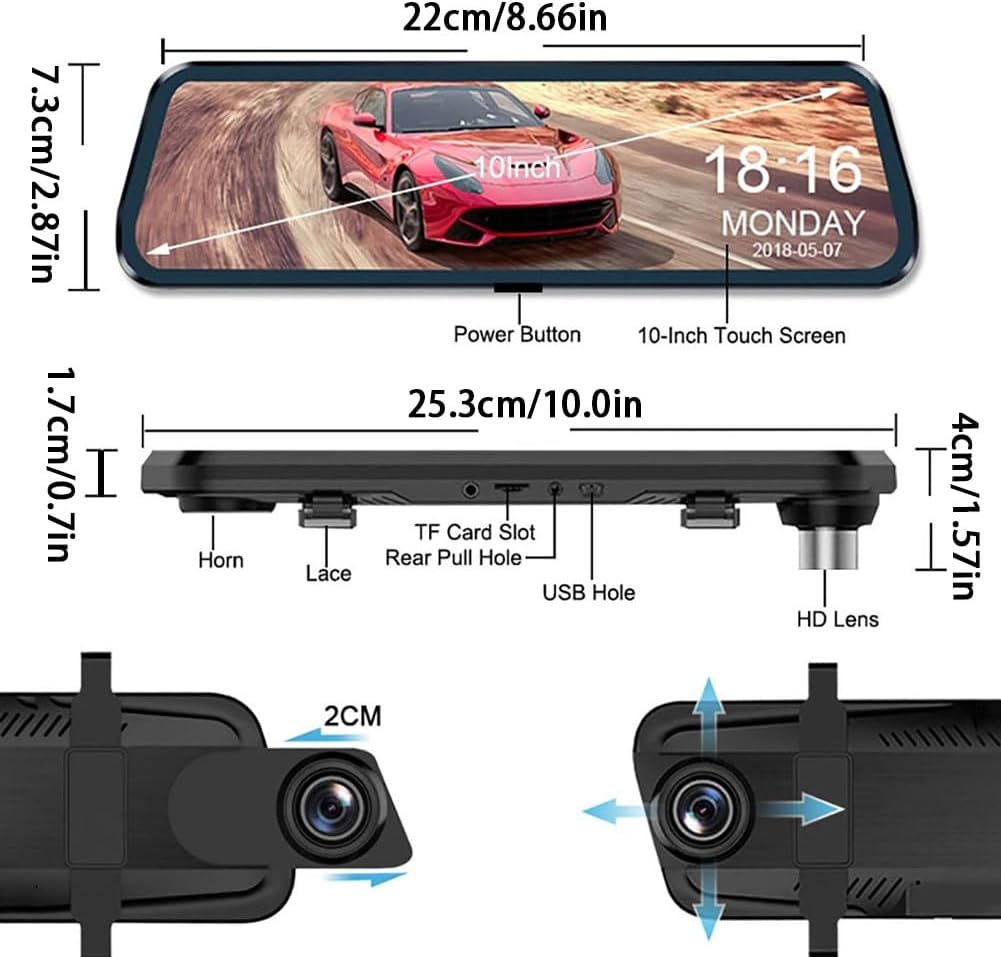
Image 3.2: Detailed view of the dash cam's dimensions and port locations, including the Power Button, 10-inch Touch Screen, TF Card Slot, Rear Pull Hole, USB Hole, and HD Lens.
4. Operating Instructions
4.1 Basic Operation
- Power On/Off: The device typically powers on and off with the vehicle ignition. You can also manually power it on/off using the Power Button.
- Touch Screen Control: Navigate menus and settings by touching the 10-inch display. Swipe gestures may be used for certain functions.
- Recording: Once powered on and a memory card is inserted, the device will automatically begin loop recording.

Image 4.1: The 10-inch touch screen display, demonstrating its interactive capabilities for convenient operation.
4.2 Recording Modes and Features
- Loop Recording: Records video in segments (e.g., 1, 3, or 5 minutes). When the memory card is full, the oldest unlocked files are overwritten.
- G-Sensor (Emergency Recording): In the event of a sudden impact or collision, the G-Sensor will automatically detect it and lock the current video file, preventing it from being overwritten by loop recording.
- Motion Detection: When enabled, the camera will automatically start recording if it detects movement in front of the vehicle while parked. This feature requires a continuous power supply (e.g., hardwire kit, not included).
- Parking Monitoring: Similar to motion detection, this feature monitors your vehicle while parked.
- Adjustable Rear View: On the touch screen, you can often swipe or tap to adjust the vertical angle of the rear camera display for optimal viewing.
4.3 Wi-Fi Connectivity
The Wi-Fi feature allows you to connect your smartphone or tablet to the dash cam via a dedicated app (app name not specified, refer to product packaging or on-screen instructions for app details). This enables you to:
- View live footage.
- Download recorded videos to your device.
- Adjust settings remotely.
5. Maintenance
- Cleaning the Lenses and Screen: Use a soft, lint-free cloth to gently wipe the camera lenses and the touch screen. Avoid abrasive cleaners or solvents.
- Memory Card Management: It is recommended to format the microSD card periodically (e.g., once a month) to ensure optimal performance and prevent data corruption. This can usually be done through the device's settings menu.
- Temperature Considerations: Avoid exposing the device to extreme temperatures for extended periods. The operating temperature range is -20°C to +70°C (-4°F to +158°F).
6. Troubleshooting
If you encounter issues with your car recorder, please refer to the following common problems and solutions:
- Device does not power on:
- Check if the car charger is properly connected to both the device and the vehicle's 12V outlet.
- Ensure the vehicle's 12V outlet is functioning (test with another device).
- Press and hold the power button for a few seconds.
- Recording stops or does not start:
- Ensure a compatible microSD card is inserted and properly formatted.
- Check if the memory card is full. Format the card if necessary (back up important files first).
- Verify that loop recording is enabled in the settings.
- Rear camera not displaying:
- Check the connection of the rear camera cable to the main unit.
- Ensure the rear camera itself is not damaged.
- Wi-Fi connection issues:
- Ensure Wi-Fi is enabled on the dash cam and your smartphone.
- Restart both the dash cam and your smartphone.
- Ensure you are using the correct app and password (if applicable).
- Poor video quality (Daytime/Nighttime):
- Clean the camera lenses.
- Ensure the protective film has been removed from the lenses.
- Check video resolution settings; ensure it is set to 1080P FHD.

Image 6.1: Example footage showing the clarity of recordings during both daytime and nighttime conditions.
7. Specifications
| Feature | Specification |
|---|---|
| Model Name | FLSABAACF-1SET |
| Display Size | 10 inches |
| Video Resolution | FHD 1080P |
| Working Temperature | -20°C to +70°C (-4°F to +158°F) |
| Functions | Reversing Image, Motion Detection, Loop Recording, Front and Rear Recording |
| Dimensions (Main Unit) | 22cm x 7.3cm (8.66in x 2.87in) |
| Item Weight | 821 Grams (1.81 pounds) |
8. Warranty and Support
This product is offered by Generic. For specific warranty information, please refer to the documentation included with your purchase or contact the seller directly. Protection plans may be available for purchase separately to extend coverage beyond the standard return period.
For technical support or further assistance, please contact your retailer or the manufacturer's customer service as indicated on the product packaging or purchase receipt.