
SMARTSTANDARD BZD16G3WT
SMARTSTANDARD Bifold Door Instruction Manual
Model: BZD16G3WT
Introduction
This manual provides comprehensive instructions for the installation, operation, and maintenance of your SMARTSTANDARD Bifold Door. Please read this manual thoroughly before beginning installation to ensure proper setup and safe use of the product. Retain this manual for future reference.
Product Features
- Space-Saving Design: Ideal for small spaces, suitable for closets, laundry rooms, living rooms, bedrooms, and bathrooms.
- Optimal Dimensions: Designed for 32" x 80" door openings, with individual door panels measuring 15.8" (W) x 78" (H).
- Privacy with Light: Features frosted tempered glass that allows light to pass through while providing privacy.
- Durable Construction: Water-proof PVC surface and tempered frosted glass for longevity.
- Easy Installation: Includes two assembled doors and a complete hardware kit with step-by-step instructions.
Specifications
| Attribute | Detail |
|---|---|
| Brand | SMARTSTANDARD |
| Model Number | BZD16G3WT |
| Color | White |
| Material | Glass, PVC |
| Product Dimensions | 0.8 x 32 x 80 inches (for 32"x80" opening) |
| Item Weight | 50.2 pounds |
| Assembly Required | Yes |
| Included Components | Assembled doors, hardware kit, installation instructions |
Setup and Installation
The SMARTSTANDARD Bifold Door is designed for straightforward installation. Please ensure you have all components listed in the "Included Components" section before starting. Refer to the provided step-by-step installation instructions included in your hardware kit for detailed guidance.
Required Tools (Not Included)
- Measuring Tape
- Pencil
- Drill
- Screwdriver (Phillips head recommended)
- Level
- Hammer
Component Overview

Image: Overview of the assembled doors and the complete hardware kit, including pivots, hinges, track, and fasteners.
Installation Steps Summary
- Prepare the Opening: Ensure your door opening measures 32" x 80" and is clean and clear of obstructions.
- Install the Track: Securely mount the top track within the door frame. The track is designed for precision extrusion molding and can support up to 150 lbs.
- Attach Hinges and Pivots: Install the hinges to connect the door panels and attach the pivot hardware to the top and bottom of the door panels.
- Hang the Door: Carefully lift and insert the top pivot into the track, then engage the bottom pivot into its bracket.
- Adjust and Secure: Adjust the door's height using the equipped wrench (up to 7mm) and ensure smooth operation. Lock the bracket to secure the door in place.

Image: Visual representation of key installation steps: installing the track, attaching hinges, hanging the door, and locking the bracket.

Image: Detailed view of the high-quality box rail system, highlighting the internal convex rail, upgraded nylon bearings, and quick locking tab for easy removal and adjustment.
Operating Instructions
The SMARTSTANDARD Bifold Door operates by folding inward or outward along its track. To open, gently pull the door panels. To close, push the panels together until they meet. Ensure no obstructions are in the path of the door panels during operation.
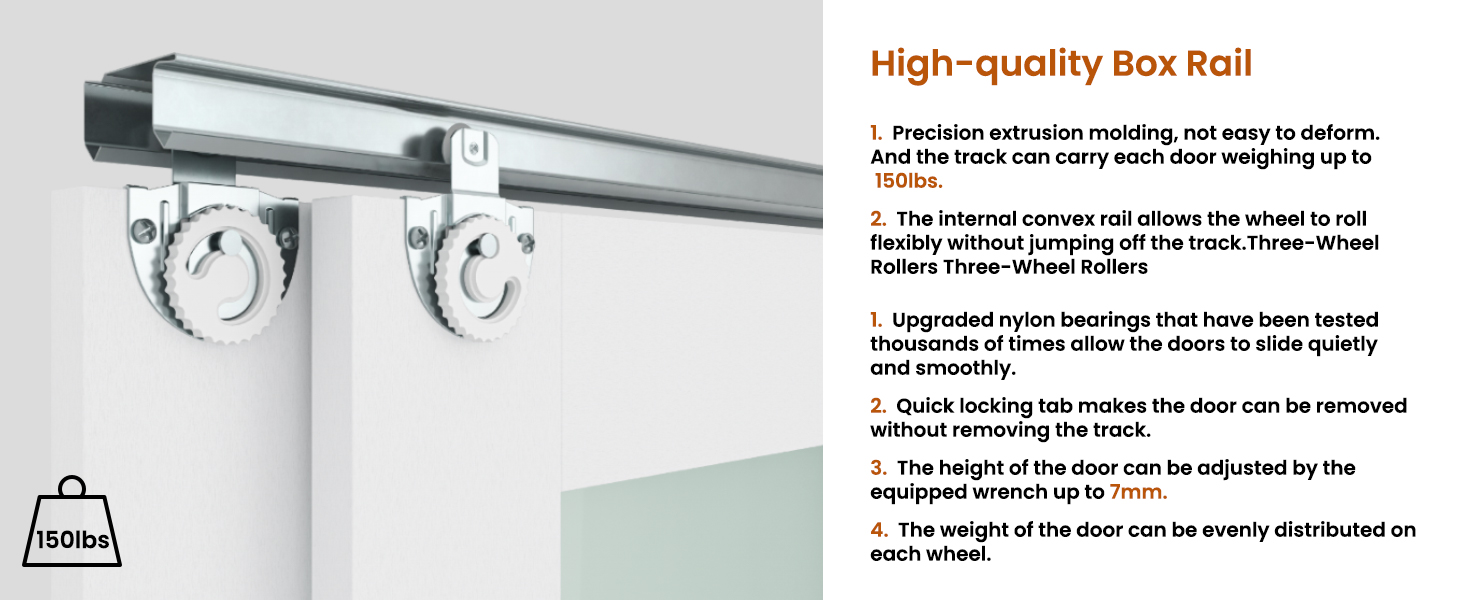
Image: Demonstrations of the bifold door in various states: fully opened, half closed, and fully closed, illustrating its operational flexibility.
Maintenance
Regular maintenance will ensure the longevity and smooth operation of your bifold door.
- Cleaning: The water-proof PVC surface and frosted glass are easy to clean. Use a soft, damp cloth with mild soap and water. Avoid abrasive cleaners or harsh chemicals that could damage the finish or glass.
- Track and Hardware: Periodically inspect the top track and all hardware components for any debris or signs of wear. Keep the track clear to ensure smooth gliding. Lubricate moving parts with a silicone-based lubricant if any squeaking or stiffness occurs.
- Glass Care: While the glass is tempered, avoid strong impacts. Clean glass panels with a glass cleaner for streak-free results.

Image: Visual indicators highlighting key product attributes: frosted glass, easy to clean surface, scratch-resistant properties, and water-proof design.
Troubleshooting
If you encounter any issues with your SMARTSTANDARD Bifold Door, refer to the following common problems and solutions:
| Problem | Possible Cause | Solution |
|---|---|---|
| Door does not slide smoothly. | Debris in track, worn rollers, misaligned track. | Clean track, check rollers for damage, ensure track is level and securely mounted. |
| Door panels rub against each other or frame. | Incorrect pivot adjustment, misaligned door frame. | Adjust top and bottom pivots. Verify door frame is square and plumb. |
| Door does not close completely. | Obstruction, misaligned bottom bracket. | Check for obstructions. Adjust the bottom bracket to allow full closure. |
| Door feels loose or wobbly. | Loose hardware, worn pivots. | Tighten all screws on hinges, pivots, and track. Replace worn components if necessary. |
Warranty and Support
SMARTSTANDARD is committed to providing quality products and customer satisfaction. For any questions regarding your purchase, installation assistance, or product support, please contact our customer service team.
While specific warranty details are not provided in this manual, please refer to your purchase documentation or contact SMARTSTANDARD customer service for information on warranty coverage and claims.
Contact Information: Please refer to the contact details provided on your product packaging or the official SMARTSTANDARD website for the most current support information.
Related documentsBZD16G3WT

Ask a question about this manual
Ask about setup, troubleshooting, compatibility, parts, safety, or missing instructions. Manuals+ will review the question and use this page’s manual context to help answer it.