THERUN TR06
THERUN Incline Treadmill User Manual
Model: TR06
1. Introduction
Thank you for choosing the THERUN Incline Treadmill. This manual provides essential information for the safe and efficient operation, assembly, and maintenance of your new fitness equipment. Please read this manual thoroughly before using the treadmill and keep it for future reference. Proper use and care will ensure a long lifespan for your treadmill and a safe workout experience.

Image 1.1: Overview of THERUN Treadmill models, highlighting key features.
2. Safety Information
Your safety is paramount. Please observe the following precautions:
- Always consult with a physician before starting any new exercise program.
- Read all instructions in this manual before using the treadmill.
- Keep children and pets away from the treadmill during operation.
- Place the treadmill on a solid, level surface with at least 2 feet of clear space behind it.
- Wear appropriate exercise clothing and athletic shoes. Do not wear loose clothing that could get caught in moving parts.
- Do not operate the treadmill if it has a damaged cord or plug, or if it is not working properly.
- Always hold the handrails when starting or stopping the treadmill.
- Use the safety key clip. Attach it to your clothing before starting your workout. In case of an emergency, pulling the safety key will immediately stop the treadmill.
- Do not step on or off the treadmill while the belt is moving.
- Do not attempt to service the treadmill yourself. Contact qualified service personnel for repairs.
3. Package Contents
Before assembly, ensure all parts are present and undamaged. If any parts are missing or damaged, do not proceed with assembly and contact customer support.
- Treadmill Main Frame
- Console Assembly
- Upright Posts (Left and Right)
- Hardware Kit (bolts, washers, nuts, tools)
- Safety Key
- Power Cord
- User Manual
4. Assembly Instructions
Assembly is required for this treadmill. It is recommended that two people assemble the unit. Follow these steps carefully:
- Unpack Components: Carefully remove all parts from the packaging and lay them out on a clear, flat surface.
- Attach Upright Posts: Secure the left and right upright posts to the treadmill base using the provided bolts and washers. Ensure they are firmly tightened.
- Mount Console: Carefully lift and attach the console assembly to the top of the upright posts. Connect any pre-attached cables as instructed in the detailed assembly diagram (not provided in this general manual).
- Secure Handrails: Attach the handrails to the console and upright posts, ensuring all connections are stable.
- Final Checks: Double-check all bolts and connections to ensure they are tight and secure before plugging in the treadmill.
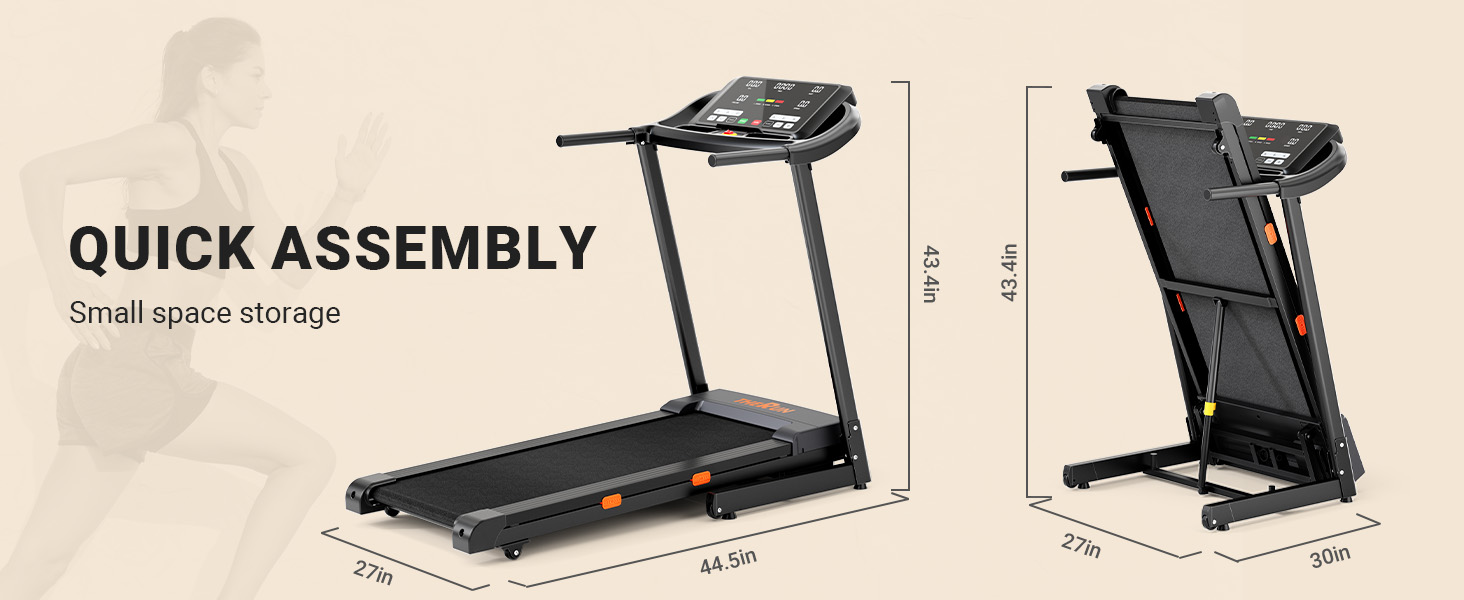
Image 4.1: Quick assembly and space-saving storage dimensions.

Image 4.2: Full view of the assembled treadmill.
5. Operating the Treadmill
5.1 Control Panel Overview
The 18-inch LED screen provides clear feedback on your workout metrics. The control panel features intuitive buttons for speed, incline, and program selection.

Image 5.1: High-definition large LED screen and control panel.
5.2 Starting a Workout
- Plug the power cord into a grounded outlet.
- Attach the safety key clip to your clothing and insert the safety key into its designated slot on the console.
- Step onto the treadmill belt, placing your feet on the side rails.
- Press the 'START' button. The belt will begin moving at a low speed (e.g., 0.5 MPH) after a short countdown.
5.3 Adjusting Speed and Incline
- Speed: Use the '+' and '-' buttons to adjust the speed from 0.5 to 9 MPH. Quick speed buttons (e.g., 3, 6, 9 MPH) are available for instant changes.
- Incline: Use the 'INCLINE +' and '-' buttons to adjust the auto incline from 0% to 12%. Quick incline buttons (e.g., 0, 6, 12%) are available.

Image 5.2: Demonstrating the 0-12% auto incline feature.

Image 5.3: Running belt dimensions and top speed.
5.4 Folding and Unfolding
The treadmill features an automatic running belt lowering system for easy folding and unfolding.
- Folding: Lift the running deck until it locks into the upright position.
- Unfolding: Gently kick the hydraulic lever with your foot. The running deck will slowly lower itself to the ground.
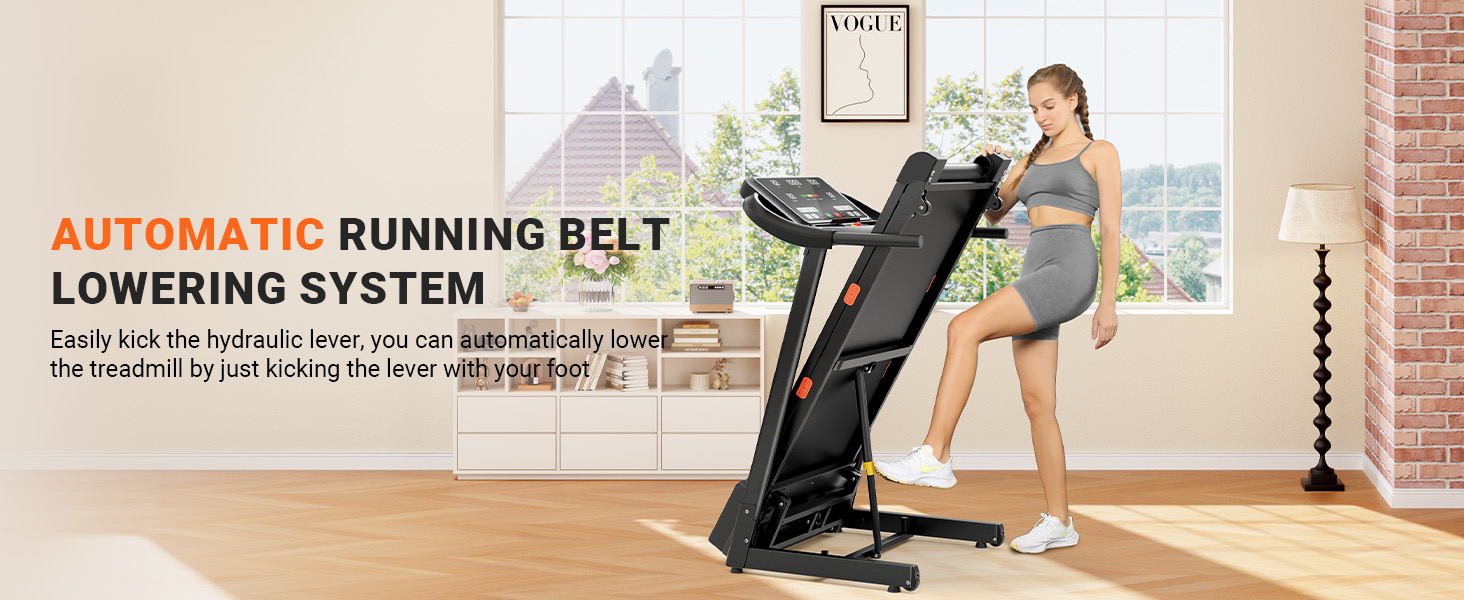
Image 5.4: Automatic running belt lowering system in action.
6. Maintenance and Care
Regular maintenance ensures the longevity and optimal performance of your treadmill.
- Cleaning: Wipe down the treadmill after each use with a damp cloth to remove sweat and dust. Do not use abrasive cleaners.
- Belt Lubrication: Lubricate the running belt every 3-6 months, or after 100 hours of use, using 100% silicone lubricant. Refer to the detailed instructions for belt lubrication in the full manual.
- Belt Tension and Alignment: Periodically check the running belt for proper tension and alignment. Adjust as needed following the instructions in the full manual.
- Motor Cover: Keep the motor cover clean and free of dust to ensure proper ventilation.

Image 6.1: Double deck shock absorption system for reduced impact.

Image 6.2: Super composite silicone shock absorption detail.
7. Troubleshooting
If you encounter issues with your treadmill, refer to the following common problems and solutions:
| Problem | Possible Cause | Solution |
|---|---|---|
| Treadmill does not start | Power cord not plugged in; Safety key not inserted; Circuit breaker tripped. | Ensure power cord is securely plugged in; Insert safety key fully; Reset circuit breaker. |
| Belt slips or hesitates | Belt too loose; Belt needs lubrication. | Adjust belt tension (refer to full manual); Lubricate the running belt. |
| Unusual noise from motor | Loose components; Motor issue. | Check all visible bolts and tighten; If noise persists, contact customer support. |
| Incline not working | Incline motor issue; Connection problem. | Check connections; Contact customer support. |
For issues not listed here or if solutions do not resolve the problem, please contact THERUN customer support.
8. Specifications
| Feature | Specification |
|---|---|
| Brand | THERUN |
| Model Name | TR06 |
| Motor Power | 3.0 HP |
| Speed Range | 0.5 - 9 MPH |
| Incline Range | 0 - 12% Auto Incline |
| Weight Capacity | 300 lbs |
| Running Belt Dimensions | Approx. 43.3" x 16.5" (L x W) |
| Display Screen | 18-inch LED Screen |
| Folded Size | 60 x 30 x 12 inches |
| Material | Alloy Steel |
| Assembly Required | Yes |

Image 8.1: Summary of key treadmill specifications and features.
9. Warranty and Support
THERUN products are manufactured to high-quality standards. For warranty information, product support, or to purchase replacement parts, please refer to the warranty card included with your product or visit the official THERUN website. Please have your model number (TR06) and purchase date ready when contacting support.
For additional assistance, you may visit the THERUN store on Amazon: THERUN Store