1. Introduction
This user manual provides detailed instructions for the safe and effective operation, maintenance, and troubleshooting of your CinusLinus Laser Level. Please read this manual thoroughly before using the device to ensure proper functionality and to prevent damage or injury.
The CinusLinus Laser Level is a versatile tool designed for various leveling and alignment tasks in DIY, construction, and home renovation projects. It features a 360° self-leveling green laser, multiple operating modes, and comes with a portable tripod for enhanced usability.
2. Safety Information
WARNING: Laser Radiation. Avoid direct eye exposure. Class II Laser Product (<1mW power output).
- Do not stare directly into the laser beam.
- Do not disassemble the laser level. Repairs should only be performed by qualified personnel.
- Keep the device out of reach of children.
- Use the device only for its intended purpose as described in this manual.
- Avoid using the laser level in extremely dusty or wet environments unless specified. The device has an IP54 rating, offering protection against dust and splashing water.
- Do not operate the device if it appears damaged.
3. Product Components
The CinusLinus Laser Level package includes the following components:
- CinusLinus Green Laser Level
- Adjustable Tripod (25.6 inches / 65 cm)
- Rotating Stand
- CR5 Batteries (2 included)
- User Manual (this document)
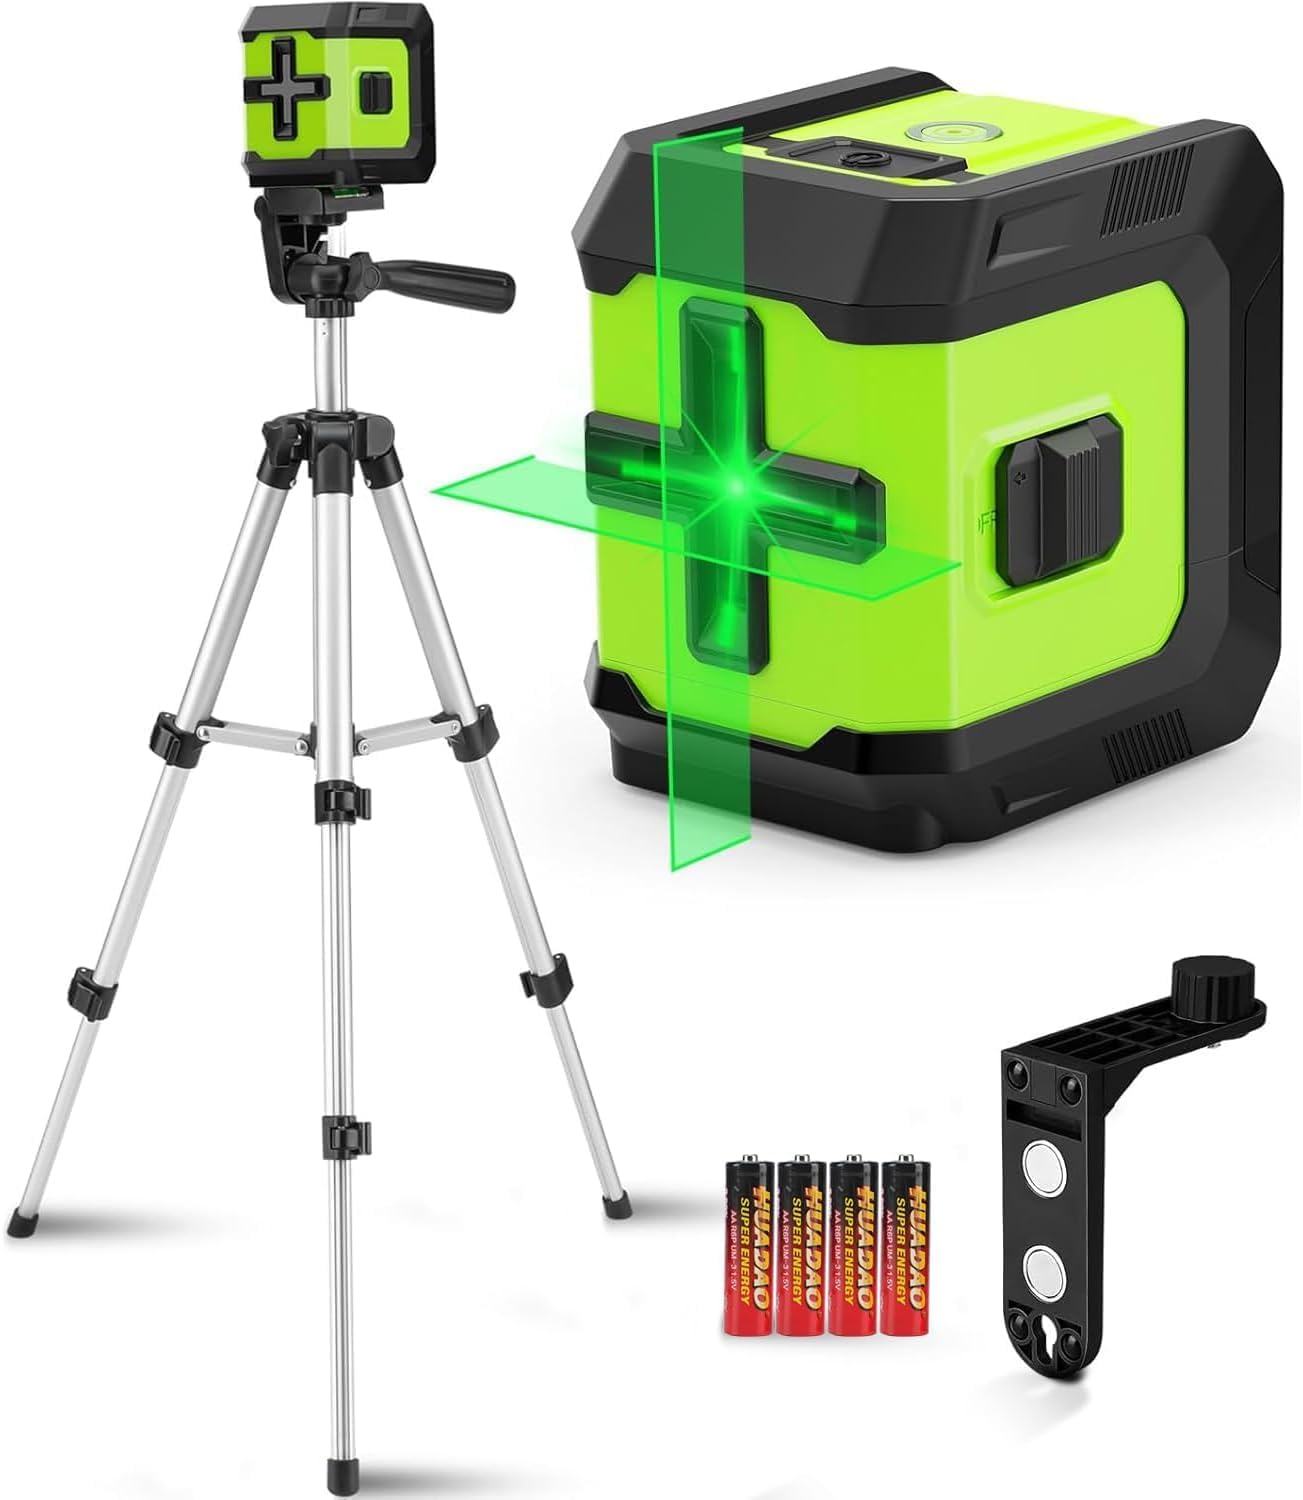
Image: CinusLinus Laser Level, tripod, batteries, and magnetic bracket.
4. Setup
4.1 Battery Installation
- Locate the battery compartment latch on the side of the laser level.
- Open the battery compartment.
- Insert the two CR5 batteries, ensuring correct polarity (+/-) as indicated inside the compartment.
- Close the battery compartment securely.

Image: Close-up of the battery compartment, showing correct battery orientation.
4.2 Tripod Assembly and Laser Level Mounting
- Extend the tripod legs to the desired height. The tripod is adjustable from 11 inches to 25.6 inches.
- Adjust the tripod's pan head for tilt and swivel motion as needed.
- Locate the 1/4"-20 threaded mount on the bottom of the laser level.
- Attach the laser level to the tripod's quick-release plate by screwing it onto the 1/4" screw.
- Ensure the laser level is securely fastened to the tripod before operation.

Image: The laser level attached to the tripod, illustrating its adjustable height and rotation capabilities.
5. Operating Instructions
5.1 Power On/Off
To power on the device, slide the ON/OFF button located on the side of the laser level to the "ON" position. To power off, slide it to the "OFF" position.
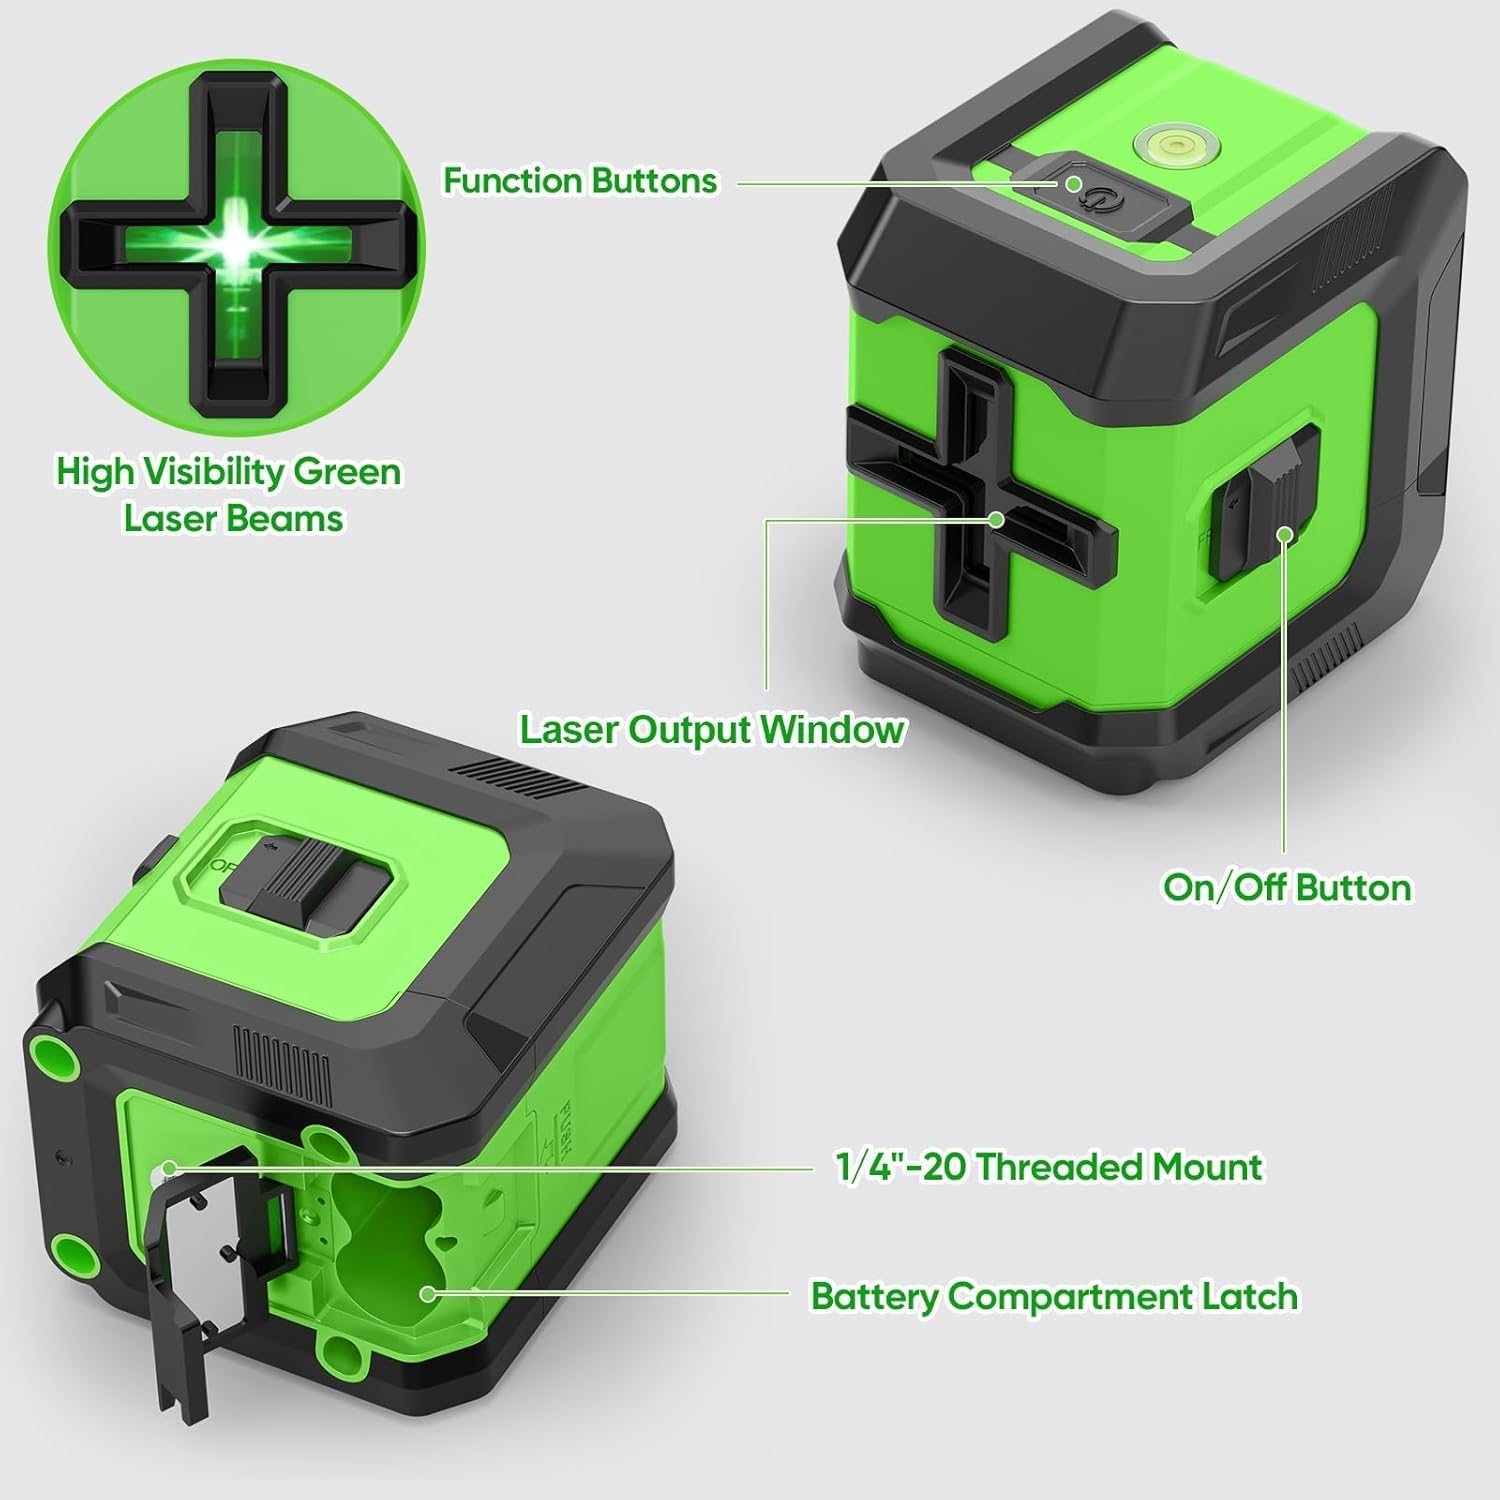
Image: Diagram highlighting the On/Off button, function buttons, laser output window, and battery compartment latch.
5.2 Self-Leveling Mode
With the ON/OFF switch in the "unlocked" position (slide button to the "ON" side), the laser level enters self-leveling mode. The device will automatically level itself within a range of ±4° of horizontal. If the tilt exceeds 4°, the laser lines will flash to indicate that the device is out of level. Adjust the tripod or surface until the lines stop flashing.

Image: Illustration of the laser level operating in self-leveling mode, projecting horizontal and vertical lines.
5.3 Manual Mode (Lock Mode)
To activate Manual Mode, slide the ON/OFF switch to the "ON" position (unlocked), then press and hold the "Function Button" (Lock icon) on top of the device for 3 seconds. In Manual Mode, the self-leveling function is disabled, allowing you to project laser lines at any desired angle. The lines will not flash in this mode, even if the device is tilted.
Image: The laser level projecting angled lines in Manual Mode, suitable for tasks like staircase alignment.
5.4 Pulse Mode
With the ON/OFF switch on the "unlock" side, the leveler is in Pulse Mode. This mode is designed for use with a laser detector (not included) to extend the working distance up to 150 ft. Pulse Mode cannot be used simultaneously with Brightness Adjustment.

Image: The laser level projecting lines in Pulse Mode, suitable for extended range applications with a detector.
5.5 Brightness Adjustment
To adjust the brightness of the laser lines, short press the function button on the top of the device. There are multiple brightness levels (e.g., 100%, 75%, 50%, 25%) to adapt to various indoor lighting conditions and conserve battery life. Note: Brightness Adjustment cannot be used at the same time as Pulse Mode.

Image: Visual representation of different laser brightness levels (100%, 75%, 50%, 25%) for various environments.
6. Maintenance
- Cleaning: Use a soft, dry cloth to clean the laser level and tripod. Do not use abrasive cleaners or solvents.
- Storage: Store the device in a cool, dry place away from direct sunlight and extreme temperatures. If storing for extended periods, remove the batteries to prevent leakage.
- Calibration: While the device is self-calibrating within its range, regular professional calibration is recommended for high-precision applications.
7. Troubleshooting
| Problem | Possible Cause | Solution |
|---|---|---|
| Laser lines are flashing. | Device is out of its self-leveling range (> ±4°). | Place the device on a more level surface or adjust the tripod until the lines stop flashing. |
| No laser lines or dim lines. | Low battery or incorrect battery installation. Device is off. Bright ambient light. | Check battery polarity and replace batteries if low. Ensure the ON/OFF switch is in the "ON" position. Use in a less brightly lit environment or adjust brightness. |
| Laser lines are not straight in Manual Mode. | Manual Mode is intended for angled projection; it does not self-level. | This is normal operation for Manual Mode. If you require self-leveled lines, ensure the device is in Self-Leveling Mode and on a level surface. |
| Cannot activate Pulse Mode and Brightness Adjustment simultaneously. | These two functions are mutually exclusive. | Select either Pulse Mode for extended range with a detector or Brightness Adjustment for indoor visibility. |
8. Specifications
- Model: Green Laser Level - 360-12
- Laser Class: Class II (<1mW power output)
- Laser Color: Green
- Accuracy: 1/9" at 32 ft
- Working Distance: 65 ft (up to 150 ft with laser detector in Pulse Mode)
- Self-Leveling Range: ±4°
- Power Source: 2 x CR5 Batteries (included)
- IP Rating: IP54 (Dust and splash water protected)
- Tripod Height: 11 inches to 25.6 inches (28 cm to 65 cm)
- Mount Thread: 1/4"-20
- Material: Plastic, Aluminium
- Item Weight: 870 g
9. Warranty and Support
CinusLinus provides a standard warranty for this product against defects in materials and workmanship under normal use. Please refer to your purchase documentation for specific warranty terms and duration.
For technical support, troubleshooting assistance, or warranty claims, please contact CinusLinus customer service through the retailer where you purchased the product or visit the official CinusLinus website for contact information.
Please retain your proof of purchase for warranty purposes.