1. Introduction
Thank you for choosing the H-Tech HT-1025 Car MP3 Radio. This manual provides essential information for the safe and efficient operation of your new device. Please read it thoroughly before installation and use, and keep it for future reference.
Safety Information
- Always ensure the vehicle is parked safely before operating the radio's controls.
- Do not attempt to install this product if you are not experienced with car audio systems. Professional installation is highly recommended.
- Incorrect wiring can cause damage to the unit or the vehicle's electrical system.
- Keep the unit away from water and excessive moisture.
- Do not disassemble the unit. Refer all servicing to qualified personnel.
2. Package Contents
Please check that all items are present in the package:
- 1 x H-Tech HT-1025 Car MP3 Radio
- 1 x Remote Control
- 1 x Instruction Manual (this document)
- 1 x Set of Installation Harnesses

Image: The H-Tech HT-1025 Car MP3 Radio unit, its remote control, and the included wiring harnesses for installation.
3. Setup and Installation
The H-Tech HT-1025 is designed for a standard 1-DIN car audio slot. Professional installation is strongly recommended to ensure correct wiring and avoid damage.
3.1 Dimensions
Ensure your vehicle's dashboard opening is compatible with the following dimensions:
- Length: Approximately 18.5 cm
- Width: Approximately 6 cm
- Height: Approximately 5.8 cm

Image: A diagram illustrating the length (18.5 cm), width (6 cm), and height (5.8 cm) of the H-Tech HT-1025 unit.
3.2 Wiring Connections
Use the provided installation harnesses to connect the unit to your vehicle's electrical system and speakers. Refer to the wiring diagram provided with the harnesses for specific connections. Key connections include:
- Power (Constant 12V, Switched 12V, Ground)
- Speaker Outputs (4 channels)
- RCA Audio Outputs (for external amplifiers, if used)
- Antenna Input
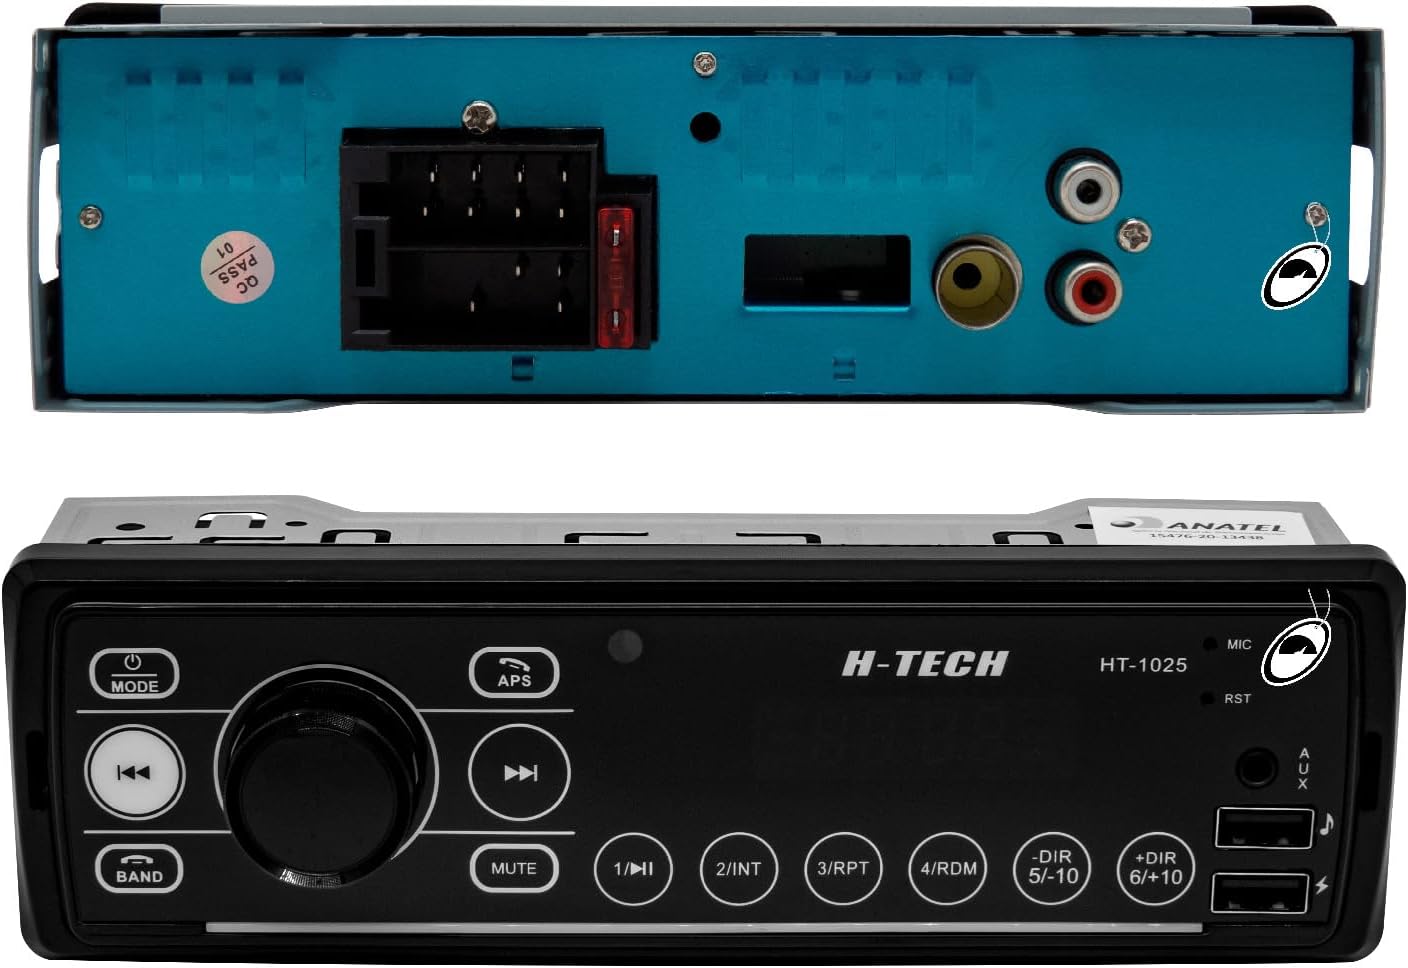
Image: The rear panel of the H-Tech HT-1025 radio, displaying the main wiring harness connector, fuse, and two RCA audio output jacks.
4. Operating Instructions
This section details the basic operation of your H-Tech HT-1025 Car MP3 Radio.
4.1 Front Panel Controls

Image: The H-Tech HT-1025 Car MP3 Radio's front panel, showing the digital display, rotary volume knob, and various control buttons, alongside the remote control.
- MODE Button: Press to cycle through available audio sources (Radio, USB, AUX, Bluetooth). Press and hold to power the unit on or off.
- Rotary Knob: Turn to adjust volume. Press to select menu options or confirm settings.
- BAND Button: In Radio mode, press to switch between AM and FM bands.
- APS Button: In Radio mode, press to automatically scan and store strong stations.
- MUTE Button: Mutes or unmutes the audio output.
- USB Ports: One port for music playback (MP3 files), another for charging devices.
- AUX Input: 3.5mm jack for connecting external audio devices.
- Number Buttons (1-6): In Radio mode, these can be used to select preset stations. In USB mode, they may have other functions like INT (Intro scan), RPT (Repeat), RDM (Random), DIR (Directory navigation).
4.2 Radio Operation (AM/FM)
- Press the MODE button until "RADIO" is displayed.
- Press the BAND button to select FM1, FM2, FM3, AM1, or AM2.
- Use the ❮ and ❯ buttons to manually tune or seek for stations.
- Press APS to automatically scan and store the strongest stations into presets.
- To manually store a station, tune to the desired frequency, then press and hold one of the number buttons (1-6) until you hear a beep.
4.3 USB Playback
- Insert a USB flash drive containing MP3 audio files into the designated USB port for music.
- The unit will automatically switch to USB mode and begin playback. If not, press the MODE button.
- Use the ❮ and ❯ buttons for track navigation.
- The number buttons (e.g., DIR 5/-10, DIR 6/+10) can be used for folder navigation or skipping multiple tracks.
- RPT (Repeat) and RDM (Random) functions are available via the number buttons.
4.4 AUX Input
- Connect an external audio device (e.g., smartphone, MP3 player) to the 3.5mm AUX input jack on the front panel using an audio cable (not included).
- Press the MODE button until "AUX" is displayed.
- Control playback from the connected device.
4.5 Bluetooth Operation
- Press the MODE button until "BT" (Bluetooth) is displayed.
- On your mobile device, enable Bluetooth and search for available devices.
- Select "HT-1025" from the list to pair. No password is typically required.
- Once paired, you can stream audio from your device to the car radio.
- Use the radio's controls or your mobile device to play/pause, skip tracks.
4.6 Audio Settings (Equalization)
- Press the EQ button on the remote control (or the rotary knob on the unit, if applicable) to cycle through preset equalization modes: POP, ROCK, CLASS, FLAT.
5. Maintenance
To ensure the longevity and optimal performance of your H-Tech HT-1025 Car MP3 Radio, follow these simple maintenance guidelines:
- Cleaning: Use a soft, dry cloth to clean the front panel. Do not use abrasive cleaners, solvents, or excessive moisture, as these can damage the finish or internal components.
- Avoid Liquids: Prevent any liquids from entering the unit.
- Temperature: Avoid exposing the unit to extreme temperatures, direct sunlight for prolonged periods, or high humidity.
- USB Port: Keep the USB ports free from dust and debris.
6. Troubleshooting
If you encounter issues with your H-Tech HT-1025, please refer to the following common problems and solutions before seeking professional assistance.
| Problem | Possible Cause | Solution |
|---|---|---|
| No power | Incorrect wiring; Blown fuse; Vehicle battery issue. | Check all power connections. Verify the fuse (located at the rear of the unit). Ensure vehicle battery is charged. |
| No sound | Volume too low; Mute function active; Incorrect speaker wiring; Source not selected. | Increase volume. Press MUTE button. Check speaker connections. Ensure correct audio source is selected. |
| Bluetooth not connecting | Bluetooth not enabled on phone; Unit not in pairing mode; Interference. | Ensure Bluetooth is enabled on your device and the radio is in BT mode. Try restarting both devices. Move closer to the unit. |
| USB not reading | Unsupported file format; Corrupted USB drive; Incorrect USB port used. | Ensure files are MP3 format. Try a different USB drive. Use the USB port designated for music playback. |
| Poor radio reception | Antenna not connected; Weak signal area; Damaged antenna. | Check antenna connection. Try tuning to a stronger station. Consider checking or replacing the antenna. |
7. Specifications
Detailed technical specifications for the H-Tech HT-1025 Car MP3 Radio:
| Model | HT-1025 |
| Power Output | 25W x 4 Channels |
| Audio Outputs | 2 x RCA |
| USB Inputs | 1 x for Charging, 1 x for Music Playback |
| AUX Input | 1 x 3.5mm Front Panel |
| Bluetooth | Yes (Version not specified, but typically 5.0 as per feature bullet) |
| Radio Tuner | AM/FM |
| Display | Digital with LED Illumination |
| Equalization Presets | POP, ROCK, CLASS, FLAT |
| Dimensions (Product) | 20 x 8 x 7 cm (approximate) |
| Weight (Product) | 250 g |
| Certification | ANATEL: 15476-20-13438 |
8. Warranty and Support
8.1 Manufacturer's Warranty
This H-Tech HT-1025 Car MP3 Radio comes with a 1-year manufacturer's warranty from the date of purchase.
Warranty Exclusions: The warranty does NOT cover damages caused by:
- Incorrect installation
- Misuse or abuse of the product
- Unauthorized repairs or modifications
- Accidental damage
Please retain your proof of purchase for warranty claims.
8.2 Customer Support
For technical assistance, warranty claims, or any questions regarding your H-Tech HT-1025 Car MP3 Radio, please contact your retailer or the manufacturer's customer service department. Refer to your purchase documentation for specific contact information.