LIBODD HT124A
LIBODD HT124A Digital Multimeter User Manual
Model: HT124A
1. Introduction
This manual provides essential information for the safe and effective operation of your LIBODD HT124A Digital Multimeter. Please read this manual thoroughly before using the device and retain it for future reference.
The HT124A is a compact, auto-ranging digital multimeter designed for various electrical measurements. It features a 4000-count display, True RMS capability, and functions such as voltage, resistance, frequency, and capacitance testing, along with non-contact voltage detection and live wire testing.

Figure 1: LIBODD HT124A Digital Multimeter. This image shows the front display and controls of the HT124A multimeter.
2. Safety Information
Always adhere to the following safety precautions to prevent personal injury and damage to the multimeter or equipment under test.
- Do not exceed the maximum input values specified for each measurement range.
- Exercise extreme caution when working with voltages above 36V DC or 25V AC RMS, as these can pose a shock hazard.
- Inspect test leads for damage before each use. Do not use if insulation is compromised.
- Ensure the function switch is in the correct position before making measurements.
- Do not operate the multimeter if it appears damaged or is not functioning properly.
- Replace batteries promptly when the low battery indicator appears to ensure accurate readings.
- Do not attempt to repair or modify the multimeter. Refer servicing to qualified personnel.
3. Package Contents
Verify that all items are present in the package upon unboxing:
- LIBODD HT124A Smart Digital Multimeter
- Test Probes (Black/Red)
- User Manual
- Packaging Box

Figure 2: HT124A Package Contents. This image illustrates the items included in the HT124A product package: the multimeter, test probes, user manual, and packaging box.
4. Setup and Initial Use
4.1 Battery Installation
The HT124A multimeter typically uses AAA batteries. To install or replace batteries:
- Ensure the multimeter is powered off and test leads are disconnected.
- Locate the battery compartment cover on the rear of the device.
- Open the cover and insert batteries, observing correct polarity (+/-).
- Close the battery compartment cover securely.
4.2 Connecting Test Leads
Connect the test leads to the appropriate input jacks:
- Insert the black test lead into the COM (Common) jack.
- Insert the red test lead into the INPUT jack for voltage, resistance, frequency, capacitance, and diode measurements.
5. Operating the Multimeter
The HT124A features a "Smart" operating mode that automatically identifies measurement types (AC/DC voltage, resistance, continuity) for ease of use. Manual mode selection is also available for specific functions.
5.1 Power On/Off
Press the Power button to turn the multimeter on or off. The device features an automatic shutdown function if no operation is performed within 15 minutes to conserve battery power.

Figure 3: Automatic Shutdown and Detachable Casing. This image highlights the 15-minute automatic shutdown feature and the durable, detachable soft rubber casing of the multimeter.
5.2 Measurement Functions
- DC/AC Voltage Measurement (V): Connect test leads in parallel to the circuit. The multimeter will automatically detect AC or DC voltage in Smart mode.
- Resistance Measurement (Ω): Ensure the circuit is de-energized. Connect test leads across the component to measure resistance.
- Frequency (Hz) and Capacitance Measurement: Select the appropriate function. Connect test leads to the circuit or component.
- Continuity Test: Used to check for open or closed circuits. A low resistance (typically <50Ω) will trigger an audible beep.
- Diode Test: Used to check the forward voltage drop of a diode.
- Non-Contact Voltage (NCV) Detection:
Allows for contactless detection of AC voltage, enhancing safety. Bring the NCV sensor area of the multimeter close to the conductor. The display will indicate signal strength (e.g., 'L' for weak, 'H' for strong) with corresponding beeping sounds and indicator lights.
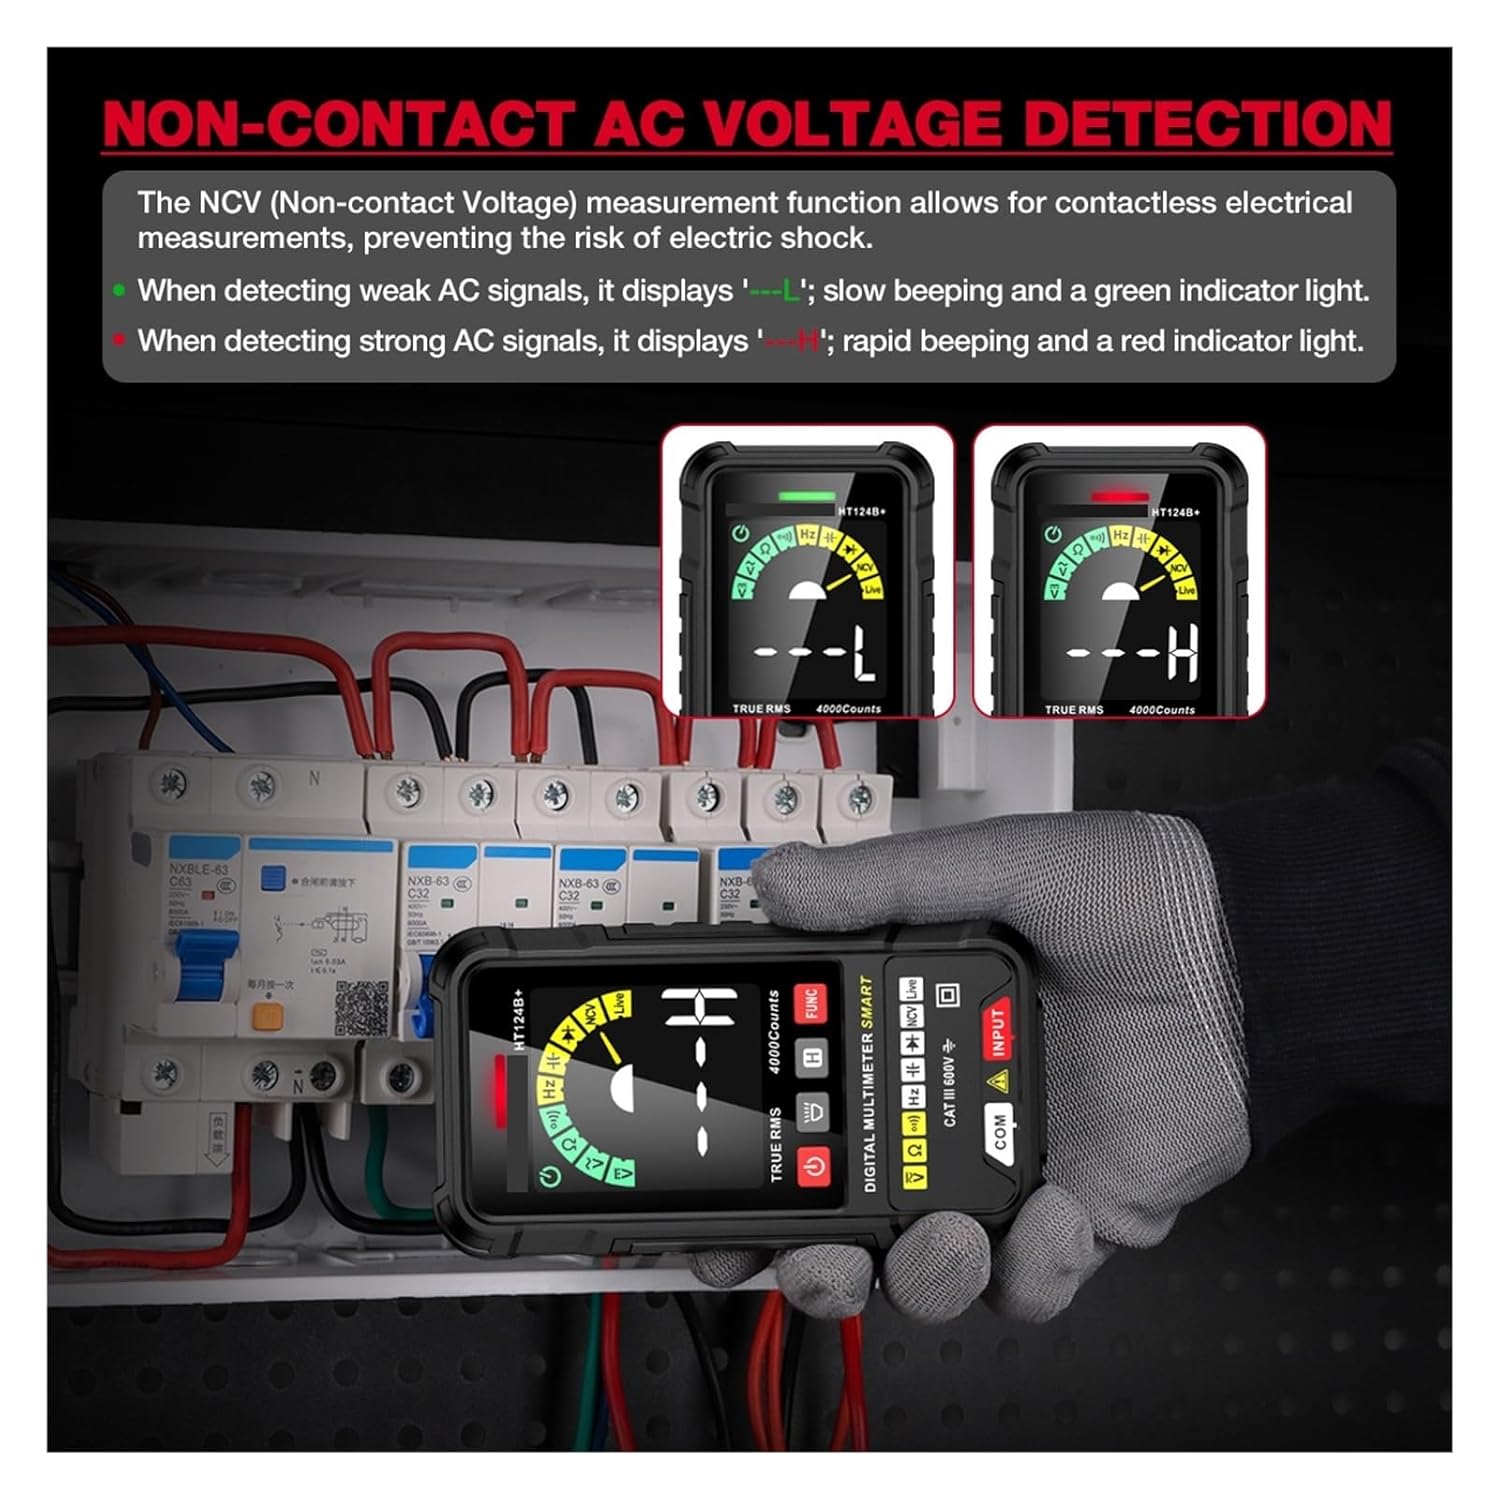
Figure 4: Non-Contact AC Voltage Detection. This image demonstrates the NCV function, showing how the multimeter indicates weak ('L') and strong ('H') AC signals without direct contact.
- Live Test (Single Probe Live Wire Detection):
This function allows detection of live wires using a single test probe. Insert a single probe into a socket for live wire detection. A slow beep and green light indicate a weak AC signal, while a rapid beep and red light indicate a strong AC signal.

Figure 5: Single Probe Live Wire Detection. This image illustrates the use of a single probe for detecting live wires in an electrical outlet.
5.3 Additional Features
- True RMS: Provides accurate measurements for non-sinusoidal AC waveforms.
- Data Hold (H): Press the 'H' button to freeze the current reading on the display. Press again to release.
- Backlight: The display features a backlight for improved visibility in low-light conditions.
- Flashlight: A built-in flashlight is available for illuminating the test area.
- High-Definition VAC Color Screen: The VA True-Color Display ensures numerical readings are easily visible even in the dark.

Figure 6: Bright LED Illumination and High-Definition VAC Color Screen. This image showcases the multimeter's built-in flashlight for dim environments and its clear, full-function VA True-Color display.
6. Maintenance
6.1 Cleaning
Wipe the case with a damp cloth and mild detergent. Do not use abrasives or solvents. Ensure the device is completely dry before use.
6.2 Battery Replacement
When the low battery indicator appears on the display, replace the batteries as described in Section 4.1.
6.3 Storage
If the multimeter is not used for an extended period, remove the batteries to prevent leakage and damage. Store the device in a cool, dry place away from direct sunlight.
The HT124A features a detachable soft rubber casing, providing insulation, dustproof, and shockproof protection for the body.
7. Troubleshooting
| Problem | Possible Cause | Solution |
|---|---|---|
| No display or dim display | Low batteries; Device not powered on. | Replace batteries; Press the Power button. |
| Inaccurate readings | Incorrect function selected; Test leads not properly connected; Low batteries. | Select correct function; Reconnect leads securely; Replace batteries. |
| No continuity beep | Circuit resistance too high; Open circuit. | Check circuit for breaks; Ensure resistance is below threshold. |
If the problem persists after attempting these solutions, contact customer support.
8. Specifications
| Parameter | Value |
|---|---|
| Model Number | HT124A |
| Display Type | Digital display (VA True-Color) |
| Counts | 4000 Counts |
| DC Voltage Range | 400mV/4V/40V/400V/600V |
| AC Voltage Range | 4V/40V/400V/600V |
| Operating Mode | Smart / Manual |
| Dimensions | 127mm x 66mm x 19mm |
| Operating Temperature | 0 - 40 ℃ |
| True RMS | Yes |
| Frequency | Yes |
| Non Contact Voltage Detection (NCV) | Yes |
| Live Test | Yes |
| Continuity | Yes |
| Diode Test | Yes |
| Data Hold | Yes |
| Lower Battery Indication | Yes |
| Auto Power Off | Yes (15 minutes) |
| Backlight | Yes |
| Flashlight | Yes |
9. Warranty and Support
Specific warranty information for the LIBODD HT124A Digital Multimeter is typically provided by the manufacturer or seller at the time of purchase. Please refer to your purchase documentation or contact the seller directly for details regarding warranty coverage and claims.
For technical support, troubleshooting assistance beyond this manual, or inquiries about replacement parts, please contact LIBODD customer service through the contact information provided with your product or on the official LIBODD website.