VEVOR MD200C-P
VEVOR Electronic Drum Set User Manual
Model: MD200C-P
Introduction
Thank you for choosing the VEVOR Electronic Drum Set. This manual provides essential information for the proper setup, operation, and maintenance of your new instrument. Please read this manual thoroughly before using the drum set to ensure optimal performance and longevity.
The VEVOR Electronic Drum Set, Model MD200C-P, is designed for both beginners and experienced players, offering a comprehensive drumming experience with quiet mesh pads, diverse sound options, and versatile connectivity.
Package Contents
Please verify that all items listed below are included in your package:
- Electronic Drum Set (Main Unit)
- Drum Module
- Drumsticks (2x)
- Kick Drum Pedal
- Hi-Hat Pedal
- User Manual (this document)
- Power Adapter (DC 9V)
- Connecting Cables for Pads and Cymbals

Setup and Assembly
Follow these steps to assemble your electronic drum set:
- Unpack Components: Carefully remove all components from the packaging and lay them out on a clean, flat surface.
- Assemble the Rack: Connect the main frame components of the drum rack. Ensure all joints are securely tightened.
- Attach Drum Pads and Cymbals: Mount the snare drum, tom drums, and cymbals onto the rack. Adjust their positions and angles for comfortable playing. The snare drum features a dual-trigger design for realistic rim shots.
- Install Pedals: Place the kick drum pedal and hi-hat pedal on the floor in their desired positions.
- Connect the Drum Module: Securely attach the drum module to the rack.
- Cable Connections: Connect each drum pad, cymbal, and pedal to the corresponding input on the drum module using the provided cables. Refer to the diagram below for correct connections.
- Power Connection: Connect the DC 9V power adapter to the drum module and then to a power outlet.


Operating Instructions
Drum Module Overview
The drum module is the central control unit for your electronic drum set. It allows you to select drum kits, sounds, practice modes, and adjust various parameters.

Sound and Kit Selection
- Drum Kits: The module comes with 32 pre-set drum kits, covering a wide range of musical styles. Use the "KIT" button and the selection knob to browse and select your desired drum kit.
- Sounds: Access 480 individual sounds to customize your drumming experience. While the module does not support user-defined kit creation, the variety of pre-set kits offers extensive options.
Practice Modes and Demo Songs
- Demo Songs: The module includes 30 demo songs. Use the "SONG" button and selection knob to play along with these tracks, aiding in rhythm and timing development.
- Practice Modes: Three dedicated practice modes are available to help improve your drumming skills:
- C-1 Beat Detection Practice
- C-2 Silent Strike
- C-3 Speed Strike Practice
- Metronome: Utilize the built-in metronome for precise timing practice. Adjust the tempo using the selection knob after pressing the "METRONOME" button.
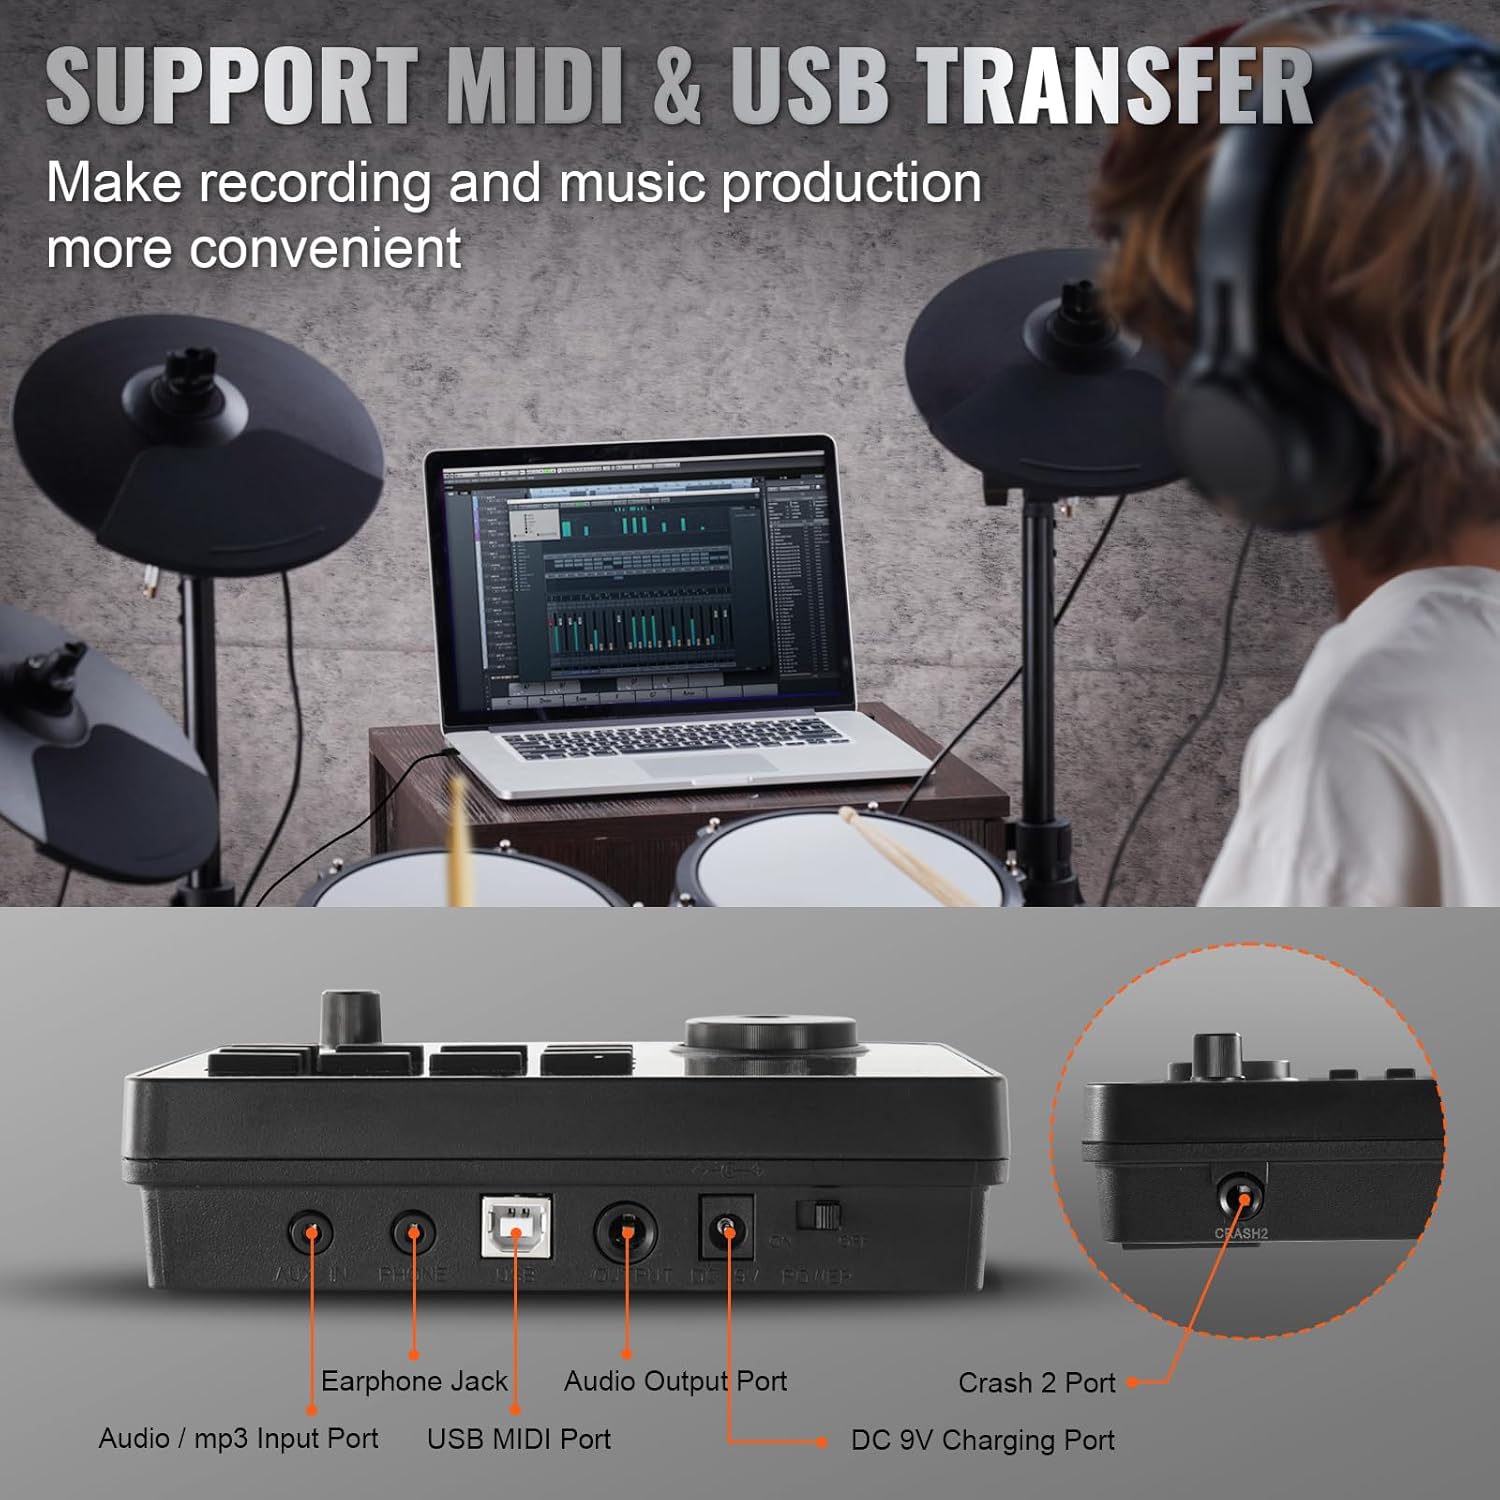
Connectivity
The drum module offers various connectivity options for enhanced functionality:
- Audio Output (OUTPUT): Connect to external amplifiers, mixers, or recording interfaces.
- Headphone Interface (PHONE): Connect headphones for private practice.
- Audio Input / MP3 Interface (AUX IN): Connect external audio devices (e.g., smartphone, MP3 player) to play along with your favorite music.
- USB MIDI: Connect the drum module to a computer for MIDI recording, music production, or use with drumming software. This allows for seamless integration with digital audio workstations (DAWs).
- DC 9V Charging Port: For connecting the power adapter.
- CRASH2 Interface: Dedicated input for an additional crash cymbal (if applicable to your model variant).
Key Features
- Quiet Mesh Pads: The drum set features mesh pads for a realistic feel and reduced acoustic noise, making it ideal for practice in various environments.
- Dual-Trigger Snare Drum: The 8-inch snare drum supports dual-triggering, allowing for distinct sounds when striking the center of the pad versus the rim, enabling realistic rim shot techniques.

Figure 6: Illustration of the dual-trigger snare drum (Strike Surface for center hit, Strike Rim for rim shot) and the choke function for cymbals. - Cymbal Choke Function: The crash cymbal includes a choke function, allowing you to mute the sound by grabbing the edge of the cymbal after striking, mimicking acoustic cymbal behavior.
- Complete Pedal Set: Includes a responsive kick drum pedal and a hi-hat pedal, designed for fast response, stable non-slip performance, and ergonomic comfort.

Figure 7: The included Kick Drum Pedal and Hi-Hat Pedal are designed for fast response and stable, non-slip use. - Adjustable Stand: The robust four-legged stand is fully adjustable in height and angle, ensuring a comfortable and stable playing position for drummers of all sizes.
Maintenance
Proper maintenance will ensure the longevity and optimal performance of your VEVOR Electronic Drum Set:
- Cleaning: Use a soft, dry cloth to wipe down the drum pads, cymbals, module, and stand. Avoid using abrasive cleaners, solvents, or waxes, as they may damage the surfaces.
- Cable Management: Regularly check all cables for wear and tear. Ensure they are not kinked or pinched. Organize cables neatly to prevent accidental disconnections or damage.
- Storage: When not in use for extended periods, store the drum set in a cool, dry place away from direct sunlight, extreme temperatures, and high humidity.
- Pad Care: While mesh pads are durable, avoid excessive force when striking. Periodically check the tension of the mesh heads; however, do not attempt to adjust tension unless specifically instructed by VEVOR support.
- Module Protection: Protect the drum module from spills and impacts. Do not place heavy objects on top of it.
Troubleshooting
If you encounter any issues with your VEVOR Electronic Drum Set, please refer to the following common troubleshooting tips:
- No Sound:
- Ensure the power adapter is securely connected and the module is turned on.
- Check that headphones or external speakers are properly connected to the "PHONE" or "OUTPUT" jacks and their volume is turned up.
- Verify that all drum pads, cymbals, and pedals are correctly connected to their respective inputs on the module.
- Check the master volume on the drum module.
- Incorrect Sound from Pad/Cymbal:
- Ensure the correct cable is connected to the correct input on the module for each pad/cymbal.
- Check the selected drum kit on the module; different kits assign different sounds to pads.
- Pads Not Responding or Double Triggering:
- Verify cable connections are secure.
- Ensure the pads are not being hit too hard or too softly for their sensitivity settings (if adjustable on the module).
- If the issue persists, try resetting the module to factory settings (refer to the module's specific instructions if available, as this manual does not detail it).
- MIDI Connectivity Issues:
- Ensure the USB cable is properly connected between the module and your computer.
- Check your computer's device manager or MIDI settings to confirm the drum module is recognized.
- Verify MIDI input settings within your music software (DAW).
If these steps do not resolve the issue, please contact VEVOR customer support for further assistance.
Specifications
| Model Number | MD200C-P |
| Product Type | Four-Legged Stand with Five Drums and Three Cymbals |
| Snare Drum Type | 8 in / 203.2 mm Mesh Drumhead |
| Tom Type | 8 in / 203.2 mm Mesh Drumhead |
| Number of Sounds | 480 |
| Kit Quantity | 32 |
| Input Power Supply | AC100 V-240 V, 50/60Hz, 0.3 A |
| Output Power Supply | DC 9 V, 0.5 A |
| Net Weight | 30.96 lbs / 14.05 kg |
| Product Dimensions (L x W x H) | 49.21 x 21.65 x 48.03 inches (1250 x 550 x 1220 mm) |
| Included Components | Electronic Drum Set, 2x Drumsticks, 1x User Manual |
| Body Material | Metal |
| Color | Black |

Warranty and Support
VEVOR products come with a standard warranty. For detailed warranty information, product registration, or technical support, please visit the official VEVOR website or contact their customer service directly. Please have your model number (MD200C-P) and purchase details ready when contacting support.
For more information, visit the VEVOR Store on Amazon.
Ask a question about this manual
Ask about setup, troubleshooting, compatibility, parts, safety, or missing instructions. Manuals+ will review the question and use this page’s manual context to help answer it.