1. Introduction
This manual provides detailed instructions for the installation, operation, and maintenance of your Tbest Brushless Motor Controller Kit, which includes an 80A motor speed controller and an S966 LCD display panel. This kit is designed for use with 60V 2000W, 60V 3000W, 72V 3000W, and 72V 5000W Hall brushless motors, offering versatile performance for electric bicycle conversions.
Please read this manual thoroughly before installation and operation to ensure correct usage and optimal performance of the product.
2. Product Overview
2.1 Components Included
The Tbest Brushless Motor Controller Kit typically includes the following components:
- 80A Brushless Motor Speed Controller
- S966 LCD Display Panel
- 20X Throttle
- 8C Speed Assist Sensor
- Associated wiring harnesses and connectors
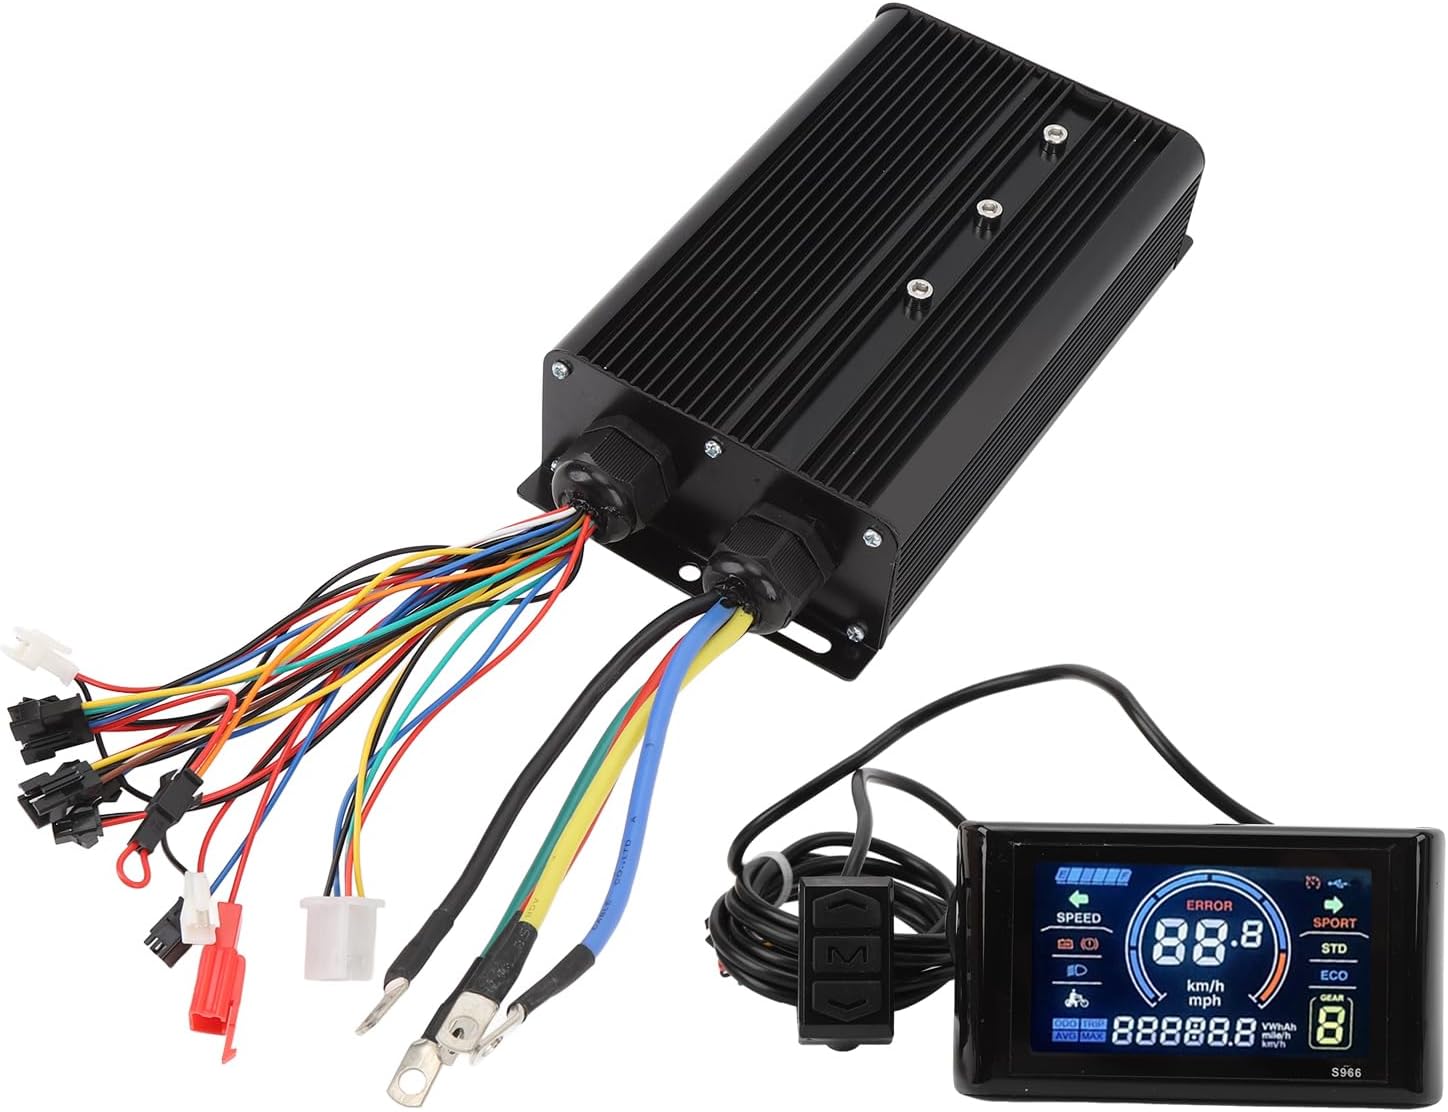
Figure 2.1: Overview of all components included in the kit.
This image displays the complete kit, including the brushless motor controller, S966 LCD display, throttle, speed assist sensor, and various wiring components.
2.2 Key Features
- Versatile Compatibility: Supports 60V 2000W, 60V 3000W, 72V 3000W, and 72V 5000W Hall brushless motors.
- Efficient Heat Dissipation: Controller housing made of aluminum alloy with a grooved design to prevent thermal overload.
- Durable Construction: LCD display crafted from robust ABS material for longevity.
- User-Friendly Interface: S966 LCD display provides clear information and easy control.
- Precise Control: Ensures steady speed, accurate braking, and smooth direction changes.
3. Specifications
| Feature | Specification |
|---|---|
| Brand | Tbest |
| Controller Current | 80A |
| Compatible Motor Wattage | 2000W, 3000W, 5000W |
| Compatible Motor Voltage | 60V, 72V (DC) |
| Controller Material | Aluminum Alloy |
| Display Model | S966 |
| Display Type | LCD |
| Display Material | ABS |
| Display Voltage Compatibility | 24V-72V |
| Display Screen Size | 4.3 inches (approx. 110x62mm) |
| Operating Temperature | -20°C to 60°C |
| Item Weight | 2.01 Kilograms (total kit) |

Figure 3.1: S966 LCD Display showing dimensions.
This image illustrates the physical dimensions of the S966 LCD display, measuring approximately 100mm in length and 61.5mm in height.
4. Setup and Installation
The Tbest Brushless Motor Controller Kit is designed for straightforward installation. Proper connection of all components is crucial for safe and correct operation. It is recommended to have basic electrical knowledge or seek professional assistance if unsure.
4.1 Safety Precautions
- Ensure the power source is disconnected before beginning any installation or wiring.
- Verify all connections are secure and correctly polarized to prevent damage to components.
- Avoid exposing the controller or display to excessive moisture or extreme temperatures beyond specified operating conditions.
4.2 Wiring Connections
The controller features multiple color-coded wires and connectors for various functions. Refer to the diagram below for typical connections. While specific wiring diagrams are not provided in this manual, the connectors are designed to be user-friendly.

Figure 4.1: Tbest Brushless Motor Controller showing input and output wiring.
This image displays the brushless motor controller unit with its numerous color-coded wires and connectors, which are used to connect to the motor, battery, display, throttle, and other accessories.
- Motor Connection: Connect the three thick phase wires (typically green, blue, yellow) from the controller to the corresponding motor phase wires. Connect the smaller Hall sensor wires (usually a 5-pin connector) to the motor's Hall sensor port.
- Battery Connection: Connect the thick red wire from the controller to the positive (+) terminal of your battery and the thick black wire to the negative (-) terminal. Ensure correct polarity.
- S966 LCD Display: Connect the display's connector (typically a 5-pin or 2-pin connector, depending on type) to the designated port on the controller.
- Throttle: Connect the throttle unit to its corresponding connector on the controller.
- Speed Assist Sensor (PAS): Install the 8C speed assist sensor on your bicycle's pedal crank and connect its wire to the controller.
- Other Accessories: Connect any additional accessories such as brake levers (with cut-off switches) or lights to their respective ports on the controller.
After all connections are made, double-check them for security and correctness before applying power.
5. Operating Instructions (S966 LCD Display)
The S966 LCD display provides essential information and control over your electric bicycle system. Familiarize yourself with its functions for an optimal riding experience.
5.1 Display Layout and Indicators

Figure 5.1: S966 LCD Display with key indicators labeled.
This image highlights the various sections of the S966 LCD display, including Battery level, Speed, Standard Mode (STD), Economy Mode (ECO), Gear level, and Total Mileage (ODO/TRIP).
- Battery Indicator: Shows the current battery charge level.
- Speed Display: Indicates current speed in km/h or mph.
- Error Indicator: Displays error codes if a system fault occurs.
- Mode Selection: Typically includes SPORT, STD (Standard), and ECO (Economy) modes for different power outputs.
- Gear/PAS Level: Shows the current pedal assist level (e.g., 1-5 or 1-9).
- Mileage: Displays ODO (total odometer) or TRIP (current trip distance).
- Headlight Indicator: Shows if headlights are active.
5.2 Button Functions
The S966 display typically features three buttons for control:

Figure 5.2: S966 LCD Display control buttons and their functions.
This image illustrates the three control buttons on the S966 display: Up (Upshift), M (Mode/Turn), and Down (Downshift).
- Up Button (▲):
- Short press: Increase PAS level / Upshift.
- Long press: (Function may vary, e.g., turn on/off headlights).
- Mode Button (M):
- Short press: Cycle through display information (e.g., ODO/TRIP, Voltage).
- Long press: Power on/off the system. Enter/exit settings menu.
- Down Button (▼):
- Short press: Decrease PAS level / Downshift.
- Long press: (Function may vary, e.g., walk assist mode).
Note: Specific long-press functions and settings menu navigation may vary. Refer to the display's internal settings for customization options.

Figure 5.3: S966 LCD Display mounted on a handlebar.
This image shows the S966 LCD display securely mounted on a bicycle handlebar, providing a clear view of the screen for the rider.
6. Maintenance
Regular maintenance ensures the longevity and reliable performance of your Tbest Brushless Motor Controller Kit.
- Cleaning: Wipe the controller and display with a soft, damp cloth. Avoid using harsh chemicals or abrasive cleaners. Ensure the display is dry after cleaning.
- Connections: Periodically check all electrical connections for tightness and signs of corrosion. Loose connections can lead to intermittent operation or damage.
- Environmental Protection: While the controller is designed to be water-resistant, avoid prolonged exposure to heavy rain or submersion. Store the electric bicycle in a dry environment when not in use.
- Inspection: Regularly inspect the wiring for any signs of wear, cuts, or damage. Replace damaged wires immediately.
7. Troubleshooting
If you encounter issues with your Tbest Brushless Motor Controller Kit, refer to the following common troubleshooting steps:
| Problem | Possible Cause | Solution |
|---|---|---|
| System does not power on. | Battery disconnected or low charge. Loose power connections. Faulty display. | Check battery connection and charge level. Ensure main power wires are securely connected. Verify display cable connection. |
| Motor not responding. | Loose motor phase wires or Hall sensor wires. Faulty throttle. Controller error. | Inspect all motor and Hall sensor connections. Check throttle functionality. Look for error codes on the S966 display. |
| Display shows an error code. | Specific system fault (e.g., motor Hall sensor error, controller over-current). | Note the error code and consult the display's specific error code list (if available) for diagnosis. Common issues include Hall sensor disconnection or motor phase wire issues. |
| Inconsistent speed assist. | Speed assist sensor (PAS) misaligned or faulty. Loose PAS connection. | Check the alignment and cleanliness of the PAS sensor. Ensure its cable is securely connected to the controller. |
If problems persist after attempting these solutions, contact customer support for further assistance.
8. Warranty and Support
Tbest products are manufactured to high-quality standards. For warranty information or technical support, please refer to the documentation provided with your purchase or contact your retailer. Keep your purchase receipt as proof of purchase for warranty claims.
For further assistance, you may visit the Tbest Store on Amazon.


