1. Introduction
This manual provides comprehensive instructions for the installation, operation, maintenance, and troubleshooting of your RUSFEIDA 4K 4CH Network Video Recorder (NVR) Model 6504. This NVR is designed to support 4K, 5MP, 4MP, 3MP, and 1080P PoE IP cameras, offering advanced features such as face detection and 24/7 recording capabilities for your security camera system.
2. What's in the Box
- RUSFEIDA 4K 4CH Network Video Recorder (NVR) Unit
Note: A Hard Disk Drive (HDD) is not included and must be purchased separately for recording functionality. Cameras, power adapter, mouse, and Ethernet cables are also typically sold separately.
3. Product Overview
The RUSFEIDA 4K 4CH NVR is a central component for your security surveillance system, offering robust features for video recording and management.
Key Features:
- Plug and Play PoE: Simplifies installation with a single Ethernet cable for both power and data transmission to PoE cameras (up to 330 feet). Supports all ONVIF protocol PoE cameras.
- 4-Channel 4K Recording: Features 4 built-in PoE ports, capable of powering up to 4 PoE cameras simultaneously and supporting live view and recording at up to 8MP/4K resolution.
- Expandable Storage: Supports up to a 14TB Hard Disk Drive (HDD) for extensive video storage (HDD not included).
- Face Detection: Advanced smart alert system that triggers notifications via app, email, and NVR when a face is detected. (Important note: This feature is supported only by RUSFEIDA PoE cameras.)
- 24/7 Continuous Recording: Ensures constant surveillance with continuous video recording.
- Remote Access: View live video remotely via the free XMEYE PRO APP on mobile devices or the VMS software on computers/tablets.
NVR Unit Diagram: Front and Rear Panels

This image displays the RUSFEIDA 4K 4CH NVR unit, showing both its front and rear panels. The front panel features control buttons and a USB port. The rear panel includes the power switch, DC 52/48V power input, four PoE ports (labeled 1-4), a LAN port, an Audio Out port, a VGA port, an HDMI port, and additional USB ports. This diagram helps identify all physical connections and controls.
4. Setup
4.1 Hardware Installation
- Hard Disk Drive (HDD) Installation:
The NVR supports up to a 14TB HDD (not included). To install, open the NVR casing, connect the SATA power and data cables to the HDD, and secure the HDD within the designated bay. The NVR is compatible with both 2.5" and 3.5" HDDs.
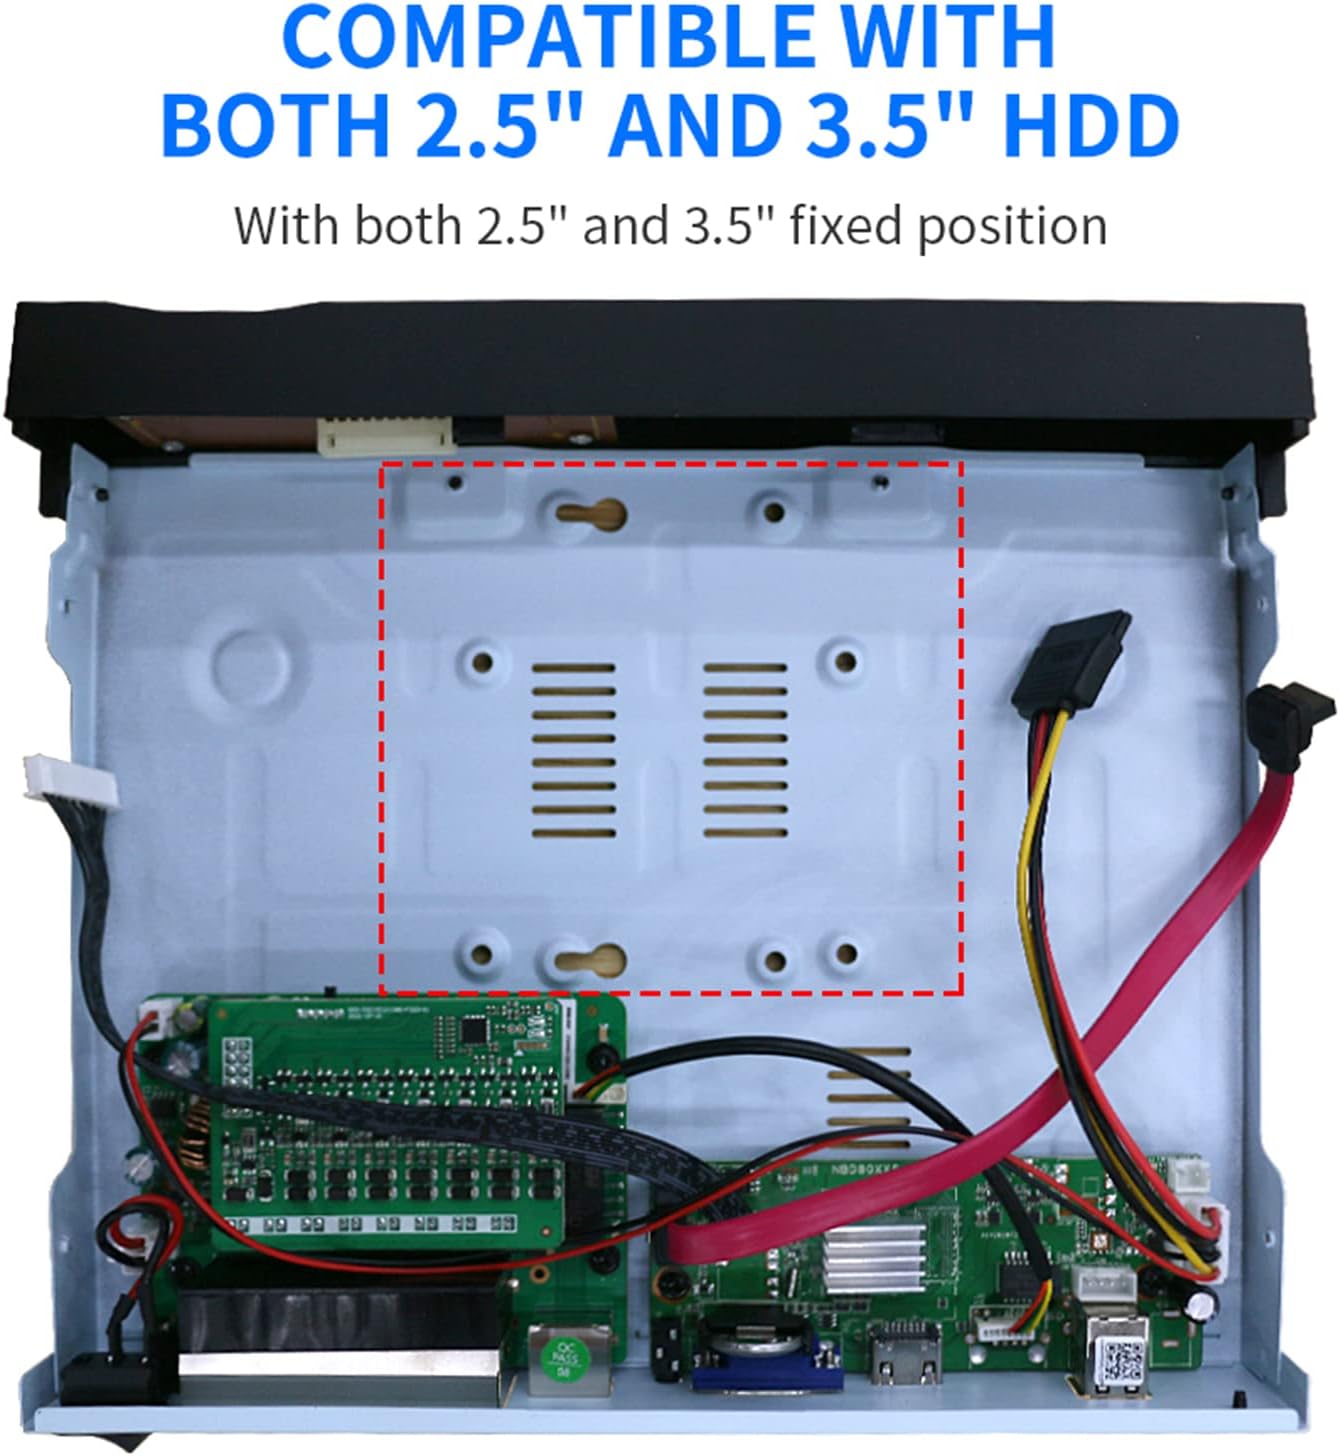
This image illustrates the internal layout of the NVR, highlighting the mounting positions for both 2.5-inch and 3.5-inch hard disk drives (HDDs). It shows the SATA data and power connectors, indicating where to connect an HDD for storage.
- Connecting PoE IP Cameras:
Connect your PoE IP cameras directly to the NVR's PoE ports (labeled 1-4) using Ethernet cables. The NVR will automatically power the cameras and receive video data, enabling a plug-and-play setup.
- Connecting to a Display:
Connect a monitor to the NVR using either the HDMI or VGA port for local viewing and configuration.
- Network Connection:
Connect the NVR's LAN port to your router or network switch using an Ethernet cable to enable remote access and network functionalities.
- Power On:
Connect the power adapter (not included) to the NVR's DC 52/48V input and plug it into a power outlet. Press the power button to turn on the NVR.
4.2 Software Setup and Remote Access
- Mobile App Connection (XMEYE PRO APP):
For remote viewing on your smartphone or tablet, download the free XMEYE PRO APP from the App Store (iOS) or Google Play (Android).

This image provides a step-by-step visual guide for connecting your NVR to the XMeye Pro mobile application. It shows downloading the app, registering an account, adding the device by serial number, and finally accessing the live video feed.
- Download the XMEYE PRO APP.
- Open the app, register an account, and log in.
- Add your NVR device by scanning the QR code or manually entering the serial number.
- Once added, you can enjoy live video and manage your security system remotely.
- Computer/Tablet Software (VMS):
For monitoring on a computer or tablet, download the VMS software. This software provides a comprehensive interface for managing your NVR and cameras.

This image displays the VMS software interface across different devices, including a desktop computer, tablet, and smartphone. It illustrates how users can remotely view and manage their NVR system using the dedicated VMS application.
5. Operating Instructions
5.1 Continuous Recording (24/7)
Once an HDD is installed and formatted, the NVR is configured for 24/7 continuous recording by default. You can access recorded footage via the local display interface, the XMEYE PRO APP, or the VMS software.
5.2 Face Detection
The NVR features intelligent face detection capabilities. To enable this, navigate to the smart detection settings in the NVR's menu. When a face is detected by a compatible RUSFEIDA PoE camera, the system will trigger an instant alert via the app, email, and NVR, and upload the event to the NVR. This feature enhances security by providing specific alerts for human presence.

This image demonstrates the face recognition feature of the security camera system. It shows a monitor displaying live camera feeds with detected faces highlighted and a side panel showing thumbnails of recognized individuals, indicating the system's ability to identify and log faces.
5.3 H.265 Video Compression
The NVR utilizes H.265 video compression technology, which is more efficient than older H.264 standards. This allows for reduced hard disk usage, faster loading speeds, and smoother playback while maintaining high video quality.

This image visually compares the efficiency of H.264 and H.265 video compression formats. It illustrates that H.265 uses significantly less hard disk space and offers faster loading and playback speeds compared to H.264, demonstrating improved performance and storage optimization.
5.4 ONVIF Protocol Support
The RUSFEIDA NVR supports the ONVIF (Open Network Video Interface Forum) protocol, ensuring compatibility with a wide range of third-party PoE IP cameras. This allows for greater flexibility in expanding your surveillance system with cameras from various manufacturers, provided they also support ONVIF.

This image highlights the RUSFEIDA NVR's compatibility with various ONVIF-supported PoE cameras from different brands. It shows the NVR unit surrounded by diverse camera types, emphasizing its open standard support for flexible system integration.
6. Maintenance
- Regular Cleaning: Keep the NVR unit clean and free from dust to ensure proper ventilation and prevent overheating. Use a soft, dry cloth for cleaning.
- Firmware Updates: Periodically check for and install firmware updates to ensure optimal performance, security, and access to new features. Refer to the manufacturer's website or contact support for update procedures.
- HDD Health Check: If an HDD is installed, regularly check its health status through the NVR's system settings to prevent data loss.
- Secure Connections: Ensure all cables (power, Ethernet, video) are securely connected to prevent interruptions in service.
7. Troubleshooting
- No Power: Ensure the power adapter is correctly connected to the NVR and a working power outlet. Check the power switch on the rear panel.
- No Video Output: Verify that the HDMI or VGA cable is securely connected to both the NVR and the monitor. Ensure the monitor is powered on and set to the correct input source.
- Cameras Not Displaying: Check if the PoE cameras are properly connected to the NVR's PoE ports. Ensure the cameras are powered on and functioning. Verify network connectivity if using non-PoE or Wi-Fi cameras.
- No Recording: Confirm that an HDD is installed, formatted, and functioning correctly. Check recording schedules and settings in the NVR menu.
- Remote Access Issues: Ensure the NVR is connected to the internet via the LAN port. Verify your mobile device has internet access. Check app login credentials and device addition status in the XMEYE PRO APP or VMS software.
- Face Detection Not Working: Confirm that the feature is enabled in the NVR settings. Ensure you are using compatible RUSFEIDA PoE cameras for this specific function.
If you encounter persistent issues, please refer to the support section for assistance.
8. Specifications
| Feature | Detail |
|---|---|
| Brand | RUSFEIDA |
| Model Number | 6504 |
| ASIN | B0DM2MC53L |
| Connectivity Technology | Ethernet |
| Compatible Devices | Camera (PoE IP Cameras, ONVIF compatible) |
| Memory Storage Capacity | Supports up to 14 TB HDD (not included) |
| Hard Disk Size | 14 TB (Maximum Supported) |
| Package Dimensions | 13.94 x 11.42 x 3.07 inches |
| Item Weight | 3.03 pounds |
| Manufacturer | HangZhou XiongMai Technology CO., LTD |
| Date First Available | November 5, 2024 |
9. Warranty and Support
RUSFEIDA provides lifetime technical support for this product. If you have any questions, require assistance with setup, operation, or troubleshooting, please contact the RUSFEIDA customer service team. They aim to respond within 24 hours to help resolve any issues.
For the most up-to-date contact information, please refer to the official RUSFEIDA website or your product packaging.